
《STL系列》之map原理及实现
上一篇文章《STL系列》之vector原理及实现,介绍了vector的原理及实现,这篇文章介绍map的原理及实现。STL实现源码下载。
STL中map的实现是基于RBTree的,我在实现的时候没有采用RBTree,觉得这东西有点复杂,我的map采用的是排序数组(CSortVector)。map中的Key存在排序数据中,通过二分查找判断某个Key是否在map中,时间复杂度为O(logN)。在用一个CVector存Key和Value,为了方便拿到Key和Value,这里有点冗余,Key被存了两次。
现在先介绍我的CSortVector,先贴出完整的代码,如下:
#ifndef _CSORTVECTOR_H_

#define _CSORTVECTOR_H_

namespace cth

{

    template<typename T>

    class csortvector:public NoCopy

    {

    public:

        typedef const T* const_iterator;

        typedef T* iterator;

        csortvector()

        {

            initData();

        }

        csortvector(int capa,const T& val=T())

        {

            initData(capa);

            newCapacity(capacity_);

            for (int i=;i<size_;i++)

                buf[i]=val;

        }

        ~csortvector()

        {

            if (buf)

            {

                delete[] buf;

                buf=NULL;

            }

            size_=capacity_=;

        }

        int add(const T& t )

        {

            int index=-;

            if (size_==)

            {

                newCapacity(calculateCapacity());

                buf[size_++]=t;

                index=;

            }else{

                int start=;

                int end=size_-;

                while(start<=end)

                {

                    index=(start+end)/;

                    if(buf[index]==t)

                    {

                        goto SORTVECTOR_INSERT;

                    }

                    else if(buf[index]>t)

                    {

                        end=index-;

                    }

                    else

                    {

                        start=index+;

                    }

                }

                if(buf[index]<t)

                {

                    index++;

                }

SORTVECTOR_INSERT:

                insert(index,t);

            }

            return index;

        }

        void insert(int index,const T& t)

        {

            assert(index>= && index<=size_);

            if (size_==capacity_)

            {

                newCapacity(calculateCapacity());

            }

            memmove(buf+index+,buf+index,(size_-index)*sizeof(T));

            buf[index]=t;

            size_++;

        }

        int indexOf(const T& t)

        {

            int begin=;

            int end=size_-;

            int index=-;

            while (begin<=end)

            {

                index=begin+(end-begin)/;

                if (buf[index]==t)

                {

                    return index;

                }else if (buf[index]<t)

                {

                    begin=index+;

                }else{

                    end=index-;

                }

            }

            return -;

        }

        int remove(const T& t)

        {

            int index=indexOf(t);

            if (index>=)

            {

                memmove(buf+index ,buf+index+,(size_-index)*sizeof(T));

                buf[--size_]=T();

            }

            return index;

        }

        void erase(const_iterator iter)

        {

            remove(*iter);

        }

        const_iterator begin() const

        {

            return const_iterator(&buf[]);

        }

        const_iterator end() const

        {

            return const_iterator(&buf[size_]);

        }

        const T& operator[](int index) const

        {

            assert(size_> && index>= && index<size_);

            return buf[index];

        }

        void clear()

        {

            if (buf)

            {

                for (int i=;i<size_;i++)

                {

                    buf[i]=T();

                }

            }

            size_=capacity_=;

        }

        bool empty() const

        {

            return size_==;

        }

        int size() const

        {

            return size_;

        }

        int capacity() const

        {

            return capacity_;

        }

    private:

        void newCapacity(int capa)

        {

            assert (capa>size_) ;

            capacity_=capa;

            T* newBuf=new T[capacity_];

            if (buf)

            {

                memcpy(newBuf,buf,size_*sizeof(T) );

                delete [] buf;

            }

            buf=newBuf;

        }

        inline void initData(int capa)

        {

            buf=NULL;

            size_=capacity_=capa>?capa:;

        }

        inline int calculateCapacity()

        {

            return capacity_*/+;

        }

        int size_;

        int capacity_ ;

        T* buf;

    };

}

#endif
CSortVector和CVector有点类似,只不过CSortVector中的数据在插入的时候需要排序,其他的接口比较相识。CSortVector的关键实现就是二分查找。新增和删除的时候都是通过二分查找,定位到指定的位置,在进行相关操作。这里有必要特意列出二分查找的实现,如下:
        int indexOf(const T& t)

        {

            int begin=;

            int end=size_-;

            int index=-;

            while (begin<=end)

            {

                index=begin+(end-begin)/;

                if (buf[index]==t)

                {

                    return index;

                }else if (buf[index]<t)

                {

                    begin=index+;

                }else{

                    end=index-;

                }

            }

            return -;

        }
CSortVector测试代码如下:
    void csortvectorTest()

    {

        csortvector<int> l;

        l.add();

        l.add();

        l.add();

        l.add();

        l.add();

        l.add();

        l.add();

        l.add();

        l.add();

        l.add();

        cout<<"任意插入一组数据后,自动排序:"<<endl;

        for (int i=;i<l.size();i++)

        {

            cout<<l[i]<<" ";

        }

        cout<<endl<<endl;

        l.erase(l.begin());

        l.erase(l.end()-);

        cout<<"删除第一个和最后一个数:"<<endl;

        for (int i=;i<l.size();i++)

        {

            cout<<l[i]<<" ";

        }

        cout<<endl<<endl;

        cout<<"5的下标:"<<l.indexOf()<<endl;

        cout<<"下标为3的数:"<<l[]<<endl;

        l.remove();

        cout<<"删除5以后,5的下标是"<<l.indexOf()<<endl<<endl;

        cout<<"最后还剩:"<<endl;

        for (int i=;i<l.size();i++)

        {

            cout<<l[i]<<" ";

        }

    }
运行结果如下:
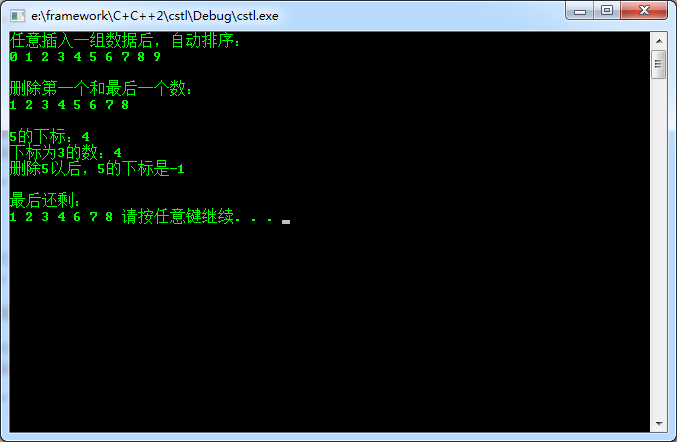
注意:由于CSortVector中的元素要排序,所以其中的元素要实现运算符”<”。
介绍完CSortVector,接下来说说CMap。其实CSortVector已经解决CMap的大部分功能了,后者只需要在前者的基础之上简单的封装即可完事。CMap源码如下:
#ifndef _CMAP_H_

#define _CMAP_H_

#include "csortvector.h"

namespace cth

{

    template<typename Key,typename Value>

    struct pair

    {

        typedef Key first_type;

        typedef Value second_type;

        pair(){}

        pair(const Key& key,const Value& val):first(key),second(val){}

        pair(const pair& other):first(other.first),second(other.second){}

        Key first;

        Value second;

    };

    class NoCopy

    {

    public:

        inline NoCopy(){}

        NoCopy(const NoCopy&);

        NoCopy& operator=(const NoCopy&);

    };

    template<typename Key,typename Value>

    class cmap:public NoCopy

    {

    public:

        typedef pair<Key,Value>* iterator;

        typedef const pair<Key,Value>* const_iterator;

        cmap(){}

        int insert(const pair<Key,Value>& item)

        {

            iterator iter=find(item.first);

            if (iter!=end())

            {

                return iter-begin();

            }

            int index=Keys.add(item.first);

            if (index>=)

            {

                index=Values.insert(Values.begin() + index,item);

            }

            return index;

        }

        int insert(const Key& key,const Value& val)

        {

            pair<Key,Value> item;

            item.first=key;

            item.second=val;

            return insert(item);

        }

        Value& operator[](const Key& key)

        {

            int index=Keys.indexOf(key);

            if (index<)

            {

                index=insert(key,Value());

            }

            return Values[index].second;

        }

        iterator begin()

        {

            return iterator(&*Values.begin());

        }

        iterator end()

        {

            return iterator(&*Values.end());

        }

        iterator find(const Key& key)

        {

            int index=Keys.indexOf(key);

            if (index<)

            {

                return end();

            }else

            {

                return iterator(&Values[index]);

            }

        }

        void erase(const Key& key)

        {

            int index=Keys.remove(key) ;

            if (index>=)

            {

                cvector<pair<Key,Value>>::iterator iter=Values.begin()+index;

                Values.erase(iter);

            }

        }

        void erase(const_iterator iter)

        {

            int index=Keys.remove(iter->first) ;

            if (index>=)

            {

                cvector<pair<Key,Value>>::iterator iter=Values.begin()+index;

                Values.erase(iter);

            }

        }

        int size()

        {

            return Keys.size();

        }

        bool empty()

        {

            return Keys.size()==;

        }

        void clear()

        {

            Keys.clear();

            Values.clear();

        }

    private:

        csortvector<Key> Keys;

        cvector<pair<Key,Value>> Values;

    };

}

#endif
插入操作,CMap的插入操作分两种,一种是通过insert方法;另一种是通过操作符[]。
Insert方法是先找到Key在Keys中的位置,如果已经存在就返回,CMap不允许重复,如果不存在就通过二分查找找到对应的位置,插入Key,并在Values中对应的地方插入Value。
通过操作符[]插入:如m[1]=1;刚开始我也不知道这个是怎么实现的,后来突然明白,操作符[]返回的是一个引用,其实就是给我m[1]的返回值赋值,调用的也是返回值的operator=,CMap只用实现operator[]就行。
其他的方法都是一些简单的封装,这里就不在累赘,最后概述一下CMap的实现:
CMap是基于一个排序数组CSortVector实现的,将Key存入排序数据中,Value和Key通过Pair<Key,Value>存在CVector中,通过二分查找确定某个Key是否存在,不存在就将这个Key插入排序数据中,返回Key在数组中的索引,并将Pair<Key,Value>存在CVector中对应的位置。删除还是通过二分查找寻找,找到就将两个数组中对应的元素删除。
CMap测试代码运行如下:

《STL系列》之map原理及实现的更多相关文章
- STL 中的map 与 hash_map的理解
可以参考侯捷编著的<STL源码剖析> STL 中的map 与 hash_map的理解 1.STL的map底层是用红黑树存储的,查找时间复杂度是log(n)级别: 2.STL的hash_ma ...
- Java 集合系列 15 Map总结
java 集合系列目录: Java 集合系列 01 总体框架 Java 集合系列 02 Collection架构 Java 集合系列 03 ArrayList详细介绍(源码解析)和使用示例 Java ...
- java基础解析系列(七)---ThreadLocal原理分析
java基础解析系列(七)---ThreadLocal原理分析 目录 java基础解析系列(一)---String.StringBuffer.StringBuilder java基础解析系列(二)-- ...
- STL中的map、unordered_map、hash_map
转自https://blog.csdn.net/liumou111/article/details/49252645 在之前使用STL时,经常混淆的几个数据结构,特别是做Leetcode的题目时,对于 ...
- STL中的map和unordered_map
STL中的map和unordered_map map 头文件:#include 原理:std::map的内部实现了一颗红黑树,有对其键值进行排序的功能,所以map是一个有序的容器,map中的每一个元素 ...
- [STL] STL各容器实现原理
STL共有六大组件1.容器 2.算法 3.迭代器 4.仿函数 6.适配器 STL容器的实现原理 STL来管理数据十分方便,省去了我们自己构建数据结构的时间.其实,STL的实现也是基于我们常见的数据结构 ...
- UVa 11991:Easy Problem from Rujia Liu?(STL练习,map+vector)
Easy Problem from Rujia Liu? Though Rujia Liu usually sets hard problems for contests (for example, ...
- Java 集合系列 08 Map架构
java 集合系列目录: Java 集合系列 01 总体框架 Java 集合系列 02 Collection架构 Java 集合系列 03 ArrayList详细介绍(源码解析)和使用示例 Java ...
- java基础解析系列(六)---注解原理及使用
java基础解析系列(六)---注解原理及使用 java基础解析系列(一)---String.StringBuffer.StringBuilder java基础解析系列(二)---Integer缓存及 ...
随机推荐
- UVAL1277_Cops and Thieves
单源点汇点无向图,要阻隔某个点的流量,必须在一个点上消耗一定的价值,问你能否在消耗价值不超过k的前提下,阻隔源点到汇点的流量. 直接对于有权值的点拆点,拆后边容量即为点权.其余的点的容量无穷,最大流即 ...
- Jade之Code
Code jade支持内嵌js的代码到jade代码之中. Unbuffered Code 无缓冲代码以-符号开始,无任何额外输出(文本是什么即是什么). jade: - for (var x = 0; ...
- java和Discuz论坛实现单点登录,通过Ucenter(用户管理中心)
标题有点问题,没有进行修改. 一 Discuz论坛搭建步骤 1:服务器环境配置 服务器要支持php语言+支持mysql 5.0以上的数据库 + Apache服务器(支持网站的一个服务器,通过域名的能访 ...
- 基于OpenCv的人脸检测、识别系统学习制作笔记之二
在网上找到了一个博客,里面有大量内容适合初学者接触和了解人脸检测的博文,正好符合我目前的学习方面,故将链接放上来,后续将分类原博客的博文并加上学习笔记. 传送门: http://blog.sina.c ...
- Cocoapods降低版本及卸载
有的时候我们需要降低Cocoapods的版本来解决第三方库的兼容问题. 一. 移除pod组件 这条指令会告诉你Cocoapods组件装在哪里 : 1 $ which pod 你可以手动移除 ...
- 我使用中的Linux命令和快捷键(For Ubuntu)
虽然自己工作一直都在MS的平台体系,自然很多的工作都需要在windows上完成,自己的电脑也一直使用windows操作系统,但是笔记本配置不是很好,导致装windows 8后,笔记本卡的难以忍受.想想 ...
- 图书馆管理系统—NABCD模型竞争性需求分析
本次课程设计设计题目:“图书管理系统”主要目的是利用数据库软件编制一个管理软件,用以实现图书.读者以及日常工作等多项管理.同时对整个系统的分析.设计过程给出一个完整论证. 1>N(Need 需求 ...
- [MFC] MFC 用mciSendString加载WAV资源文件
@ - @ FIRDST:为什么不用路径加载? 因为mciSendString函数不支持加载资源文件里的WAV资源,如果按路径加载,那么你的WAV就暴露在exe之外,无法实现音频资源的很好保护 ...
- [OpenGL] 1、环境搭建及最小系统
>_<: 首先推荐一个企业版的VC6.0自带OpenGL和DirectX,非常方便:http://pan.baidu.com/s/1mgIAGi8 PS: 要注意这里的OpenGL建立的工 ...
- dubbo的安装和使用
dubbo的安装和使用