路由器配置——OSPF协议(1)
一、实验目的:用OSPF协议使全网互通
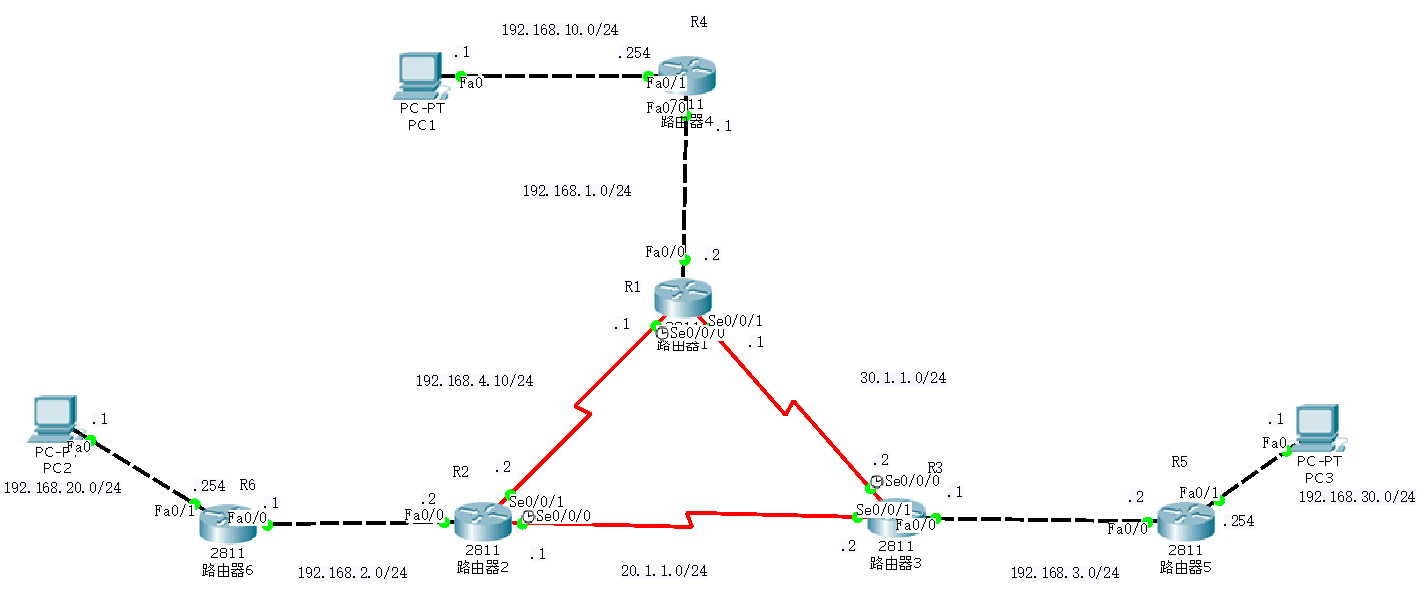
二、拓扑图
三、具体步骤配置
(1)R1路由器配置
Router>enable
Router#configure terminal
Enter configuration commands, one per line. End with CNTL/Z.
Router(config)#hostname R1
R1(config)#interface f0/0
R1(config-if)#ip address 192.168.1.2 255.255.255.0
R1(config-if)#no shutdown
R1(config-if)#interface s0/0/0
R1(config-if)#ip address 10.1.1.1 255.255.255.0
R1(config-if)#clock rate 64000
R1(config-if)#no shutdown
R1(config-if)#interface s0/0/1
R1(config-if)#ip address 30.1.1.1 255.255.255.0
R1(config-if)#clock rate 64000
This command applies only to DCE interfaces
R1(config-if)#no shutdown
R1(config-if)#exit
R1(config)#router ospf 1
R1(config-router)#router-id 1.1.1.1
R1(config-router)#network 192.168.1.0 0.0.0.255 area 0
R1(config-router)#network 10.1.1.0 0.0.0.255 area 0
R1(config-router)#network 30.1.1.0 0.0.0.255 area 0
R1(config-router)#end
(2)R2路由器配置
Router>enable
Router#configure terminal
Enter configuration commands, one per line. End with CNTL/Z.
Router(config)#hostname R2
R2(config)#interface f0/0
R2(config-if)#ip address 192.168.2.2 255.255.255.0
R2(config-if)#no shutdown
R2(config-if)#interface s0/0/0
R2(config-if)#ip address 20.1.1.1 255.255.255.0
R2(config-if)#clock rate 64000
R2(config-if)#no shutdown
R2(config-if)#interface s0/0/1
R2(config-if)#ip address 10.1.1.2 255.255.255.0
R2(config-if)#clock rate 64000
This command applies only to DCE interfaces
R2(config-if)#no shutdown
%LINK-5-CHANGED: Interface Serial0/0/1, changed state to down
R2(config-if)#exit
R2(config)#router ospf 1
R2(config-router)#router-id 2.2.2.2
R2(config-router)#network 192.168.2.0 0.0.0.255 area 0
R2(config-router)#network 20.1.1.0 0.0.0.255 area 0
R2(config-router)#network 10.1.1.0 0.0.0.255 area 0
R2(config-router)#end
(3)R3路由器配置
Router>enable
Router#configure terminal
Enter configuration commands, one per line. End with CNTL/Z.
Router(config)#hostname R3
R3(config)#interface f0/0
R3(config-if)#ip address 192.168.3.1 255.255.255.0
R3(config-if)#no shutdown
R3(config-if)#interface s0/0/0
R3(config-if)#ip address 30.1.1.2 255.255.255.0
R3(config-if)#clock rate 64000
R3(config-if)#no shutdown
%LINK-5-CHANGED: Interface Serial0/0/0, changed state to down
R3(config-if)#interface s0/0/1
R3(config-if)#ip address 20.1.1.2 255.255.255.0
R3(config-if)#clock rate 64000
This command applies only to DCE interfaces
R3(config-if)#no shutdown
%LINK-5-CHANGED: Interface Serial0/0/1, changed state to down
R3(config-if)#exit
R3(config)#router ospf 1
R3(config-router)#router-id 3.3.3.3
R3(config-router)#network 192.168.3.0 0.0.0.255 area 0
R3(config-router)#network 30.1.1.0 0.0.0.255 area 0
R3(config-router)#network 20.1.1.0 0.0.0.255 area 0
R3(config-router)#end
(4)R4路由器配置
Router>enable
Router#configure terminal
Enter configuration commands, one per line. End with CNTL/Z.
Router(config)#hostname R4
R4(config)#interface f0/0
R4(config-if)#ip address 192.168.1.1 255.255.255.0
R4(config-if)#no shutdown
R4(config-if)#interface f0/1
R4(config-if)#ip address 192.168.10.254 255.255.255.0
R4(config-if)#no shutdown
R4(config-if)#exit
R4(config)#router ospf 1
R4(config-router)#router-id 4.4.4.4
R4(config-router)#network 192.168.1.0 0.0.0.255 area 0
R4(config-router)#network 192.168.10.0 0.0.0.255 area 0
R4(config-router)#end
(5)R5路由器配置
Router>enable
Router#configure terminal
Enter configuration commands, one per line. End with CNTL/Z.
Router(config)#hostname R5
R5(config)#interface f0/0
R5(config-if)#ip address 192.168.3.2 255.255.255.0
R5(config-if)#no shutdown
R5(config-if)#interface f0/1
R5(config-if)#ip address 192.168.30.254 255.255.255.0
R5(config-if)#no shutdown
R5(config-if)#exit
R5(config)#router ospf 1
R5(config-router)#router-id 5.5.5.5
R5(config-router)#network 192.168.3.0 0.0.0.255 area 0
R5(config-router)#network 192.168.30.0 0.0.0.255 area 0
R5(config-router)#end
(6)R6路由器配置
Router>enable
Router#configure terminal
Enter configuration commands, one per line. End with CNTL/Z.
Router(config)#hostname R6
R6(config)#interface f0/0
R6(config-if)#ip address 192.168.2.1 255.255.255.0
R6(config-if)#no shutdown
R6(config-if)#interface f0/1
R6(config-if)#ip address 192.168.20.254 255.255.255.0
R6(config-if)#no shutdown
R6(config-if)#exit
R6(config)#router ospf 1
R6(config-router)#router-id 6.6.6.6
R6(config-router)#network 192.168.2.0 0.0.0.255 area 0
R6(config-router)#network 192.168.20.0 0.0.0.255 area 0
R6(config-router)#end
四、验证测试
1、查看R1路由表信息

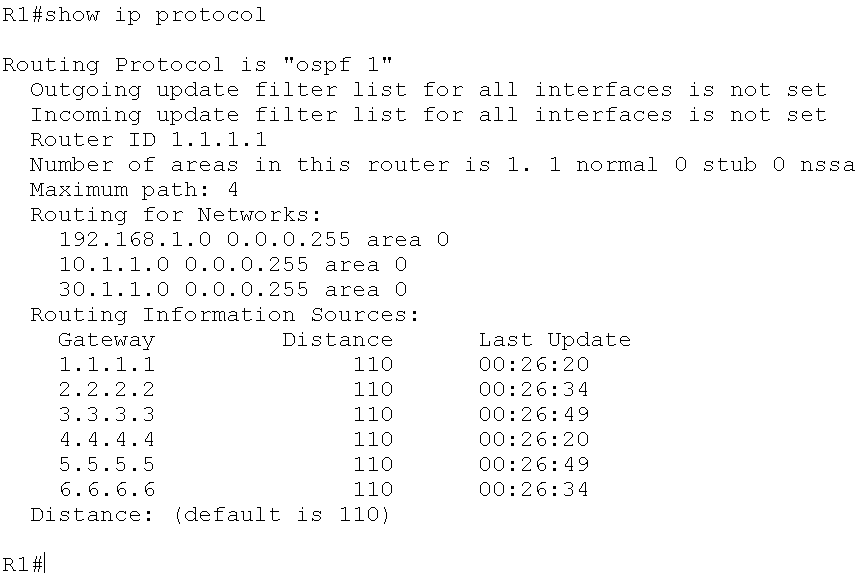
2、查看ip路由协议配置与统计信息
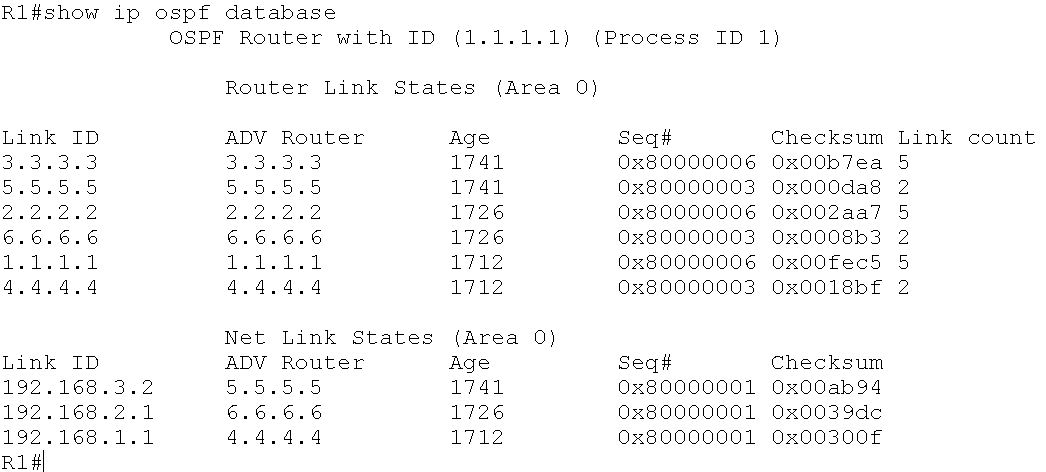
3、查看OSPF数据库信息
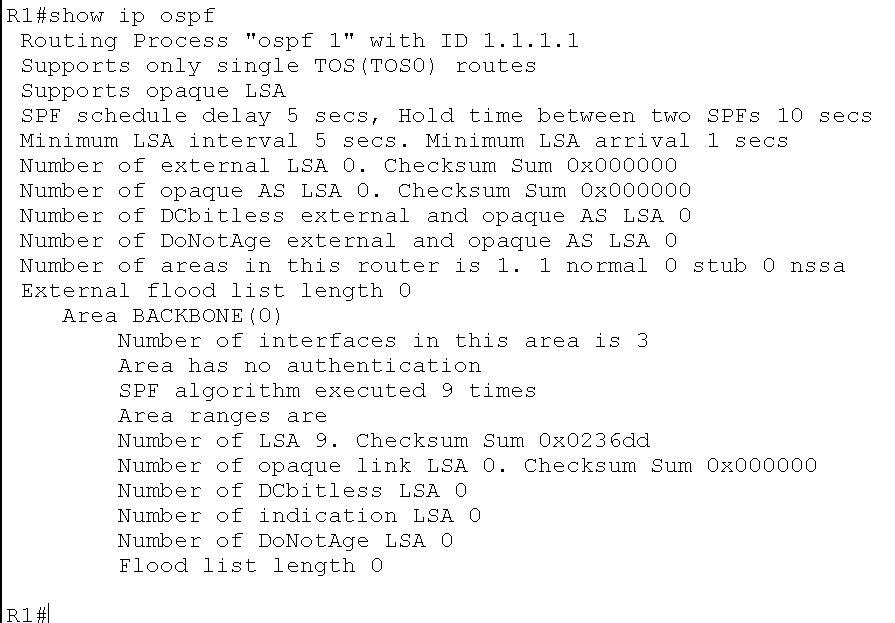
4、查看OSPF进程及区域的细节。如路由器运行SPF算法的次数
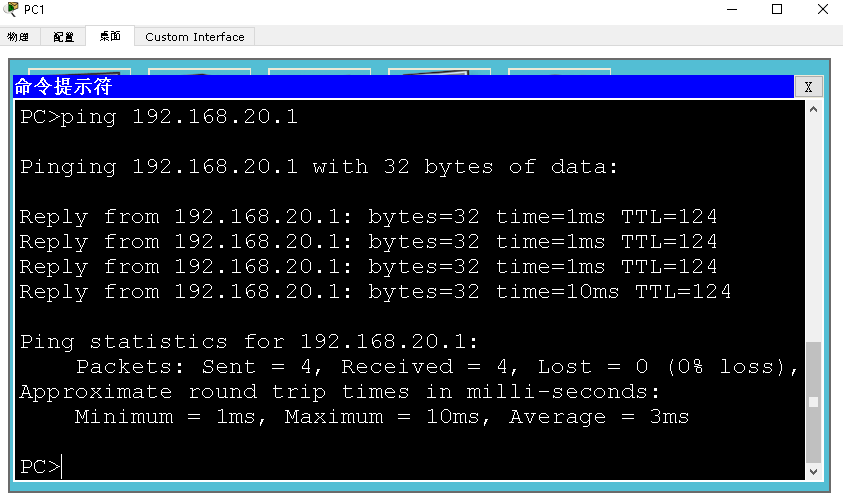
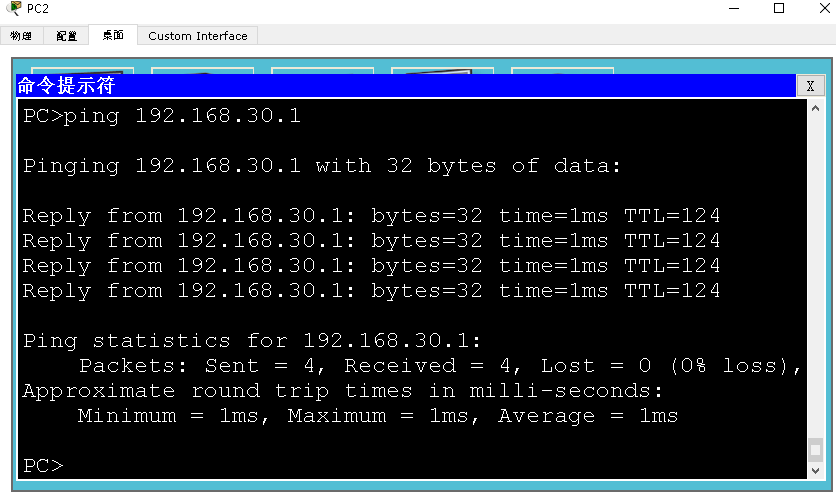
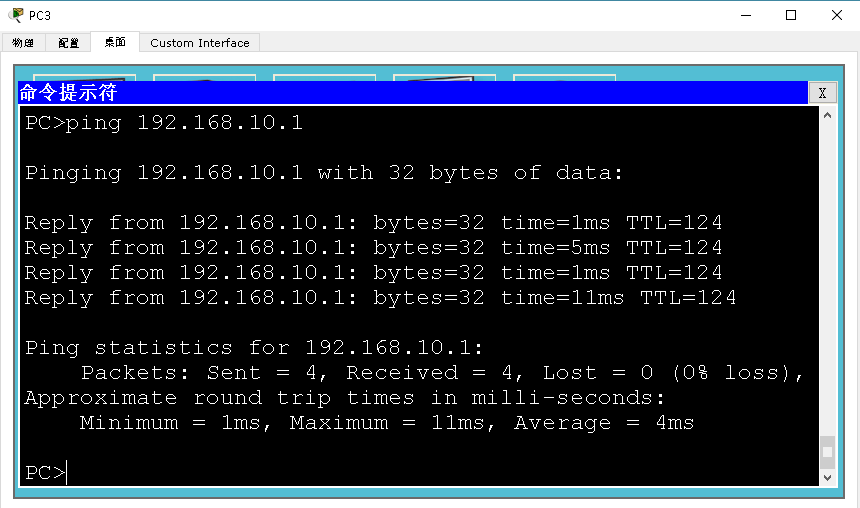
5、测试各台主机间是否互通
(1)PC1与PC2
(2)PC2与PC3
(3)PC3与PC1
路由器配置——OSPF协议(1)的更多相关文章
- 路由器配置——OSPF协议(2)
一.实验目的:使用OSPF协议达到全网互通的效果 二.拓扑图 三.具体步骤配置 (1)R1路由器配置 Router>enableRouter#configure terminalEnter co ...
- 路由器配置PPP协议 CHAP验证 PAP验证
路由器配置PPP协议 CHAP验证 PAP验证 来源 https://www.cnblogs.com/tcheng/p/5967485.html PAP是两次握手,明文传输用户密码进行认证:CHAP是 ...
- 华为路由器配置OSPF
OSPF是什么 OSPF(Open Shortest Pass First,开放最短路径优先协议),是一个最常用的内部网管协议,是一个链路状态协议. 使用场景:适用于运营商.政府机构等大型网络中多节点 ...
- OSPF协议详解
CCNP OSPF协议详解 2010-02-24 20:30:22 标签:CCNP 职场 OSPF 休闲 OSPF(Open Shortest Path Fitst,ospf)开放最短路径优先协议,是 ...
- H3C路由器配置——动态路由OSPF协议
一.介绍 1.OSPF协议介绍 (1).OSPF(Open Shortest Path First,开放最短路径优先)路由协议是用于网际协议(IP)网络的链路状态路由协议.是一个被各厂商设备广泛支持的 ...
- OSPF协议学习以及路由器配置
OSPF协议学习以及路由器配置 1.实验任务 2,使用eNsp搭建网络拓扑 3.配置路由IP ps:要使用GE(3层口),2层口(E口)需要先配置Vlan才能配置IP地址 4.配置路由器R1的ospf ...
- OSPF协议介绍及配置 (下)
4.特殊区域详解 为了让我们的讲解更加的通俗易懂,我们看上面这个拓扑,这是一个根据客户业务逻辑结构所涉及的OSPF网络,共有三个区域(实际上远远不止),骨干区域area0为一级行及二级行所部署,*** ...
- OSPF协议介绍及配置 (上)
OSPF协议介绍及配置 (上) 一.OSPF概述 回顾一下距离矢量路由协议的工作原理:运行距离矢量路由协议的路由器周期性的泛洪自己的路由表,通过路由的交互,每台路由器都从相邻的路由器学习到路由,并且加 ...
- OSPF协议介绍及配置
一.OSPF概述 回顾一下距离矢量路由协议的工作原理:运行距离矢量路由协议的路由器周期性的泛洪自己的路由表,通过路由的交互,每台路由器都从相邻的路由器学习到路由,并且加载进自己的路由表中,而对于这个网 ...
随机推荐
- OBB碰撞
OBB碰撞检测,坐标点逆时针 class OBBTest extends egret.DisplayObjectContainer { private obb1:OBB; private obb2:O ...
- 玩linux笔记——持续更新
说在最前面 centos 是基于redhat linux,所以最好的教程在红帽官网 https://access.redhat.com/documentation/en-us/red_hat_ente ...
- Jmeter博文索引~基础知识和实践操作汇总
所有Jmeter笔记的目录/索引 一,基础操作和常用操作 Jmeter入门(一)理论基础 Jmeter安装及配置(含JDK安装) Jmeter之设置线程组运行次数/时间 Jmeter之参数化(4种设置 ...
- Java 抽象类详解
在<Java中的抽象方法和接口>中,介绍了抽象方法与接口,以及做了简单的比较. 这里我想详细探讨下抽象类. 一.抽象类的定义 被关键字“abstract”修饰的类,为抽象类.(而且,abx ...
- MyBatis 示例-动态 SQL
MyBatis 的动态 SQL 包括以下几种元素: 详细的使用参考官网文档:http://www.mybatis.org/mybatis-3/zh/dynamic-sql.html 本章内容简单描述这 ...
- C#签名验签帮助类
using System; using System.IO; using System.Text; using System.Collections.Generic; using System.Sec ...
- ArrayList插入1000w条数据的时间比较分析
一分钟系列: 读懂GC日志 ArrayList插入1000w条数据之后,我怀疑了jvm... Java JIT性能调优 Java性能优化指南系列(三):理解JIT编译器 准备:调试程序加入VM Opt ...
- javascript中用&&跟||来简化if{}else{}的写法
原文:javascript中用&&跟||来简化if{}else{}的写法 目录 javascript中用&&跟||来简化if{}else{}的写法 1. if else ...
- docker-compose deploy replicaSet in standalone MongoDB cluster and with auth
经过两天的折腾,终于实现了自己想要的效果,就是通过docker-compose 部署最新的mongodb replicaSet, 主要是为了测试 4.2 最新的多文档事务,下面将整个步骤分享一下: d ...
- 如何上传HTML5应用到SAP云平台的Cloud Foundry环境下
先使用WebIDE创建一个HTML5应用.New->Project from Template: 从可选模板里选择SAPUI5 Application: 创建一个HTML5 Module,取名为 ...