threejs CameraHelper 查看照相机的观察范围
简单例子
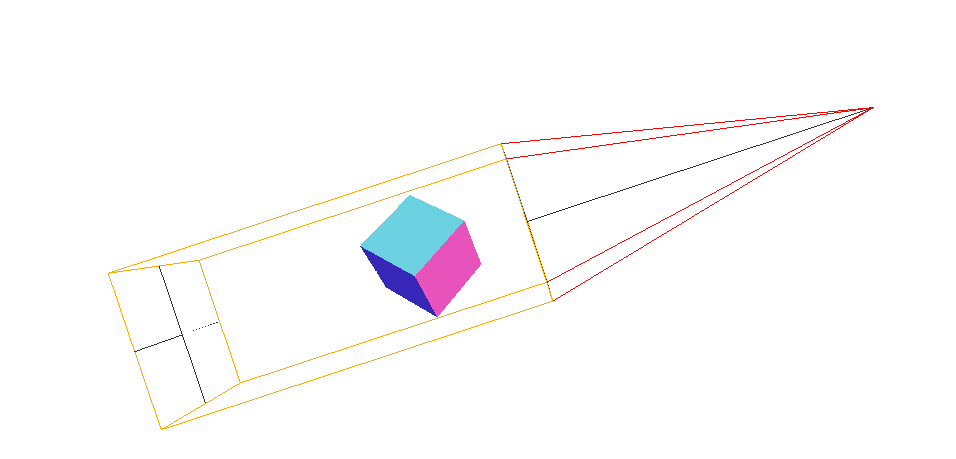
这个例子,是在一个视图中,看到照相机的辅助线,也就是,一个照相机的观察访问
这样,就需要两个照相机,一个是主照相机,一个是加有辅助线的照相机(有两种,正交和透视,这里辅助的使用的是正交的)
设置两个照相机位置:注意,辅助的子照相机要在主照相机里面,这样才能在主照相机的镜头下看到辅助照相机的观察范围
 //场景、摄像机、渲染器、实体

    var scene, camera, renderer, cameraHelper;

    var cube, controls;

    //在页面加载完,进行绘制渲染页面

    window.onload = function() {

      init(); //数据初始化

      setSize(); //设置大小画布

      cube(); //绘制实体

      animate(); //动画渲染

    };

    //初始化摄像机,场景,渲染器,以及一些工具,比如摄像机辅助线,控制器

    function init() {

      scene = new THREE.Scene();

      camera = new THREE.PerspectiveCamera(

        ,

        window.innerWidth / window.innerHeight,

        0.1,

      );

      camera.position.set(, , );

      camera.lookAt(new THREE.Vector3(, , ));

      //正交投影照相机

      camera2 = new THREE.OrthographicCamera(-, , , -, , );

      renderer = new THREE.WebGLRenderer({ alpha: true });

      camera2.position.set(, , );

      camera2.lookAt(new THREE.Vector3(, , ));

      //renderer = new THREE.WebGLRenderer();

      //camera.position.z = 10;

      controls = new THREE.OrbitControls(camera);

      controls.autoRotate = true;

      //照相机帮助线

      cameraHelper = new THREE.CameraHelper(camera2);

      scene.add(cameraHelper);

    }

    //设置画布大小,这个设置为整个视图,就不需要剪切了

    function setSize() {

      renderer.setSize(window.innerWidth, window.innerHeight);

      document.body.appendChild(renderer.domElement);

    }

    //普通的四方体

    function cube() {

      var geometry = new THREE.BoxGeometry(, , );

      var material = new THREE.MeshNormalMaterial({ color: 0x00ff00 });

      cube = new THREE.Mesh(geometry, material);

      //设置位置

      cube.position.set(, , -1.5);

      scene.add(cube);

    }

    function animate() {

      requestAnimationFrame(animate); //一帧帧动画

      cube.rotation.x += 0.005;

      cube.rotation.y += 0.005;

      cube.rotation.z += 0.005;

      camera.updateProjectionMatrix();

      controls.update();

      cameraHelper.update();

      renderer.render(scene, camera); //渲染

    }
看完简单的例子,看看复杂的,
左边是一个视图,用一个小的照相机渲染出来的就是右边辅助线的照相机,
右边是两个照相机渲染出来的,右边,外面有个大的照相机,看到里面有个小的照相机,并且通过辅助线看到里面照相机的观察区域。
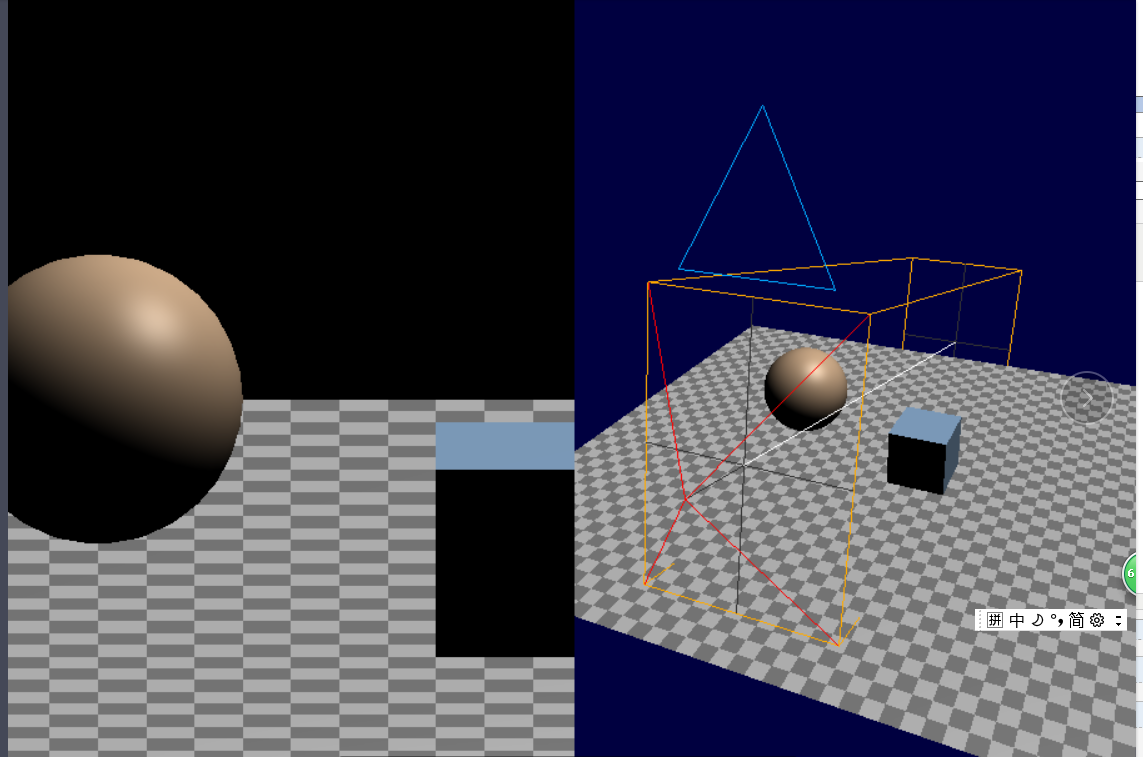
html部分:是,一个Canvas ,然后拆分为左右两个视图
<canvas id="c"></canvas>

    <div class="split">

       <div id="view1" tabindex="1"></div>

       <div id="view2" tabindex="2"></div>

    </div>

  <script src="https://threejsfundamentals.org/threejs/resources/threejs/r105/three.min.js"></script>

<script src="https://threejsfundamentals.org/threejs/resources/threejs/r105/js/controls/OrbitControls.js"></script>
css
html, body {

  margin: 0;

  height: 100%;

}

#c {

  width: 100%;

  height: 100%;

  display: block;

}

.split {

  position: absolute;

  left: 0;

  top: 0;

  width: 100%;

  height: 100%;

  display: flex;

}

.split>div {

  width: 100%;

  height: 100%;

}
js,他是有两个照相机,
1.一个透视作为主照相机,
2.一个正交作为辅助照相机,
在正交照相机加上辅助线,然后把辅助线弄到场景里面,
这样我们就可以在一个照相机(主照相机下)下看到另一个照相机(另一个有辅助线的照相机)的作用范围(辅助线范围)
var renderer,

  scene,

  camera,

  camera2,

  cameraHelper,

  canvas,

  view1Elem,

  view2Elem;

function init() {

  renderer = new THREE.WebGLRenderer({ canvas });

  const size = 1;

  const near = 5;

  const far = 50;

  //正交投影照相机

  camera = new THREE.OrthographicCamera(-size, size, size, -size, near, far);

  //透视投影照相机

  camera2 = new THREE.PerspectiveCamera(

    60, // fov

    2, // aspect

    0.1, // near

    500 // far

  );

  //照相机帮助线

  cameraHelper = new THREE.CameraHelper(camera);

  scene = new THREE.Scene();

  scene.background = new THREE.Color("black");

  scene.add(cameraHelper);

}

function setCarema() {

  camera.zoom = 0.2;

  camera.position.set(0, 10, 20);

  //旋转控制器

  const controls = new THREE.OrbitControls(camera, view1Elem);

  controls.target.set(0, 5, 0);

  controls.update();

  camera2.position.set(16, 28, 40);

  camera2.lookAt(0, 5, 0);

  //旋转控制器

  const controls2 = new THREE.OrbitControls(camera2, view2Elem);

  controls2.target.set(0, 5, 0);

  controls2.update();

}

function drawObj() {

  //面的绘制

  {

    const planeSize = 40;

    const loader = new THREE.TextureLoader();

    const texture = loader.load(

      "https://threejsfundamentals.org/threejs/resources/images/checker.png"

    );

    texture.wrapS = THREE.RepeatWrapping;

    texture.wrapT = THREE.RepeatWrapping;

    texture.magFilter = THREE.NearestFilter;

    const repeats = planeSize / 2;

    texture.repeat.set(repeats, repeats);

    const planeGeo = new THREE.PlaneBufferGeometry(planeSize, planeSize);

    const planeMat = new THREE.MeshPhongMaterial({

      map: texture,

      side: THREE.DoubleSide

    });

    const mesh = new THREE.Mesh(planeGeo, planeMat);

    mesh.rotation.x = Math.PI * -0.5;

    scene.add(mesh);

  }

  //正方体的绘制

  {

    const cubeSize = 4;

    const cubeGeo = new THREE.BoxBufferGeometry(cubeSize, cubeSize, cubeSize);

    const cubeMat = new THREE.MeshPhongMaterial({ color: "#8AC" });

    const mesh = new THREE.Mesh(cubeGeo, cubeMat);

    mesh.position.set(cubeSize + 1, cubeSize / 2, 0);

    scene.add(mesh);

  }

  //球体的绘制

  {

    const sphereRadius = 3;

    const sphereWidthDivisions = 32;

    const sphereHeightDivisions = 16;

    const sphereGeo = new THREE.SphereBufferGeometry(

      sphereRadius,

      sphereWidthDivisions,

      sphereHeightDivisions

    );

    const sphereMat = new THREE.MeshPhongMaterial({ color: "#CA8" });

    const mesh = new THREE.Mesh(sphereGeo, sphereMat);

    mesh.position.set(-sphereRadius - 1, sphereRadius + 2, 0);

    scene.add(mesh);

  }

  //光线的设置

  {

    const color = 0xffffff;

    const intensity = 1;

    const light = new THREE.DirectionalLight(color, intensity);

    light.position.set(0, 10, 0);

    light.target.position.set(-5, 0, 0);

    scene.add(light);

    scene.add(light.target);

  }

}

//重新渲染 渲染器的大小,如果canvas的大小不是renderer的大小,就重新设置大小 canvas的大小,这个是因为

function resizeRendererToDisplaySize(renderer) {

  const canvas = renderer.domElement;

  const width = canvas.clientWidth;

  const height = canvas.clientHeight;

  const needResize = canvas.width !== width || canvas.height !== height;

  if (needResize) {

    renderer.setSize(width, height, false);

  }

  return needResize;

}


//剪刀,用来切割canvas 到两个view中,通过view切割计算,找到view的位置,然后进行渲染

function setScissorForElement(elem) {

  const canvasRect = canvas.getBoundingClientRect(); //包围盒的正方体

  const elemRect = elem.getBoundingClientRect();

  // compute a canvas relative rectangle

  const right = Math.min(elemRect.right, canvasRect.right) - canvasRect.left;

  const left = Math.max(0, elemRect.left - canvasRect.left);

  const bottom = Math.min(elemRect.bottom, canvasRect.bottom) - canvasRect.top;

  const top = Math.max(0, elemRect.top - canvasRect.top);

  const width = Math.min(canvasRect.width, right - left);

  const height = Math.min(canvasRect.height, bottom - top);

  // setup the scissor to only render to that part of the canvas

  const positiveYUpBottom = canvasRect.height - bottom;

  renderer.setScissor(left, positiveYUpBottom, width, height);

  renderer.setViewport(left, positiveYUpBottom, width, height);

  // return the aspect

  return width / height;

}

function render() {

  resizeRendererToDisplaySize(renderer);

  // turn on the scissor  开启剪刀,可以进行切割

  renderer.setScissorTest(true);

  // render the original view

  {

    const aspect = setScissorForElement(view1Elem);

    // update the camera for this aspect

    camera.left = -aspect;

    camera.right = aspect;

    camera.updateProjectionMatrix();

    cameraHelper.update();

    // don't draw the camera helper in the original view

    cameraHelper.visible = false;

    scene.background.set(0x000000);

    renderer.render(scene, camera);

  }

  // render from the 2nd camera

  {

    const aspect = setScissorForElement(view2Elem);

    // update the camera for this aspect

    camera2.aspect = aspect;

    camera2.updateProjectionMatrix();

    // draw the camera helper in the 2nd view

    cameraHelper.visible = true;

    scene.background.set(0x000040);

    renderer.render(scene, camera2);

  }

  requestAnimationFrame(render);

}

window.onload = function() {

  canvas = document.querySelector("#c");

  view1Elem = document.querySelector("#view1");

  view2Elem = document.querySelector("#view2");

  init();

  setCarema();

  drawObj();

  requestAnimationFrame(render);

};
上面这个例子有点小复杂,因为涉及到,剪刀进行切割视图的计算
threejs CameraHelper 查看照相机的观察范围的更多相关文章
- 科学计算三维可视化---TVTK管线与数据加载(用IVTK根据观察管线)
一:用IVTK根据观察管线 (一)引入该工具 from tvtk.tools import ivtk 可能需要安装pygments pip3 install pygments (二)使用ivtk显示立 ...
- 一、threejs————灯光阴影
threejs设置阴影有三个注意点 1.只有支持阴影的灯光才可以 pointLight,spotlight,directionallight 2.添加摄像机辅助器 THREE.CameraHelper ...
- kvm 使用入门详解
kvm 是虚拟化技术的一个典型实现,功能非常强大,使用很方便.kvm 本身主要实现对 CPU 的虚拟化,内存和IO的虚拟化使用了开源软件 qemu,qemu 是纯软件层面的虚拟化,其实就是个模拟器.k ...
- 【Win 10 应用开发】三维变换
所谓三维变换,其实是在二维平面上产生三维的视觉效果.前面老周简单提了一下透视效果,如果透视效果不能满需求,那可以考虑用三维变换. UIElement类有一个属性叫Transform3D,它定义的类型为 ...
- IL接口和类的属性
上一篇文章学习了IL的入门,接下来我们再通过两个例子来了解下类的属性.构造函数以及接口的使用 一.类的属性.构造函数 1.先看下我们要构建的类的C#代码,然后再进行IL的实现,示例代码如下: [Ser ...
- hadoop中遇到的一些问题
1.验证词统计程序.----无法加载本地库 出现错误: WARN util.NativeCodeLoader: Unable to load native-hadoop library for you ...
- OpenGL投影矩阵
概述 透视投影 正交投影 概述 计算机显示器是一个2D平面.OpenGL渲染的3D场景必须以2D图像方式投影到计算机屏幕上.GL_PROJECTION矩阵用于该投影变换.首先,它将所有定点数据从观察坐 ...
- Git学习笔记(1)——安装,配置,创建库,文件添加到库
初次接触git,为了记忆深刻,把学习的简单流程记录下来. 本文记录了Git在Ubuntu上的安装,配置,以及创建版本库和往库中添加文件的过程. 1.Git的安装:(Ubuntu-Linux非常友好的安 ...
- 如何调试Android Framework?
Linus有一句名言广为人知:Read the fucking source code. 但其实,要深入理解某个软件.框架或者系统的工作原理,仅仅「看」代码是远远不够的.就拿Android Frame ...
随机推荐
- MacOS 安装配置 Laravel
简单介绍: Laravel是一个用PHP编写的免费开源Web框架.它是由Taylor Otwell创作的,遵循MVC开发方法. 截至2015年3月,Laravel被认为是最流行的基于PHP的框架之一. ...
- linux系统telnet端口不通能收到SYN但不回SYN+ACK响应问题排查(转载)
linux系统telnet端口不通能收到SYN但不回SYN+ACK响应问题排查 一:背景:一台机器从公司办公网登录不上且所有tcp端口都telnet不通,但是通过同机房同的其它机器却可以正常访问到出问 ...
- ISO/IEC 9899:2011 条款6.7.10——静态断言
6.7.10 静态断言 语法 1.static-assert_declaration: _Static_assert ( constant-expression , strin ...
- python-learning-第二季-数据库编程
https://www.bjsxt.com/down/8468.html 代码实现: #coding:utf- #导入模块 import sqlite3 #创建connect连接 con = sqli ...
- 006-guava 集合-集合工具类-集合扩展工具类
一.概述 需要实现自己的集合扩展.也许你想要在元素被添加到列表时增加特定的行为,或者你想实现一个Iterable,其底层实际上是遍历数据库查询的结果集 二.使用 2.1.ForwardingList装 ...
- datax实例——全量、增量同步
一.全量同步 本文以mysql -> mysql为示例: 本次测试的表为mysql的系统库-sakila中的actor表,由于不支持目的端自动建表,此处预先建立目的表: CREATE TABLE ...
- Python手册 3.7
Python手册 3.7 下载地址:https://pan.baidu.com/s/1dPzwwP3ehnyLUNWTsB2QJg 关注微信公众号获取提取码: 输入:py99 获取提取码
- 关于Image模块的调色板
参考:https://blog.csdn.net/zhangziju/article/details/79123275 https://blog.csdn.net/qq_21239003/articl ...
- 用easymock来mock数据
昨天学习微信小程序了解了一个模拟数据的工具EasyMock,一早到公司就使用试试. 1.创建项目: 创建好如下所示: 2.创建接口: 点击右下角+号按钮即可. 操作栏依次是:预览,编辑,链接,更多操作 ...
- html测试页LODOP的内容反复进入打印设计
打印设计是给开发人员使用的工具,用打印设计辅助开发后,打印设计的界面本身的菜单下,可以生成代码,然后把对应的内容信息补充上,拷贝到自己的页面的JS里或存起来,作为模版使用. 也可以关闭打印设计,可返回 ...