mysql8.0.17gtid方式实现主从同步
数据库的安装:
[root@node1 8.0.17]# rpm -ivh mysql-community-common-8.0.17-1.el7.x86_64.rpm
警告:mysql-community-common-8.0.17-1.el7.x86_64.rpm: 头V3 DSA/SHA1 Signature, 密钥 ID 5072e1f5: NOKEY
准备中... ################################# [100%]
正在升级/安装...
1:mysql-community-common-8.0.17-1.e################################# [100%]
[root@node1 8.0.17]# rpm -ivh mysql-community-libs-8.0.17-1.el7.x86_64.rpm
警告:mysql-community-libs-8.0.17-1.el7.x86_64.rpm: 头V3 DSA/SHA1 Signature, 密钥 ID 5072e1f5: NOKEY
准备中... ################################# [100%]
正在升级/安装...
1:mysql-community-libs-8.0.17-1.el7################################# [100%]
[root@node1 8.0.17]# rpm -ivh mysql-community-client-8.0.17-1.el7.x86_64.rpm
警告:mysql-community-client-8.0.17-1.el7.x86_64.rpm: 头V3 DSA/SHA1 Signature, 密钥 ID 5072e1f5: NOKEY
准备中... ################################# [100%]
正在升级/安装...
1:mysql-community-client-8.0.17-1.e################################# [100%]
[root@node1 8.0.17]# rpm -ivh mysql-community-server-8.0.17-1.el7.x86_64.rpm
警告:mysql-community-server-8.0.17-1.el7.x86_64.rpm: 头V3 DSA/SHA1 Signature, 密钥 ID 5072e1f5: NOKEY
准备中... ################################# [100%]
正在升级/安装...
1:mysql-community-server-8.0.17-1.e################################# [100%]
[root@node1 8.0.17]# rpm -ivh mysql-community-devel-8.0.17-1.el7.x86_64.rpm --force --nodeps
警告:mysql-community-devel-8.0.17-1.el7.x86_64.rpm: 头V3 DSA/SHA1 Signature, 密钥 ID 5072e1f5: NOKEY
准备中... ################################# [100%]
正在升级/安装...
1:mysql-community-devel-8.0.17-1.el################################# [100%]
[root@node1 8.0.17]# systemctl start mysqld
[root@node1 8.0.17]# more /var/log/mysqld.log |grep password
2019-07-28T07:48:29.031474Z 5 [Note] [MY-010454] [Server] A temporary password is generated for root@localhost: Z3(E!khsm_EE
[root@node1 8.0.17]# mysql -uroot -p
Enter password:
Welcome to the MySQL monitor. Commands end with ; or \g.
Your MySQL connection id is 8
Server version: 8.0.17
Copyright (c) 2000, 2019, Oracle and/or its affiliates. All rights reserved.
Oracle is a registered trademark of Oracle Corporation and/or its
affiliates. Other names may be trademarks of their respective
owners.
Type 'help;' or '\h' for help. Type '\c' to clear the current input statement.
mysql> alter user 'root'@'localhost' identified by 'kavl7kAkkle!'; 登录成功之后必须先修改密码,才能使用。
Query OK, 0 rows affected (0.02 sec)
mysql> show databases;
+--------------------+
| Database |
+--------------------+
| information_schema |
| mysql |
| performance_schema |
| sys |
+--------------------+
4 rows in set (0.01 sec)
环境:
master:
master配置文件:
[root@master 8.0.17]# grep -v '^#' /etc/my.cnf
[mysqld]
datadir=/var/lib/mysql
socket=/var/lib/mysql/mysql.sock
log-error=/var/log/mysqld.log
pid-file=/var/run/mysqld/mysqld.pid
server-id=1
gtid-mode=on
enforce-gtid-consistency=on
log-slave-updates=on
log_bin = binlog
[root@master 8.0.17]# systemctl restart mysql
[root@master 8.0.17]# mysql -uroot -pkavl7kAkkle!
mysql> create user 'repl'@'192.168.199.%' identified by 'kavl7kAkkle!'; 建立同步的账号
mysql>grant replication slave on *.* to 'repl'@'192.168.199.%';
mysql> flush privileges;
Query OK, 0 rows affected (0.01 sec)
测试一下建立的账号是否可以在slave上登录(可以登录)
[root@node1 8.0.17]# mysql -urepl -h 192.168.199.6 -pkavl7kAkkle!
mysql: [Warning] Using a password on the command line interface can be insecure.
Welcome to the MySQL monitor. Commands end with ; or \g.
Your MySQL connection id is 24
Server version: 8.0.17 MySQL Community Server - GPL
Copyright (c) 2000, 2019, Oracle and/or its affiliates. All rights reserved.
Oracle is a registered trademark of Oracle Corporation and/or its
affiliates. Other names may be trademarks of their respective
owners.
Type 'help;' or '\h' for help. Type '\c' to clear the current input statement.
mysql>
查看gtid是否开启:
mysql> show variables like "%gtid%";
+----------------------------------+------------------------------------------+
| Variable_name | Value |
+----------------------------------+------------------------------------------+
| binlog_gtid_simple_recovery | ON |
| enforce_gtid_consistency | ON |
| gtid_executed | c3a99d8b-b10e-11e9-9e44-000c297d60e3:1-7 |
| gtid_executed_compression_period | 1000 |
| gtid_mode | ON |
| gtid_next | AUTOMATIC |
| gtid_owned | |
| gtid_purged | |
| session_track_gtids | OFF |
+----------------------------------+------------------------------------------+
9 rows in set (0.02 sec)
查看服务器的UUID:
mysql> show global variables like '%uuid%';
+---------------+--------------------------------------+
| Variable_name | Value |
+---------------+--------------------------------------+
| server_uuid | c3a99d8b-b10e-11e9-9e44-000c297d60e3 |
+---------------+--------------------------------------+
1 row in set (0.01 sec)
查看主服务器的状态:
mysql> show master status;
+---------------+----------+--------------+------------------+------------------------------------------+
| File | Position | Binlog_Do_DB | Binlog_Ignore_DB | Executed_Gtid_Set |
+---------------+----------+--------------+------------------+------------------------------------------+
| binlog.000003 | 878 | | | c3a99d8b-b10e-11e9-9e44-000c297d60e3:1-7 |
+---------------+----------+--------------+------------------+------------------------------------------+
node1:
[root@node1 8.0.17]# grep -v '^#' /etc/my.cnf
[mysqld]
datadir=/var/lib/mysql
socket=/var/lib/mysql/mysql.sock
log-error=/var/log/mysqld.log
pid-file=/var/run/mysqld/mysqld.pid
server-id=2
gtid-mode=on
enforce-gtid-consistency=on
log-slave-updates=on
[root@node1 8.0.17]# systemctl restart mysqld
[root@node1 8.0.17]# mysql -uroot -pkavl7kAkkle!
mysql> change master to master_host='192.168.199.6',master_user='repl',master_password='kavl7kAkkle!'; 指定主库IP,使用的用户,密码
mysql> start slave;
Query OK, 0 rows affected, 1 warning (0.00 sec)
查看slave状态:
mysql> show slave status \G;
*************************** 1. row ***************************
Slave_IO_State: Waiting for master to send event
Master_Host: 192.168.199.6
Master_User: repl
Master_Port: 3306
Connect_Retry: 60
Master_Log_File: binlog.000003
Read_Master_Log_Pos: 878
Relay_Log_File: node1-relay-bin.000003
Relay_Log_Pos: 1086
Relay_Master_Log_File: binlog.000003
Slave_IO_Running: Yes
Slave_SQL_Running: Yes
测试gtid主从复制
在master上建立数据库slave上自动创建了。
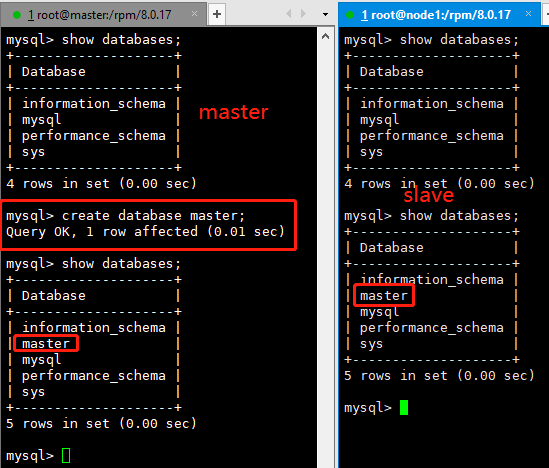
在master上查看,可以看到slave的状态(主库的sever_id、从库的server_id、slave_UUID)
mysql> show slave hosts;
+-----------+------+------+-----------+--------------------------------------+
| Server_id | Host | Port | Master_id | Slave_UUID |
+-----------+------+------+-----------+--------------------------------------+
| 2 | | 3306 | 1 | 167eed9d-b10c-11e9-af77-000c2973f66b |
+-----------+------+------+-----------+--------------------------------------+
至此gtid主从复制搭建成功!!!!有什么问题欢迎留言指教。
mysql8.0.17gtid方式实现主从同步的更多相关文章
- zabbix3.0.4监控mysql主从同步
zabbix3.0.4监控mysql主从同步 1.监控mysql主从同步原理: 执行一个命令 mysql -u zabbix -pzabbix -e 'show slave status\G' 我们在 ...
- mysql8.0.25版本设置主从数据库,并且从库只读
具体操作步骤 说明:主从数据库版本一致 1.主库创建同步使用的用户 create user 'repl'@'%' identified with 'mysql_native_password' by ...
- MySQL5.7主从同步--点位方式及GTID方式
MySQL5.6加入了GTID的新特性,其全称是Global Transaction Identifier,可简化MySQL的主从切换以及Failover.GTID用于在binlog中唯一标识一个事务 ...
- mysql-8.0 安装教程(自定义配置文件,密码方式已修改)
下载zip安装包: MySQL8.0 For Windows zip包下载地址:https://dev.mysql.com/downloads/file/?id=476233,进入页面后可以不登录.后 ...
- Mysql主从同步(1) - 概念和原理介绍 以及 主从/主主模式 部署记录
Mysql复制概念Mysql内建的复制功能是构建大型高性能应用程序的基础, 将Mysql数据分布到多个系统上,这种分布机制是通过将Mysql某一台主机数据复制到其它主机(slaves)上,并重新执行一 ...
- 高级程序员必知必会,一文详解MySQL主从同步原理,推荐收藏
1. MySQL主从同步实现方式 MySQL主从同步是基于Bin Log实现的,而Bin Log记录的是原始SQL语句. Bin Log共有三种日志格式,可以binlog_format配置参数指定. ...
- MySQL8.0安装
背景 MySQl 8.0 出来已经有段时间了,据说性能有很大提高,在网上看过很多安装教程,大同小异, 在这里亲身实战实战下MySQL8.0在Windows10系统下的安装,以下为详细的安装步骤. 1. ...
- mysql-8.0.11-winx64.zip安装教程
mysql-8.0.11-winx64.zip安装教程 下载zip安装包: MySQL8.0 For Windows zip包下载地址:https://dev.mysql.com/download ...
- 解决Navicat 无法连接mysql8.0
必须执行下面两个步骤,缺一不可. 一. mysql8.0加密方式与mysql5几加密方式不同,需要先更改加密方式. 更改加密方式 ALTERUSER 'root'@'localhost' ...
随机推荐
- C#从零单排上王者系列---元组
从零单排系列说明 博主最初的想法是想写个蜕茧成蝶的系列文章,后来觉得博客的表现形式很难做到连贯和系统.所以从本篇博客开始博主会选择书中比较重要和不好理解的知识点并结合自己的实际工作经验来讲解,不再是照 ...
- MySql翻页查询
分页查询在网页中随处可见,那原理是什么呢?下面简单介绍一下基于MySql数据库的limit实现方法. 首先明确为什么要使用分页查询,因为数据庞大,查询不可能全部显示在页面上,如果全部显示在页面上,也会 ...
- Mediawiki 子页链接无效的问题
添加下面的配置到 LocalSettings.php 中即可: # Enable subpages in the main namespace $wgNamespacesWithSubpages[NS ...
- 记一次Git提交报错的问题
通常代码版本控制的步骤是: 在代码版本控制平台新建一个仓库 clone远程仓库到本地 开始编码,然后是一系列add,commit,push 我的步骤是: 在远程代码版本管理平台新建一个仓库 在本地新建 ...
- S2-033、S2-037
前言 S2-033漏洞和S2-032类似,也是由于开启了动态方法调用,action mapper中的执行的方法名可控,导致了ognl表达式注入. 正文 Rest插件中获取action mapper是用 ...
- friend
#include <iostream> using namespace std; //friend 友元,效率的问题 //get 方法和set方法,是标准封装的结果,friend破坏了这种 ...
- tornado 常见问题处理
1 怎么获取从页面中的传值 使用 self.get_body_argument tornado的参数存储在self.request.body内,通过json以后就可以直接取值,当初我在前端使用angu ...
- WebApplication 启动类一定要存于某个包下
否则spring启动器 无法识别 包类目录
- iptables详解说明
Iptabels是与Linux内核集成的包过滤防火墙系统,几乎所有的linux发行版本都会包含Iptables的功能.如果 Linux 系统连接到因特网或 LAN.服务器或连接 LAN 和因特网的代理 ...
- 用Python做一个飞机大战游戏
基于pygame的一款小游戏 这是我上半年做的一款小游戏,但是一直忘记了,现在才上传代码. github项目地址:StarMan 代码基于pygame,Python版本3.5.2运行正常. 游戏很简单 ...