体验三大JavaScript文件上传库(Uppy.js/Filepond/Dropzone)
最近发现了一个高颜值的前端上传组件Uppy.js,立即上手体验了一波,感觉还不错。然后又看到同类型的Filepond以及Dropzone.js,对比体验了一下,感觉都很优秀,但是在体验过程中,都遇到了一点点问题,所以记录一下。
uppy.js
组件引用有两种方式,npm包引入或者引用cdn地址。github上的简单示例:
<!-- 1. Add CSS to `<head>` -->

<link href="https://transloadit.edgly.net/releases/uppy/v1.5.0/uppy.min.css" rel="stylesheet">

<!-- 2. Add JS before the closing `</body>` -->

<script src="https://transloadit.edgly.net/releases/uppy/v1.5.0/uppy.min.js"></script>

<!-- 3. Initialize -->

<div class="UppyDragDrop"></div>

<script>

  var uppy = Uppy.Core()

  uppy.use(Uppy.DragDrop, { target: '.UppyDragDrop' })

  uppy.use(Uppy.Tus, { endpoint: '//master.tus.io/files/' })

</script>
官方网站的示例很详细,查看文档后,改动成使用dashboard,endpoint是后端接收文件的方法,后端是aspnetcore创建的MVC示例项目。
 <!doctype html>

 <html>

 <head>

     <meta charset="utf-8">

     <title>Uppy</title>

     <!-- 1. Add CSS to `<head>` -->

     <link href="https://transloadit.edgly.net/releases/uppy/v1.5.0/uppy.min.css" rel="stylesheet">

 </head>

 <body>

     <div id="uppy-dashboard-area"></div>

     <!-- 2. Add JS before the closing `</body>` -->

     <script src="https://transloadit.edgly.net/releases/uppy/v1.5.0/uppy.min.js"></script>

     <script>

         var zhcn = {

             strings: {

                 // When `inline: false`, used as the screen reader label for the button that closes the modal.

                 closeModal: '关闭弹框',

                 // Used as the screen reader label for the plus (+) button that shows the “Add more files” screen

                 addMoreFiles: '添加更多文件',

                 // Used as the header for import panels, e.g., “Import from Google Drive”.

                 importFrom: '从 %{name} 导入',

                 // When `inline: false`, used as the screen reader label for the dashboard modal.

                 dashboardWindowTitle: 'Uppy Dashboard Window (Press escape to close)',

                 // When `inline: true`, used as the screen reader label for the dashboard area.

                 dashboardTitle: 'Uppy Dashboard',

                 // Shown in the Informer when a link to a file was copied to the clipboard.

                 copyLinkToClipboardSuccess: '链接已复制',

                 // Used when a link cannot be copied automatically — the user has to select the text from the

                 // input element below this string.

                 copyLinkToClipboardFallback: '复制下面的链接',

                 // Used as the hover title and screen reader label for buttons that copy a file link.

                 copyLink: '复制链接',

                 // Used as the hover title and screen reader label for file source icons, e.g., “File source: Dropbox”.

                 fileSource: '文件来源: %{name}',

                 // Used as the label for buttons that accept and close panels (remote providers or metadata editor)

                 done: '完成',

                 // Used as the screen reader label for buttons that remove a file.

                 removeFile: '移除文件',

                 // Used as the screen reader label for buttons that open the metadata editor panel for a file.

                 editFile: '编辑文件',

                 // Shown in the panel header for the metadata editor. Rendered as “Editing image.png”.

                 editing: '正在编辑 %{file}',

                 // Text for a button shown on the file preview, used to edit file metadata

                 edit: '编辑',

                 // Used as the screen reader label for the button that saves metadata edits and returns to the

                 // file list view.

                 finishEditingFile: '结束编辑文件',

                 // Used as the label for the tab button that opens the system file selection dialog.

                 myDevice: '我的设备',

                 // Shown in the main dashboard area when no files have been selected, and one or more

                 // remote provider plugins are in use. %{browse} is replaced with a link that opens the system

                 // file selection dialog.

                 dropPasteImport: 'Drop files here, paste, %{browse} or import from',

                 // Shown in the main dashboard area when no files have been selected, and no provider

                 // plugins are in use. %{browse} is replaced with a link that opens the system

                 // file selection dialog.

                 dropPaste: '拖拽文件到这里 or %{browse}',

                 // This string is clickable and opens the system file selection dialog.

                 browse: '浏览本地文件',

                 // Used as the hover text and screen reader label for file progress indicators when

                 // they have been fully uploaded.

                 uploadComplete: '上传完成',

                 // Used as the hover text and screen reader label for the buttons to resume paused uploads.

                 resumeUpload: '继续',

                 // Used as the hover text and screen reader label for the buttons to pause uploads.

                 pauseUpload: '暂停',

                 // Used as the hover text and screen reader label for the buttons to retry failed uploads.

                 retryUpload: '重试',

                 // Used in a title, how many files are currently selected

                 xFilesSelected: {

                     0: '%{smart_count} 个文件已选择',

                     1: '%{smart_count} 个文件已选择'

                 },

                 // uppy/status-bar strings:

                 uploading: '上传中...',

                 complete: '完成'

                 // ...etc

             }

         };

         var uppy = Uppy.Core({

             autoProceed: false,

             allowMultipleUploads: true, // 上传完成之后,是否可继续添加文件上传

             restrictions: {

                 maxFileSize: 1024 * 1024 * 1024 * 4, // 以字节为单位

                 maxNumberOfFiles: 100,

                 minNumberOfFiles: 1,

                 allowedFileTypes: ['image/*', 'video/*'] // mime类型(image/png)或者文件后缀名(.jpg)

             }

         })

             .use(Uppy.Dashboard, {

                 id: 'Dashboard',

                 metaFields: [

                     { id: 'name', name: 'Name', placeholder: 'file name' }

                 ],

                 target: '#uppy-dashboard-area',

                 note: 'image and video only',

                 inline: true,

                 showLinkToFileUploadResult: true,

                 showProgressDetails: true,

                 hideUploadButton: false,

                 hideRetryButton: false,

                 hidePauseResumeButton: false,

                 hideCancelButton: false,

                 hideProgressAfterFinish: false,

                 closeModalOnClickOutside: false,

                 closeAfterFinish: false,

                 disableStatusBar: false,

                 disableInformer: false,

                 disableThumbnailGenerator: false,

                 disablePageScrollWhenModalOpen: true,

                 animateOpenClose: true,

                 proudlyDisplayPoweredByUppy: true,

                 onRequestCloseModal: () => this.closeModal(),

                 showSelectedFiles: true,

                 locale: zhcn,

                 browserBackButtonClose: false

             })

             .use(Uppy.Tus, {

                 endpoint: '/FileUpload/Upload'

             })

         uppy.on('file-added', (file) => {

             uppy.setFileMeta(file)

         })

         uppy.on('file-removed', (file) => {

             console.log('Removed file', file)

         })

         uppy.on('upload-success', (file, response) => {

         })

         uppy.on('complete', (result) => {

             console.log('Upload complete! We’ve uploaded these files:', result.successful)

         })

     </script>

 </body>

 </html>
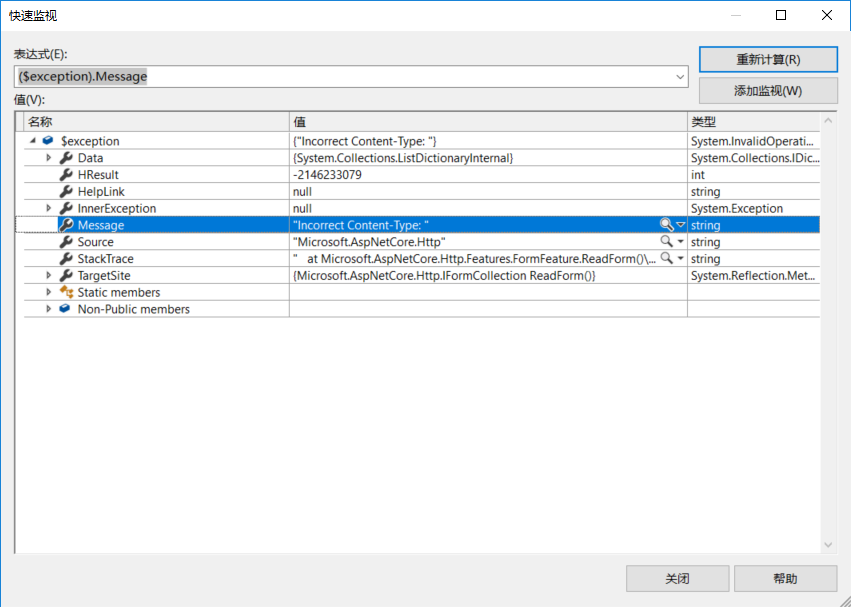
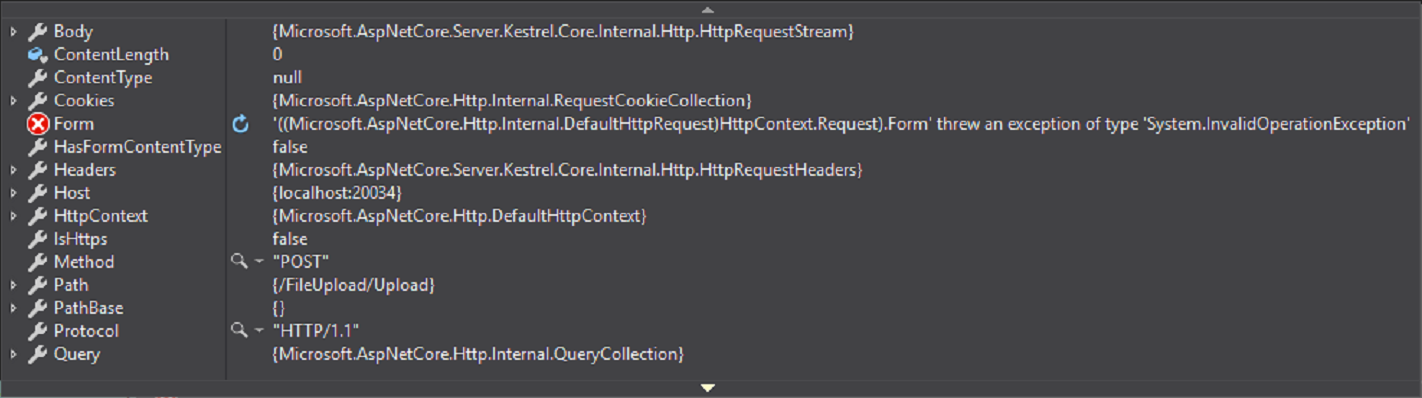
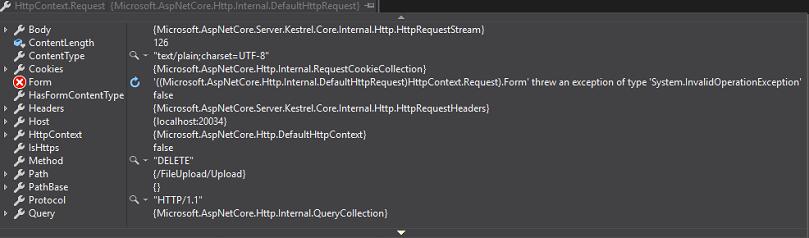
运行项目,拖拽图片,上传,然后后端却怎么也接收不到文件。用IFormFile和IFormFileCollection类型都接收不到参数,改用Request.Form接收文件报错,而且会连续5次请求。查看异常请求,没有ContentType,ContentLength=0,说明这是一个空请求?
看看前端请求,发现有点不一样,Upload-Length刚好就是上传图片的大小,那么这个Upload-Metadata应该就是上传的图片了。
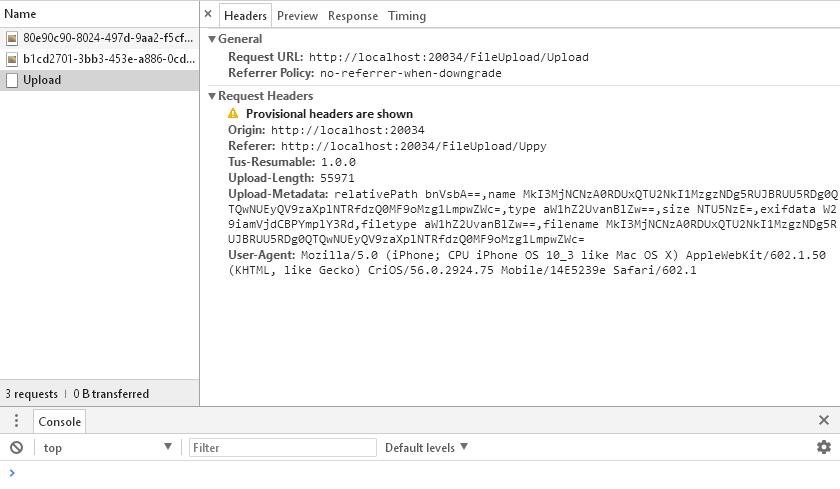
看到有relativePath,name,type,size,exifdata,filetype,filename属性,然而可能是我太弱鸡了,不知道如何取出文件。( ̄□ ̄||)
继续翻官方文档,好在uppy支持XHR方式,然后也发现了uppy的本地化js,上传方式改为使用XHRUpload,Dashboard的locale属性改为引入的js,所以就变成了这样:
<!doctype html>

<html>

<head>

    <meta charset="utf-8">

    <title>Uppy</title>

    <!-- 1. Add CSS to `<head>` -->

    <link href="https://transloadit.edgly.net/releases/uppy/v1.5.0/uppy.min.css"

          asp-fallback-href="~/css/uppy/Uppy.min.css"

          asp-fallback-test-class="uppy-Root"

          rel="stylesheet">

</head>

<body>

    <div id="drag-drop-area"></div>

    <!-- 2. Add JS before the closing `</body>` -->

    <script src="https://transloadit.edgly.net/releases/uppy/v1.5.0/uppy.min.js"

            asp-fallback-src="~/js/uppy/Uppy.min.js"

            asp-fallback-test="window.Uppy"></script>

    <script src="https://transloadit.edgly.net/releases/uppy/locales/v1.7.0/zh_CN.min.js"

            asp-fallback-src="~/js/uppy/zh_CN.min.js"></script>

    <script>

        var uppy = Uppy.Core({

            autoProceed: false,

            allowMultipleUploads: true, // 上传完成之后,是否可继续添加文件上传

            restrictions: {

                maxFileSize: 1024 * 1024 * 1024 * 4, // 以字节为单位

                maxNumberOfFiles: 100,

                minNumberOfFiles: 1,

                allowedFileTypes: ['image/*', 'video/*'] // mime类型(image/png)或者文件后缀名(.jpg)

            }

        })

            .use(Uppy.Dashboard, {

                id: 'Dashboard',

                metaFields: [

                    // 重命名文件

                    { id: 'name', name: 'Name', placeholder: 'file name' }

                ],

                //trigger: '#uppy-select-files',

                target: '#drag-drop-area',

                note: 'image and video only',

                inline: true,

                //width: 750,

                //height: 550,

                //thumbnailWidth: 280,

                showLinkToFileUploadResult: true,

                showProgressDetails: true,

                hideUploadButton: false,

                hideRetryButton: false,

                hidePauseResumeButton: false,

                hideCancelButton: false,

                hideProgressAfterFinish: false,

                closeModalOnClickOutside: false,

                closeAfterFinish: false,

                disableStatusBar: false,

                disableInformer: false,

                disableThumbnailGenerator: false,

                disablePageScrollWhenModalOpen: true,

                animateOpenClose: true,

                proudlyDisplayPoweredByUppy: true,

                onRequestCloseModal: () => this.closeModal(),

                showSelectedFiles: true,

                locale: Uppy.locales.zh_CN,

                browserBackButtonClose: false

            })

            .use(Uppy.XHRUpload, {

                id: 'XHRUpload',

                endpoint: '/FileUpload/Upload',

                method: 'post',

                formData: true,

                fieldName: 'files[]',

                metaFields: null,

                bundle: true,

                getResponseData(responseText, response) {

                    //debugger

                    console.log(response)

                },

                getResponseError(responseText, xhr) {

                    //debugger

                },

                timeout: 30 * 1000, // default 30s

                limit: 0, // Limit the amount of uploads going on at the same time.

                responseType: '', // only '','text','arraybuffer','blob','document'

                locale: {

                    strings: {

                        timeOut: 'upload stalled for %{seconds} seconds, aborting..'

                    }

                }

            })

        uppy.on('file-added', (file) => {

            //uppy.setFileMeta(file)

            uppy.setFileMeta(file.id, {

                size: file.size

            })

        })

        uppy.on('file-removed', (file) => {

            console.log('Removed file', file)

        })

        uppy.on('upload-success', (file, response) => {

            //debugger

        })

        uppy.on('complete', (result) => {

            console.log('Upload complete! We’ve uploaded these files:', result.successful)

        })

    </script>

</body>

</html>

Filepond
Filepond支持多个前端框架,Angular,React,Vue和jQuery。并且Filepond有非常多的插件,首先看看filepond的官方示例,
<!--

The classic file input element we'll enhance

to a file pond, configured with attributes

-->

<input type="file"

    class="filepond"

    name="filepond"

    multiple

    data-max-file-size="3MB"

    data-max-files="3">

// We want to preview images, so we register

// the Image Preview plugin, We also register

// exif orientation (to correct mobile image

// orientation) and size validation, to prevent

// large files from being added

FilePond.registerPlugin(

  FilePondPluginImagePreview,

  FilePondPluginImageExifOrientation,

  FilePondPluginFileValidateSize

);

// Select the file input and use

// create() to turn it into a pond

FilePond.create(

    document.querySelector('input')

);
改造一下:
<!DOCTYPE html>

<html>

<head>

    <title>FilePond CDN</title>

    <!-- Filepond 样式文件 -->

    <link href="https://unpkg.com/filepond/dist/filepond.css" rel="stylesheet">

    <!-- 引入图像预览插件的css文件 -->

    <link href="https://unpkg.com/filepond-plugin-image-preview/dist/filepond-plugin-image-preview.css" rel="stylesheet">

</head>

<body>

    <input type="file" class="filepond" name="filepond">

    <!-- FilePond js文件 -->

    <script src="https://unpkg.com/filepond/dist/filepond.js"></script>

    <!-- FilePondPluginImagePreview 图像预览 -->

    <script src="https://unpkg.com/filepond-plugin-image-preview/dist/filepond-plugin-image-preview.js"></script>

    <!--FilePondPluginFileValidateSize 大小限制-->

    <script src="https://unpkg.com/filepond-plugin-file-validate-size/dist/filepond-plugin-file-validate-size.js"></script>

    <!--FilePondPluginFileValidateType 类型验证-->

    <script src="https://unpkg.com/filepond-plugin-file-validate-type/dist/filepond-plugin-file-validate-type.js"></script>

    <!-- 将所有输入元素转换为 ponds -->

    <script>

        //FilePond.parse(document.body);

        /*

         * 注册插件

         */

        FilePond.registerPlugin(

            FilePondPluginFileValidateSize, // 文件大小限制

            FilePondPluginFileValidateType, // 文件类型验证

            FilePondPluginImagePreview // 图片预览

        );

        FilePond.setOptions({

            // endpoint,后端地址

            server: '/FileUpload/Upload',

            allowImagePreview: true,

            imagePreviewMinHeight: 44,

            imagePreviewMaxHeight: 256,

            allowFileTypeValidation: true, // 文件类型验证

            acceptedFileTypes: ['image/jpeg', 'image/png'], // 支持的文件类型

        })

        FilePond.create(document.querySelector("input"), {

            allowFileSizeValidation: true, // 启用文件大小限制

            maxFileSize: '1000KB', // 单个文件大小限制

            maxTotalFileSize: '5MB',// 所有文件的总大小限制

            labelMaxFileSize: 'Maximum file size is {filesize}'

        });

    </script>

</body>

</html>
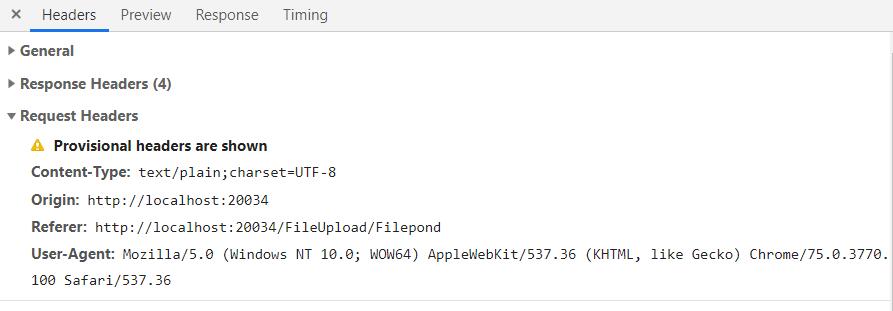
右上角有一个删除icon,点击之后发现发送了一个DELETE请求到后端,然而我并知道如何处理这个DELETE请求, ╮(╯▽╰)╭
看前台请求也没有什么有用的参数。如果是要处理HTTP DELETE请求的话,应该是要有参数的,可能文档有说明,有空再仔细研究。
Dropzonejs
直接贴上目前已经看过文档的部分代码吧。
<link type="text/css" rel="stylesheet" href="~/css/dropzone/Dropzone.css" />

<script type="text/javascript" src="~/js/dropzone/Dropzone.js"></script>

<h1>Dropzone</h1>

<div class="dropzone" id="dropzoneArea">

    <div class="am-text-success dz-message">

        将文件拖拽到此处<br>或者点此打开文件管理器选择文件

    </div>

</div>

<script type="text/javascript">

    Dropzone.autoDiscover = false;

    var dzone = new Dropzone("#dropzoneArea", {

        url: "/FileUpload/Upload",

        autoProcessQueue: true,

        addRemoveLinks: true,

        dictRemoveFile : "删除",

        dictCancelUpload: "取消",

        acceptedFiles: ".jpg,.jpeg,.png,.gif",//支持的格式

        maxFiles: 10,//最多上传几个图片

        maxFilesize: 5,//图片的大小,单位是M

        method: 'post',

        filesizeBase: 1024,

        init: function () {

            this.on("success", function (file, xhr) {

                console.log(xhr);

            })

            this.on("removedfile", function (file) {

                console.log("File " + file.name + " removed");

            })

        },

        sending: function(file, xhr, formData) {

            formData.append("filesize", file.size);

        },

        success: function (file, response, e) {

            //debugger

            alert(response.message);

        }

    });

</script>
Dropzone也是默认自动上传,看了文档有禁止自动上传的选项,自己加一个上传按钮,然后绑定事件。目前没有很深入的看文档,不太清楚在哪一步来处理processQueue。Dropzone默认样式也比较一般,需要重新写样式。不过上传后的预览有毛玻璃效果,看起来还不错。
Enqueuing file uploads

When a file gets added to the dropzone, its status gets set to Dropzone.QUEUED(after the accept function check passes) which means that the file is now in the queue.

If you have the option autoProcessQueue set to true then the queue is immediately processed, after a file is dropped or an upload finished, by calling.processQueue() which checks how many files are currently uploading, and if it’s less than options.parallelUploads, .processFile(file) is called.

If you set autoProcessQueue to false, then .processQueue() is never called implicitly. This means that you have to call it yourself when you want to upload all files currently queued.

三款产品各有特点,界面都很美观,除了Dropzone需要额外写一些样式。总结一下目前遇到的待解决的问题:
Uppy - 使用Uppy.Tus方式上传文件
Filepond - 前端删除文件的http delete请求
Dropzone - 自动上传文件的处理事件
体验三大JavaScript文件上传库(Uppy.js/Filepond/Dropzone)的更多相关文章
- 讲解开源项目:功能强大的 JS 文件上传库
本文作者:HelloGitHub-kalifun HelloGitHub 的<讲解开源项目>系列,项目地址:https://github.com/HelloGitHub-Team/Arti ...
- 【精心推荐】几款极好的 JavaScript 文件上传插件
文件上传功能作为网页重要的组成部分,几乎无处不在,从简单的单个文件上传到复杂的批量上传.拖放上传,需要开发者花费大量的时间和精力去处理,以期实现好用的上传功能.这篇文章向大家推荐几款很棒的 JavaS ...
- js文件上传库
收集了2个与具体UI库和框架无任何耦合的JS文件上传库:支持断点续传.支持npm安装. resumable.js fileapi
- 几款极好的 JavaScript 文件上传插件
文件上传功能作为网页重要的组成部分,几乎无处不在,从简单的单个文件上传到复杂的批量上传.拖放上传,需要开发者花费大量的时间和精力去处理,以期实现好用的上传功能.这篇文章向大家推荐几款很棒的 JavaS ...
- Javascript文件上传插件
jQuery File Uploader 这是最受欢迎的 jQuery 文件上传组件,支持批量上传,拖放上传,显示上传进度条以及校验功能. 支持预览图片.音频和视频,支持跨域上传和客户端图片缩放,支持 ...
- JavaScript 文件上传类型判断
文件上传时用到一个功能,使用html元素的input标签实现, <input id="imageFile" name="imageFile1" accep ...
- 文件上传:swfupload.js、blueimp-file-upload
一.swfupload 1.下载swfupload http://code.google.com/p/swfupload/ 2. 3.API http://www.cnblogs.com/henw/ ...
- 文件上传限制条件(JS、后缀、文件名、类型、截断)绕过及修复建议
在现代互联网的Web应用程序中,上传文件是一 种常见的功能,因为它有助于提高业务效率,比如企业的OA系统,允许用户上传图片.视频.头像和许多其他类型的文件.然而向用户提供的功能越多,Web应用受到攻击 ...
- HTML5 JavaScript 文件上传
function fileUpload(targetUrl) { // 隐藏表单名称 var inputName = '_fileselect'; // 文件尺寸 this.fileSize = 0; ...
随机推荐
- Python日志库logging总结-可能是目前为止将logging库总结的最好的一篇文章
在部署项目时,不可能直接将所有的信息都输出到控制台中,我们可以将这些信息记录到日志文件中,这样不仅方便我们查看程序运行时的情况,也可以在项目出现故障时根据运行时产生的日志快速定位问题出现的位置. 1. ...
- OpenJudge计算概论-最长单词2
/*======================================================================== 最长单词2 总时间限制: 1000ms 内存限制: ...
- Redis Sentinel 高可用服务架构搭建
https://www.cnblogs.com/xishuai/p/redis-sentinel.html
- dts reader
package com.aliyun.dts.connect; import com.alibaba.fastjson.JSONObject; import com.aliyun.drc.client ...
- VL10B 采购订单转DN
传入采购订单项目建交货单 FUNCTION zmmfmXXXX. *"------------------------------------------------------------ ...
- IDEA的查询引用、调用关系图的功能(转)
转自: http://www.cnblogs.com/ghj1976/p/5382455.html Eclipse的"Call Hierarchy"可以查看一个Java方法或类成员 ...
- charles 高级批量请求
本文参考:charles 高级批量请求 这个我感觉有点鸡肋,真正的批量请求,推荐使用JMter charles 高级批量请求就是下面这种简单的设置的 简单的使用还是可以的; 比如简单的测试下,向某一个 ...
- 【MM系列】在SAP里查看数据的方法
公众号:SAP Technical 本文作者:matinal 原文出处:http://www.cnblogs.com/SAPmatinal/ 原文链接:[MM系列]在SAP里查看数据的方法 前言部 ...
- 解决用cmd编译运行java时的错误
最近上java课程,平时都是用IDEA打代码的,但老师要我们用cmd编译运行,于是在IDEA撸完代码用cmd编译,但却老是编译不出来,有很多乱码.,提示着“错误:GBK的不可映射字符”,又试了几次,着 ...
- 51.Qt-使用ajax获取ashx接口的post数据
由于当前C++项目需要使用ajax库去post调用ashx接口,接口地址如下所示: 需要传递的参数如下: 然后发现qml比较好调用ajax.js库,所以本章通过C++界面去获取qml方法来实现调用as ...