路由器配置——单臂路由实现VLAN间通信
一、实验目的:用路由器使同和不同vlan可以通信
二、拓扑图如下:
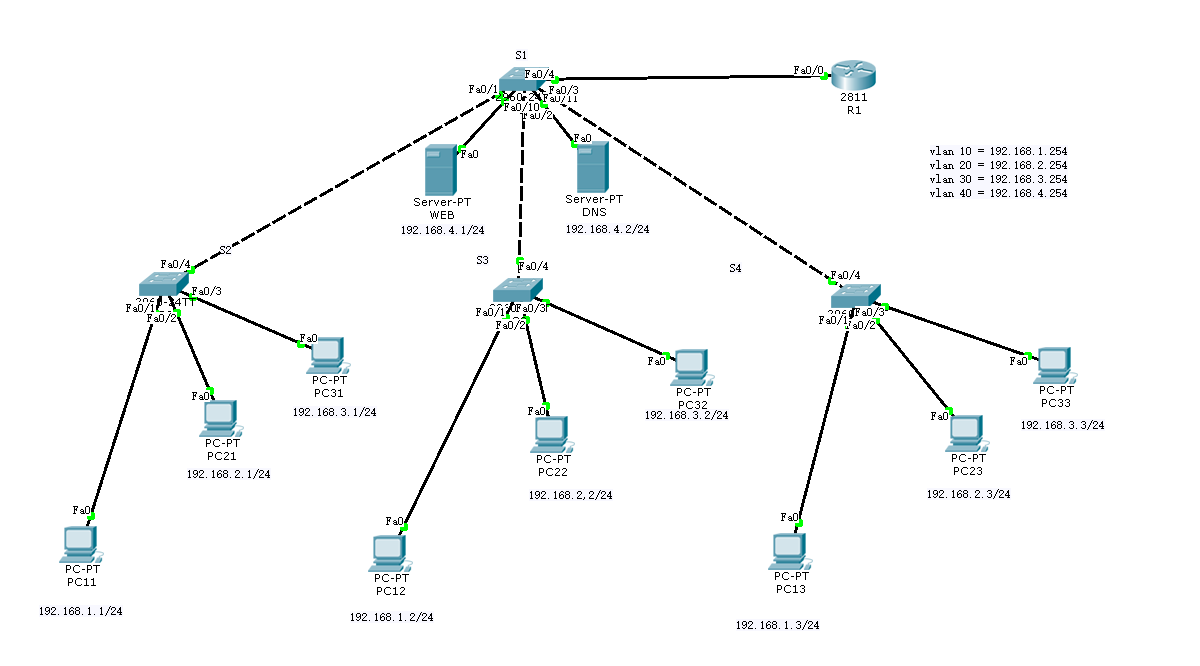
三、具体步骤:
(1)R1路由器配置:
Router>en --进入特权模式
Router#conf t --进入全局配置模式
Enter configuration commands, one per line. End with CNTL/Z.
Router(config)#hostname R1 --修改路由器名为R1
R1(config)#interface f0/0 --进入端口
R1(config-if)#no shutdown --开启端口
R1(config-if)#interface f0/0.1 --进入子端口
R1(config-subif)#encapsulation dot1q 10
R1(config-subif)#ip address 192.168.1.254 255.255.255.0 --给子端口设置ip地址
R1(config-subif)#interface f0/0.2 --进入子端口
R1(config-subif)#encapsulation dot1q 20 --封装端口
R1(config-subif)#ip address 192.168.2.254 255.255.255.0 --给子端口设置ip地址
R1(config-subif)#interface f0/0.3 --进入子端口
R1(config-subif)#encapsulation dot1q 30 --封装端口
R1(config-subif)#ip address 192.168.3.254 255.255.255.0 --给子端口设置ip地址
R1(config-subif)#interface f0/0.4 --进入子端口
R1(config-subif)#encapsulation dot1q 40 --封装端口
R1(config-subif)#ip address 192.168.4.254 255.255.255.0 --给子端口设置ip地址
R1(config-subif)#end --返回特权模式
R1#copy running-config startup-config --保存配置
[OK] --保存成功
(2)S1交换机配置
Switch>en --进入全局配置模式
Switch#conf t --进入全局配置模式
Enter configuration commands, one per line. End with CNTL/Z.
Switch(config)#hostname S1 --修改交换机名为S1
S1(config)#vtp domain abc --创建vtp域
Domain name already set to abc.
S1(config)#vtp mode server 设置当前交换机在vtp中为server模式
Device mode already VTP SERVER.
S1(config)#vlan 10 --创建vlan 10
S1(config-vlan)#vlan 20 --创建vlan 20
S1(config-vlan)#vlan 30 --创建vlan 30
S1(config-vlan)#vlan 40 --创建vlan 40
S1(config-vlan)#interface range f0/1-4 --进入f0/1,f0/2,f0/3,f0/4端口
S1(config-if-range)#switchport mode trunk --设置f0/1-f0/4之间所有端口为trunk模式
S1(config-if-range)#interface range f0/10-11 --进入f0/10和f0/11端口
S1(config-if-range)#switchport mode access --设置f0/10,f0/11端口为access模式
S1(config-if-range)#switchport access vlan 40 --将f0/10,f0/11端口划入vlan 40
S1(config-if-range)#end --返回特权模式
S1#copy running-config startup-config --保存配置
[OK] --保存成功
(3)S2交换机配置
Switch>en --进入特权模式
Switch#conf t --进入全局配置模式
Enter configuration commands, one per line. End with CNTL/Z.
Switch(config)#hostname S2 --修改交换机名为S2
S2(config)#vtp mode client --设置当前交换机在vtp中为客户模式
Device mode already VTP CLIENT.
S2(config)#interface f0/1 --进入f0/1端口
S2(config-if)#switchport mode access --设置f0/1端口为access模式
S2(config-if)#switchport access vlan 10 --将f0/1端口划入vlan 10
S2(config-if)#interface f0/2 --进入f0/2端口
S2(config-if)#switchport mode access --设置f0/2端口为access模式
S2(config-if)#switchport access vlan 20 --将f0/2划入vlan2
S2(config-if)#interface f0/3 --进入f0/3端口
S2(config-if)#switchport mode access --设置f0/3端口为access模式
S2(config-if)#switchport access vlan 30 --将f0/3端口划入vlan 30
S2(config-if)#interface f0/4 --进入f0/4端口
S2(config-if)#switchport mode trunk --设置f0/4端口为trunk模式
S2(config-if)#end --返回特权模式
S2#copy running-config startup-config --保存配置
[OK] --保存成功
(4)S3交换机配置
Switch>en --进入特权模式
Switch#conf t --进入全局配置模式
Enter configuration commands, one per line. End with CNTL/Z.
Switch(config)#hostname S3 --修改交换机名为S3
S3(config)#vtp mode client --设置当前交换机在vtp中为客户模式
Device mode already VTP CLIENT.
S3(config)#interface f0/1 --进入f0/1端口
S3(config-if)#switchport mode access --设置f0/1端口为access模式
S3(config-if)#switchport access vlan 10 --将f0/1端口划入vlan 10
S3(config-if)#interface f0/2 --进入f0/2端口
S3(config-if)#switchport mode access --设置f0/2端口为access模式
S3(config-if)#switchport access vlan 20 --将f0/2端口划入vlan 20
S3(config-if)#interface f0/3 --进入f0/3端口
S3(config-if)#switchport mode access --设置f0/3端口为access模式
S3(config-if)#switchport access vlan 30 --将f0/3端口划入vlan 30
S3(config-if)#interface f0/4 --进入f0/4端口
S3(config-if)#switchport mode trunk --设置f0/4端口为trunk模式
S3(config-if)#end --返回特权模式
S3#copy running-config startup-config --保存配置
[OK] --保存成功
(5)S4交换机配置
Switch>en --进入特权模式
Switch#conf t --进入全局配置模式
Enter configuration commands, one per line. End with CNTL/Z.
Switch(config)#hostname S4 --修改交换机名为S4
S4(config)#vtp mode client --设置当前交换机在VTP中为客户模式
Device mode already VTP CLIENT.
S4(config)#interface f0/1 --进入f0/1端口
S4(config-if)#switchport mode access --设置f0/1端口为access模式
S4(config-if)#switchport access vlan 10 --将f0/1划分到vlan 10
S4(config-if)#interface f0/2 --进入f0/2端口
S4(config-if)#switchport mode access --设置f0/2端口为access模式
S4(config-if)#switchport access vlan 20 --将f0/2划分到vlan 20
S4(config-if)#interface f0/3 --进入f0/3端口
S4(config-if)#switchport mode access --设置f0/3端口为access模式
S4(config-if)#switchport access vlan 30 --将f0/3划分到vlan 30
S4(config-if)#interface f0/4 --进入f0/4端口
S4(config-if)#switchport mode trunk --将f0/4端口设置为trunk模式
S4(config-if)#end --返回特权模式
S4#copy running-config startup-config --保存配置
[OK] --保存成功
四、验证不同vlan是否能通讯
(1)PC11与PC22

vlan 10和vlan 20可以通信
(2)PC33与WEB
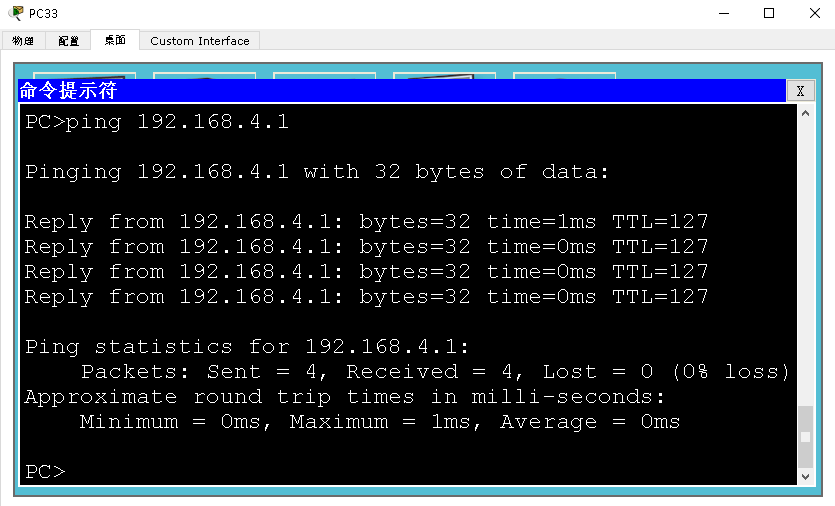
vlan 30 与vlan 40 可以通信
路由器配置——单臂路由实现VLAN间通信的更多相关文章
- 路由器基础配置之单臂路由实现vlan间通信
我们将以上面的拓扑图开始进行配置,目的为设置单臂路由实现vlan间通信,设置4个vlan,pc0,1,2为vlan10 pc3,4,5为vlan20:pc6,7,8为vlan30:server0,1为 ...
- 单臂路由实现VLAN间通信
实验要求:利用路由器完成同vlan能通信,不同vlan也能通信 拓扑如下: 涉及内容有: 1.VTP的创建和配置 2.VLAN的创建和划分 3.路由器的单臂路由配置 配置如下: route1 enab ...
- 利用单臂路由实现VLAN间的路由
实验4:利用单臂路由实现VLAN间的路由. 实验原理: 实验内容: 本实验模拟公司网络场景,路由器R1是公司的出口网关,员工PC通过接入层交换机(如S2和S3)接入公司网络,接入层交换机又通过汇聚交 ...
- eNSP仿真软件之利用单臂路由实现VLAN间路由
1. 实验原理 以太网中,通常会使用VLAN技术隔离二层广播域来减少广播的影响,并增强网络的安全性和可管理性.其缺点是同时也严格地隔离了不同VLAN之间的任何二层流量,使分属于不同VLAN的用户不能直 ...
- VLAN实验4(在eNSP上利用单臂路由实现VLAN间路由)
原理概述: 以太网中,通常会使用VLAN技术隔离二层广播域来减少广播的影响*并增强 网络的安全性和可管理性.其缺点足同时也严格地隔离了不同VLAN之间的任何二层流量,使分属于不同VLAN的用户 不能直 ...
- VLAN实验4:利用单臂路由实现VLAN间路由
单臂路由: 实验环境: 实验拓扑图: 实验编址: 实验步骤:1.创建VLAN并配置Access.Trunk接口. 我们在S2上创建VLAN10和VLAN20,并且吧链接PC1的E0/0/1和链接PC2 ...
- 在ensp上利用单臂路由实验VLAN间路由
我们为什么要设置单臂路由? 因为我们要解决不同vlan,不同网络的PC机间的通信问题~ 那它为啥叫单臂路由嘞? 单臂路由的原理时通过一台路由器,使vlan间互通数据通过路由器进行三层转发,如果在路由器 ...
- eNSP——利用单臂路由实现VLAN间路由
原理: 以太网中,通常会使用VLAN技术隔离二层广播域来减少广播的影响,并增强网络的安全性和可管理性.其缺点是同时也严格地隔离了不同VLAN之间的任何二层流量,使分属于不同VLAN的用户不能直接互相通 ...
- 利用单臂路由实现VLAN间路由(有1个疑问)
配置PC机: PC1:IP 192.168.1.1 :掩码:255.255.255.0:网关:192.168.1.254 VLAN 10 PC2:IP 192.168.2.1 :掩码:255.255 ...
随机推荐
- wc、iconv命令
一.wc:统计文件打印换行符,单词和字节数 语法: wc [OPTION] ... [FILE] ... wc [OPTION] ... --files0-from = F 描 ...
- 缓存策略:redis缓存之springCache
最近通过同学,突然知道服务器的缓存有很多猫腻,这里通过网上查询其他人的资料,进行记录: 缓存策略 比较简单的缓存策略: 1.失效:应用程序先从cache取数据,没有得到,则从数据库中取数据,成功后,放 ...
- Java深入分析类与对象
深入分析类与对象 1,成员属性封装 在类之中的组成就是属性与方法,一般而言方法都是对外提供服务的,所以是不会进行封装处理的,而对于属性需要较高的安全性,所以往往需要对其进行保护,这个时候就需要采用封装 ...
- TensorFlow良心入门教程
All the matrials come from Machine Learning class in Polyu,HK and I reorganize them and add referenc ...
- 【ExtJs】ext前台中的日期控件传输时间到后台的转换保存过程
//前台日期选择框 {fieldLabel:, padding: ',afterLabelTextTpl: required,allowBlank: false,format: 'Y-m-d H:i: ...
- <%%> <%! %> <%=%> <%-- --%> jsp中jstl一些运用
<%%> 这里面可以添加java代码片段<%! %> 这里添加java方法 主要是用来声明变量的 <%=%> 将变量或表达式值输出到页面<%-- --%> ...
- postgres 索引
索引是一种特殊的查询表,可以使用搜索引擎的数据库以加快数据检索.简单地说,索引是表中的数据的一个指针,在一个数据库中的索引是非常相似,如:一本书的目录. 例如,如果想在一本书中引用的所有页面讨论某个话 ...
- D-Link系列路由器漏洞挖掘入门
D-Link系列路由器漏洞挖掘入门 前言 前几天去上海参加了geekpwn,看着大神们一个个破解成功各种硬件,我只能在下面喊 6666,特别羡慕那些大神们.所以回来就决定好好研究一下路由器,争取跟上大 ...
- centos6.4升级openssh7.4p1
Centos6.4版本yum升级openssh版本最高到5.3,想要升级到更高的版本需要重新编译 一.查看当前openssh版本: [root@localhost ~]# ssh -VOpenSSH_ ...
- 8.5.zookeeper应用案例_分布式应用HA
1.实现分布式应用(主节点HA)及客户端动态更新主节点状态 需求:某分布式系统中,主节点可以有多台,服务器可以动态(变化)上下线,任意一台客户端都能实时感知到主节点服务器的上下线 思路:架设Zooke ...