win 10 下面安装 mysql-8.0.12-winx64 的过程
win10 上面如何安装多个 MySQL8
1.官网下载 MySQL Community Downloads
https://dev.mysql.com/downloads/mysql/

2.解压到你要安装的目录
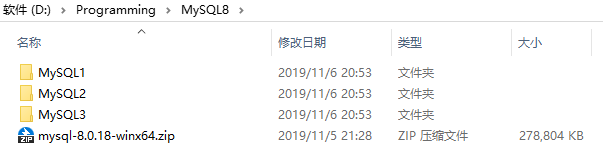
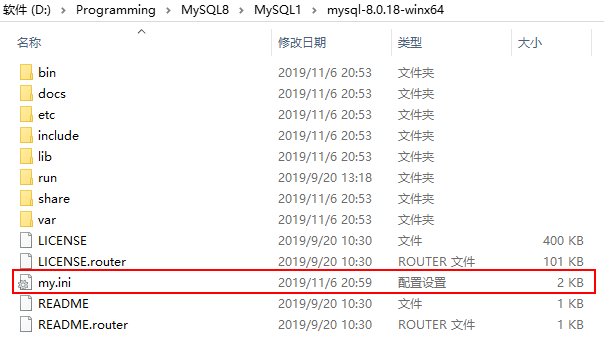
3.在MySQL的根目录下面新建my.ini的配置文件

[mysqld]

# 设置3306端口

port=3306

# 设置mysql的安装目录(需要设置为自己的安装目录)

basedir=D:\Programming\MySQL8\MySQL1\mysql-8.0.18-winx64

# 设置mysql数据库的数据的存放目录(mysql-8.0.18不需要手动创建data文件夹)

datadir=D:\Programming\MySQL8\MySQL1\mysql-8.0.18-winx64\data

# 允许最大连接数

max_connections=200

# 允许连接失败的次数(这是为了防止有人从该主机试图攻击数据库系统)

max_connect_errors=10

# 服务端使用的字符集默认为utf8mb4

character-set-server=utf8mb4

# 创建新表时将使用的默认存储引擎

default-storage-engine=INNODB

# 默认使用mysql_native_password插件认证

default_authentication_plugin=mysql_native_password

# 去掉sql_mode中的only_full_group_by

sql_mode=strict_trans_tables,no_zero_in_date,no_zero_date,error_for_division_by_zero,no_engine_substitution

[mysql]

# 设置mysql客户端默认字符集

default-character-set=utf8mb4

[client]

# 设置mysql客户端连接服务端时默认使用的端口

port=3306

default-character-set=utf8mb4
4.通过管理员的身份打开cmd窗口跳转路径到MySQL的bin目录
# 进入到mysql的bin目录底下操作:

# 初始化mysql

mysqld --defaults-file=D:\Programming\MySQL8\MySQL1\mysql-8.0.18-winx64\my.ini --initialize --console

# 安装mysql服务

mysqld --install [服务名] MySQL1 --defaults-file=D:\Programming\MySQL8\MySQL1\mysql-8.0.18-winx64\my.ini

mysqld --install MySQL1 --defaults-file=D:\Programming\MySQL8\MySQL1\mysql-8.0.18-winx64\my.ini

# 启动mysql服务

net start [服务名]

net start mysql1

# 停止mysql服务

net stop [服务名]

net stop mysql1

# 卸载mysql服务

mysqld -remove [服务名]

mysqld --remove mysql1

# 登录mysql

mysql -h localhost -u root -P 3306 -p

# 修改mysql密码

alter user 'root'@'localhost' identified with mysql_native_password by '123456';

flush privileges;

# 开启mysql远程访问

# 方式一:

use mysql;

create user 'root'@'%' identified by '123456';

grant all on *.* to 'root'@'%';

alter user 'root'@'%' identified with mysql_native_password by '123456';

flush privileges;

# 方式二:

use mysql;

select user,authentication_string,host from user;

update user set host = '%' where user = 'root';

flush privileges;

alter user 'root'@'%' identified with mysql_native_password by '123456';


5.其他
MySQL2安装步骤
D:\Programming\MySQL8\MySQL2\mysql-8.0.18-winx64\bin>mysqld --defaults-file=D:\Programming\MySQL8\MySQL2\mysql-8.0.18-winx64\my.ini --initialize --console

2019-11-06T13:19:04.091682Z 0 [System] [MY-013169] [Server] D:\Programming\MySQL8\MySQL2\mysql-8.0.18-winx64\bin\mysqld.exe (mysqld 8.0.18) initializing of server in progress as process 3276

2019-11-06T13:19:07.073501Z 5 [Note] [MY-010454] [Server] A temporary password is generated for root@localhost: X>cZPPE6Qkpi

D:\Programming\MySQL8\MySQL2\mysql-8.0.18-winx64\bin>mysqld --install MySQL2 --defaults-file=D:\Programming\MySQL8\MySQL2\mysql-8.0.18-winx64\my.ini

Service successfully installed.

D:\Programming\MySQL8\MySQL2\mysql-8.0.18-winx64\bin>net start mysql2

MySQL2 服务正在启动 .

MySQL2 服务已经启动成功。

D:\Programming\MySQL8\MySQL2\mysql-8.0.18-winx64\bin>mysql -h localhost -u root -P 3307 -p

Enter password: ************

Welcome to the MySQL monitor.  Commands end with ; or \g.

Your MySQL connection id is 8

Server version: 8.0.18

Copyright (c) 2000, 2019, Oracle and/or its affiliates. All rights reserved.

Oracle is a registered trademark of Oracle Corporation and/or its

affiliates. Other names may be trademarks of their respective

owners.

Type 'help;' or '\h' for help. Type '\c' to clear the current input statement.

mysql> alter user 'root'@'localhost' identified with mysql_native_password by '123456';

Query OK, 0 rows affected (0.01 sec)

mysql> flush privileges;

Query OK, 0 rows affected (0.00 sec)

mysql> use mysql;

Database changed

mysql> create user 'root'@'%' identified by '123456';

Query OK, 0 rows affected (0.00 sec)

mysql> grant all on *.* to 'root'@'%';

Query OK, 0 rows affected (0.00 sec)

mysql> alter user 'root'@'%' identified with mysql_native_password by '123456';

Query OK, 0 rows affected (0.00 sec)

mysql> flush privileges;

Query OK, 0 rows affected (0.00 sec)

mysql>
MySQL3安装步骤
D:\Programming\MySQL8\MySQL3\mysql-8.0.18-winx64\bin>mysqld --defaults-file=D:\Programming\MySQL8\MySQL3\mysql-8.0.18-winx64\my.ini --initialize --console

2019-11-06T13:22:41.619497Z 0 [System] [MY-013169] [Server] D:\Programming\MySQL8\MySQL3\mysql-8.0.18-winx64\bin\mysqld.exe (mysqld 8.0.18) initializing of server in progress as process 3956

2019-11-06T13:22:44.022580Z 5 [Note] [MY-010454] [Server] A temporary password is generated for root@localhost: dF-++?wor5oH

D:\Programming\MySQL8\MySQL3\mysql-8.0.18-winx64\bin>mysqld --install MySQL3 --defaults-file=D:\Programming\MySQL8\MySQL3\mysql-8.0.18-winx64\my.ini

Service successfully installed.

D:\Programming\MySQL8\MySQL3\mysql-8.0.18-winx64\bin>net start mysql3

MySQL3 服务正在启动 .

MySQL3 服务已经启动成功。

D:\Programming\MySQL8\MySQL3\mysql-8.0.18-winx64\bin>mysql -h localhost -u root -P 3308 -p

Enter password: ************

Welcome to the MySQL monitor.  Commands end with ; or \g.

Your MySQL connection id is 8

Server version: 8.0.18

Copyright (c) 2000, 2019, Oracle and/or its affiliates. All rights reserved.

Oracle is a registered trademark of Oracle Corporation and/or its

affiliates. Other names may be trademarks of their respective

owners.

Type 'help;' or '\h' for help. Type '\c' to clear the current input statement.

mysql> alter user 'root'@'localhost' identified with mysql_native_password by '123456';

Query OK, 0 rows affected (0.00 sec)

mysql> flush privileges;

Query OK, 0 rows affected (0.00 sec)

mysql> use mysql;

Database changed

mysql> create user 'root'@'%' identified by '123456';

Query OK, 0 rows affected (0.00 sec)

mysql> grant all on *.* to 'root'@'%';

Query OK, 0 rows affected (0.01 sec)

mysql> alter user 'root'@'%' identified with mysql_native_password by '123456';

Query OK, 0 rows affected (0.00 sec)

mysql> flush privileges;

Query OK, 0 rows affected (0.00 sec)

mysql>
win 10 下面安装 mysql-8.0.12-winx64 的过程的更多相关文章
- Linux安装mysql.8.0.12
1. linux安装mysql8.0.12,亲测可用. 以下是安装过程中出现的问题: 1 [root@localtest1 file]# systemctl start mysqld 2 Job fo ...
- win10 安装mysql 8.0.12
按照CSDN以及博客园的其他教程, 之前安装过几次都有或多或少的bug 主要安装步骤: 1.配置my.ini文件 2.管理员进入终端, 切换到.../bin目录下进行操作 3.指令操作: 1) mys ...
- 【Linux】CentOS 7.4 安装 MySQL 8.0.12 解压版
安装环境/工具 1.Linux(CentOS 7.4版) 2.mysql-8.0.12-el7-x86_64.tar.gz 安装步骤 参考:https://dev.mysql.com/doc/refm ...
- windows下mysql 8.0.12安装步骤及基本使用教程
本文实例为大家分享了windows下mysql 8.0.12安装步骤及使用教程,供大家参考,具体内容如下 补充:mysql 已经更新到了 8.0.19,大致步骤和这个差不多,照着来就完事了. 我下载的 ...
- MySQL 8.0.12 基于Windows 安装教程(超级详细)
MySQL 8.0.12 基于Windows 安装教程(超级详细) (一步一步来,装不了你找我!) 本教程仅适用Windows系统,如果你原本装了没装上,一定要先删除原本的数据库,执行:mysqld ...
- 安装Mysql 8.0的艰难体验
背景: Mysql 8.0 以后版本,在性能等方面有了很大提升,而且在自动编号.Timestamp等字段的设置上有了很方便的进步,因此在一年前即开始将原有的基于5.5版本的服务器逐渐向8.0转移.但转 ...
- centos 8及以上安装mysql 8.0
本文适用于centos 8及以上安装mysql 8.0,整体耗时20分钟内,不需要FQ 1.环境先搞好 systemctl stop firewalld //关闭防火墙 systemctl disab ...
- cmake编译安装mysql 5.6.12
cmake安装mysql 5.6.12 从mysql 5.5 开始就要用cmake编译安装 下载mysql 下载地址:http://pan.baidu.com/s/1o68xxqE 一.安装mysql ...
- windows下安装 mysql 8.0 以上版本以及遇到的问题
Windows 上安装 MySQL Windows 上安装 MySQL 相对来说会较为简单,地那就链接 https://cdn.mysql.com//Downloads/MySQL-8.0/mysql ...
- SQLyog 报错2058 :连接 mysql 8.0.12 解决方法
今天闲来无事,下载新版的 mysql 8.0.12 安装. 为了方便安装查看,我下载了sqlyog 工具 连接 mysql 配置新连接报错:错误号码 2058,分析是 mysql 密码加密方法变了. ...
随机推荐
- Moodle通过CLI安装
Moodle通过CLI安装 前提:Moodle准备工作已经完成 1) 数据库(及用户) 2) moodledata目录 3) 源代码及站点配置 安装过程 打开终端,或通过Putty或Xshell等软件 ...
- LightOJ 1278 - Sum of Consecutive Integers 分解奇因子 + 思维
http://www.lightoj.com/volume_showproblem.php?problem=1278 题意:问一个数n能表示成几种连续整数相加的形式 如6=1+2+3,1种. 思路:先 ...
- jQuery拖拽 & 弹出层
了解更多请查看 官网 和 API iDrag & iDialog 介绍 特点: iDialog.js依赖于jquery编写的简单易用的对话框,同时还可以通过添加css3,改变对话框的展现动画. ...
- uva10766生成树计数(矩阵树定理)
更正了我之前打错的地方,有边的话G[i][j]=-1; WA了好多次,中间要转成long double才行..这个晚点更新. #include<cstdio> #include<cs ...
- PHP练习4 留言板
一.要求 二.示例页面 三.网页代码及网页显示 1.denglu.php 登录页面 <!DOCTYPE html PUBLIC "-//W3C//DTD XHTML 1.0 Tran ...
- JS语句循环(100以内奇偶数、100以内与7先关的数、100以内整数的和、10以内阶乘、乘法口诀、篮球弹起高度、64格子放东西)
3.循环 循环是操作某一个功能(执行某段代码). ①循环四要素: a 循环初始值 b 循环的条件 c 循环状态 d 循环体 ②for循环 a 穷举:把所有的可能性的都一一列出来. b 迭代:每次循环都 ...
- bzoj 1483 链表启发式合并
首先我们可以比较容易的在n的时间内算出来开始的答案,我们维护一些链表,分别表示不同的颜色,那么我们在计算答案的时候,只需要扫一遍所有的链表,判断链表相邻两项是否在序列中相邻,不相邻的话肯定在这其中的一 ...
- js原生读取json
function showJson(){ var test; if(window.XMLHttpRequest){ test = new XMLHttpRequest(); }else if(wind ...
- Linux System.map文件【转】
转自:http://blog.csdn.net/ysbj123/article/details/51233618 当运行GNU链接器gld(ld)时若使用了"-M"选项,或者使用n ...
- vscode和phpStorm使用xdebug调试设置
phpStorm http://www.cnblogs.com/cxscode/p/7045944.html http://www.cnblogs.com/cxscode/p/7050781.html ...