几个动画demo
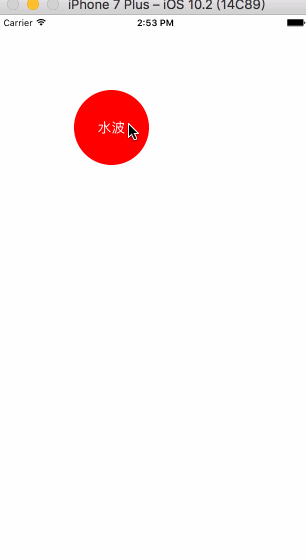
一、点击扩散效果
这个效果没什么难度,主要是加深对核心动画的理解和使用,但是还是有几个想说明的地方。先看一下效果,具体内容代码里有注释。
//

//  CircleButton.m

//  UITest

//

//  Created by 邓竹立 on 16/11/14.

//  Copyright © 2016年 GiveMeFive. All rights reserved.

//

#import "CircleButton.h"

#import "UIColor_Hex_Extension.h"

@interface CircleButton ()<CAAnimationDelegate>

@property(nonatomic,weak)CALayer *animationLayer;

@end

@implementation CircleButton

-(instancetype)initWithFrame:(CGRect)frame{

    if (self = [super initWithFrame:frame]) {

        //即使做了UIControlEventTouchDown 事件,依旧可以响应UIControlEventTouchUpInside 无需担心

        [self addTarget:self action:@selector(tapDown) forControlEvents:UIControlEventTouchDown];

    }

    return self;

}

-(void)tapDown{

    [self.animationLayer removeFromSuperlayer];

    CALayer *layer = [CALayer layer];

    self.animationLayer = layer;

    layer.frame = self.bounds;

    layer.cornerRadius = MIN(self.bounds.size.width/2, self.bounds.size.height/2);

    layer.backgroundColor = [UIColor colorWithHex:0x2381e5].CGColor;

    layer.masksToBounds = YES;

    [self.layer addSublayer:layer];

    //添加核心动画 (pop 其实也很好用)

    CABasicAnimation *transformAnimation = [CABasicAnimation animationWithKeyPath:@"transform.scale"];

    transformAnimation.fromValue = @1;

    transformAnimation.toValue = @1.6;

    transformAnimation.duration = 0.5;

    //注意使用opacity,不要用alpha

    CAKeyframeAnimation *alphaAnimation = [CAKeyframeAnimation animationWithKeyPath:@"opacity"];

    alphaAnimation.values = @[@0,@.5,@0];

    alphaAnimation.duration = 0.5;

    alphaAnimation.removedOnCompletion = NO;

    CAAnimationGroup *groupAnimation = [CAAnimationGroup animation];

    groupAnimation.animations = @[alphaAnimation,transformAnimation];

    groupAnimation.duration = 0.5;

    groupAnimation.repeatCount = 1;

    //项目中我一般不会这么做,我会采用关闭隐式动画的方式解决动画回归的问题,这种方式是偷懒的方式,因为真实的layer 并没有在你看到的地方 , 你所看到的是 layer.presentationLayer

    groupAnimation.removedOnCompletion = NO;

    groupAnimation.fillMode = kCAFillModeForwards;

    groupAnimation.timingFunction = [CAMediaTimingFunction functionWithName:kCAMediaTimingFunctionEaseOut];

    /**注意:**/

    //个人认为,下两行最危险。 因为addAnimation:会对groupAnimation做一次copy,如果你addAnimation后再对groupAnimation做任何修改是不起作用的

    groupAnimation.delegate = self;

    [layer addAnimation:groupAnimation forKey:@"circle"];

    self.userInteractionEnabled = NO;

    __weak typeof(self) weakSelf = self;

    dispatch_after(dispatch_time(DISPATCH_TIME_NOW, (int64_t)(0.5 * NSEC_PER_SEC)), dispatch_get_main_queue(), ^{

        weakSelf.userInteractionEnabled = YES;

    });

}

-(void)animationDidStop:(CAAnimation *)anim finished:(BOOL)flag{

    [self.animationLayer removeFromSuperlayer];

}

@end
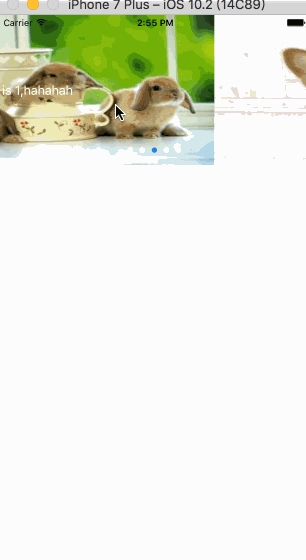
二、图片轮播
图片轮播已经老生常谈了,我在一个APP上看到这个效果还不错就试着写了下。代码没什么,主要是逻辑上的处理。
//

//  AnimationCycleScrollView.m

//  UITest

//

//  Created by 邓竹立 on 16/11/14.

//  Copyright © 2016年 GiveMeFive. All rights reserved.

//

#import "AnimationCycleScrollView.h"

#import "UIColor_Hex_Extension.h"

@interface AnimationCycleScrollView ()<UIScrollViewDelegate,UIGestureRecognizerDelegate>

@property(nonatomic,weak)UIScrollView *backScrollView;

@property(nonatomic,weak)UIScrollView *frontScrollView;

@property(nonatomic,weak)UIView *panView;

@property(nonatomic,weak)UIPageControl *pageControl;

@property(nonatomic,assign)CGPoint startPoint;

@property(nonatomic,strong)NSArray *images;

@property(nonatomic,strong)NSArray* titleViews;

@end

@implementation AnimationCycleScrollView

-(instancetype)initWithFrame:(CGRect)frame images:(NSArray *)images titleViews:(NSArray *)titleViews{

    if (self = [super initWithFrame:frame]) {

        self.titleViews = titleViews;

        self.images = images;

        // 底层显示图片的scrollView

        UIScrollView *backScrollView = [[UIScrollView alloc] initWithFrame:CGRectMake(0, 0, frame.size.width, frame.size.height)];

        [self addSubview:backScrollView];

        self.backScrollView = backScrollView;

        backScrollView.pagingEnabled = YES;

        backScrollView.contentSize = CGSizeMake((images.count+2)*frame.size.width, 0);

        backScrollView.showsVerticalScrollIndicator = NO;

        backScrollView.showsHorizontalScrollIndicator = NO;

        backScrollView.delegate = self;

        //顶层显示文字的scrollView

        UIScrollView *frontScrollView = [[UIScrollView alloc] init];

        frontScrollView.frame = backScrollView.frame;

        frontScrollView.delegate = self;

        frontScrollView.pagingEnabled = YES;

        frontScrollView.contentSize = CGSizeMake((titleViews.count+2)*frame.size.width, 0);

        frontScrollView.showsHorizontalScrollIndicator = NO;

        frontScrollView.showsVerticalScrollIndicator = NO;

        [self addSubview:frontScrollView];

        self.frontScrollView = frontScrollView;

        //手势view

        UIView *panView = [[UIView alloc] initWithFrame:CGRectMake(0, 0, frame.size.width, frame.size.height)];

        panView.backgroundColor = [UIColor clearColor];

        [self addSubview:panView];

        UIPanGestureRecognizer *pan = [[UIPanGestureRecognizer alloc] initWithTarget:self action:@selector(pan:)];

        [panView addGestureRecognizer:pan];

        self.panView = panView;

        UIPageControl *pageControl = [[UIPageControl alloc] initWithFrame:CGRectMake(0, frame.size.height - 30, frame.size.width, 20)];

        self.pageControl = pageControl;

        pageControl.numberOfPages = images.count;

        pageControl.pageIndicatorTintColor = [UIColor whiteColor];

        pageControl.currentPageIndicatorTintColor = [UIColor colorWithHex:0x2381e5];

        pageControl.hidesForSinglePage = YES;

        pageControl.userInteractionEnabled = NO;

        [self addSubview:pageControl];

        for (int i = 0; i<images.count; i++) {

            UIImage *image = images[i];

            UIImageView *imageView = [[UIImageView alloc] init];

            imageView.image = image;

            imageView.frame = CGRectMake((i+1)*backScrollView.frame.size.width, 0, backScrollView.frame.size.width, backScrollView.frame.size.height);

            [backScrollView addSubview:imageView];

        }

        UIImageView *imageView = [[UIImageView alloc] init];

        imageView.image = [images lastObject];

        imageView.frame = CGRectMake(0, 0, backScrollView.frame.size.width, backScrollView.frame.size.height);

        [backScrollView addSubview:imageView];

        imageView = [[UIImageView alloc] init];

        imageView.image = [images firstObject];

        imageView.frame = CGRectMake(backScrollView.frame.size.width*(images.count+1), 0, backScrollView.frame.size.width, backScrollView.frame.size.height);

        [backScrollView addSubview:imageView];

        for (int i = 0; i<titleViews.count; i++) {

            UIView *view = titleViews[i];

            [frontScrollView addSubview:view];

            view.frame = CGRectMake((i+1)*frontScrollView.frame.size.width, 0, frontScrollView.frame.size.width, frontScrollView.frame.size.height);

        }

        UIView *view = [titleViews lastObject];

        NSData *data = [NSKeyedArchiver archivedDataWithRootObject:view];

        view = [NSKeyedUnarchiver unarchiveObjectWithData:data];

        view.frame = CGRectMake(0, 0, frontScrollView.frame.size.width, frontScrollView.frame.size.height);

        [frontScrollView addSubview:view];

        view = [titleViews firstObject] ;

        data = [NSKeyedArchiver archivedDataWithRootObject:view];

        view = [NSKeyedUnarchiver unarchiveObjectWithData:data];

        view.frame = CGRectMake((titleViews.count+1)*frontScrollView.frame.size.width, 0, frontScrollView.frame.size.width, frontScrollView.frame.size.height);

        [frontScrollView addSubview:view];

        frontScrollView.userInteractionEnabled = NO;

        backScrollView.userInteractionEnabled = NO;

        frontScrollView.contentOffset = CGPointMake(frontScrollView.frame.size.width, 0);

        backScrollView.contentOffset = CGPointMake(backScrollView.frame.size.width, 0);

    }

    return self;

}

-(void)pan:(UIPanGestureRecognizer*)ges{

    switch (ges.state) {

        case UIGestureRecognizerStateBegan:{

            self.startPoint = [ges locationInView:ges.view];

        }

            break;

        case UIGestureRecognizerStateEnded:{

            CGPoint endPoint = [ges locationInView:ges.view];

            [self dealWithEndPoint:endPoint];

        }

            break;

        case UIGestureRecognizerStateFailed:{

            CGPoint endPoint = [ges locationInView:ges.view];

            [self dealWithEndPoint:endPoint];

        }

            break;

        case UIGestureRecognizerStateCancelled:{

            CGPoint endPoint = [ges locationInView:ges.view];

            [self dealWithEndPoint:endPoint];

        }

            break;

        default:

            break;

    }

}

-(void)dealWithEndPoint:(CGPoint)endPoint{

    __weak typeof(self) weakSelf = self;

    if (endPoint.x < self.startPoint.x) {

        //不是最后一个

        if (self.frontScrollView.contentOffset.x <= self.frontScrollView.frame.size.width*(_titleViews.count - 1)) {

            [UIView animateKeyframesWithDuration:0.7 delay:0 options:UIViewKeyframeAnimationOptionCalculationModeCubicPaced animations:^{

                weakSelf.frontScrollView.contentOffset = CGPointMake(weakSelf.frontScrollView.contentOffset.x + weakSelf.frontScrollView.frame.size.width, 0);

            } completion:^(BOOL finished) {

                weakSelf.pageControl.currentPage = self.frontScrollView.contentOffset.x/self.frontScrollView.frame.size.width -1;

            }];

            [UIView animateKeyframesWithDuration:0.3 delay:0.2 options:UIViewKeyframeAnimationOptionCalculationModeDiscrete animations:^{

                weakSelf.backScrollView.contentOffset = CGPointMake(weakSelf.backScrollView.contentOffset.x + weakSelf.backScrollView.frame.size.width, 0);

            } completion:nil];

        }else{

            [UIView animateKeyframesWithDuration:0.7 delay:0 options:UIViewKeyframeAnimationOptionCalculationModeCubicPaced animations:^{

                weakSelf.frontScrollView.contentOffset = CGPointMake((weakSelf.titleViews.count+1)*weakSelf.frontScrollView.frame.size.width, 0);

            } completion:^(BOOL finished) {

                weakSelf.frontScrollView.contentOffset = CGPointMake(weakSelf.frontScrollView.frame.size.width, 0);

                weakSelf.pageControl.currentPage = 0 ;

            }];

            [UIView animateKeyframesWithDuration:0.3 delay:0.2 options:UIViewKeyframeAnimationOptionCalculationModeDiscrete animations:^{

                weakSelf.backScrollView.contentOffset = CGPointMake(weakSelf.backScrollView.frame.size.width*(_titleViews.count+1), 0);

            } completion:^(BOOL finished) {

                weakSelf.backScrollView.contentOffset = CGPointMake(weakSelf.backScrollView.frame.size.width, 0);

            }];

        }

    }else if (endPoint.x > self.startPoint.x){

        if (self.frontScrollView.contentOffset.x > self.frontScrollView.frame.size.width) {

            [UIView animateKeyframesWithDuration:0.7 delay:0 options:UIViewKeyframeAnimationOptionCalculationModeCubicPaced animations:^{

                weakSelf.frontScrollView.contentOffset = CGPointMake(weakSelf.frontScrollView.contentOffset.x - weakSelf.frontScrollView.frame.size.width, 0);

            }completion:^(BOOL finished) {

                weakSelf.pageControl.currentPage = weakSelf.frontScrollView.contentOffset.x/weakSelf.frontScrollView.frame.size.width -1 ;

            }];

            [UIView animateKeyframesWithDuration:0.3 delay:0.2 options:UIViewKeyframeAnimationOptionCalculationModeDiscrete animations:^{

                weakSelf.backScrollView.contentOffset = CGPointMake(weakSelf.backScrollView.contentOffset.x - weakSelf.backScrollView.frame.size.width, 0);

            }completion:nil];

        }else{

            [UIView animateKeyframesWithDuration:0.7 delay:0 options:UIViewKeyframeAnimationOptionCalculationModeCubicPaced animations:^{

                weakSelf.frontScrollView.contentOffset = CGPointMake(0, 0);

            }completion:^(BOOL finished) {

                weakSelf.frontScrollView.contentOffset = CGPointMake(weakSelf.frontScrollView.frame.size.width*(_titleViews.count), 0);

                weakSelf.pageControl.currentPage = _titleViews.count - 1;

            }];

            [UIView animateKeyframesWithDuration:0.3 delay:0.2 options:UIViewKeyframeAnimationOptionCalculationModeDiscrete animations:^{

                weakSelf.backScrollView.contentOffset = CGPointMake(0, 0);

            }completion:^(BOOL finished) {

                weakSelf.backScrollView.contentOffset = CGPointMake(weakSelf.backScrollView.frame.size.width*(_images.count), 0);

            }];

        }

    }

}

@end
三、毛毛虫效果
这个也是在那个APP上看到的,不得不佩服国外的APP 交互就是比较新颖。国内的APP交互效果基本都千篇一律。

//

//  SectionSelectView.m

//  UITest

//

//  Created by 邓竹立 on 16/11/14.

//  Copyright © 2016年 GiveMeFive. All rights reserved.

//

#import "SectionSelectView.h"

#import "UIColor_Hex_Extension.h"

@interface SectionSelectView ()

@property(nonatomic,assign)NSInteger currentIndex;

@property(nonatomic,weak)UIView *backView;

@end

@implementation SectionSelectView

-(instancetype)initWithFrame:(CGRect)frame titles:(NSArray *)titles icons:(NSArray *)icons currentIndex:(NSInteger)index{

    if (self = [super initWithFrame:frame]) {

        self.currentIndex = index;

        CGFloat margin = 20;

        CGFloat w = (frame.size.width - (titles.count+1)*margin)/titles.count;

        CGFloat h = 40;

        UIView * backView = [[UIView alloc] init];

        backView.backgroundColor = [UIColor whiteColor];

        backView.layer.cornerRadius = 20;

        backView.clipsToBounds = YES;

        [self addSubview:backView];

        self.backView = backView;

        for (int i = 0; i<titles.count; i++) {

            NSString *title = titles[i];

            NSString *imageName = icons[i];

            UIButton *button = [UIButton buttonWithType:UIButtonTypeCustom];

            [button setTitle:title forState:UIControlStateNormal];

            [self addSubview:button];

            button.frame = CGRectMake(margin+i*(margin+w), (frame.size.height - h)/2, w, h);

            [button setImage:[UIImage imageNamed:imageName] forState:UIControlStateNormal];

            button.titleLabel.font = [UIFont systemFontOfSize:14];

            [button setTitleColor:[UIColor whiteColor] forState:UIControlStateNormal];

            if (index == i) {

                backView.frame = button.frame;

                [button setTitleColor:[UIColor colorWithHex:0x2381e5] forState:UIControlStateNormal];

            }

            button.tag = 1000+i;

            [button addTarget:self action:@selector(didClickType:) forControlEvents:UIControlEventTouchUpInside];

        }

    }

    return self;

}

-(void)didClickType:(UIButton *)sender{

    if (sender.tag - 1000 == self.currentIndex) {

        return;

    }

    NSInteger index = sender.tag - 1000;

    UIButton *currentButton = [self viewWithTag:1000+self.currentIndex];

    __weak typeof(self) weakSelf = self;

    if (index > self.currentIndex) {

        [UIView animateWithDuration:0.5 animations:^{

            weakSelf.backView.frame = CGRectMake(currentButton.frame.origin.x, currentButton.frame.origin.y,sender.frame.origin.x+sender.frame.size.width - currentButton.frame.origin.x , sender.frame.size.height);

            [currentButton setTitleColor:[UIColor whiteColor] forState:UIControlStateNormal];

            [sender setTitleColor:[UIColor colorWithHex:0x2381e5] forState:UIControlStateNormal];

        }completion:^(BOOL finished) {

            [UIView animateWithDuration:0.5 animations:^{

                weakSelf.backView.frame = sender.frame;

            }];

        }];

    }else{

        [UIView animateWithDuration:0.5 animations:^{

            weakSelf.backView.frame = CGRectMake(sender.frame.origin.x, sender.frame.origin.y, currentButton.frame.origin.x+currentButton.frame.size.width - sender.frame.origin.x, sender.frame.size.height);

            [currentButton setTitleColor:[UIColor whiteColor] forState:UIControlStateNormal];

            [sender setTitleColor:[UIColor colorWithHex:0x2381e5] forState:UIControlStateNormal];

        }completion:^(BOOL finished) {

            [UIView animateWithDuration:0.5 animations:^{

                weakSelf.backView.frame = sender.frame;

            }];

        }];

    }

    self.currentIndex = sender.tag - 1000;

}

@end
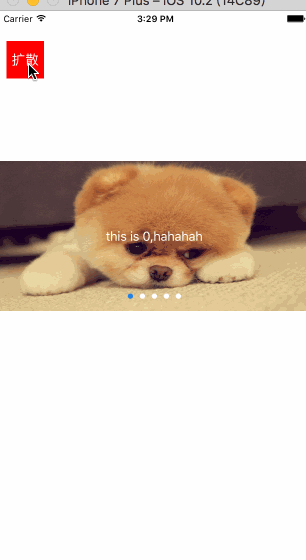
四、任意view 的扩散效果
个人认为这个效果不好看,原APP 中这个使用这种扩散(或收缩)来介绍某个功能的按钮。
//

//  UIView+CircleAlert.m

//  UITest

//

//  Created by 邓竹立 on 16/11/15.

//  Copyright © 2016年 GiveMeFive. All rights reserved.

//

#import "UIView+CircleAlert.h"

//#import <objc/runtime.h>

@implementation UIView (CircleAlert)

-(void)showCircleAlert{

    UIWindow *keyWindow = nil;

    for (UIWindow *window in  [UIApplication sharedApplication].windows) {

        if (window.rootViewController) {

            keyWindow = window;

            break;

        }

    }

    //截屏(我试过直接只用背景视图的Layer,但是对button 这类的View 不可用,打印发现,button.titleLabel 看不到)

    /*

     (lldb) po sender.layer

     <CALayer:0x6080000326c0; position = CGPoint (35 65); bounds = CGRect (0 0; 50 50); delegate = <UIButton: 0x7fc4c3f0d580; frame = (10 40; 50 50); opaque = NO; layer = <CALayer: 0x6080000326c0>>; sublayers = (<_UILabelLayer: 0x60000008c1c0>); allowsGroupOpacity = YES; backgroundColor = <CGColor 0x6080000adf20> [<CGColorSpace 0x6080000328a0> (kCGColorSpaceICCBased; kCGColorSpaceModelRGB; sRGB IEC61966-2.1; extended range)] ( 1 0 0 1 )>

     NSData *data = [NSKeyedArchiver archivedDataWithRootObject:sender.layer];

     CALayer *layer = [NSKeyedUnarchiver unarchiveObjectWithData:data];

     (lldb) po layer

     <CALayer:0x60000022b600; position = CGPoint (35 65); bounds = CGRect (0 0; 50 50); sublayers = (<_UILabelLayer: 0x60000008a000>); allowsGroupOpacity = YES; backgroundColor = <CGColor 0x6000000af120> [<CGColorSpace 0x60800002a660> (kCGColorSpaceICCBased; kCGColorSpaceModelRGB; sRGB IEC61966-2.1)] ( 1 0 0 1 )>

     */

    UIImageView *imageView = [[UIImageView alloc] init];

    imageView.frame = keyWindow.bounds;

    imageView.image = [self shootScreenWithView:keyWindow];

    //在真实的view 上盖一个半透明黑色layer;

    CALayer *blackLayer = [CALayer layer];

    blackLayer.backgroundColor = [UIColor colorWithRed:0 green:0 blue:0 alpha:0.5].CGColor;

    blackLayer.frame = keyWindow.layer.bounds;

    [keyWindow.layer addSublayer:blackLayer];

    //把导出的盖在真实的View 上;

    [keyWindow addSubview:imageView];

    //生成一个path 为圆的图层 作为Layer 的mask

    CAShapeLayer *shapeLayer = [CAShapeLayer layer];

    UIBezierPath *path = [UIBezierPath bezierPathWithArcCenter:self.center radius:sqrt(pow(self.bounds.size.width, 2)+pow(self.bounds.size.height, 2))/2 startAngle:0 endAngle:2*M_PI clockwise:YES];

    shapeLayer.path = path.CGPath;

    imageView.layer.mask = shapeLayer;

    //圆图层做放大动画

    CGSize size = [UIScreen mainScreen].bounds.size;

    CGFloat maxR = sqrt(pow(size.width, 2)+pow(size.height, 2));

    //添加动画

    CABasicAnimation *animation = [CABasicAnimation animationWithKeyPath:@"path"];

    animation.fromValue = (__bridge id _Nullable)(path.CGPath);

    animation.toValue = (__bridge id _Nullable)([UIBezierPath bezierPathWithArcCenter:self.center radius:maxR startAngle:0 endAngle:2*M_PI clockwise:YES].CGPath);

    animation.duration = 1;

    animation.fillMode = kCAFillModeForwards;

    animation.removedOnCompletion = NO;

    [shapeLayer addAnimation:animation forKey:@"path"];

    //动画完成 移除layer 和 view

    dispatch_after(dispatch_time(DISPATCH_TIME_NOW, (int64_t)(0.5 * NSEC_PER_SEC)), dispatch_get_main_queue(), ^{

        [imageView removeFromSuperview];

        [blackLayer removeFromSuperlayer];

    });

}

//截屏

-(UIImage *)shootScreenWithView:(UIView*)view{

    UIGraphicsBeginImageContextWithOptions(view.bounds.size, NO, 0.0);

    CGContextRef ctx=UIGraphicsGetCurrentContext();

    [view.layer renderInContext: ctx];

    UIImage *image=UIGraphicsGetImageFromCurrentImageContext();

    UIGraphicsEndImageContext();

    return image;

}

@end
代码写的比较暴力粗糙,如果有什么错误纰漏之处请联系我,QQ:395565391
几个动画demo的更多相关文章
- 适应手机端的jQuery图片滑块动画DEMO演示
在线预览 下载地址 实例代码 <!DOCTYPE html PUBLIC "-//W3C//DTD XHTML 1.0 Transitional//EN" "htt ...
- css3 一个六边形 和 放大旋转动画DEMO演示
<!DOCTYPE html> <html> <head> <meta charset="gb2312"> <title> ...
- HTML5骨骼动画Demo | 使用min2d、createjs、pixi播放spine动画
Spine做骨骼动画是比较流行的,使用起来可能相对复杂,但功能毕竟强大,所以市场占有率较大. 在unity.cocos2d.starling中使用spine已经很成熟了,而HTML5这一块可能刚刚起步 ...
- css3 动画demo
1)http://www.yyyweb.com/demo/css-cokecan/inner.html 2)页面切换效果demo http://www.yyyweb.com/demo/page-tra ...
- 出栈入栈动画demo
项目做了一个切换界面动画的功能,用到了出栈入栈的,写了一个demo package com.myron.stackview; import java.util.Stack; import androi ...
- Android Animation 动画Demo(Frame帧动画)
上一页介绍Animation动画第一:Tween吐温动画. 本文介绍了以下Animation也有动画的形式:Frame帧动画. Frame动画是一系列照片示出的顺序按照一定的处理,和机制,以放电影很阶 ...
- 【重点突破】—— Vue2.0 transition 动画Demo实践填坑
前言:vue1.0版本和2.0版本的过渡系统改变是很大的,具体请详看文档介绍.本文转载自郭锦荣的博客,一共列举了四种transition的使用实践,分别是css过渡.css动画.javascript钩 ...
- vue拼图动画Demo
这是一个基于vue的Demo,可以实现拼图动画,但是具体的没有写拼图成功的逻辑,鼠标悬停移动.周期刷新 我把它放到的我的博客园界面上了.刷新界面可以看到. 演示地址 :https://liruilon ...
- [iOS 多线程 & 网络 - 3.0] - 在线动画Demo
A.需求 所有数据都从服务器下载 动画列表包含:图片.动画名标题.时长副标题 点击打开动画观看 code source: https://github.com/hellovoidworld/Vid ...
随机推荐
- OWIN学习
在微软.net的dll中 有Microsoft.Owin Microsoft.Owin.Security, Microsoft.Owin.Security.Cookies, Microsoft.Owi ...
- Umbraco Form需要引用些客户端dependencies (jquery)
Preparing your frontend In order to work correctly Umbraco Forms needs some client dependencies, bei ...
- oracle表数据误删还原
首先,找到数据删除前的一个时间点. select timestamp_to_scn(to_timestamp('2013-10-12 8:30:00', 'YYYY-MM-DD HH24:MI:SS' ...
- 关于local storage及session storage 应用问题
H5- storage 可以在不同页面内进行数据传递数据信息,保证了数据传输不许后台交互即可在前端部分自我实现,以下为local storage 应用个人简析: * localStorage * se ...
- ECSHOP文件目录详解
ECShop 最新程序 的结构图及各文件相应功能介绍ECShop文件结构目录┣ activity.php 活动列表┣ affiche.php 广告处理文件┣ affiliate.php 生成商品列表┣ ...
- postfix反垃圾邮件说明
参考地址:http://guailele.blog.51cto.com/1156442/780223 1.打开 smtp 的认证模块 在/etc/postfix/main.cf文件最后加上: sm ...
- android学习日记21--消息提示之Toast和Notification
1.Toast Toast译为土司,类似切片面包,用于弹出比较快速的及时提示信息.当Toast被显示时,虽然它悬浮应用程序最上方,但是并未获得焦点.它的设计就是为了提示有用的信息,而不打扰用户其他操作 ...
- 深入研究Block捕获外部变量和__block实现原理
Blocks是C语言的扩充功能,而Apple 在OS X Snow Leopard 和 iOS 4中引入了这个新功能“Blocks”.从那开始,Block就出现在iOS和Mac系统各个API中,并被大 ...
- 有效范围为request的bean
Car.java类 package tom.jiafei; public class Car { String carnumber; String name; String date; public ...
- 不使用Math.random实现随机数。
var rand = (function(){ var today = new Date(); var seed = today.getTime(); function rnd(){ seed = ( ...