
Angular路由——辅助路由
一、辅助路由语法
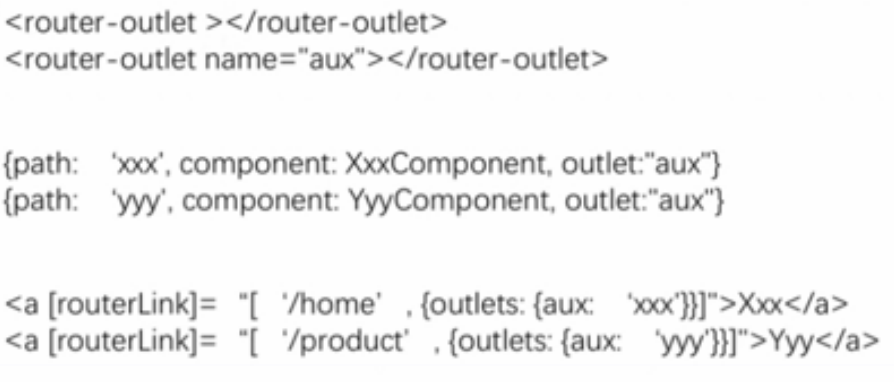
同时控制多个插座内容。
第一步:
模版上除了主插座,还需要声明一个带name属性的插座
第二步:
路由配置中配置name为aux的插座上可以显示哪些组件,比如显示xxx和yyy组件。
第三步:
在导航时候,路由到某个地址时,辅助的插座上显示哪个组件
二、实例
聊天功能可以在任何页面(商品列表页面,商品详情页面,主页面等)使用。
第一步:在app组件的模版上在定义一个插座来显示聊天面板。
<a [routerLink]="['/home']">主页</a>

<a [routerLink]="['/product',2]">商品详情</a>

<input type="button" value="商品详情" (click)="toProductDetails()">

<router-outlet></router-outlet>

<router-outlet name="aux"></router-outlet>
第二步:单独开发一个聊天室组件,只显示在新定义的插座上。
新建聊天组件并修改模版
ng g c chat
<textarea

placeholder="请输入聊天内容" n

class="chat"

ame="" id="" cols="30" rows="10"></textarea>
.chat{

background: green;

height: 100px;

width: 30%;

float: left;

box-sizing: border-box;

}
修改home组件和product组件模版,包一层div并设置样式
.product{

    background: yellow;

    height: 100px;

    width: 70%;

    float: left;

    box-sizing: border-box;

}

.home{

    background: red;

    height: 100px;

    width: 70%;

    float: left;

    box-sizing: border-box;

}
配置路由决定聊天组件是否显示
const routes: Routes = [

  { path: '', redirectTo : 'home',pathMatch:'full' },

  { path: 'chat', component: ChatComponent, outlet: "aux"},//辅助路由

  { path: 'home', component: HomeComponent },

  { path: 'product/:id', component: ProductComponent, children:[

    { path: '', component : ProductDescComponent },

    { path: 'seller/:id', component : SellerInfoComponent }

  ] },

  { path: '**', component: Code404Component }

];
第三步:通过路由参数控制新插座是否显示聊天面板
增加开始聊天和结束聊天按钮
<!--The content below is only a placeholder and can be replaced.-->

<a [routerLink]="['/home']">主页</a>

<a [routerLink]="['/product',2]">商品详情</a>

<input type="button" value="商品详情" (click)="toProductDetails()">

<a [routerLink]="[{outlets: {aux: 'chat'}}]">开始聊天</a>

<a [routerLink]="[{outlets: {aux: null}}]">结束聊天</a>

<router-outlet></router-outlet>

<router-outlet name="aux"></router-outlet>
效果:
点开始聊天,URL后面多了一个(aux:chat) :辅助路由aux插座路由路径是chat,chat路径对应显示ChatComponent。
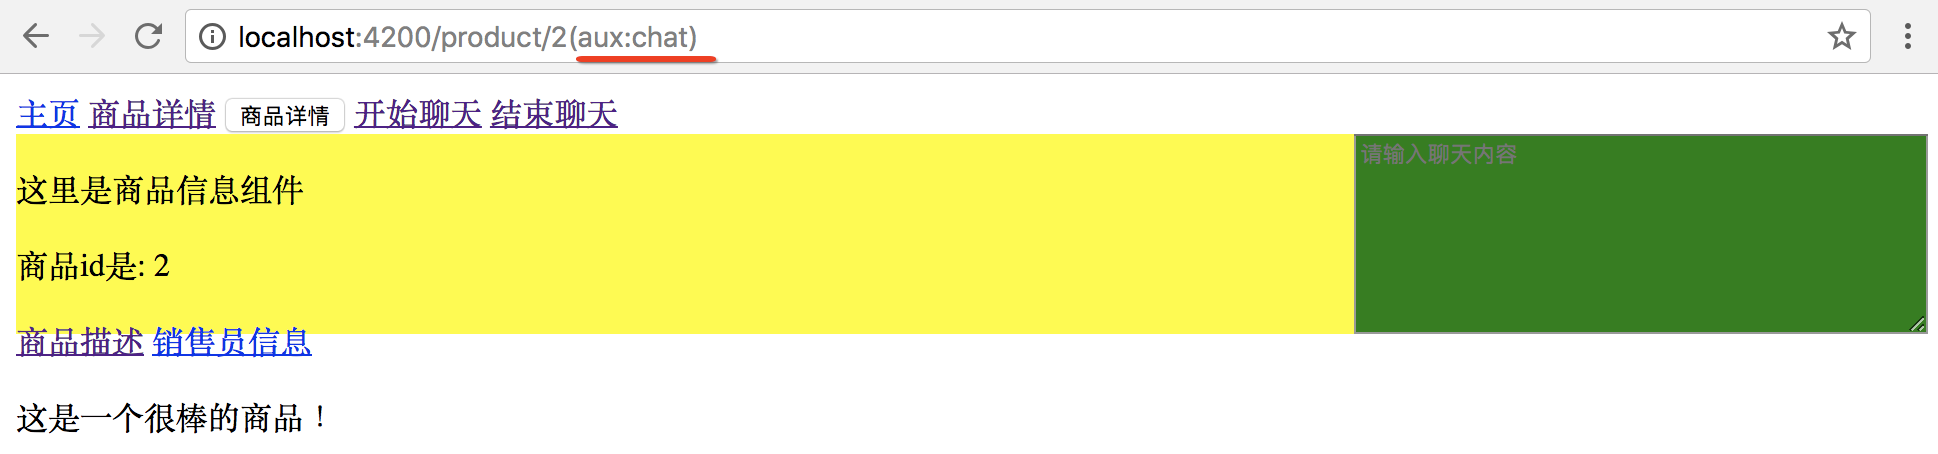
主路由可随意切换,不影响辅助路由
http://localhost:4200/home(aux:chat)

http://localhost:4200/product/2(aux:chat)
扩展:如果想展示chat组件时候,主路由要跳到home组件上。
用priamry指定主路由路径,因为主路由没有名字。
<a [routerLink]="[{outlets: {primary: 'home' , aux: 'chat'}}]">开始聊天</a>
本文作者starof,因知识本身在变化,作者也在不断学习成长,文章内容也不定时更新,为避免误导读者,方便追根溯源,请诸位转载注明出处:http://www.cnblogs.com/starof/p/9006227.html 有问题欢迎与我讨论,共同进步。
Angular路由——辅助路由的更多相关文章
- Angular 4 辅助路由
1.辅助路由 2. 创建chat组件 ng g component chat 3. 组件html css: .chat{ background:green; height:100px; width:2 ...
- angular路由详解五(辅助路由)
在HTML文件中 //主路由 <router-outlet></router-outlet> //辅助路由 <router-outlet name="aux& ...
- Angular路由——子路由
一.子路由语法: 二.实例 在商品详情页面,除了显示商品id信息,还显示了商品描述,和销售员的信息. 通过子路由实现商品描述组件和销售员信息组件展示在商品详情组件内部. 1.新建2个组件修改其内容 n ...
- Angular : 绑定, 参数传递, 路由
如何把jquery导入angular npm install jquery --savenpm install @type/jquery --save-dev "node_modules/z ...
- angular.js的路由和模板在asp.net mvc 中的使用
angular.js的路由和模板在asp.net mvc 中的使用 我们知道angular.js是基于mvc 的一款优秀js框架,它也有一套自己的路由机制,和asp.net mvc 路由不太一样.as ...
- angular4 辅助路由
1.辅助路由 2. 创建chat组件 ng g component chat 3. 组件html css: 1 2 3 4 5 6 7 .chat{ background:green; hei ...
- Angular routing生成路由和路由的跳转
Angular routing生成路由和路由的跳转 什么是路由 路由的目的是可以让根组件按照不同的需求动态加载不同的组件. 根据不同地址,加载不同组件,实现单页面应用. Angular 命令创建一个配 ...
- Angular学习笔记—路由(转载)
创建路由 1.首先安装 Angular Router.你可以通过运行以下任一操作来执行此操作: yarn add @angular/router # OR npm i --save @angular/ ...
- Angular 监听路由变化
var app = angular.module('Mywind',['ui.router']) //Angular 监听路由变化 function run($ionicPlatform, $loca ...
随机推荐
- 数据分析---《Python for Data Analysis》学习笔记【02】
<Python for Data Analysis>一书由Wes Mckinney所著,中文译名是<利用Python进行数据分析>.这里记录一下学习过程,其中有些方法和书中不同 ...
- jmeter5.1测试websocket接口
jmeter没有websocket协议的取样器,需要我们自己开发,但是网上已经有大神先开发好了,[相关jar包,点击左侧加群获取] 只需要放到jmeter的ext目录(D:\apache-jmeter ...
- 求一个数组中重复数字的个数,要求复杂度为O(n)
给出代码 #include <stdio.h> #include <unistd.h> #include <iostream> #include <memor ...
- Cucumber常用关键字
常用关键字(中英文对应) 对应的测试用例 Feature(功能) test suite (测试用例集) background(背景) Scenario(场景) test case(测试用例) Sc ...
- SQL随记(一)
1.关于define表示定义 2.sql%rowcount用于记录修改的条数,必须放在一个CUD语句后面执行,无法在select中使用. 3.两种调用过程的关键字:exec和call 两者区别: (1 ...
- python之模块之shutil模块
shutil -- --High-level file operations 高级的文件操作模块. os模块提供了对目录或者文件的新建/删除/查看文件属性,还提供了对文件以及目录的路径操作.比如说: ...
- Netty 源码分析
https://segmentfault.com/a/1190000007282628 netty社区-简书闪电侠 :https://netty.io/wiki/related-articles.ht ...
- 使用 https://git.io 缩短 a GitHub.com URL.
curl -i https://git.io -F 'url=https://develon2015.github.io' -F 'code=develon' 现在点击 http://git.io/d ...
- 5.CentOS7安装MySQL
在CentOS中默认安装有MariaDB,这个是MySQL的分支,但为了需要,还是要在系统中安装MySQL,而且安装完成之后可以直接覆盖掉MariaDB. 1 下载并安装MySQL官方的 Yum Re ...
- C++ 在类里面使用多线程技术
参考链接: https://blog.csdn.net/jmh1996/article/details/72235232 说明: C++的每个成员函数都会有一定转化, 而static 则不会 ...