通过注解配置Bean
之前说的三种配置方式,都是使用XML配置,现在我们说说使用注解配置Bean。
这部分内容主要分为两个部分:使用注解配置Bean,使用注解配置Bean属性。
在classpath中扫描组件
组件扫描:Spring能够从ClassPath下自动扫描,侦测和实例化具有特定注释的组件
特定组件包括:
@Component
@Respository 持久层
@Service 业务层
@Controller 控制层
这四个标签可以混用,暂时没有什么区别,不过建议在不同层用不同的注释,方便阅读。
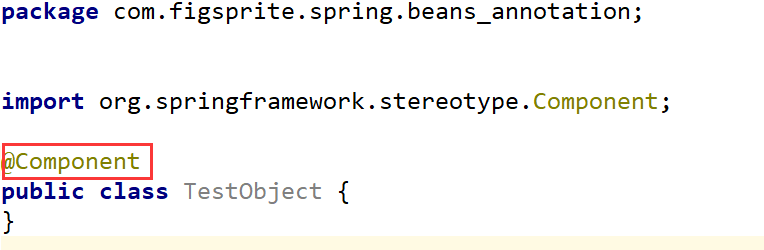
创建一个新的包com.figsprite.spring.beans_annotation,新的类com.figsprite.spring.beans_annotation.TestObject:
在TestObject.java里我们先放上注释,
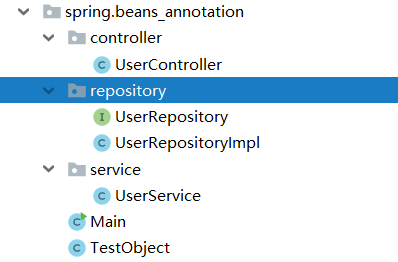
现在Bean还没有被IOC容器管理,我们再来建一个子包com.figsprite.spring.beans_annotation.repository,写一个接口com.figsprite.spring.beans_annotation.repository.UserRepository和实现类com.figsprite.spring.beans_annotation.repository.UserRepositoryImpl,接下来写业务层和控制层,分别创建一个包,然后写上相应代码,并写上注释:
UserController.java:
package com.figsprite.spring.beans_annotation.controller;

import org.springframework.stereotype.Controller;

@Controller

public class UserController {

    public void execute(){

        System.out.println("Controller execute");

    }

}
UserService.java:
package com.figsprite.spring.beans_annotation.service;

import org.springframework.stereotype.Service;

@Service

public class UserService {

    public void add(){

        System.out.println("Service Add");

    }

}
UserRepository.java
package com.figsprite.spring.beans_annotation.repository;

public interface UserRepository {

    void save();

}
UserRepositoryImpl.java
package com.figsprite.spring.beans_annotation.repository;

import org.springframework.stereotype.Repository;

@Repository("userRepository")

public class UserRepositoryImpl implements UserRepository{

    @Override

    public void save() {

        System.out.println("SAVE");

    }

}
做完这些,我们可以创建一个配置文件beans-annotation.xml,然后我们在这个配置文件里,通过<context:component-scan>标签扫描具有这些注释的类的包:
<context:component-scan base-package="com.figsprite.spring.beans_annotation"/>
接下来做一个测试,创建Main.java
在我们没有指明Bean对象的id时,在注释配置下,默认id为类名的驼峰命名。
如何命名呢?只要在我们刚刚写的标签里加个括号指定就行:
@Repository("userRepository")
Main.java:
- package com.figsprite.spring.beans_annotation;
- import com.figsprite.spring.beans_annotation.controller.UserController;
- import com.figsprite.spring.beans_annotation.repository.UserRepositoryImpl;
- import com.figsprite.spring.beans_annotation.service.UserService;
- import org.springframework.context.ApplicationContext;
- import org.springframework.context.support.ClassPathXmlApplicationContext;
- public class Main {
- public static void main(String[] args) {
- ApplicationContext ctx = new ClassPathXmlApplicationContext("beans-annotation.xml");
- TestObject to = (TestObject) ctx.getBean("testObject") ;
- System.out.println(to);
- UserController userController = (UserController) ctx.getBean("userController");
- System.out.println(userController);
- UserRepositoryImpl userRepository = (UserRepositoryImpl) ctx.getBean("userRepository");
- System.out.println(userRepository);
- UserService userService = (UserService) ctx.getBean("userService");
- System.out.println(userService);
- }
- }

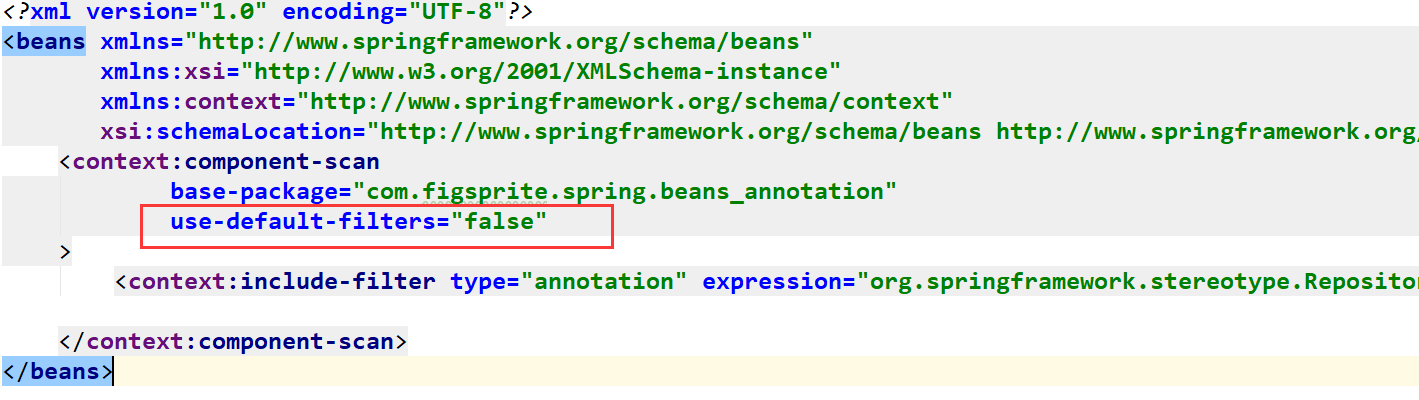
接下来回到<context:compomenr-scan>标签,再来说说里面的其他属性resource-pattern
,这个属性可以过滤特定类,比如我只想扫描repository底下的类,
<context:component-scan
base-package="com.figsprite.spring.beans_annotation"
resource-pattern="repository/*.class"/>
这样在Main里面,我们只会得到UserRepository的对象,其他的就得不到了,肯定报错,

<context:compomenr-scan>标签还有两个子标签
<context:include-filtter>包含哪些指定表达式的组件
< context:exclude-filtter >排除哪些指定表达式的组件
type属性:这里就介绍两种常用的annotation根据注解锁定目标,

比如不包含Repository注解
<context:exclude-filter type="annotation" expression="org.springframework.stereotype.Repository"/>
对于<context:include-filtter>,由于<context:compomenr-scan>默认是扫描包下的所有指定表达式组件,所有我们要加上use-default-filters="false",这样就不会自动扫描了,<context:include-filtter>与< context:exclude-filtter >使用方法一致,
另外一种是使用assignable方式,根据类名锁定目标。这里就再演示了
通过注解配置Bean的更多相关文章
- [原创]java WEB学习笔记103:Spring学习---Spring Bean配置:基于注解的方式(基于注解配置bean,基于注解来装配bean的属性)
本博客的目的:①总结自己的学习过程,相当于学习笔记 ②将自己的经验分享给大家,相互学习,互相交流,不可商用 内容难免出现问题,欢迎指正,交流,探讨,可以留言,也可以通过以下方式联系. 本人互联网技术爱 ...
- Spring(二)--FactoryBean、bean的后置处理器、数据库连接池、引用外部文件、使用注解配置bean等
实验1:配置通过静态工厂方法创建的bean [通过静态方法提供实例对象,工厂类本身不需要实例化!] 1.创建静态工厂类 public class StaticFactory { private st ...
- Spring(十五):通过注解配置 Bean
在ClassPath中扫描组件 1)组件扫描(component scanning):Spring能够从classpath下自动扫描,侦测和实例化具有特定注解的组件: 2)特定组件包含: --- @C ...
- IDEA02 利用Maven创建Web项目、为Web应用添加Spring框架支持、bean的创建于获取、利用注解配置Bean、自动装配Bean、MVC配置
1 环境版本说明 Jdk : 1.8 Maven : 3.5 IDEA : 专业版 2017.2 2 环境准备 2.1 Maven安装及其配置 2.2 Tomcat安装及其配置 3 详细步骤 3.1 ...
- Spring IOC机制之使用注解配置bean
一. 通过注解配置bean 1.1 概述 相对于XML方式而言,通过注解的方式配置bean更加简洁和优雅,而且和MVC组件化开发的理念十分契合,是开发中常用的使用方式. 1.2 ...
- 14Spring通过注解配置Bean(2)
下面将对13Spring通过注解配置Bean(1)的中Repository.Service.Controller通过注解方式来建立关联. <context:component-scan>元 ...
- 13Spring通过注解配置Bean(1)
配置Bean的形式:基于XML文件的方式:基于注解的方式(基于注解配置Bean:基于注解来装配Bean的属性) 下面介绍基于注解的方式来配置Bean. ——组件扫描(component scannin ...
- Spring框架入门之基于Java注解配置bean
Spring框架入门之基于Java注解配置bean 一.Spring bean配置常用的注解 常用的有四个注解 Controller: 用于控制器的注解 Service : 用于service的注解 ...
- Spring 注解配置Bean
一.使用注解配置Bean 1.注解 在类定义.方法定义.成员变量定义前使用.其简化<bean>标签,功能同<bean>标签.格式为: @注解标记名. 2.组件扫描 Spring ...
随机推荐
- c#计算机视觉库openCVSharp
作为研究计算机视觉的一员,大家肯定对Intel大名鼎鼎的openCV系列计算机视觉库耳熟能详,对于很多人来说openCV甚至已经成为其项目研究不可缺少的一部分.但是,由于项目兼容性的要求.openCV ...
- Java开发笔记(三十六)字符串的常用方法
不管是给字符串赋值,还是对字符串格式化,都属于往字符串填充内容,一旦内容填充完毕,则需开展进一步的处理.譬如一段Word文本,常见的加工操作就有查找.替换.追加.截取等等,按照字符串的处理结果异同,可 ...
- jsp内置对象的作用范围
内置对象的作用范围是指每个内置对象的某个实例在多长时间和多大的范围中有效,即在什么样的范围内可以有效地访问同一个对象实例. 在javax.servlet.jsp.PageContext的类中定义了4个 ...
- JavaScript splice() 方法和JavaScript split() 方法
定义和用法 splice() 方法向/从数组中添加/删除项目,然后返回被删除的项目. 注释:该方法会改变原始数组. 语法 arrayObject.splice(index,howmany,item1, ...
- Mapbox浅析(快速入门Mapbox)
1.是什么? Mapbox是一个可以免费创建并定制个性化地图的网站. 2.了解一些基本东西 常见的 mapbox.js和mapbox-gl.js的异同点? 相同点: 1.都是由Mapbox公司推出的免 ...
- Netty学习笔记(三) 自定义编码器
编写一个网络应用程序需要实现某种编解码器,编解码器的作用就是讲原始字节数据与自定义的消息对象进行互转.网络中都是以字节码的数据形式来传输数据的,服务器编码数据后发送到客户端,客户端需要对数据进行解码, ...
- electron入坑指南
electron入坑指南 简介 electron 实际集成chrome浏览器和node环境, 运行你写的网页 app 基本目录结构 index.html 名称可以不是index, 这个文件与普通网页的 ...
- SQLServer之删除视图
删除视图注意事项 删除视图时,将从系统目录中删除视图的定义和有关视图的其他信息. 还将删除视图的所有权限. 使用 DROP TABLE 删除的表上的任何视图都必须使用 DROP VIEW 显式删除. ...
- Ubuntu系统分配存储空间的建议以及给Ubuntu系统根目录扩容方法(从20GB追加100GB)
当初准备装双系统时,也思考了很久分配多少空间给Ubuntu16.04系统,查了许多资料,大多意思是‘/’目录总共给20GB,其他的给/home.网上资料推荐的大多跟这篇文章一样:https://blo ...
- Markdown语法指南
1.背景 个人比较喜欢用Markdonw写东西,比如写博客随笔,写有道云笔记等,但有的时候会突然忘记某个具体语法怎么写了,如插入图片.插入链接.表格等,那干脆把这个语法简单地总结一下,也方便日后快速查 ...