
Netty 源码学习——服务端流程分析
在上一篇我们已经介绍了客户端的流程分析,我们已经对启动已经大体上有了一定的认识,现在我们继续看对服务端的流程来看一看到底有什么区别。
服务端代码
public class NioServer {

	private static final int PORT = 9898;

	public static void main(String[] args) {

		EventLoopGroup boss = new NioEventLoopGroup(1);

		EventLoopGroup work = new NioEventLoopGroup();

		try {

			ServerBootstrap bootstrap = new ServerBootstrap();

			bootstrap.group(boss, work).channel(NioServerSocketChannel.class).option(ChannelOption.SO_BACKLOG, 100)

					.handler(new LoggingHandler(LogLevel.INFO)).childHandler(new ChannelInitializer<SocketChannel>() {

						@Override

						protected void initChannel(SocketChannel ch) throws Exception {

							ChannelPipeline pipeline = ch.pipeline();

							pipeline.addLast("stringDecoder", new StringDecoder());

							pipeline.addLast("stringEncoder", new StringEncoder());

							pipeline.addLast("serverHandle", new SimpleChannelInboundHandler<String>() {

								@Override

								protected void channelRead0(ChannelHandlerContext ctx, String msg) throws Exception {

								}

							});

						}

					});

			ChannelFuture channelFuture = bootstrap.bind(PORT).sync();

			channelFuture.channel().closeFuture().sync();

		} catch (InterruptedException e) {

			e.printStackTrace();

		} finally {

			boss.shutdownGracefully();

			work.shutdownGracefully();

		}

	}

}
上面代码主要做了以下几件事
- 声明 EventLoopGroup 不管是服务端还是客户端都需要初始化 EventLoopGroup,上面代码中声明了两个 EventLoopGroup,boss 的作用是处理客户端的连接事件,work 的作用是处理客户端连接事件的 IO 操作。
- channel 的初始化,我们发现和客户端的类型不一样,客户端是 NioSocketChannel 而服务端则是 NioServerSocketChannel。
- option 的设置。
- handler 的设置。
- childHandler 的设置。
group 的初始化操作
NioEventLoopGroup 的初始化操作在客户端已经说明过了,这里就不再多说了。我们直接来看 bootstrap.group(boss, work); 这句代码我们跟进去。
public ServerBootstrap group(EventLoopGroup parentGroup, EventLoopGroup childGroup) {

    // 调用父类构造器传入 boss

    super.group(parentGroup);

    if (childGroup == null) {

        throw new NullPointerException("childGroup");

    }

    if (this.childGroup != null) {

        throw new IllegalStateException("childGroup set already");

    }

    // 将 work 赋值给 childGroup 属性

    this.childGroup = childGroup;

    return this;

}

// 父类的构造器

public B group(EventLoopGroup group) {

    if (group == null) {

        throw new NullPointerException("group");

    }

    if (this.group != null) {

        throw new IllegalStateException("group set already");

    }

    this.group = group;

    return self();

}
上面主要是把 boss 的引用传入给父类的 group 属性保存,work 给自己的 childGroup 属性保存。boss 主要用于处理客户端的连接请求就像饭店的一个服务员会引导顾客,而 work 就是厨师实际干活的啦。
Channel 的初始化过程
通过客户端的分析我们其实已经知道 bootstrap.channel(class); 方法是将 class 存入到一个 ReflectiveChannelFactory 实例中真正的实例化 channel 就是调用该工厂的 newChannel(); 方法实现。
public B channel(Class<? extends C> channelClass) {

    if (channelClass == null) {

        throw new NullPointerException("channelClass");

    }

    return channelFactory(new ReflectiveChannelFactory<C>(channelClass));

}

// ReflectiveChannelFactory

@Override

public T newChannel() {

    try {

        return constructor.newInstance();

    } catch (Throwable t) {

        throw new ChannelException("Unable to create Channel from class " + constructor.getDeclaringClass(), t);

    }

}
这样就能创造出一个 NioServerSocket 实例。从代码中可以看出是通过反射实例化的那么肯定是执行 NioServerSocketChannel 的构造方法,我们继续来看下 NioServerSocketChannel 的实例化过程,在看之前我们先来看下 NioServerSocketChannel 的继承结构图。
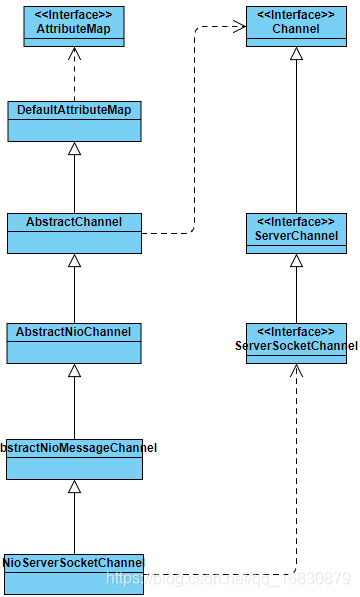
首先我们来看 NioServerSocket 的构造器
private static final SelectorProvider DEFAULT_SELECTOR_PROVIDER = SelectorProvider.provider();

public NioServerSocketChannel() {

    this(newSocket(DEFAULT_SELECTOR_PROVIDER));

}
我们看到构造器发现在内部调用了 newSokcet 方法传了 sun.nio.ch.DefaultSelectorProvider 实例进去。
private static ServerSocketChannel newSocket(SelectorProvider provider) {

    try {

        // 调用 openSocketChannel 方法获取 ServerSocketChannel

        return provider.openServerSocketChannel();

    } catch (IOException e) {

        throw new ChannelException(

                "Failed to open a server socket.", e);

    }

}
获取到了 ServerSocketChannel 后会调用重载的构造器
public NioServerSocketChannel(ServerSocketChannel channel) {

    super(null, channel, SelectionKey.OP_ACCEPT);

    config = new NioServerSocketChannelConfig(this, javaChannel().socket());

}
发现会调用父类的构造器和创造一个 config 实例。我们到 AbstractNioChannel 的构造器看看
protected AbstractNioChannel(Channel parent, SelectableChannel ch, int readInterestOp) {

    super(parent);

    // ch 赋值

    this.ch = ch;

    // OP_ACCEPT 赋值

    this.readInterestOp = readInterestOp;

    try {

        // 设置非阻塞

        ch.configureBlocking(false);

    } catch (IOException e) {

        try {

            ch.close();

        } catch (IOException e2) {

            if (logger.isWarnEnabled()) {

                logger.warn(

                        "Failed to close a partially initialized socket.", e2);

            }

        }

        throw new ChannelException("Failed to enter non-blocking mode.", e);

    }

}
上面代码主要设置了一下 channel 和继续调用父类的构造器
protected AbstractChannel(Channel parent) {

    this.parent = parent;

    id = newId();

    unsafe = newUnsafe();

    pipeline = newChannelPipeline();

}
上面代码在客户端的时候已经说过,但是需要注意的是 unsafe 的实例类型会不一样,服务端的实例类型是 AbstractNioMessageChannel$NioMessageUnsafe 的实例。
@Override

protected AbstractNioUnsafe newUnsafe() {

    return new NioMessageUnsafe();

}
ChannelPipeline 的实例化
ChannelPipeline 的流程在客户端的分析中说明了,后面也会单独出一期 ChannelPipeline 的说明,在此不在说了。
bootstrap.option()
private final Map<ChannelOption<?>, Object> options = new LinkedHashMap<ChannelOption<?>, Object>();

public <T> B option(ChannelOption<T> option, T value) {

    if (option == null) {

        throw new NullPointerException("option");

    }

    if (value == null) {

        synchronized (options) {

            options.remove(option);

        }

    } else {

        synchronized (options) {

            options.put(option, value);

        }

    }

    return self();

}
我们发现 option 方法中是调用父类的 AbstractBootstrap.option 来为 options 赋值。
bootstrap.handler()
private volatile ChannelHandler handler;

public B handler(ChannelHandler handler) {

    if (handler == null) {

        throw new NullPointerException("handler");

    }

    this.handler = handler;

    return self();

}
handler() 方法也是调用父类的 AbstractBootstrap.handler() 来为 handler 属性赋值。
bootstrap.childHandler()
private volatile ChannelHandler childHandler;

public ServerBootstrap childHandler(ChannelHandler childHandler) {

    if (childHandler == null) {

        throw new NullPointerException("childHandler");

    }

    this.childHandler = childHandler;

    return this;

}
childHandler() 方法也是调用自身的 handler() 来为 childHandler 属性赋值。因为这是服务端扩展的一个属性。
bootstrap.bind()
终于到了重头戏了,我们查看了下 bind() 到最后发现是 io.netty.bootstrap.AbstractBootstrap#doBind 中实现的.
private ChannelFuture doBind(final SocketAddress localAddress) {

    // 重点查看代码

    final ChannelFuture regFuture = initAndRegister();

    // 以下代码省略

    if (regFuture.cause() != null) {

        return regFuture;

    }

        return promise;

    }

}
我们跟进去 initAndRegister() 方法看一看.
final ChannelFuture initAndRegister() {

    Channel channel = null;

    try {

        // channel 初始化在上面已经说过了

        channel = channelFactory.newChannel();

        // 初始化 channel

        init(channel);

    } catch (Throwable t) {

    }

    // 这个 group 就是 bossGroup

    ChannelFuture regFuture = config().group().register(channel);

}
我们重点看 init(channel); 在下面获取到的就是 bossGroup 随后就将 bossGroup 和我们的 NioServerSocketChannel 关联起来了。
那么我们的 workGroup 是怎么处理的呢?我们进去看看 init(channel);
@Override

void init(Channel channel) throws Exception {

    // 将之前设置的 option 和 NioServerSocketChannel 关联起来

    final Map<ChannelOption<?>, Object> options = options0();

    synchronized (options) {

        setChannelOptions(channel, options, logger);

    }

    // 设置一些属性到 NioServerSocketChannel 中

    final Map<AttributeKey<?>, Object> attrs = attrs0();

    synchronized (attrs) {

        for (Entry<AttributeKey<?>, Object> e: attrs.entrySet()) {

            @SuppressWarnings("unchecked")

            AttributeKey<Object> key = (AttributeKey<Object>) e.getKey();

            channel.attr(key).set(e.getValue());

        }

    }

    // 获取到 NioServerSocketChannel 对应的 ChannelPipeline,在实例化的时候就已经创建了对应了 ChannelPipeline

    ChannelPipeline p = channel.pipeline();

    final EventLoopGroup currentChildGroup = childGroup;

    final ChannelHandler currentChildHandler = childHandler;

    final Entry<ChannelOption<?>, Object>[] currentChildOptions;

    final Entry<AttributeKey<?>, Object>[] currentChildAttrs;

    synchronized (childOptions) {

        currentChildOptions = childOptions.entrySet().toArray(newOptionArray(0));

    }

    synchronized (childAttrs) {

        currentChildAttrs = childAttrs.entrySet().toArray(newAttrArray(0));

    }

    // 重点

    p.addLast(new ChannelInitializer<Channel>() {

        @Override

        public void initChannel(final Channel ch) throws Exception {

            final ChannelPipeline pipeline = ch.pipeline();

            ChannelHandler handler = config.handler();

            if (handler != null) {

                pipeline.addLast(handler);

            }

            ch.eventLoop().execute(new Runnable() {

                @Override

                public void run() {

                    pipeline.addLast(new ServerBootstrapAcceptor(

                            ch, currentChildGroup, currentChildHandler, currentChildOptions, currentChildAttrs));

                }

            });

        }

    });

}
上面代码主要做了
- 设置 option
- 设置 attr
- 设置 NioServerSocketChannel 对应的 ChannelPipeline
从上面的代码片段中我们看到, 它为 pipeline 中添加了一个 ChannelInitializer, 而这个 ChannelInitializer 中添加了一个关键的 ServerBootstrapAcceptor handler。
我们先来看下这个类
ServerBootstrapAcceptor(

        final Channel channel, EventLoopGroup childGroup, ChannelHandler childHandler,

        Entry<ChannelOption<?>, Object>[] childOptions, Entry<AttributeKey<?>, Object>[] childAttrs) {

    this.childGroup = childGroup;

    this.childHandler = childHandler;

    this.childOptions = childOptions;

    this.childAttrs = childAttrs;

    enableAutoReadTask = new Runnable() {

        @Override

        public void run() {

            channel.config().setAutoRead(true);

        }

    };

}
ServerBootstrapAcceptor 这个类中包含了 childGroup、childHandler、childOptions、childAttrs,并且重写了 channelRead 方法。
并且将 ServerBootstrapAcceptor 的实例放在了 ChannelPipeline 的最后面.跟进 addLast() 方法会发现是在 DefaultChannelPipeline.addLast0()
private void addLast0(AbstractChannelHandlerContext newCtx) {

    AbstractChannelHandlerContext prev = tail.prev;

    newCtx.prev = prev;

    newCtx.next = tail;

    prev.next = newCtx;

    tail.prev = newCtx;

}
从上面代发会发现将 ServerBootstrapAcceptor 放在了最后一个。
Channel 的注册
服务器端和客户端的 Channel 的注册过程一致。
Netty 源码学习——服务端流程分析的更多相关文章
- Netty源码解析---服务端启动
Netty源码解析---服务端启动 一个简单的服务端代码: public class SimpleServer { public static void main(String[] args) { N ...
- Netty源码解析 -- 服务端启动过程
本文通过阅读Netty源码,解析Netty服务端启动过程. 源码分析基于Netty 4.1 Netty是一个高性能的网络通信框架,支持NIO,OIO等多种IO模式.通常,我们都是使用NIO模式,该系列 ...
- Mybatis源码学习第六天(核心流程分析)之Executor分析
今Executor这个类,Mybatis虽然表面是SqlSession做的增删改查,其实底层统一调用的是Executor这个接口 在这里贴一下Mybatis查询体系结构图 Executor组件分析 E ...
- Mybatis源码学习第六天(核心流程分析)之Executor分析(补充)
补充上一章没有讲解的三个Executor执行器; 还是贴一下之前的代码吧;我发现其实有些分析注释还是写在代码里面比较好,方便大家理解,之前是我的疏忽,不好意思 @Override public < ...
- Netty 源码学习——客户端流程分析
Netty 源码学习--客户端流程分析 友情提醒: 需要观看者具备一些 NIO 的知识,否则看起来有的地方可能会不明白. 使用版本依赖 <dependency> <groupId&g ...
- Netty源码学习系列之4-ServerBootstrap的bind方法
前言 今天研究ServerBootstrap的bind方法,该方法可以说是netty的重中之重.核心中的核心.前两节的NioEventLoopGroup和ServerBootstrap的初始化就是为b ...
- 【Netty源码学习】DefaultChannelPipeline(三)
上一篇博客中[Netty源码学习]ChannelPipeline(二)我们介绍了接口ChannelPipeline的提供的方法,接下来我们分析一下其实现类DefaultChannelPipeline具 ...
- Netty 源码学习——EventLoop
Netty 源码学习--EventLoop 在前面 Netty 源码学习--客户端流程分析中我们已经知道了一个 EventLoop 大概的流程,这一章我们来详细的看一看. NioEventLoopGr ...
- 【Netty源码学习】ServerBootStrap
上一篇博客[Netty源码学习]BootStrap中我们介绍了客户端使用的启动服务,接下来我们介绍一下服务端使用的启动服务. 总体来说ServerBootStrap有两个主要功能: (1)调用父类Ab ...
随机推荐
- Mamen所需要的jar包怎么生成
Mamen所需要的jar包怎么生成 使用 mamen 难免碰到,不知道的 jar 包,不知道怎么在 pom 文件中写,分享一个网址,可以把你想要的 jar 包生成 pom 配置文件,个人感觉非常好用. ...
- UVA 212 Use of Hospital Facilities
题目链接:https://vjudge.net/problem/UVA-212 题意摘自<算法禁赛入门经典> 题目大意 医院里有 N(N ≤ 10)个手术室和 M(M ≤ 30)个恢复室. ...
- 2.Jmeter 快速入门教程(二)--创建简单web测试 打印 E-mail
今天我们就来实际用Jmeter创建一个测试场景,并进行性能测试. 注:由于本人使用中文版本,使用英文版本的请注意具体的菜单及参数名称. 1. 添加线程组(相当于lr里的scenario 设置) 打开j ...
- Scrapy框架: 第一个程序
首先创建项目: scrappy start project maitian 第二步: 明确要抓取的字段items.py import scrapy class MaitianItem(scrapy.I ...
- SpringBoot开发详解(五)--Controller接收参数以及参数校验
原文链接:http://blog.csdn.net/qq_31001665 如有侵权,请联系博主删除博客,谢谢 Controller 中注解使用 接受参数的几种传输方式以及几种注解: 在上一篇中,我 ...
- 【目录】Asp.NETCore轻松学系列
随笔分类 - Asp.NETCore轻松学系列 Asp.NETCore轻松学系列阅读指引目录 摘要: 耗时两个多月,坚持写这个入门系列文章,就是想给后来者更好更快的上手体验,这个系列可以说是从入门到进 ...
- adb 提示adb server version(31) doesn't match this client(40) 解决办法
有时候我们用adb工具去连接安卓设备,或者模拟器的时候,会提示adb server version(31) doesn't match this client(40)这样的提示.如图 提示的字面意思就 ...
- 每天一个Linux常用命令 命令
指令名称 : chmod 使用权限 : 所有使用者 使用方式 :chmod 777 /root 第一个7指文件所属用户,第二个7指文件所属用户的用户组,第三个7指其他用户 说明 : Linux/Uni ...
- 界面设计微信小程序
上一个周期将微信小程序的程序编完了,虽然还有很多需要修改的地方,大体已经完成.剩下的边角料以后再弄 这个周期来学习一下微信小程序的设计....好吧. 首先还是需要看一下微信的设计指南的.地址 http ...
- eclipse启动Failed to load the JNI shared library
由于安装jdk安装了多个版本,用其他开发工具,某天再打开eclipse时弹出“Failed to load the JNI shared library jvm.dll” 原因:eclipse的版本与 ...