一、基础项目构建,引入web模块,完成一个简单的RESTful API
一、Spring Boot的主要优点:
- 为所有Spring开发者更快的入门
- 开箱即用,提供各种默认配置来简化项目配置
- 内嵌式容器简化Web项目
- 没有冗余代码生成和XML配置的要求
二、使用maven构建项目
1.访问官网:http://start.spring.io/ 选择基本的构建工具。
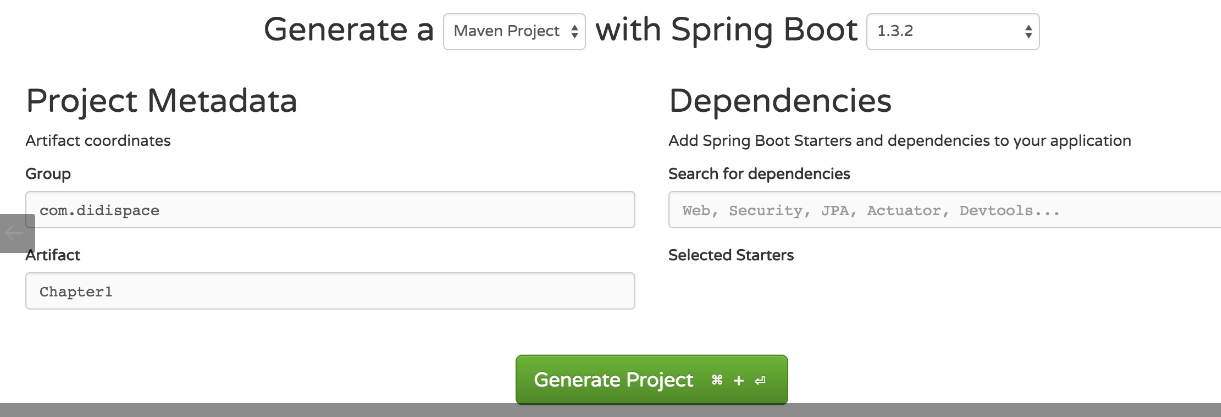
2.点击Generate Project下载项目压缩包。
3.解压项目包,并用ecplise以Maven项目导入
- 菜单中选择
File–>New–>Project from Existing Sources... - 选择解压后的项目文件夹,点击
OK - 点击
Import project from external model并选择Maven,点击Next到底为止。 - 若你的环境有多个版本的JDK,注意到选择
Java SDK的时候请选择Java 7以上的版本
三、项目结构解析
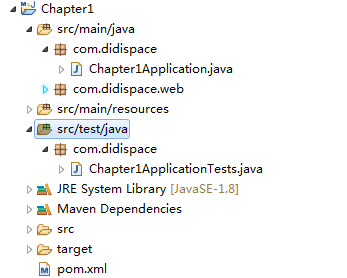
通过上面步骤完成了基础项目的创建,Spring Boot的基础结构共三个文件(具体路径根据用户生成项目时填写的Group所有差异):
src/main/java下的程序入口:Chapter1Applicationsrc/main/resources下的配置文件:application.propertiessrc/test/下的测试入口:Chapter1ApplicationTests
package com.didispace;

import org.springframework.boot.SpringApplication;

import org.springframework.boot.autoconfigure.SpringBootApplication;

import org.springframework.boot.builder.SpringApplicationBuilder;

import org.springframework.boot.context.web.SpringBootServletInitializer;

@SpringBootApplication

public class Chapter1Application extends SpringBootServletInitializer{

    public static void main(String[] args) {

        SpringApplication.run(Chapter1Application.class, args);

    }

    @Override//为了打包springboot项目

    protected SpringApplicationBuilder configure(SpringApplicationBuilder builder) {

        return builder.sources(this.getClass());

    }

}
Chapter1Application
server.port=8080
application.properties
package com.didispace;

import com.didispace.web.HelloController;

import org.junit.Before;

import org.junit.Ignore;

import org.junit.Test;

import org.junit.runner.RunWith;

import org.springframework.boot.test.SpringApplicationConfiguration;

import org.springframework.http.MediaType;

import org.springframework.mock.web.MockServletContext;

import org.springframework.test.context.junit4.SpringJUnit4ClassRunner;

import org.springframework.test.context.web.WebAppConfiguration;

import org.springframework.test.web.servlet.MockMvc;

import org.springframework.test.web.servlet.request.MockMvcRequestBuilders;

import org.springframework.test.web.servlet.setup.MockMvcBuilders;

import static org.hamcrest.Matchers.equalTo;

import static org.springframework.test.web.servlet.result.MockMvcResultMatchers.content;

import static org.springframework.test.web.servlet.result.MockMvcResultMatchers.status;

@RunWith(SpringJUnit4ClassRunner.class)

@SpringApplicationConfiguration(classes = MockServletContext.class)

@WebAppConfiguration

public class Chapter1ApplicationTests {

    private MockMvc mvc;

    @Before

    public void setUp() throws Exception {

        mvc = MockMvcBuilders.standaloneSetup(new HelloController()).build();

    }

    @Test

    public void getHello() throws Exception {

        mvc.perform(MockMvcRequestBuilders.get("/hello").accept(MediaType.APPLICATION_JSON))

                .andExpect(status().isOk())

                .andExpect(content().string(equalTo("Hello World")));

    }

}
Chapter1ApplicationTests
生成的Chapter1Application和Chapter1ApplicationTests类都可以直接运行来启动当前创建的项目,由于目前该项目未配合任何数据访问或Web模块,程序会在加载完Spring之后结束运行。
四、引入web模块
当前的pom.xml内容如下,仅引入了两个模块:
spring-boot-starter:核心模块,包括自动配置支持、日志和YAMLspring-boot-starter-test:测试模块,包括JUnit、Hamcrest、Mockito
<?xml version="1.0" encoding="UTF-8"?>

<project xmlns="http://maven.apache.org/POM/4.0.0" xmlns:xsi="http://www.w3.org/2001/XMLSchema-instance"

    xsi:schemaLocation="http://maven.apache.org/POM/4.0.0 http://maven.apache.org/xsd/maven-4.0.0.xsd">

    <modelVersion>4.0.0</modelVersion>

    <groupId>com.didispace</groupId>

    <artifactId>Chapter1</artifactId>

    <version>1.0.0</version>

    <packaging>jar</packaging>

    <name>Chapter1</name>

    <description>The first Spring Boot project</description>

    <parent>

        <groupId>org.springframework.boot</groupId>

        <artifactId>spring-boot-starter-parent</artifactId>

        <version>1.3.2.RELEASE</version>

        <relativePath/> <!-- lookup parent from repository -->

    </parent>

    <properties>

        <project.build.sourceEncoding>UTF-8</project.build.sourceEncoding>

        <java.version>1.8</java.version>

    </properties>

    <dependencies>

        <dependency>

            <groupId>org.springframework.boot</groupId>

            <artifactId>spring-boot-starter</artifactId>

        </dependency>

        <dependency>

            <groupId>org.springframework.boot</groupId>

            <artifactId>spring-boot-starter-test</artifactId>

            <scope>test</scope>

        </dependency>

        <dependency>

            <groupId>org.springframework.boot</groupId>

            <artifactId>spring-boot-starter-web</artifactId>

        </dependency>

    </dependencies>

    <build>

        <defaultGoal>compile</defaultGoal>

        <sourceDirectory>src</sourceDirectory>

        <finalName>springboot-package</finalName>

        <plugins>

            <plugin>

                <groupId>org.springframework.boot</groupId>

                <artifactId>spring-boot-maven-plugin</artifactId>

                <configuration>

                    <mainClass>com.didispace.Chapter1Application</mainClass>

                    <skipTests>true</skipTests>

                </configuration>

                <executions>

                    <execution>

                        <goals>

                            <goal>repackage</goal>

                        </goals>

                    </execution>

                </executions>

            </plugin>

        </plugins>

    </build>

</project>
pom.xml
五、编写服务
package com.didispace.web;

import org.springframework.web.bind.annotation.RequestMapping;

import org.springframework.web.bind.annotation.RestController;

@RestController

public class HelloController {

    @RequestMapping("/hello")

    public String index() {

        return "Hello World";

    }

}
HelloController
启动主程序,打开浏览器访问http://localhost:8080/hello,可以看到页面输出Hello World
六、编写单元测试用例
package com.didispace;

import com.didispace.web.HelloController;

import org.junit.Before;

import org.junit.Ignore;

import org.junit.Test;

import org.junit.runner.RunWith;

import org.springframework.boot.test.SpringApplicationConfiguration;

import org.springframework.http.MediaType;

import org.springframework.mock.web.MockServletContext;

import org.springframework.test.context.junit4.SpringJUnit4ClassRunner;

import org.springframework.test.context.web.WebAppConfiguration;

import org.springframework.test.web.servlet.MockMvc;

import org.springframework.test.web.servlet.request.MockMvcRequestBuilders;

import org.springframework.test.web.servlet.setup.MockMvcBuilders;

import static org.hamcrest.Matchers.equalTo;

import static org.springframework.test.web.servlet.result.MockMvcResultMatchers.content;

import static org.springframework.test.web.servlet.result.MockMvcResultMatchers.status;

@RunWith(SpringJUnit4ClassRunner.class)

@SpringApplicationConfiguration(classes = MockServletContext.class)

@WebAppConfiguration

public class Chapter1ApplicationTests {

    private MockMvc mvc;

    @Before

    public void setUp() throws Exception {

        mvc = MockMvcBuilders.standaloneSetup(new HelloController()).build();

    }

    @Test

    public void getHello() throws Exception {

        mvc.perform(MockMvcRequestBuilders.get("/hello").accept(MediaType.APPLICATION_JSON))

                .andExpect(status().isOk())

                .andExpect(content().string(equalTo("Hello World")));

    }

}
Chapter1ApplicationTests
一、基础项目构建,引入web模块,完成一个简单的RESTful API的更多相关文章
- 基础项目构建,引入web模块,完成一个简单的RESTful API 转载来自翟永超
简介 在您第一次接触和学习Spring框架的时候,是否因为其繁杂的配置而退却了?在你第n次使用Spring框架的时候,是否觉得一堆反复粘贴的配置有一些厌烦?那么您就不妨来试试使用Spring Boot ...
- Node学习(二) --使用http和fs模块实现一个简单的服务器
1.创建一个www目录,存储静态文件1.html.1.jpg. * html文件内容如下: 12345678910111213 <html lang="en">< ...
- 从SpringBoot到SpringCloudAlibaba简明教程(一):初识SpringBoot及其基础项目构建
前言 Spring框架的大名想必大家早已如雷贯耳,我们来看一下springboot诞生的初衷,以及它在springframe的基础上解决了哪些痛点. 很久以前,J2EE还是java企业级应用的标准规范 ...
- nodejs基础 用http模块 搭建一个简单的web服务器 响应JSON、html
前端在开发中,大多会想浏览器获取json数据,下面来用nodejs中的http模块搭建一个返回json数据的服务器 var http = require("http"); var ...
- SpringBoot2.x入门:引入web模块
前提 这篇文章是<SpringBoot2.x入门>专辑的第3篇文章,使用的SpringBoot版本为2.3.1.RELEASE,JDK版本为1.8. 主要介绍SpringBoot的web模 ...
- springboot2.0入门(二)-- 基础项目构建+插件的使用
一.idea中新建第一个HelloWorld项目 点击next: 下一步 在这里可以选择我们需要依赖的第三方软件类库,包括spring-boot-web,mysql驱动,mybatis等.我们这里暂时 ...
- SpringBoot2.x入门教程:引入jdbc模块与JdbcTemplate简单使用
这是公众号<Throwable文摘>发布的第23篇原创文章,收录于专辑<SpringBoot2.x入门>. 前提 这篇文章是<SpringBoot2.x入门>专辑的 ...
- vue-cli安装以及创建一个简单的项目(二)(vuex使用、发行一个简单的app)
1.vuex的使用 vuex是vue的状态管理中心,vuex来保存我们需要管理的状态值,值一旦被修改,所有引用该值的地方就会自动更新,常用于: 1.多个视图依赖同一状态(l例:菜单导航) 2.来自不同 ...
- 使用springboot实现一个简单的restful crud——01、项目简介以及创建项目
前言 之前一段时间学习了一些springboot的一些基础使用方法和敲了一些例子,是时候写一个简单的crud来将之前学的东西做一个整合了 -- 一个员工列表的增删改查. 使用 restful api ...
随机推荐
- SET - 改变运行时参数
樊伟胜SYNOPSIS SET [ SESSION | LOCAL ] name { TO | = } { value | 'value' | DEFAULT } SET [ SESSION | LO ...
- 微信小程序 textarea的placeholder层级过高 在弹层之上 bug解决方法
微信小程序textarea的placeholder的层级一直都是一个神坑, 我们是没有办法将我们的弹层加大层级去盖过placeholder的, 所以要解决这个问题只能从另外的角度找思路 我的思路是 : ...
- bootStrap @media 用法
一. @media 格式 @media all and (min-width:xxx) and (max-width:xxx) (亦可以写成@media all and (min-width:xxx) ...
- Delphi 版本信息获取函数 GetFileVersionInfo、GetFileVersionInfoSize、VerFindFile、VerInstallFile和VerQueryValue
一.版本信息获取函数简介和作用 获取文件版本信息的作用: 1. 避免在新版本的组件上安装旧版本的相同组件: 2. 在多语言系统环境中,操作系统根据文件版本信息里提供的语言信息在启动程序时决定使用的正确 ...
- Delphi 获取系统的语言环境参数GetSystemDefaultLangID、VerLanguageName、GetLocaleInfo
1 核心的两个API函数:GetSystemDefaultLangID 和 VerLanguageName. GetSystemDefaultLangID:获得系统默认语言的ID VerLanguag ...
- 数据中台核心方法论--OneModel为何需要产品化支撑?
什么是产品化 大部分创业公司都是从一个伟大的想法创意开始的,并且需要有一堆技术专家来实现.我们清楚,伟大的技术并不等同于和伟大的产品,技术可以解决问题,但如果它没有办法法规模化,那这些技术或者能力对用 ...
- hibernate 1 对1
举例:部门departments -------部门经理managers 映射 有两种方式 1:外键映射.类似于多对1.但是设置了unique唯一. 带外键的: package com.hiber ...
- Python基础(三):简化除法判断、分析apache访问日志、扫描存活主机、利用多线程实现ssh并发访问
一.简化除法判断 目标: 编写mydiv.py脚本,主要要求如下: 提示用户输入一个数字作为除数 如果用户按下Ctrl+C或Ctrl+D则退出程序 如果用户输入非数字字符,提示用户应该输入数字 如果用 ...
- 工程师技术(六):Linux工程师 综合测试
一.Linux工程师 综合测试 目标: 根据本文提供的练习步骤完成所有练习案例. 方案: 开始练习之前,先依次重置虚拟机环境. [root@room9pc13 ~]# rht-vmctl reset ...
- vue2.0 组件的生命周期
vue官方文档中给出的vue生命周期的流程图 如下: 生命周期探究 对于执行顺序和什么时候执行,看上面两个图基本有个了解了.下面我们将结合代码去看看钩子函数的执行. <!DOCTYPE html ...