
MyBatis-Plus中如何使用ResultMap
MyBatis-Plus (简称
MP)是一个MyBatis的增强工具,在MyBatis的基础上只做增强不做改变,为简化开发、提高效率而生。
MyBatis-Plus对MyBatis基本零侵入,完全可以与MyBatis混合使用,这点很赞。
在涉及到关系型数据库增删查改的业务时,我比较喜欢用MyBatis-Plus,开发效率极高。具体的使用可以参考官网,或者自己上手摸索感受一下。
下面简单总结一下在MyBatis-Plus中如何使用ResultMap。
问题说明
先看个例子:
有如下两张表:
create table tb_book

(

    id     bigint primary key,

    name   varchar(32),

    author varchar(20)

);

create table tb_hero

(

    id      bigint primary key,

    name    varchar(32),

    age     int,

    skill   varchar(32),

    bid bigint

);
其中,tb_hero中的bid关联tb_book表的id。
下面先看Hero实体类的代码,如下:
import com.baomidou.mybatisplus.annotation.TableField;

import com.baomidou.mybatisplus.annotation.TableId;

import com.baomidou.mybatisplus.annotation.TableName;

import com.fasterxml.jackson.annotation.JsonInclude;

import lombok.Getter;

import lombok.NoArgsConstructor;

import lombok.Setter;

@Getter

@Setter

@NoArgsConstructor

@TableName("tb_hero")

@JsonInclude(JsonInclude.Include.NON_NULL)

public class Hero {

    @TableId("id")

    private Long id;

    @TableField(value = "name", keepGlobalFormat = true)

    private String name;

    @TableField(value = "age", keepGlobalFormat = true)

    private Integer age;

    @TableField(value = "skill", keepGlobalFormat = true)

    private String skill;

    @TableField(value = "bid", keepGlobalFormat = true)

    private Long bookId;

    // *********************************

    // 数据库表中不存在以下字段(表join时会用到)

    // *********************************

    @TableField(value = "book_name", exist = false)

    private String bookName;

    @TableField(value = "author", exist = false)

    private String author;

}
注意了,我特地把tb_hero表中的bid字段映射成实体类Hero中的bookId属性。
- 测试
BaseMapper中内置的insert()方法或者IService中的save()方法
MyBatis-Plus打印出的SQL为:
==> Preparing: INSERT INTO tb_hero ( id, "name", "age", "skill", "bid" ) VALUES ( ?, ?, ?, ?, ? )

==> Parameters: 1589788935356416(Long), 阿飞(String), 18(Integer), 天下第一快剑(String), 1(Long)
没毛病, MyBatis-Plus会根据@TableField指定的映射关系,生成对应的SQL。
- 测试
BaseMapper中内置的selectById()方法或者IService中的getById()方法
MyBatis-Plus打印出的SQL为:
==> Preparing: SELECT id,"name","age","skill","bid" AS bookId FROM tb_hero WHERE id=?

==> Parameters: 1(Long)
也没毛病,可以看到生成的SELECT中把bid做了别名bookId。
- 测试自己写的SQL
比如现在我想连接tb_hero与tb_book这两张表,如下:
@Mapper

@Repository

public interface HeroMapper extends BaseMapper<Hero> {

    @Select({"SELECT tb_hero.*, tb_book.name as book_name, tb_book.author" +

            " FROM tb_hero" +

            " LEFT JOIN tb_book" +

            " ON tb_hero.bid = tb_book.id" +

            " ${ew.customSqlSegment}"})

    IPage<Hero> pageQueryHero(@Param(Constants.WRAPPER) Wrapper<Hero> queryWrapper,

                              Page<Hero> page);

}
查询MyBatis-Plus打印出的SQL为:
==> Preparing: SELECT tb_hero.*, tb_book.name AS book_name, tb_book.author FROM tb_hero LEFT JOIN tb_book ON tb_hero.bid = tb_book.id WHERE ("bid" = ?) ORDER BY id ASC LIMIT ? OFFSET ?

==> Parameters: 2(Long), 1(Long), 1(Long)
SQL没啥问题,过滤与分页也都正常,但是此时你会发现bookId属性为null,如下:
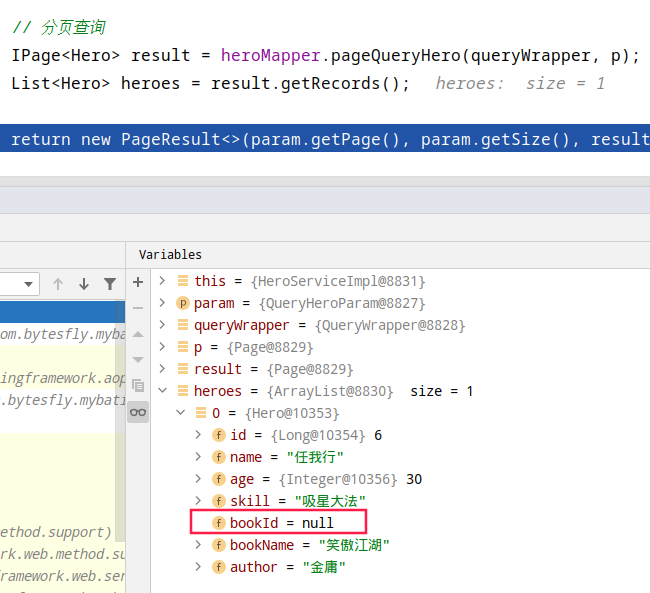
为什么呢?
调用BaseMapper中内置的selectById()方法并没有出现这种情况啊???
回过头来再对比一下在HeroMapper中自己定义的查询与MyBatis-Plus自带的selectById()有啥不同,还记得上面的刚刚的测试吗,生成的SQL有啥不同?
原来,MyBatis-Plus为BaseMapper中内置的方法生成SQL时,会把SELECT子句中bid做别名bookId,而自己写的查询MyBatis-Plus并不会帮你修改SELECT子句,也就导致bookId属性为null。
解决方法
- 方案一:表中的字段与实体类的属性严格保持一致(字段有下划线则属性用驼峰表示)
在这里就是tb_hero表中的bid字段映射成实体类Hero中的bid属性。这样当然可以解决问题,但不是本篇讲的重点。
方案二:把自己写的
SQL中bid做别名bookId方案三:使用
@ResultMap,这是此篇的重点
在@TableName设置autoResultMap = true
@TableName(value = "tb_hero", autoResultMap = true)

public class Hero {

}
然后在自定义查询中添加@ResultMap注解,如下:
import org.apache.ibatis.annotations.Mapper;

import org.apache.ibatis.annotations.Param;

import org.apache.ibatis.annotations.ResultMap;

import org.apache.ibatis.annotations.Select;

import org.springframework.stereotype.Repository;

@Mapper

@Repository

public interface HeroMapper extends BaseMapper<Hero> {

    @ResultMap("mybatis-plus_Hero")

    @Select({"SELECT tb_hero.*, tb_book.name as book_name, tb_book.author" +

            " FROM tb_hero" +

            " LEFT JOIN tb_book" +

            " ON tb_hero.bid = tb_book.id" +

            " ${ew.customSqlSegment}"})

    IPage<Hero> pageQueryHero(@Param(Constants.WRAPPER) Wrapper<Hero> queryWrapper,

                              Page<Hero> page);

}
这样,也能解决问题。
下面简单看下源码,@ResultMap("mybatis-plus_实体类名")怎么来的。
详情见: com.baomidou.mybatisplus.core.metadata.TableInfo#initResultMapIfNeed()
/**

 * 自动构建 resultMap 并注入(如果条件符合的话)

 */

void initResultMapIfNeed() {

    if (autoInitResultMap && null == resultMap) {

        String id = currentNamespace + DOT + MYBATIS_PLUS + UNDERSCORE + entityType.getSimpleName();

        List<ResultMapping> resultMappings = new ArrayList<>();

        if (havePK()) {

            ResultMapping idMapping = new ResultMapping.Builder(configuration, keyProperty, StringUtils.getTargetColumn(keyColumn), keyType)

                .flags(Collections.singletonList(ResultFlag.ID)).build();

            resultMappings.add(idMapping);

        }

        if (CollectionUtils.isNotEmpty(fieldList)) {

            fieldList.forEach(i -> resultMappings.add(i.getResultMapping(configuration)));

        }

        ResultMap resultMap = new ResultMap.Builder(configuration, id, entityType, resultMappings).build();

        configuration.addResultMap(resultMap);

        this.resultMap = id;

    }

}
注意看上面的字符串id的构成,你应该可以明白。
思考: 这种方式的ResultMap默认是强绑在一个@TableName上的,如果是某个聚合查询或者查询的结果并非对应一个真实的表怎么办呢?有没有更优雅的方式?
自定义@AutoResultMap注解
基于上面的思考,我做了下面简单的实现:
- 自定义@AutoResultMap注解
import java.lang.annotation.*;

/**

 * 使用@AutoResultMap注解的实体类

 * 自动生成{auto.mybatis-plus_类名}为id的resultMap

 * {@link MybatisPlusConfig#initAutoResultMap()}

 */

@Documented

@Retention(RetentionPolicy.RUNTIME)

@Target(ElementType.TYPE)

public @interface AutoResultMap {

}
- 启动时扫描@AutoResultMap注解的实体类
package com.bytesfly.mybatis.config;

import cn.hutool.core.util.ClassUtil;

import cn.hutool.core.util.ReflectUtil;

import com.baomidou.mybatisplus.annotation.DbType;

import com.baomidou.mybatisplus.core.metadata.TableInfo;

import com.baomidou.mybatisplus.core.metadata.TableInfoHelper;

import com.baomidou.mybatisplus.extension.plugins.MybatisPlusInterceptor;

import com.baomidou.mybatisplus.extension.plugins.inner.PaginationInnerInterceptor;

import com.baomidou.mybatisplus.extension.toolkit.JdbcUtils;

import com.bytesfly.mybatis.annotation.AutoResultMap;

import lombok.extern.slf4j.Slf4j;

import org.apache.ibatis.builder.MapperBuilderAssistant;

import org.mybatis.spring.SqlSessionTemplate;

import org.mybatis.spring.annotation.MapperScan;

import org.springframework.beans.factory.annotation.Autowired;

import org.springframework.boot.autoconfigure.jdbc.DataSourceProperties;

import org.springframework.context.annotation.Bean;

import org.springframework.context.annotation.Configuration;

import org.springframework.transaction.annotation.EnableTransactionManagement;

import javax.annotation.PostConstruct;

import java.util.Set;

/**

 * 可添加一些插件

 */

@Configuration

@EnableTransactionManagement(proxyTargetClass = true)

@MapperScan(basePackages = "com.bytesfly.mybatis.mapper")

@Slf4j

public class MybatisPlusConfig {

    @Autowired

    private SqlSessionTemplate sqlSessionTemplate;

    /**

     * 分页插件(根据jdbcUrl识别出数据库类型, 自动选择适合该方言的分页插件)

     * 相关使用说明: https://baomidou.com/guide/page.html

     */

    @Bean

    public MybatisPlusInterceptor mybatisPlusInterceptor(DataSourceProperties dataSourceProperties) {

        String jdbcUrl = dataSourceProperties.getUrl();

        DbType dbType = JdbcUtils.getDbType(jdbcUrl);

        MybatisPlusInterceptor interceptor = new MybatisPlusInterceptor();

        interceptor.addInnerInterceptor(new PaginationInnerInterceptor(dbType));

        return interceptor;

    }

    /**

     * @AutoResultMap注解的实体类自动构建resultMap并注入

     */

    @PostConstruct

    public void initAutoResultMap() {

        try {

            log.info("--- start register @AutoResultMap ---");

            String namespace = "auto";

            String packageName = "com.bytesfly.mybatis.model.db.resultmap";

            Set<Class<?>> classes = ClassUtil.scanPackageByAnnotation(packageName, AutoResultMap.class);

            org.apache.ibatis.session.Configuration configuration = sqlSessionTemplate.getConfiguration();

            for (Class clazz : classes) {

                MapperBuilderAssistant assistant = new MapperBuilderAssistant(configuration, "");

                assistant.setCurrentNamespace(namespace);

                TableInfo tableInfo = TableInfoHelper.initTableInfo(assistant, clazz);

                if (!tableInfo.isAutoInitResultMap()) {

                    // 设置 tableInfo的autoInitResultMap属性 为 true

                    ReflectUtil.setFieldValue(tableInfo, "autoInitResultMap", true);

                    // 调用 tableInfo#initResultMapIfNeed() 方法,自动构建 resultMap 并注入

                    ReflectUtil.invoke(tableInfo, "initResultMapIfNeed");

                }

            }

            log.info("--- finish register @AutoResultMap ---");

        } catch (Throwable e) {

            log.error("initAutoResultMap error", e);

            System.exit(1);

        }

    }

}
关键代码其实没有几行,耐心看下应该不难懂。
- 使用@AutoResultMap注解
还是用例子来说明更直观。
下面是一个聚合查询:
@Mapper

@Repository

public interface BookMapper extends BaseMapper<Book> {

    @ResultMap("auto.mybatis-plus_BookAgg")

    @Select({"SELECT tb_book.id, max(tb_book.name) as name, array_agg(distinct tb_hero.id order by tb_hero.id asc) as hero_ids" +

            " FROM tb_hero" +

            " INNER JOIN tb_book" +

            " ON tb_hero.bid = tb_book.id" +

            " GROUP BY tb_book.id"})

    List<BookAgg> agg();

}
其中BookAgg的定义如下,在实体类上使用了@AutoResultMap注解:
@Getter

@Setter

@NoArgsConstructor

@AutoResultMap

public class BookAgg {

    @TableId("id")

    private Long bookId;

    @TableField("name")

    private String bookName;

    @TableField("hero_ids")

    private Object heroIds;

}
完整代码见: https://github.com/bytesfly/springboot-demo/tree/master/springboot-mybatis-plus
MyBatis-Plus中如何使用ResultMap的更多相关文章
- Mybatis中resultType和resultMap
一.概述MyBatis中在查询进行select映射的时候,返回类型可以用resultType,也可以用resultMap,resultType是直接表示返回类型的,而resultMap则是对外部Res ...
- Mybatis框架中实现双向一对多关系映射
学习过Hibernate框架的伙伴们很容易就能简单的配置各种映射关系(Hibernate框架的映射关系在我的blogs中也有详细的讲解),但是在Mybatis框架中我们又如何去实现 一对多的关系映射呢 ...
- 详解Java的MyBatis框架中SQL语句映射部分的编写
这篇文章主要介绍了Java的MyBatis框架中SQL语句映射部分的编写,文中分为resultMap和增删查改实现两个部分来讲解,需要的朋友可以参考下 1.resultMap SQL 映射XML 文件 ...
- MyBatis Generator中文文档
MyBatis Generator中文文档 MyBatis Generator中文文档地址: http://mbg.cndocs.tk/ 该中文文档由于尽可能和原文内容一致,所以有些地方如果不熟悉,看 ...
- Mybatis系列(二):优化MyBatis配置文件中的配置和解决字段名与实体类属性名不相同的冲突
原文链接:http://www.cnblogs.com/xdp-gacl/p/4264301.html http://www.cnblogs.com/xdp-gacl/p/4264425.ht ...
- Mybatis分页中遇到的坑3
Mybatis Mapper.xml 配置文件中 resultMap 节点的源码解析 相关文章 Mybatis 解析配置文件的源码解析 Mybatis 类型转换源码分析 Mybatis 数据源和数 ...
- mybatis框架中XxxxMaper.xml的文件
我们知道在mybatis框架中,config.xml中会关联到许多的XxxxMapper的xml文件,这些文件又对应着一个个的接口,来观察下这些xml文件 从以下这个文件为例子: <?xml v ...
- 关于Mybatis中表中字段名和POJO中字段名不同的解决方法
项目结构: POJO中: package com.domain; /** * @author mzy * 定义orders表对应的实体类 */ public class Order { /** * C ...
- 【转】MyBatis学习总结(三)——优化MyBatis配置文件中的配置
[转]MyBatis学习总结(三)——优化MyBatis配置文件中的配置 一.连接数据库的配置单独放在一个properties文件中 之前,我们是直接将数据库的连接配置信息写在了MyBatis的con ...
随机推荐
- 洛谷4895 独钓寒江雪 (树哈希+dp+组合)
qwq 首先,如果是没有要求本质不同的话,那么还是比较简单的一个树形dp 我们令\(dp[i][0/1]\)表示是否\(i\)的子树,是否选\(i\)这个点的方案数. 一个比较显然的想法. \(dp[ ...
- Python - faker
安装 faker pip install Faker pip install Dumper 设置生成器 from faker import Faker fake = Faker() 它可以通过访问以想 ...
- 树莓派4B学习札记
防静电 树莓派比较容易被静电损坏,要做好以下预防措施 使用的时候不要用手去触摸PCB和针脚!特别是上电之后! 拿板卡的时候,要习惯性拿板卡的边缘 勤洗手,勤摸墙壁,释放身上的静电 系统安装 8GB以上 ...
- 微信小程序添加外部地图服务数据
先上效果: 缘起 使用微信小程序做地图相关功能的时候,有个需求是需要接入自己发布的地图服务.查看微信小程序地图组件文档,发现它对地图相关的支持很少,只有一些基础功能,比如添加点.线.面.气泡和一些常规 ...
- OO第四单元作业总结及课程总结
一.本单元作业架构设计 1.第一次作业 本单元首次接触到UML以及相关概念,在面对第一次作业时首先花了很大功夫去阅读官方接口中各种UmlElement的代码,才理解了输入的模型元素中各属性的含义.总的 ...
- Noip模拟77 2021.10.15
T1 最大或 $T1$因为没有开$1ll$右移给炸掉了,调了一年不知道为啥,最后实在不懂了 换成$pow$就过掉了,但是考场上这题耽误了太多时间,后面的题也就没办法好好打了.... 以后一定要注意右移 ...
- Noip模拟31 2021.8.5
T1 Game 当时先胡了一发$\textit{Next Permutation}$... 然后想正解,只想到贪心能求最大得分,然后就不会了.. 然后就甩个二十分的走了... 正解的最大得分(叫它$k ...
- 单片机STM32在开发中常用库函数详解
1.GPIO初始化函数 用法: voidGPIO_Configuration(void) { GPIO_InitTypeDefGPIO_InitStructure;//GPIO状态恢复默认参数 GPI ...
- 计算机网络之流量控制(停止-等待协议、滑动窗口、后退N帧协议GBN、选择重传协议SR)、滑动窗口、可靠传输机制
文章转自:https://blog.csdn.net/weixin_43914604/article/details/104908762 学习课程:<2019王道考研计算机网络> 学习目的 ...
- JAVA笔记1__基本数据类型/输入输出/随机数/数组
/**八种基本数据类型 boolean byte short int long char float double */ public class test1{ public static void ...