
Hive-0.x.x - Enviornment Setup
All Hadoop sub-projects such as Hive, Pig, and HBase support Linux operating system. Therefore, you need to install any Linux flavored OS. The following simple steps are executed for Hive installation:
Step 1: Verifying JAVA Installation
Java must be installed on your system before installing Hive. Let us verify java installation using the following command:
$ java –version
If Java is already installed on your system, you get to see the following response:
java version "1.7.0_71"

Java(TM) SE Runtime Environment (build 1.7.0_71-b13)

Java HotSpot(TM) Client VM (build 25.0-b02, mixed mode)
If java is not installed in your system, then follow the steps given below for installing java.
Installing Java
Step I:
Download java (JDK <latest version> - X64.tar.gz) by visiting the following link http://www.oracle.com/technetwork/java/javase/downloads/jdk7-downloads-1880260.html.
Then jdk-7u71-linux-x64.tar.gz will be downloaded onto your system.
Step II:
Generally you will find the downloaded java file in the Downloads folder. Verify it and extract the jdk-7u71-linux-x64.gz file using the following commands.
$ cd Downloads/

$ ls

jdk-7u71-linux-x64.gz

$ tar zxf jdk-7u71-linux-x64.gz

$ ls

jdk1..0_71 jdk-7u71-linux-x64.gz
Step III:
To make java available to all the users, you have to move it to the location “/usr/local/”. Open root, and type the following commands.
$ su

password:

# mv jdk1..0_71 /usr/local/

# exit
Step IV:
For setting up PATH and JAVA_HOME variables, add the following commands to ~/.bashrc file.
export JAVA_HOME=/usr/local/jdk1..0_71

export PATH=$PATH:$JAVA_HOME/bin
Now apply all the changes into the current running system.
$ source ~/.bashrc
Step V:
Use the following commands to configure java alternatives:
# alternatives --install /usr/bin/java java usr/local/java/bin/java

# alternatives --install /usr/bin/javac javac usr/local/java/bin/javac

# alternatives --install /usr/bin/jar jar usr/local/java/bin/jar

# alternatives --set java usr/local/java/bin/java

# alternatives --set javac usr/local/java/bin/javac

# alternatives --set jar usr/local/java/bin/jar
Now verify the installation using the command java -version from the terminal as explained above.
Step 2: Verifying Hadoop Installation
Hadoop must be installed on your system before installing Hive. Let us verify the Hadoop installation using the following command:
$ hadoop version
If Hadoop is already installed on your system, then you will get the following response:
Hadoop 2.4. Subversion https://svn.apache.org/repos/asf/hadoop/common -r 1529768

Compiled by hortonmu on --07T06:28Z

Compiled with protoc 2.5.

From source with checksum 79e53ce7994d1628b240f09af91e1af4
If Hadoop is not installed on your system, then proceed with the following steps:
Downloading Hadoop
Download and extract Hadoop 2.4.1 from Apache Software Foundation using the following commands.
$ su

password:

# cd /usr/local

# wget http://apache.claz.org/hadoop/common/hadoop-2.4.1/

hadoop-2.4..tar.gz

# tar xzf hadoop-2.4..tar.gz

# mv hadoop-2.4./* to hadoop/

# exit
Installing Hadoop in Pseudo Distributed Mode
The following steps are used to install Hadoop 2.4.1 in pseudo distributed mode.
Step I: Setting up Hadoop
You can set Hadoop environment variables by appending the following commands to ~/.bashrc file.
export HADOOP_HOME=/usr/local/hadoop

export HADOOP_MAPRED_HOME=$HADOOP_HOME

export HADOOP_COMMON_HOME=$HADOOP_HOME

export HADOOP_HDFS_HOME=$HADOOP_HOME

export YARN_HOME=$HADOOP_HOME

export HADOOP_COMMON_LIB_NATIVE_DIR=$HADOOP_HOME/lib/native export

PATH=$PATH:$HADOOP_HOME/sbin:$HADOOP_HOME/bin
Now apply all the changes into the current running system.
$ source ~/.bashrc
Step II: Hadoop Configuration
You can find all the Hadoop configuration files in the location “$HADOOP_HOME/etc/hadoop”. You need to make suitable changes in those configuration files according to your Hadoop infrastructure.
$ cd $HADOOP_HOME/etc/hadoop
In order to develop Hadoop programs using java, you have to reset the java environment variables in hadoop-env.sh file by replacing JAVA_HOME value with the location of java in your system.
export JAVA_HOME=/usr/local/jdk1..0_71
Given below are the list of files that you have to edit to configure Hadoop.
core-site.xml
The core-site.xml file contains information such as the port number used for Hadoop instance, memory allocated for the file system, memory limit for storing the data, and the size of Read/Write buffers.
Open the core-site.xml and add the following properties in between the <configuration> and </configuration> tags.
<configuration>

   <property>

      <name>fs.default.name</name>

      <value>hdfs://localhost:9000</value>

   </property>

</configuration>
hdfs-site.xml
The hdfs-site.xml file contains information such as the value of replication data, the namenode path, and the datanode path of your local file systems. It means the place where you want to store the Hadoop infra.
Let us assume the following data.
dfs.replication (data replication value) = 1

(In the following path /hadoop/ is the user name.

hadoopinfra/hdfs/namenode is the directory created by hdfs file system.)

namenode path = //home/hadoop/hadoopinfra/hdfs/namenode

(hadoopinfra/hdfs/datanode is the directory created by hdfs file system.)

datanode path = //home/hadoop/hadoopinfra/hdfs/datanode
Open this file and add the following properties in between the <configuration>, </configuration> tags in this file.
<configuration>

   <property>

      <name>dfs.replication</name>

      <value>1</value>

   </property>

   <property>

      <name>dfs.name.dir</name>

      <value>file:///home/hadoop/hadoopinfra/hdfs/namenode</value>

   </property>

   <property>

      <name>dfs.data.dir</name>

      <value>file:///home/hadoop/hadoopinfra/hdfs/datanode</value >

   </property>

</configuration>
Note: In the above file, all the property values are user-defined and you can make changes according to your Hadoop infrastructure.
yarn-site.xml
This file is used to configure yarn into Hadoop. Open the yarn-site.xml file and add the following properties in between the <configuration>, </configuration> tags in this file.
<configuration>

   <property>

      <name>yarn.nodemanager.aux-services</name>

      <value>mapreduce_shuffle</value>

   </property>

</configuration>
mapred-site.xml
This file is used to specify which MapReduce framework we are using. By default, Hadoop contains a template of yarn-site.xml. First of all, you need to copy the file from mapred-site,xml.template to mapred-site.xml file using the following command.
$ cp mapred-site.xml.template mapred-site.xml
Open mapred-site.xml file and add the following properties in between the <configuration>, </configuration> tags in this file.
<configuration>

   <property>

      <name>mapreduce.framework.name</name>

      <value>yarn</value>

   </property>

</configuration>
Verifying Hadoop Installation
The following steps are used to verify the Hadoop installation.
Step I: Name Node Setup
Set up the namenode using the command “hdfs namenode -format” as follows.
$ cd ~

$ hdfs namenode -format
The expected result is as follows.
// :: INFO namenode.NameNode: STARTUP_MSG:

/************************************************************

STARTUP_MSG: Starting NameNode

STARTUP_MSG: host = localhost/192.168.1.11

STARTUP_MSG: args = [-format]

STARTUP_MSG: version = 2.4.1

...

...

10/24/14 21:30:56 INFO common.Storage: Storage directory

/home/hadoop/hadoopinfra/hdfs/namenode has been successfully formatted.

10/24/14 21:30:56 INFO namenode.NNStorageRetentionManager: Going to

retain 1 images with txid >= 0

10/24/14 21:30:56 INFO util.ExitUtil: Exiting with status 0

10/24/14 21:30:56 INFO namenode.NameNode: SHUTDOWN_MSG:

/************************************************************

SHUTDOWN_MSG: Shutting down NameNode at localhost/192.168.1.11

 ************************************************************/
Step II: Verifying Hadoop dfs
The following command is used to start dfs. Executing this command will start your Hadoop file system.
$ start-dfs.sh
The expected output is as follows:
// ::

Starting namenodes on [localhost]

localhost: starting namenode, logging to /home/hadoop/hadoop-2.4./logs/hadoop-hadoop-namenode-localhost.out

localhost: starting datanode, logging to /home/hadoop/hadoop-2.4./logs/hadoop-hadoop-datanode-localhost.out

Starting secondary namenodes [0.0.0.0]
Step III: Verifying Yarn Script
The following command is used to start the yarn script. Executing this command will start your yarn daemons.
$ start-yarn.sh
The expected output is as follows:
starting yarn daemons

starting resourcemanager, logging to /home/hadoop/hadoop-2.4./logs/yarn-hadoop-resourcemanager-localhost.out

localhost: starting nodemanager, logging to /home/hadoop/hadoop-2.4./logs/yarn-hadoop-nodemanager-localhost.out
Step IV: Accessing Hadoop on Browser
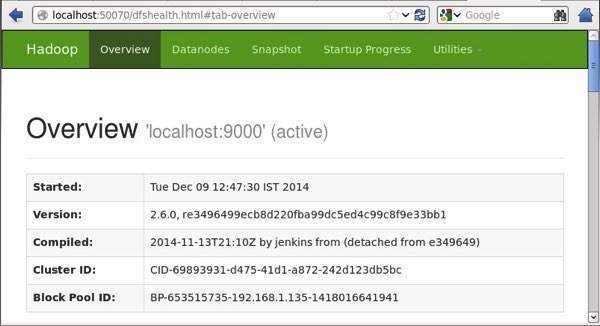
The default port number to access Hadoop is 50070. Use the following url to get Hadoop services on your browser.
http://localhost:50070/
Step V: Verify all applications for cluster
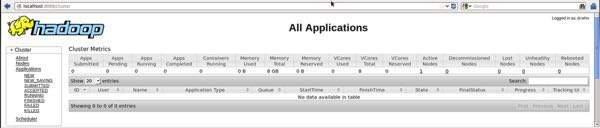
The default port number to access all applications of cluster is 8088. Use the following url to visit this service.
http://localhost:8088/
Step 3: Downloading Hive
We use hive-0.14.0 in this tutorial. You can download it by visiting the following link http://apache.petsads.us/hive/hive-0.14.0/. Let us assume it gets downloaded onto the /Downloads directory. Here, we download Hive archive named “apache-hive-0.14.0-bin.tar.gz” for this tutorial. The following command is used to verify the download:
$ cd Downloads

$ ls
On successful download, you get to see the following response:
apache-hive-0.14.0-bin.tar.gz
Step 4: Installing Hive
The following steps are required for installing Hive on your system. Let us assume the Hive archive is downloaded onto the /Downloads directory.
Extracting and verifying Hive Archive
The following command is used to verify the download and extract the hive archive:
$ tar zxvf apache-hive-0.14.-bin.tar.gz

$ ls
On successful download, you get to see the following response:
apache-hive-0.14.0-bin apache-hive-0.14.0-bin.tar.gz
Copying files to /usr/local/hive directory
We need to copy the files from the super user “su -”. The following commands are used to copy the files from the extracted directory to the /usr/local/hive” directory.
$ su -

passwd:

# cd /home/user/Download

# mv apache-hive-0.14.-bin /usr/local/hive

# exit
Setting up environment for Hive
You can set up the Hive environment by appending the following lines to ~/.bashrc file:
export HIVE_HOME=/usr/local/hive

export PATH=$PATH:$HIVE_HOME/bin

export CLASSPATH=$CLASSPATH:/usr/local/Hadoop/lib/*:.

export CLASSPATH=$CLASSPATH:/usr/local/hive/lib/*:.
The following command is used to execute ~/.bashrc file.
$ source ~/.bashrc
Step 5: Configuring Hive
To configure Hive with Hadoop, you need to edit the hive-env.sh file, which is placed in the $HIVE_HOME/conf directory. The following commands redirect to Hive config folder and copy the template file:
$ cd $HIVE_HOME/conf

$ cp hive-env.sh.template hive-env.sh
Edit the hive-env.sh file by appending the following line:
export HADOOP_HOME=/usr/local/hadoop
Hive installation is completed successfully. Now you require an external database server to configure Metastore. We use Apache Derby database.
Step 6: Downloading and Installing Apache Derby
Follow the steps given below to download and install Apache Derby:
Downloading Apache Derby
The following command is used to download Apache Derby. It takes some time to download.
$ cd ~

$ wget http://archive.apache.org/dist/db/derby/db-derby-10.4.2.0/db-derby-10.4.2.0-bin.tar.gz
The following command is used to verify the download:
$ ls
On successful download, you get to see the following response:
db-derby-10.4.2.0-bin.tar.gz
Extracting and verifying Derby archive
The following commands are used for extracting and verifying the Derby archive:
$ tar zxvf db-derby-10.4.2.0-bin.tar.gz

$ ls
On successful download, you get to see the following response:
db-derby-10.4.2.0-bin db-derby-10.4.2.0-bin.tar.gz
Copying files to /usr/local/derby directory
We need to copy from the super user “su -”. The following commands are used to copy the files from the extracted directory to the /usr/local/derby directory:
$ su -

passwd:

# cd /home/user

# mv db-derby-10.4.2.0-bin /usr/local/derby

# exit
Setting up environment for Derby
You can set up the Derby environment by appending the following lines to ~/.bashrc file:
export DERBY_HOME=/usr/local/derby

export PATH=$PATH:$DERBY_HOME/bin

export CLASSPATH=$CLASSPATH:$DERBY_HOME/lib/derby.jar:$DERBY_HOME/lib/derbytools.jar
The following command is used to execute ~/.bashrc file:
$ source ~/.bashrc
Create a directory to store Metastore
Create a directory named data in $DERBY_HOME directory to store Metastore data.
$ mkdir $DERBY_HOME/data
Derby installation and environmental setup is now complete.
Step 7: Configuring Metastore of Hive
Configuring Metastore means specifying to Hive where the database is stored. You can do this by editing the hive-site.xml file, which is in the $HIVE_HOME/conf directory. First of all, copy the template file using the following command:
$ cd $HIVE_HOME/conf

$ cp hive-default.xml.template hive-site.xml
Edit hive-site.xml and append the following lines between the <configuration> and </configuration> tags:
<property>

   <name>javax.jdo.option.ConnectionURL</name>

   <value>jdbc:derby://localhost:1527/metastore_db;create=true</value>

   <description>JDBC connect string for a JDBC metastore</description>

</property>
Create a file named jpox.properties and add the following lines into it:
javax.jdo.PersistenceManagerFactoryClass = org.jpox.PersistenceManagerFactoryImpl

org.jpox.autoCreateSchema = false

org.jpox.validateTables = false

org.jpox.validateColumns = false

org.jpox.validateConstraints = false

org.jpox.storeManagerType = rdbms

org.jpox.autoCreateSchema = true

org.jpox.autoStartMechanismMode = checked

org.jpox.transactionIsolation = read_committed

javax.jdo.option.DetachAllOnCommit = true

javax.jdo.option.NontransactionalRead = true

javax.jdo.option.ConnectionDriverName = org.apache.derby.jdbc.ClientDriver

javax.jdo.option.ConnectionURL = jdbc:derby://hadoop1:1527/metastore_db;create = true

javax.jdo.option.ConnectionUserName = APP

javax.jdo.option.ConnectionPassword = mine
Step 8: Verifying Hive Installation
Before running Hive, you need to create the /tmp folder and a separate Hive folder in HDFS. Here, we use the /user/hive/warehouse folder. You need to set write permission for these newly created folders as shown below:
chmod g+w
Now set them in HDFS before verifying Hive. Use the following commands:
$ $HADOOP_HOME/bin/hadoop fs -mkdir /tmp

$ $HADOOP_HOME/bin/hadoop fs -mkdir /user/hive/warehouse

$ $HADOOP_HOME/bin/hadoop fs -chmod g+w /tmp

$ $HADOOP_HOME/bin/hadoop fs -chmod g+w /user/hive/warehouse
The following commands are used to verify Hive installation:
$ cd $HIVE_HOME

$ bin/hive
On successful installation of Hive, you get to see the following response:
Logging initialized using configuration in jar:file:/home/hadoop/hive-0.9./lib/hive-common-0.9..jar!/hive-log4j.properties

Hive history file=/tmp/hadoop/hive_job_log_hadoop_201312121621_1494929084.txt

………………….

hive>
The following sample command is executed to display all the tables:
hive> show tables;

OK

Time taken: 2.798 seconds

hive>
Hive-0.x.x - Enviornment Setup的更多相关文章
- hadoop2.2.0 + hbase 0.94 + hive 0.12 配置记录
一开始用hadoop2.2.0 + hbase 0.96 + hive 0.12 ,基本全部都配好了.只有在hive中查询hbase的表出错.以直报如下错误: java.io.IOException: ...
- hive-0.12升级成hive 0.13.1
安装了0.12之后,听说0.13.1有许多新的特性,包括永久函数,所以想更新成0.13版的(元数据放在mysql中) 2014年8月5日实验成功 hive0.13.1的新特性 新特性详见 http:/ ...
- hive 0.11的安装配置
一.上传hive 0.11解压后的文件到linux 1.用的版本是shark站点提供的,可能是针对shark修改了代码. 2.追加mysql.oracle两个jdbc驱动包到lib目录下. 二.配置相 ...
- hive 0.10 0.11新增特性综述
我们的hive版本升迁经历了0.7.1 -> 0.8.1 -> 0.9.0,并且线上shark所依赖的hive版本也停留在0.9.0上,在这些版本上有我们自己的bug fix patch和 ...
- Hive 0.12.0安装指南
目录 目录 1 1. 前言 1 2. 约定 1 3. 服务端口 2 4. 安装MySQL 2 4.1. 安装MySQL 2 4.2. 创建Hive元数据库 2 5. 安装步骤 3 5.1. 下载Hiv ...
- 【甘道夫】Hive 0.13.1 on Hadoop2.2.0 + Oracle10g部署详细解释
环境: hadoop2.2.0 hive0.13.1 Ubuntu 14.04 LTS java version "1.7.0_60" Oracle10g ***欢迎转载.请注明来 ...
- centos6.4 安装 hive 0.12.0
环境:centos6.4 64bit, 前提:hadoop已经正常运行,可以使用hadoop dfsadmin -report查看 hive 解压 tar zcvf hive-0.12.0.ta ...
- Hive 0.12 Caused by: MetaException(message:Version information not found in metastore. )解决方法
配置完成Mysql存储元数据信息,启动后测试show tables报错ERROR exec.DDLTask: org.apache.hadoop.hive.ql.metadata.HiveExcept ...
- hadoop 1.1.2和 hive 0.10 和hbase 0.94.9整合
今天弄了一下hive0.10和hbase0.94.9整合,需要设置的并不多,但是也遇到了一些问题. 1.复制jar包 拷贝hbase-0.94.9.jar,zookeeper-3.4.5.jar,pr ...
随机推荐
- 一步一步使用ABP框架搭建正式项目系列教程之本地化详解
返回总目录<一步一步使用ABP框架搭建正式项目系列教程> 本篇目录 扯扯本地化 ABP中的本地化 小结 扯扯本地化 本节来说说本地化,也有叫国际化.全球化的,不管怎么个叫法,反正道理都是一 ...
- .NET 基础一步步一幕幕[方法、结构、枚举]
方法.结构.枚举 方法: 将一堆代码进行重用的一种机制. 语法: [访问修饰符] 返回类型 <方法名>(参数列表){ 方法主体: } 返回值类型:如果不需要写返回值,写void 方法名:P ...
- SqlHelper中IN集合场景下的参数处理
我手头有个古老的项目,持久层用的是古老的ADO.net.前两天去昆明旅游,其中的一个景点是云南民族村,通过导游介绍知道了一个古老的民族——基诺族,“基”在这个族内代表舅舅,“基诺”意为“跟在舅舅后边” ...
- eclipse打开文件所在目录
设置 添加扩展工具,添加步骤如下: Run-->External Tools-->External Tools Configurations... new 一个 programlocati ...
- 多线程映射工具——ThreadLocal
ThreadLocal相当于一个Map<Thread, T>,各线程使用自己的线程对象Thread.currentThread()作为键存取数据,但ThreadLocal实际上是一个包装了 ...
- 面向对象的JS(一)
JavaScript是弱类型,可变性强 /*JavaScript和其他的语言类似,也是面向对象,自然也就是存在类和对象(对象是类的实例化)*/ //1.JS对象 var empty = {}; //没 ...
- 读书笔记--SQL必知必会02--检索数据
2.1 SELECT语句 SELECT语句的用途是从一个或多个表中检索信息. 关键字(keyword) 作为SQL组成部分的保留字.关键字不能作为表或列的名字. 2.2 检索单个列 多条SQL语句必须 ...
- [占位-未完成]scikit-learn一般实例之十一:异构数据源的特征联合
[占位-未完成]scikit-learn一般实例之十一:异构数据源的特征联合 Datasets can often contain components of that require differe ...
- Node学习笔记(三):基于socket.io web版你画我猜(一)
经过惨淡的面试,也是知道了自己的不足,刚好最近在学习node,心中便有了做一个web版的你画我猜的想法 首先说下思路,在做准备工作的时候,有两个大概的思路: 1.规定一块div,捕捉鼠标事件,动态生成 ...
- Entity Framework 教程——安装Entity Framework环境
安装Entity Framework环境 Entity Framework 5.0 API分布在两个地方,一个可在NuGet包管理器中找到,一个存在于.NET framework中..NET fram ...