
虚拟机上安装Cell节点(12.1.2.3.3)
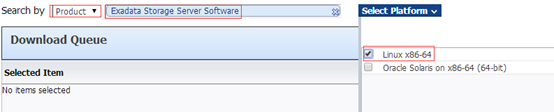
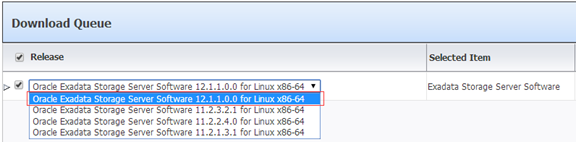
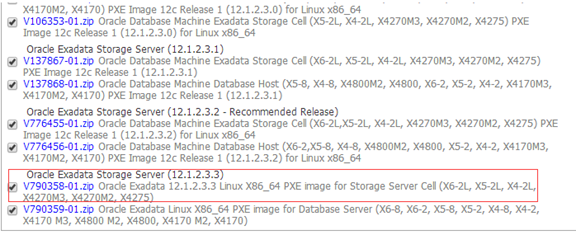
安装介质下载
打开firefox,输入:https://edelivery.oracle.com

点击"Sign In",输入帐号、密码,登陆edelivery网站。
安装操作系统
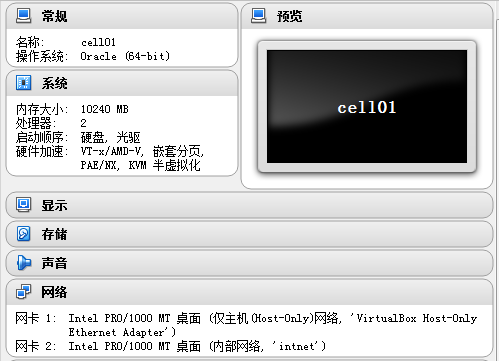
首先,安装一种虚拟机软件,例如virtualbox, 然后配置一台linux虚拟机,内存分配至少10GB,注意如果内存设置太少,会导致CELLSRV服务无法启动(具体报错信息,可参考后续内容);分配两块网卡,eth0为管理网卡,eth1为IB心跳网卡。(注意:其实分配一块网卡就够,但为了最大程度地模拟exadata的存储节点,所以将管理网与IB网分离。)
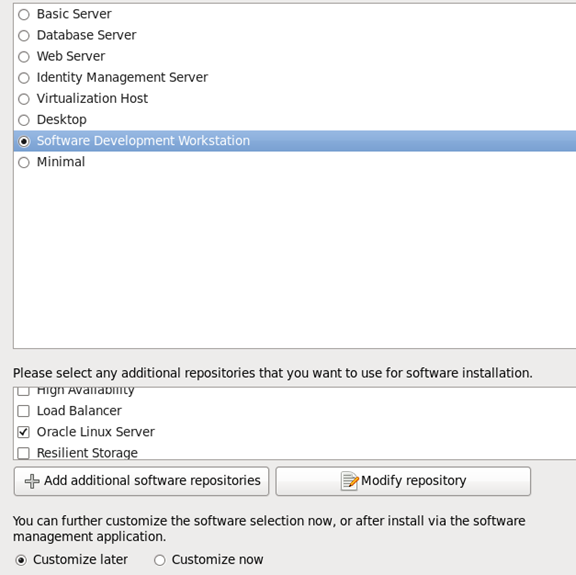
在虚拟机中安装Oracle Linux 6.6操作系统,整个操作系统的安装过程比较简单,只需要注意的是在安装过程中选上"软件开发"即可。
安装系统包
mkdir /mnt/cdrom
mount /dev/cdrom /mnt/cdrom
cd /etc/yum.repos.d
rm -rf public-yum-ol6.repo
vi cdrom-oel6.repo
添加如下内容:
[base]
name=iso
baseurl=file:///mnt/cdrom
gpgcheck=1
enabled=1
gpgkey=file:///mnt/cdrom/RPM-GPG-KEY-oracle
# yum install -y lm_sensors net-snmp net-snmp-utils perl-Compress-Zlib perl-HTML-Parser perl-libwww-perl perl-HTML-Tagset
系统网络配置
1、网络配置如下:
[root@cell03 ~]# more /etc/sysconfig/network-scripts/ifcfg-eth0
DEVICE=eth0
TYPE=Ethernet
UUID=997505ac-4d9a-47cc-a5ae-452c9f185fcb
ONBOOT=yes
NM_CONTROLLED=yes
BOOTPROTO=none
HWADDR=08:00:27:3E:67:F7
IPADDR=192.168.56.165
PREFIX=24
GATEWAY=192.168.56.1
DEFROUTE=yes
IPV4_FAILURE_FATAL=yes
IPV6INIT=no
NAME="System eth0"
[root@cell03 ~]#
[root@cell03 ~]# more /etc/sysconfig/network-scripts/ifcfg-eth1
DEVICE=eth1
TYPE=Ethernet
UUID=0a4024ae-8ae7-480e-8a7f-2ddd8ae0db59
ONBOOT=yes
NM_CONTROLLED=yes
BOOTPROTO=none
HWADDR=08:00:27:3A:A4:CB
IPADDR=10.0.0.15
PREFIX=24
DEFROUTE=yes
IPV4_FAILURE_FATAL=yes
IPV6INIT=no
NAME="System eth1"
[root@cell03 ~]#
2、host文件配置
[root@cell03 ~]# more /etc/hosts
127.0.0.1 localhost localhost.localdomain localhost4 localhost4.localdomain4
::1 localhost localhost.localdomain localhost6 localhost6.localdomain6
192.168.56.162 dmdb02.oracle.com dmdb02
10.0.0.12 dmdb02-priv.oracle.com dmdb02-priv
192.168.56.165 cell03.oracle.com cell03
10.0.0.15 cell03-priv.oracle.com cell03-priv
[root@cell03 ~]#
创建目录
# chmod 775 /var/log/oracle
# mkdir /opt/oracle
# chmod 775 /opt/oracle
配置系统内核
# vi /etc/sysctl.conf
添加如下内容:
fs.file-max = 65536
fs.aio-max-nr=50000000
vm.min_free_kbytes=512000
net.core.rmem_default=262144
net.core.wmem_default=262144
net.core.rmem_max = 8388608
net.core.wmem_max = 4194304
执行/sbin/sysctl -p 命令,使内核参数生效。
# vi /etc/security/limits.conf
添加如下内容:
* soft nofile 65536
* hard nofile 65536
root soft nofile 131072
root hard nofile 131072
celladmin soft nproc 2047
celladmin hard nproc 16384
celladmin soft nofile 131072
celladmin hard nofile 131072
# vi /etc/pam.d/login
添加如下内容:
session required pam_limits.so
配置RDS协议
# modprobe rds_tcp
# modprobe rds_rdma
vi /etc/modprobe.d/rds.conf
添加如下内容:
install rds /sbin/modprobe --ignore-install rds && /sbin/modprobe rds_tcp && /sbin/modprobe rds_rdma
关闭防火墙和selinux
# chkconfig iptables off
# service iptables stop
# chkconfig ip6tables off
# service ip6tables stop
同时,修改/etc/selinux/config 文件,将SELINUX=enforcing改为SELINUX=disabled
重要说明:
存储节点严禁开启防火墙。在Exadata真实环境中,存储节点的防火墙服务是开启的,但未进行任何配置。后期在运维过程中,不要尝试配置存储节点的防火墙服务,因为一些端口的关闭,会导致cellsrv服务无法与MS或RS服务通信。
安装Cell软件
1、安装java:
从下载的存储软件V790358-01.zip中,可以解压出nfsimg-12.1.2.3.3-161013-DL180.tar包,进一步解压,会生成cellbits/cellrpms.tbz文件,该文件其实是一个ZIP包,对该文件继续解压,会解压出jdk1.8.0_66-1.8.0_66-fcs.x86_64.rpm.
[root@cell03 tmp]# rpm -ihv jdk1.8.0_66-1.8.0_66-fcs.x86_64.rpm
warning: jdk1.8.0_66-1.8.0_66-fcs.x86_64.rpm: Header V3 DSA/SHA1 Signature, key ID 1e5e0159: NOKEY
Preparing... ########################################### [100%]
1:jdk1.8.0_66 ########################################### [100%]
Unpacking JAR files...
tools.jar...
plugin.jar...
javaws.jar...
deploy.jar...
rt.jar...
jsse.jar...
charsets.jar...
localedata.jar...
jfxrt.jar...
[root@cell03 tmp]#
2、安装cell软件:
从下载的存储软件V790358-01.zip中,进一步解压,会生成cellbits/cell.bin文件,该文件其实是一个ZIP包,对该文件继续解压,会解压出cell的 RPM安装包cell-12.1.2.3.3_LINUX.X64_161013-1.x86_64.rpm
[root@cell03 tmp]# unzip cell.bin
Archive: cell.bin
warning [cell.bin]: 25582 extra bytes at beginning or within zipfile
(attempting to process anyway)
inflating: cell-12.1.2.3.3_LINUX.X64_161013-1.x86_64.rpm
[root@cell03 tmp]#
正式安装cell软件:
[root@cell03 tmp]# rpm -ihv cell-12.1.2.3.3_LINUX.X64_161013-1.x86_64.rpm
error: Failed dependencies:
perl(XML::Simple) is needed by cell-12.1.2.3.3_LINUX.X64_161013-1.x86_64
[root@cell03 tmp]#
从以上报错信息可以看出,需要依赖perl(XML::Simple)包,这个包可以从安装介质中抽取出来,这个包在cellbits /commonos.tbz文件中,将commonos.tbz文件解压,即可得到perl(XML::Simple)包。
[root@cell03 tmp]# rpm -ihv perl-XML-Simple-2.18-6.el6.noarch.rpm
Preparing... ########################################### [100%]
1:perl-XML-Simple ########################################### [100%]
[root@cell03 tmp]# rpm -ihv cell-12.1.2.3.3_LINUX.X64_161013-1.x86_64.rpm
Preparing... ########################################### [100%]
Pre Installation steps in progress ...
Host name from hostname comamnd is cell03.oracle.com
Host name to use: cell03.oracle.com
1:cell ########################################### [100%]
Post Installation steps in progress ...
Set cellusers group for /opt/oracle/cell12.1.2.3.3_LINUX.X64_161013/cellsrv/deploy/log directory
Set 775 permissions for /opt/oracle/cell12.1.2.3.3_LINUX.X64_161013/cellsrv/deploy/log directory
/opt/oracle/cell12.1.2.3.3_LINUX.X64_161013/cellsrv/deploy
Installation SUCCESSFUL.
Done. Please Login as user celladmin, startup RS and MS, then create cell to startup CELLSRV to complete cell configuration.
If this is a manual installation, please stop and restart ExaWatcher to pick up newly installed binaries.
You can run "/opt/oracle.ExaWatcher/ExaWatcher.sh --stop" and then "/opt/oracle.ExaWatcher/ExaWatcher.sh --fromconf" to stop and restart ExaWatcher.
Logout and then re-login to use the new cell environment.
[root@cell03 tmp]#
至此,cell存储软件安装完毕。
调试Cell软件
安装完cell软件,在后续启动cell服务的过程中会出现如下一些错误:
CellCLI> alter cell restart services all
Stopping the RS, CELLSRV, and MS services...
The SHUTDOWN of services was successful.
Starting the RS, CELLSRV, and MS services...
Getting the state of RS services... running
Starting CELLSRV services...
The STARTUP of CELLSRV services was not successful.
CELL-01531: Unable to parse the cellinit.ora file due to incorrect parameters in the file.
Starting MS services...
The STARTUP of MS services was successful.
CellCLI>
解决办法:
检查cellinit.ora文件,发现该文件内容为空,可以手动修改该文件,添加如下内容:
ipaddress1=10.0.0.15/24
HTTP_PORT=8888
错误2:
Sat Jan 07 03:59:47 2017
CELL process id=5034
CELL host name=cell03.oracle.com
CELL version=12.1.2.3.3,label=OSS_12.1.2.3.3_LINUX.X64_161013,Fri_Oct_14_02:57:46_PDT_2016
CELLSRV version md5: f13842609a16ff8687fafcec297fc915
OS Stats: Physical memory: 3696 MB. Num cores: 2
CELLSRV configuration parameters:
Cellsrv max memory not set. Total available mem: 3696 MB is less than required minimum: 3891 MB.
Running on simulated hardware in production environment
ocl_si_extent_desc_alloc: Extent descriptor allocation failed. Error:3 (Invalid parameters)
ocl_si_cache_config: SI alloc extent desc failed. num extent:0
Sat Jan 07 03:59:47 2017
[RS] monitoring process /opt/oracle/cell12.1.2.3.3_LINUX.X64_161013/cellsrv/bin/cellrsomt (pid: 4992) returned with error: 161
Errors in file /opt/oracle/cell12.1.2.3.3_LINUX.X64_161013/log/diag/asm/cell/cell03/trace/svtrc_5034_main.trc (incident=137):
ORA-00600: internal error code, arguments: [ocl_sarr_init:zero total number of items], [ocl_sarr.c@174], [], [], [], [], [], [], [], [], [], []
Incident details in: /opt/oracle/cell12.1.2.3.3_LINUX.X64_161013/log/diag/asm/cell/cell03/incident/incdir_137/svtrc_5034_main_i137.trc
System state dump completed (with 1 failures)
Sweep [inc][137]: completed
CELLSRV error - ORA-600 internal error
解决办法:
存储节点虚拟机分配的物理内存太小了,增大虚拟机的物理内存,该问题会消失。
注意:
经过大量测试,给虚拟机分配的内存必须超过10000M,否则因为内存问题,除了以上错误之外,还会报各种不同的错误,这里不再列举其它错误信息。
错误3:
CellCLI> alter cell restart services all
Stopping the RS, CELLSRV, and MS services...
The SHUTDOWN of services was successful.
Starting the RS, CELLSRV, and MS services...
Getting the state of RS services... running
Starting CELLSRV services...
The STARTUP of CELLSRV services was successful.
Starting MS services...
The STARTUP of MS services was not successful.
CELL-01554: MS startup failed for unknown reasons.
CellCLI>
alert日志报错信息如下:
Wed Nov 16 11:45:07 2016
[RS] Start service MS failed with error: -74.
Wed Nov 16 11:45:07 2016
[RS] monitoring process /opt/oracle/cell12.1.2.3.1_LINUX.X64_160411/cellsrv/bin/cellrsmmt (pid: 12760) returned with error: 162
Wed Nov 16 11:45:07 2016
[RS] Service MS is no longer present
Errors in file /opt/oracle/cell12.1.2.3.1_LINUX.X64_160411/log/diag/asm/cell/sddxcel06/trace/rstrc_12752_mmt.trc (incident=57):
RS-7445 [Serv MS is absent] [It will be restarted] [] [] [] [] [] [] [] [] [] []
Incident details in: /opt/oracle/cell12.1.2.3.1_LINUX.X64_160411/log/diag/asm/cell/sddxcel06/incident/incdir_57/rstrc_12752_mmt_i57.trc
Sweep [inc][57]: completed
Wed Nov 16 11:45:07 2016
[RS] Stopped Service MS
解决办法:
修改/opt/oracle/cell/cellsrv/deploy/msdomain/bin/setDomainEnv.sh文件:
将:
JAVA_OPTIONS="-XX:-UseLargePages -XX:ParallelGCThreads=8 -verbose:gc -Xloggc:../log/wls_gc6932.trc -XX:NumberOfGCLogFiles=5 .....(内容太多,略)
修改为:
JAVA_OPTIONS="-XX:-UseLargePages -XX:ParallelGCThreads=8 ........(内容太多,略) .......-Dweblogic.ListenPort=8888 -Djava.library.path=/opt/oracle/cell12.1.2.3.3_LINUX.X64_161013/cellsrv/lib -Djava.security.egd=file:/dev/./urandom"
即将存储软件的库文件路径写入java的环境变量中。
错误4:
[RS] Start service CELLSRV failed with error: -63.
Sun Jan 08 09:13:54 2017
RSBK version=12.1.2.3.3,label=OSS_12.1.2.3.3_LINUX.X64_161013,Fri_Oct_14_02:57:42_PDT_2016
[RS] Started Service RS_BACKUP with pid 10118
Sun Jan 08 09:13:54 2017
[RS] monitoring process /opt/oracle/cell12.1.2.3.3_LINUX.X64_161013/cellsrv/bin/cellrsomt (pid: 10115) returned with error: 134
[RS] Monitoring process for service CELLSRV was told not to resuscitate. Disabling monitoring process.
[RS] Kill previous monitoring process for core RS
Sun Jan 08 09:13:54 2017
[RS] Started monitoring process /opt/oracle/cell12.1.2.3.3_LINUX.X64_161013/cellsrv/bin/cellrssmt with pid 10132
Sun Jan 08 09:13:54 2017
[RS] Started monitoring process /opt/oracle/cell12.1.2.3.3_LINUX.X64_161013/cellsrv/bin/cellrsomt with pid 10188
解决办法:
这个故障是由于防火墙未关闭。 OEL6存在一个问题,即chkconfig iptables off 无法关闭防火墙的自动启动功能,即使执行了该命令,当操作系统重启后,还是会自动启动防火墙。
需要将以下命令写入/etc/rc.d/rc.local中:
# chkconfig iptables off
# service iptables stop
# chkconfig ip6tables off
# service ip6tables stop
检查cell服务状态:
[root@cell03 ~]# cellcli -e list cell detail
name: cell03
cellVersion: OSS_12.1.2.3.3_LINUX.X64_161013
cpuCount: 2/4
diagHistoryDays: 7
fanCount: 0/0
fanStatus: normal
flashCacheMode: WriteThrough
id: c3043721-8031-4541-8d35-88a7ac489529
interconnectCount: 0
iormBoost: 0.0
ipaddress1: 10.0.0.15/24
kernelVersion: 3.8.13-44.1.1.el6uek.x86_64
makeModel: Fake hardware
memoryGB: 10
metricHistoryDays: 7
offloadGroupEvents:
powerCount: 0/0
powerStatus: normal
releaseImageStatus: success
releaseVersion: 12.1.2.3.3
releaseTrackingBug: 24441458
securityCert: PrivateKey OK
Certificate: Subject CN=cell03.oracle.com,OU=Oracle Exadata,O=Oracle Corporation,L=Redwood City,ST=California,C=US
Issuer CN=cell03.oracle.com,OU=Oracle Exadata,O=Oracle Corporation,L=Redwood City,ST=California,C=US
status: online
temperatureReading: 0.0
temperatureStatus: normal
upTime: 0 days, 0:09
cellsrvStatus: running
msStatus: running
rsStatus: running
[root@cell03 ~]#
[root@cell03 ~]#
可见,cellsrv、MS、RS三个服务都是running状态,说明cell存储软件在虚拟机上配置成功。
建立虚拟的磁盘和闪盘
# mkdir -p /opt/oracle/cell/disks/raw
# cd /opt/oracle/cell/disks/raw
# vi dd.sh
添加如下内容:
dd if=/dev/zero of=disk01 bs=1M count=1024
dd if=/dev/zero of=disk02 bs=1M count=1024
dd if=/dev/zero of=disk03 bs=1M count=1024
dd if=/dev/zero of=disk04 bs=1M count=1024
dd if=/dev/zero of=disk05 bs=1M count=1024
dd if=/dev/zero of=disk06 bs=1M count=1024
dd if=/dev/zero of=disk07 bs=1M count=1024
dd if=/dev/zero of=disk08 bs=1M count=1024
dd if=/dev/zero of=disk09 bs=1M count=1024
dd if=/dev/zero of=disk10 bs=1M count=1024
dd if=/dev/zero of=disk11 bs=1M count=1024
dd if=/dev/zero of=disk12 bs=1M count=1024
dd if=/dev/zero of=FLASH01 bs=1M count=1024
dd if=/dev/zero of=FLASH02 bs=1M count=1024
dd if=/dev/zero of=FLASH03 bs=1M count=1024
dd if=/dev/zero of=FLASH04 bs=1M count=1024
[root@cell03 raw]# chmod +x dd.sh
[root@cell03 raw]# ./dd.sh
[root@cell03 raw]# rm -rf dd.sh
[root@cell03 raw]# ll
total 16777280
-rw-r--r-- 1 root root 1073741824 Jan 6 15:28 disk01
-rw-r--r-- 1 root root 1073741824 Jan 6 15:29 disk02
-rw-r--r-- 1 root root 1073741824 Jan 6 15:29 disk03
-rw-r--r-- 1 root root 1073741824 Jan 6 15:29 disk04
-rw-r--r-- 1 root root 1073741824 Jan 6 15:29 disk05
-rw-r--r-- 1 root root 1073741824 Jan 6 15:29 disk06
-rw-r--r-- 1 root root 1073741824 Jan 6 15:29 disk07
-rw-r--r-- 1 root root 1073741824 Jan 6 15:29 disk08
-rw-r--r-- 1 root root 1073741824 Jan 6 15:29 disk09
-rw-r--r-- 1 root root 1073741824 Jan 6 15:29 disk10
-rw-r--r-- 1 root root 1073741824 Jan 6 15:29 disk11
-rw-r--r-- 1 root root 1073741824 Jan 6 15:29 disk12
-rw-r--r-- 1 root root 1073741824 Jan 6 15:29 FLASH01
-rw-r--r-- 1 root root 1073741824 Jan 6 15:29 FLASH02
-rw-r--r-- 1 root root 1073741824 Jan 6 15:29 FLASH03
-rw-r--r-- 1 root root 1073741824 Jan 6 15:29 FLASH04
[root@cell03 raw]#
执行dd.sh脚本,创建对应的磁盘和闪盘:其中磁盘12块,每块大小为1GB,闪盘4块,每块大小也是1GB。
创建celldisk
[root@cell03 raw]# cellcli
CellCLI: Release 12.1.2.3.3 - Production on Fri Jan 06 15:33:57 CST 2017
Copyright (c) 2007, 2016, Oracle. All rights reserved.
CellCLI> create celldisk all
CellDisk FD_00_cell03 successfully created
CellDisk FD_01_cell03 successfully created
CellDisk FD_02_cell03 successfully created
CellDisk FD_03_cell03 successfully created
CellDisk CD_disk01_cell03 successfully created
CellDisk CD_disk02_cell03 successfully created
CellDisk CD_disk03_cell03 successfully created
CellDisk CD_disk04_cell03 successfully created
CellDisk CD_disk05_cell03 successfully created
CellDisk CD_disk06_cell03 successfully created
CellDisk CD_disk07_cell03 successfully created
CellDisk CD_disk08_cell03 successfully created
CellDisk CD_disk09_cell03 successfully created
CellDisk CD_disk10_cell03 successfully created
CellDisk CD_disk11_cell03 successfully created
CellDisk CD_disk12_cell03 successfully created
CellCLI>
创建flashlog和flashcache
CellCLI> create flashlog all
Flash log cell03_FLASHLOG successfully created
CellCLI> create flashcache all
Flash cache cell03_FLASHCACHE successfully created
CellCLI> list flashcache detail
name: cell03_FLASHCACHE
cellDisk: FD_01_cell03,FD_00_cell03,FD_02_cell03,FD_03_cell03
creationTime: 2017-01-06T15:38:12+08:00
degradedCelldisks:
effectiveCacheSize: 3.3125G
id: 5fb44bac-a28a-4881-ba0f-09ff6b8fe023
size: 3.3125G
status: normal
CellCLI> list flashlog detail
name: cell03_FLASHLOG
cellDisk: FD_01_cell03,FD_02_cell03,FD_00_cell03,FD_03_cell03
creationTime: 2017-01-06T15:37:48+08:00
degradedCelldisks:
effectiveSize: 512M
efficiency: 100.0
id: 61e9b2fe-8673-4b1f-99f2-aa74b9321490
size: 512M
status: normal
CellCLI>
创建griddisk
CellCLI> create griddisk all harddisk prefix=DATA, size=700M
GridDisk DATA_CD_disk01_cell03 successfully created
GridDisk DATA_CD_disk02_cell03 successfully created
GridDisk DATA_CD_disk03_cell03 successfully created
GridDisk DATA_CD_disk04_cell03 successfully created
GridDisk DATA_CD_disk05_cell03 successfully created
GridDisk DATA_CD_disk06_cell03 successfully created
GridDisk DATA_CD_disk07_cell03 successfully created
GridDisk DATA_CD_disk08_cell03 successfully created
GridDisk DATA_CD_disk09_cell03 successfully created
GridDisk DATA_CD_disk10_cell03 successfully created
GridDisk DATA_CD_disk11_cell03 successfully created
GridDisk DATA_CD_disk12_cell03 successfully created
CellCLI> create griddisk all harddisk prefix=RECO
GridDisk RECO_CD_disk01_cell03 successfully created
GridDisk RECO_CD_disk02_cell03 successfully created
GridDisk RECO_CD_disk03_cell03 successfully created
GridDisk RECO_CD_disk04_cell03 successfully created
GridDisk RECO_CD_disk05_cell03 successfully created
GridDisk RECO_CD_disk06_cell03 successfully created
GridDisk RECO_CD_disk07_cell03 successfully created
GridDisk RECO_CD_disk08_cell03 successfully created
GridDisk RECO_CD_disk09_cell03 successfully created
GridDisk RECO_CD_disk10_cell03 successfully created
GridDisk RECO_CD_disk11_cell03 successfully created
GridDisk RECO_CD_disk12_cell03 successfully created
CellCLI>
CellCLI> list griddisk RECO_CD_disk12_cell03 detail
name: RECO_CD_disk12_cell03
asmDiskGroupName:
asmDiskName:
asmFailGroupName:
availableTo:
cachingPolicy: default
cellDisk: CD_disk12_cell03
comment:
creationTime: 2017-01-16T00:03:09+08:00
diskType: HardDisk
errorCount: 0
id: 01d76bee-229d-4cc1-9db4-203050892790
offset: 736M
size: 288M
status: active
CellCLI>
CellCLI>
虚拟机上安装Cell节点(12.1.2.3.3)的更多相关文章
- 在虚拟机上安装红帽Linux.5.5.for.x86.服务器版系统(按针对安装oracle 10g作的配置)
在虚拟机上安装红帽Linux.5.5.for.x86.服务器版系统(按针对安装oracle 10g作的配置) 软件版本: 虚拟机版本:vmwareworkstation 7.11 build-28 ...
- 【转载】Linux小白福利:《超容易的Linux系统管理入门书》(三)在虚拟机上安装Linux
本篇是Linux小白最佳实践第3篇,目的就是让白菜们自己动手安装个Linux玩玩.如果你是Linux小白,请务必亲自动手来安装.不想安装多个操作系统的,虚拟机是最佳选择,一台电脑上可以用虚拟机安装7. ...
- Linux学习(一)-安装vm虚拟机以及如何在虚拟机上安装Centos系统
(一)基本说明 学习Linux需要一个环境,我们需要创建一个虚拟机,然后在虚拟机上安装一个Centos系统来学习. 1)安装软件vm12; 2)通过vm12创建一个虚拟机空间; 3)在vm12创建好的 ...
- 虚拟机上安装Linux系统之ubuntu
以前自己在虚拟机上安装过几回Linux系统,有centos.ubuntu,不过都没来得及写一个安装教程,今天正好需要重新安装一下,就分享一个安装ubuntu的详细教程 安装前准备: VMWare虚拟机 ...
- 如何在windows Server 2008虚拟机上安装SQLServer2008数据库
一.环境准备 1.cn_windows_server_2008_r2_standard_enterprise_datacenter_web_x64_dvd_x15-50360.iso 2.NDP452 ...
- 在VM虚拟机上安装Microsoft Dynamics CRM 2016 步骤图解及安装注意事项
安装Dynamics CRM 2016环境配置要求: 系统版本:Windows Server 2012 R2(必须) SQL 版本: SQLServer2014SP1-FullSlipstream-x ...
- 虚拟机上安装Linux操作系统
很久之前就知道虚拟机这个东西,也都在虚拟机上安装过Windows的操作系统和Linux的操作系统,但是一直都没有去做笔记. 最近还是比较有时间,就移除了前两天刚刚安装的Linux系统,重新安装一次,做 ...
- Mac系统下使用VirtualBox虚拟机安装win7--第三步 在虚拟机上安装 Windows 7
第三步 在虚拟机上安装 Windows 7 等待虚拟机进入 Windows 7 的安装界面以后,在语言,货币,键盘输入法这一面,建议保持默认设置,直接点击“下一步”按钮,如图所示
- 在VMware Workstation11虚拟机上安装黑苹果
图文详解如何在VMware Workstation11虚拟机上安装黑苹果Mac OS X 10.10系统-网络教程与技术 -亦是美网络 http://www.yishimei.cn/network/5 ...
随机推荐
- 搭建JavaEE项目是遇到的几个问题
问题描述:无法读取spring mvc的xsd文件 参考http://eric-yan.iteye.com/blog/1908470 schema_reference.4: Failed to rea ...
- linux命令学习笔记(35):ln 命令
ln是linux中又一个非常重要命令,它的功能是为某一个文件在另外一个位置建立一个同步的链接.当我们需要在 不同的目录,用到相同的文件时,我们不需要在每一个需要的目录下都放一个必须相同的文件,我们只要 ...
- Popular Cows
传送门(poj):http://poj.org/problem?id=2186 (bzoj):http://www.lydsy.com/JudgeOnline/problem.php?id=1051 ...
- 使用NSURLProtocol和NSURLSession拦截UIWebView的HTTP请求(包括ajax请求)
问题:服务器端有一个网站需要AD认证,整站都开了Basic认证,包括图片,CSS等资源,我在HTTP请求头里面添加认证所需的用户名和密码,传递到服务器端可以认证通过.我在UIWebView的shoul ...
- VBA中的函数Timer用法
第1.40例 Timer 函数一.题目: 要求编写一段代码,运用 Timer 函数来计算本代码运行所化的时间.二.代码:Sub 示例_1_040() Dim t, i&, a t ...
- 自定义Panel中添加依赖属性需要注意的问题
今天帮忙同事调试一个自定义Panel的问题, 很奇怪, 利用Binding可以通过ItemSource来添加控件,但是在Listbox的xaml里添加几个ListboxItem却报异常: Visual ...
- 【jQuery】CheckBox使用attr全选无法正确显示
今天编写JS脚本时,遇到如下的问题. 下面是源代码: <script src="../Scripts/jquery-2.1.3.js"></script> ...
- 什么是Nginx?为什么使用Nginx?
源自 https://blog.csdn.net/yougoule/article/details/78186138 一.前言 为毛要用nginx服务器代理,不直接用tomcat 7.0,还 ...
- man syslog | col -b > syslog.txt
linux man手册导出,解决man乱码 man syslog | col -b > syslog.txt
- [51nod1094]和为k的连续区间
法一:暴力$O({n^2})$看脸过 #include<bits/stdc++.h> using namespace std; typedef long long ll; ],sum[]; ...