自定义资源支持:K8s Device Plugin 从原理到实现
本文主要分析 k8s 中的 device-plugin 机制工作原理,并通过实现一个简单的 device-plugin 来加深理解。
1. 背景
默认情况下,k8s 中的 Pod 只能申请 CPU 和 Memory 这两种资源,就像下面这样:
resources:

  requests:

    memory: "1024Mi"

    cpu: "100m"

  limits:

    memory: "2048Mi"

    cpu: "200m"
随着 AI 热度越来越高,更多的业务 Pod 需要申请 GPU 资源,GPU 环境搭建指南:如何在裸机、Docker、K8s 等环境中使用 GPU 中我们分析了如何在 k8s 环境中使用 GPU,就是靠 Device Plugin 机制,通过该机制使得 k8s 能感知到节点上的 GPU 资源,就像原生的 CPU 和 Memory 资源一样使用。
实际上在早期,K8s 也提供了一种名为 alpha.kubernetes.io/nvidia-gpu 的资源来支持 NVIDIA GPU,不过后面也发现了很多问题,每增加一种资源都要修改 k8s 核心代码,k8s 社区压力山大。于是在 1.8 版本引入了 device plugin 机制,通过插件形式来接入其他资源,设备厂家只需要开发对应的 xxx-device-plugin 就可以将资源接入到 k8s 了。
ps:类似的还有引入
CSI让存储插件从 Kubernetes 内部(in-tree)代码库中分离出来,改为独立的、可插拔的外部组件(out-of-tree),还有CRI、CNI等等,这里的 Device Plugin 也能算作其中的一种。
Device Plugin 有两层含义,下文中根据语义自行区分:
- 首先它可以代表 k8s 中的 Device Plugin framework
- 其次也可以代表厂家的具体实现,比如 NVIDIA/k8s-device-plugin,就是用于接入 NVIDIA GPU 资源的 Device Plugin 实现
2. 原理
Device Plugin 的工作原理其实不复杂,可以分为 插件注册 和 kubelet 调用插件两部分。
- 插件注册:DevicePlugin 启动时会想节点上的 Kubelet 发起注册,这样 Kubelet就可以感知到该插件的存在了
- kubelet 调用插件:注册完成后,当有 Pod 申请对于资源时,kubelet 就会调用该插件 API 实现具体功能
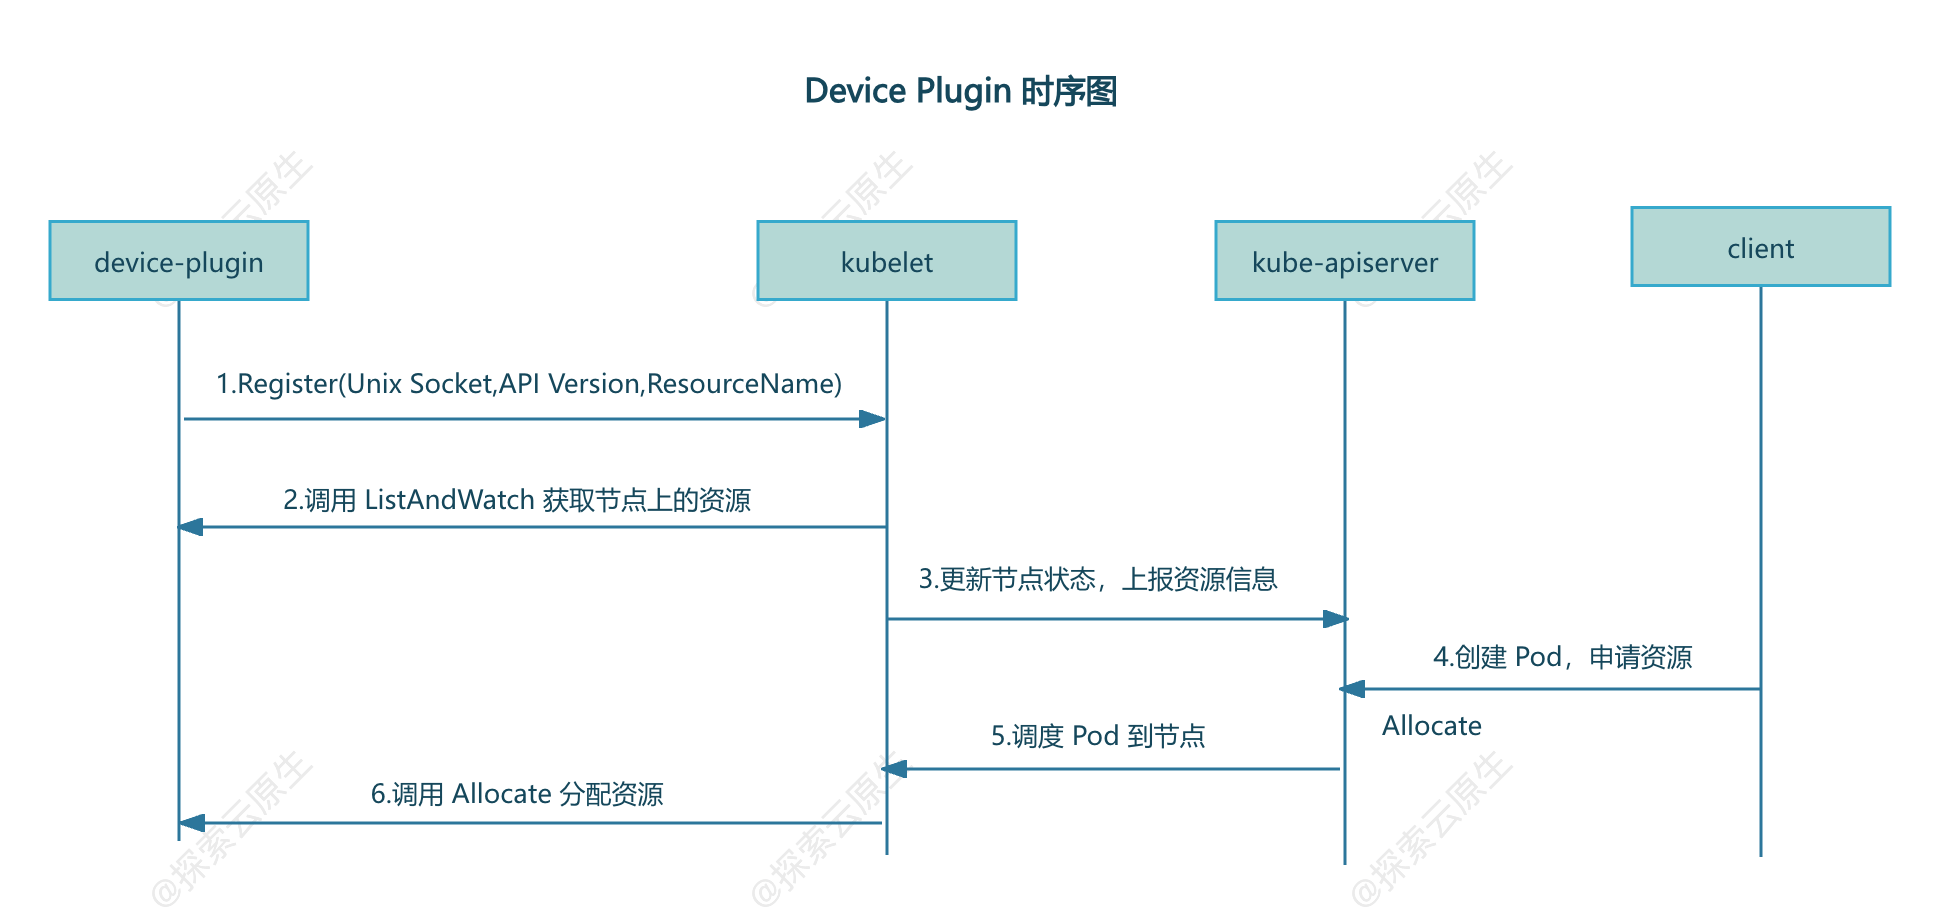
如 k8s 官网上的图所示:

Kubelet 部分
为了提供该功能,Kubelet 新增了一个 Registration gRPC service:
service Registration {

	rpc Register(RegisterRequest) returns (Empty) {}

}
device plugin 可以调用该接口向 Kubelet 进行注册,注册接口需要提供三个参数:
device plugin 对应的 unix socket 名字:后续 kubelet 根据名称找到对应的 unix socket,并向插件发起调用
device plugin 调 API version:用于区分不同版本的插件
device plugin 提供的 ResourceName:遇到不能处理的资源申请时(CPU和Memory之外的资源),Kubelet 就会根据申请的资源名称来匹配对应的插件
- ResourceName 需要按照
vendor-domain/resourcetype格式,例如nvidia.com/gpu。
- ResourceName 需要按照
device plugin 部分
要进行设备管理,device plugin 插件需要实现以下接口:
GetDevicePluginOptions:这个接口用于获取设备插件的信息,可以在其返回的响应中指定一些设备插件的配置选项,可以看做是插件的元数据ListAndWatch:该接口用于列出可用的设备并持续监视这些设备的状态变化。GetPreferredAllocation:将分配偏好信息提供给 device plugin,以便 device plugin 在分配时可以做出更好的选择
Allocate:该接口用于向设备插件请求分配指定数量的设备资源。PreStartContainer: 该接口在容器启动之前调用,用于配置容器使用的设备资源。
只有
ListAndWatch和Allocate两个接口是必须的,其他都是可以选的。
工作流程
一般所有的 Device Plugin 实现最终都会以 Pod 形式运行在 k8s 集群中,又因为需要管理所有节点,因此都会以 DaemonSet 方式部署。
device plugin 启动之后第一步就是向 Kubelet 注册,让 Kubelet 知道有一个新的设备接入了。
为了能够调用 Kubelet 的 Register 接口,Device Plugin Pod 会将宿主机上的 kubelet.sock 文件(unix socket)挂载到容器中,通过 kubelet.sock 文件发起调用以实现注册。
集群部署后,Kubelet 就会启动,
1)Kubelet 启动 Registration gRPC 服务(kubelet.sock),提供 Register 接口
2)device-plugin 启动后,通过 kubelet.sock 调用 Register 接口,向 Kubelet 进行注册,注册信息包括 device plugin 的 unix socket,API Version,ResourceName
3)注册成功后,Kubelet 通过 device-plugin 的 unix socket 向 device plugin 调用 ListAndWatch, 获取当前节点上的资源
4)Kubelet 向 api-server 更新节点状态来记录上一步中发现的资源
- 此时
kubelet get node -oyaml就能查看到 Node 对象的 Capacity 中多了对应的资源
5)用户创建 Pod 并申请该资源,调度完成后,对应节点上的 kubelet 调用 device plugin 的 Allocate 接口进行资源分配
- 此时
大致如下:
【Kubernetes 系列】持续更新中,搜索公众号【探索云原生】订阅,阅读更多文章。

3. 实现
device plugin 实现大致分为三部分:
- 1)启动时向 Kubelet 发起注册
- 注意监控 kubelet 的重启,一般是使用
fsnotify类似的库监控 kubelet.sock 的重新创建事件。如果 kubelet.sock 重新创建了,则认为 kubelet 是重启了,那么需要重新注册
- 注意监控 kubelet 的重启,一般是使用
- 2)gRPC Server:主要是实现
ListAndWatch和Allocate两个方法
实现 gRPC Server
简单起见,这里只实现了ListAndWatch 和 Allocate 这两个必须的方法。
对 gRPC 不熟悉的童鞋可以看下这个 --> gRPC 系列教程
ListAndWatch
这是一个 gRPC 的 Stream 方法,建立长连接,可以持续向 Kubelet 发送设备的信息。
// ListAndWatch returns a stream of List of Devices

// Whenever a Device state change or a Device disappears, ListAndWatch

// returns the new list

func (c *GopherDevicePlugin) ListAndWatch(_ *pluginapi.Empty, srv pluginapi.DevicePlugin_ListAndWatchServer) error {

	devs := c.dm.Devices()

	klog.Infof("find devices:%s", String(devs))

	err := srv.Send(&pluginapi.ListAndWatchResponse{Devices: devs})

	if err != nil {

		return errors.WithMessage(err, "send device failed")

	}

	klog.Infoln("waiting for device update")

	for range c.dm.notify {

		devs = c.dm.Devices()

		klog.Infof("device update,new device list:%s", String(devs))

		_ = srv.Send(&pluginapi.ListAndWatchResponse{Devices: devs})

	}

	return nil

}
发现设备的部分代码如下:
func (d *DeviceMonitor) List() error {

	err := filepath.Walk(d.path, func(path string, info fs.FileInfo, err error) error {

		if info.IsDir() {

			klog.Infof("%s is dir,skip", path)

			return nil

		}

		d.devices[info.Name()] = &pluginapi.Device{

			ID:     info.Name(),

			Health: pluginapi.Healthy,

		}

		return nil

	})

	return errors.WithMessagef(err, "walk [%s] failed", d.path)

}
很简单,就是遍历查看 /etc/gophers 目录下的所有文件,每个文件都会当做一个设备。
然后再启动一个 Goroutine 监控设备的变化,即/etc/gophers 目录下文件有变化时通过 chan 发送通知,将最新的设备信息发送给 Kubelet。
func (d *DeviceMonitor) Watch() error {

	klog.Infoln("watching devices")

	w, err := fsnotify.NewWatcher()

	if err != nil {

		return errors.WithMessage(err, "new watcher failed")

	}

	defer w.Close()

	errChan := make(chan error)

	go func() {

		defer func() {

			if r := recover(); r != nil {

				errChan <- fmt.Errorf("device watcher panic:%v", r)

			}

		}()

		for {

			select {

			case event, ok := <-w.Events:

				if !ok {

					continue

				}

				klog.Infof("fsnotify device event: %s %s", event.Name, event.Op.String())

				if event.Op == fsnotify.Create {

					dev := path.Base(event.Name)

					d.devices[dev] = &pluginapi.Device{

						ID:     dev,

						Health: pluginapi.Healthy,

					}

					d.notify <- struct{}{}

					klog.Infof("find new device [%s]", dev)

				} else if event.Op&fsnotify.Remove == fsnotify.Remove {

					dev := path.Base(event.Name)

					delete(d.devices, dev)

					d.notify <- struct{}{}

					klog.Infof("device [%s] removed", dev)

				}

			case err, ok := <-w.Errors:

				if !ok {

					continue

				}

				klog.Errorf("fsnotify watch device failed:%v", err)

			}

		}

	}()

	err = w.Add(d.path)

	if err != nil {

		return fmt.Errorf("watch device error:%v", err)

	}

	return <-errChan

}
Allocate
Allocate 则是需要告知 kubelet 怎么将设备分配给容器,这里实现比较简单,就是在对应容器中增加一个环境变量,Gopher=$deviceId
// Allocate is called during container creation so that the Device

// Plugin can run device specific operations and instruct Kubelet

// of the steps to make the Device available in the container

func (c *GopherDevicePlugin) Allocate(_ context.Context, reqs *pluginapi.AllocateRequest) (*pluginapi.AllocateResponse, error) {

	ret := &pluginapi.AllocateResponse{}

	for _, req := range reqs.ContainerRequests {

		klog.Infof("[Allocate] received request: %v", strings.Join(req.DevicesIDs, ","))

		resp := pluginapi.ContainerAllocateResponse{

			Envs: map[string]string{

				"Gopher": strings.Join(req.DevicesIDs, ","),

			},

		}

		ret.ContainerResponses = append(ret.ContainerResponses, &resp)

	}

	return ret, nil

}
简单看一下 NVIDIA 的 device plugin 是怎么实现 Allocate 的。
// Allocate which return list of devices.

func (plugin *NvidiaDevicePlugin) Allocate(ctx context.Context, reqs *pluginapi.AllocateRequest) (*pluginapi.AllocateResponse, error) {

	responses := pluginapi.AllocateResponse{}

	for _, req := range reqs.ContainerRequests {

		if err := plugin.rm.ValidateRequest(req.DevicesIDs); err != nil {

			return nil, fmt.Errorf("invalid allocation request for %q: %w", plugin.rm.Resource(), err)

		}

		response, err := plugin.getAllocateResponse(req.DevicesIDs)

		if err != nil {

			return nil, fmt.Errorf("failed to get allocate response: %v", err)

		}

		responses.ContainerResponses = append(responses.ContainerResponses, response)

	}

	return &responses, nil

}
核心其实是这个方法:
// updateResponseForDeviceListEnvvar sets the environment variable for the requested devices.

func (plugin *NvidiaDevicePlugin) updateResponseForDeviceListEnvvar(response *pluginapi.ContainerAllocateResponse, deviceIDs ...string) {

	response.Envs[plugin.deviceListEnvvar] = strings.Join(deviceIDs, ",")

}
给容器添加了一个环境变量,value 为设备 id,具体 deviceID 提供了两种测量,可能是编号或者 uuid
const (

	DeviceIDStrategyUUID  = "uuid"

	DeviceIDStrategyIndex = "index"

)
key 是一个变量 plugin.deviceListEnvvar,初始化如下:
	plugin := NvidiaDevicePlugin{

		deviceListEnvvar:     "NVIDIA_VISIBLE_DEVICES",

		socket:               pluginPath + ".sock",

	  // ...

	}
也就是说 NVIDIA 这个 device plugin 实现 Allocate 主要就是给容器增加了环境变量,例如:
NVIDIA_VISIBLE_DEVICES="0,1"
在文章 GPU 环境搭建指南:使用 GPU Operator 加速 Kubernetes GPU 环境搭建 中提到 GPU Operator 会使用 NVIDIA Container Toolit Installer 安装 NVIDIA Container Toolit。
这个 NVIDIA Container Toolit 的作用就是添加对 GPU 的支持,也包括了识别 NVIDIA_VISIBLE_DEVICES 这个环境变量,然后将对应设备挂载到容器里。
除此之外还会把设备挂载到容器里:
func (plugin *NvidiaDevicePlugin) apiDeviceSpecs(devRoot string, ids []string) []*pluginapi.DeviceSpec {

	optional := map[string]bool{

		"/dev/nvidiactl":        true,

		"/dev/nvidia-uvm":       true,

		"/dev/nvidia-uvm-tools": true,

		"/dev/nvidia-modeset":   true,

	}

	paths := plugin.rm.GetDevicePaths(ids)

	var specs []*pluginapi.DeviceSpec

	for _, p := range paths {

		if optional[p] {

			if _, err := os.Stat(p); err != nil {

				continue

			}

		}

		spec := &pluginapi.DeviceSpec{

			ContainerPath: p,

			HostPath:      filepath.Join(devRoot, p),

			Permissions:   "rw",

		}

		specs = append(specs, spec)

	}

	return specs

}
核心为:
		spec := &pluginapi.DeviceSpec{

			ContainerPath: p,

			HostPath:      filepath.Join(devRoot, p),

			Permissions:   "rw",

		}
这里指定了设备在宿主机上的 Path 和挂载到容器之后的 Path,后续就可以根据这些信息进行设备挂载了。
其他方法
另外几个方法非强制的,因此只做一个空实现。
// GetDevicePluginOptions returns options to be communicated with Device

// Manager

func (c *GopherDevicePlugin) GetDevicePluginOptions(_ context.Context, _ *pluginapi.Empty) (*pluginapi.DevicePluginOptions, error) {

	return &pluginapi.DevicePluginOptions{PreStartRequired: true}, nil

}

// GetPreferredAllocation returns a preferred set of devices to allocate

// from a list of available ones. The resulting preferred allocation is not

// guaranteed to be the allocation ultimately performed by the

// devicemanager. It is only designed to help the devicemanager make a more

// informed allocation decision when possible.

func (c *GopherDevicePlugin) GetPreferredAllocation(_ context.Context, _ *pluginapi.PreferredAllocationRequest) (*pluginapi.PreferredAllocationResponse, error) {

	return &pluginapi.PreferredAllocationResponse{}, nil

}

// PreStartContainer is called, if indicated by Device Plugin during registeration phase,

// before each container start. Device plugin can run device specific operations

// such as reseting the device before making devices available to the container

func (c *GopherDevicePlugin) PreStartContainer(_ context.Context, _ *pluginapi.PreStartContainerRequest) (*pluginapi.PreStartContainerResponse, error) {

	return &pluginapi.PreStartContainerResponse{}, nil

}
向 Kubelet 进行注册
注册也是很简单,调用 deviceplugin 提供的 RegisterRequest 方法即可。
// Register registers the device plugin for the given resourceName with Kubelet.

func (c *GopherDevicePlugin) Register() error {

	conn, err := connect(pluginapi.KubeletSocket, common.ConnectTimeout)

	if err != nil {

		return errors.WithMessagef(err, "connect to %s failed", pluginapi.KubeletSocket)

	}

	defer conn.Close()

	client := pluginapi.NewRegistrationClient(conn)

	reqt := &pluginapi.RegisterRequest{

		Version:      pluginapi.Version,

		Endpoint:     path.Base(common.DeviceSocket),

		ResourceName: common.ResourceName,

	}

	_, err = client.Register(context.Background(), reqt)

	if err != nil {

		return errors.WithMessage(err, "register to kubelet failed")

	}

	return nil

}
监控 kubelet.sock 状态
使用 fsnotify 库监控 kubelet.sock 文件状态,通过 kubelet.sock 文件的变化来判断 kubelet 是否重启,当 kubelet 重启后 device plugin 也需要重启,然后注册到新的 kubelet.sock。
// WatchKubelet restart device plugin when kubelet restarted

func WatchKubelet(stop chan<- struct{}) error {

	watcher, err := fsnotify.NewWatcher()

	if err != nil {

		return errors.WithMessage(err, "Unable to create fsnotify watcher")

	}

	defer watcher.Close()

	go func() {

		// Start listening for events.

		for {

			select {

			case event, ok := <-watcher.Events:

				if !ok {

					continue

				}

				klog.Infof("fsnotify events: %s %v", event.Name, event.Op.String())

				if event.Name == pluginapi.KubeletSocket && event.Op == fsnotify.Create {

					klog.Warning("inotify: kubelet.sock created, restarting.")

					stop <- struct{}{}

				}

			case err, ok := <-watcher.Errors:

				if !ok {

					continue

				}

				klog.Errorf("fsnotify failed restarting,detail:%v", err)

			}

		}

	}()

	// watch kubelet.sock

	err = watcher.Add(pluginapi.KubeletSocket)

	if err != nil {

		return errors.WithMessagef(err, "Unable to add path %s to watcher", pluginapi.KubeletSocket)

	}

	return nil

}
为什么需要重新注册
因为Kubelet 中使用一个 map 来存储注册的插件,因此每次 Kubelet 重启都会丢失,所以我们在实现 device plugin 时就要监控 Kubelet 重启状态并重新注册。
Kubelet Register 方法 实现如下:
// /pkg/kubelet/cm/devicemanager/plugin/v1beta1/server.go#L143-L165

func (s *server) Register(ctx context.Context, r *api.RegisterRequest) (*api.Empty, error) {

	klog.InfoS("Got registration request from device plugin with resource", "resourceName", r.ResourceName)

	metrics.DevicePluginRegistrationCount.WithLabelValues(r.ResourceName).Inc()

	if !s.isVersionCompatibleWithPlugin(r.Version) {

		err := fmt.Errorf(errUnsupportedVersion, r.Version, api.SupportedVersions)

		klog.InfoS("Bad registration request from device plugin with resource", "resourceName", r.ResourceName, "err", err)

		return &api.Empty{}, err

	}

	if !v1helper.IsExtendedResourceName(core.ResourceName(r.ResourceName)) {

		err := fmt.Errorf(errInvalidResourceName, r.ResourceName)

		klog.InfoS("Bad registration request from device plugin", "err", err)

		return &api.Empty{}, err

	}

	if err := s.connectClient(r.ResourceName, filepath.Join(s.socketDir, r.Endpoint)); err != nil {

		klog.InfoS("Error connecting to device plugin client", "err", err)

		return &api.Empty{}, err

	}

	return &api.Empty{}, nil

}
核心在 connectClient 方法:
func (s *server) connectClient(name string, socketPath string) error {

	c := NewPluginClient(name, socketPath, s.chandler)

	s.registerClient(name, c)

	if err := c.Connect(); err != nil {

		s.deregisterClient(name)

		klog.ErrorS(err, "Failed to connect to new client", "resource", name)

		return err

	}

	go func() {

		s.runClient(name, c)

	}()

	return nil

}
怎么保存这个 client 的呢?
func (s *server) registerClient(name string, c Client) {

	s.mutex.Lock()

	defer s.mutex.Unlock()

	s.clients[name] = c

	klog.V(2).InfoS("Registered client", "name", name)

}
定义如下:
type server struct {

	socketName string

	socketDir  string

	mutex      sync.Mutex

	wg         sync.WaitGroup

	grpc       *grpc.Server

	rhandler   RegistrationHandler

	chandler   ClientHandler

	clients    map[string]Client // 使用 map 存储,并为持久化

}
main.go
main 方法分为三个部分:
- 1)启动 gRPC 服务
- 2)向 Kubelet 进行注册
- 3)监控 kubelet.sock 状态
func main() {

	klog.Infof("device plugin starting")

	dp := device_plugin.NewGopherDevicePlugin()

	go dp.Run()

	// register when device plugin start

	if err := dp.Register(); err != nil {

		klog.Fatalf("register to kubelet failed: %v", err)

	}

	// watch kubelet.sock,when kubelet restart,exit device plugin,then will restart by DaemonSet

	stop := make(chan struct{})

	err := utils.WatchKubelet(stop)

	if err != nil {

		klog.Fatalf("start to kubelet failed: %v", err)

	}

	<-stop

	klog.Infof("kubelet restart,exiting")

}
4. 测试
部署
首先是部署 i-device-plugin,一般使用 DaemonSet 方式部署,完整 yaml 如下:
apiVersion: apps/v1

kind: DaemonSet

metadata:

  name: i-device-plugin

  namespace: kube-system

  labels:

    app: i-device-plugin

spec:

  selector:

    matchLabels:

      app: i-device-plugin

  template:

    metadata:

      labels:

        app: i-device-plugin

    spec:

      containers:

        - name: i-device-plugin

          image: docker.io/lixd96/i-device-plugin:latest

          imagePullPolicy: IfNotPresent

          resources:

            limits:

              cpu: "1"

              memory: "512Mi"

            requests:

              cpu: "0.1"

              memory: "128Mi"

          volumeMounts:

            - name: device-plugin

              mountPath: /var/lib/kubelet/device-plugins

            - name: gophers

              mountPath: /etc/gophers

      volumes:

        - name: device-plugin

          hostPath:

            path: /var/lib/kubelet/device-plugins

        - name: gophers

          hostPath:

            path: /etc/gophers
以 hostPath 方式将用到的两个目录挂载到 Pod 里:
- /var/lib/kubelet/device-plugins:请求 kubelet.sock 发起调用,同时将 device-plugin gRPC 服务的 sock 文件写入该目录供 kubelet 调用
- /etc/gophers:在该 Demo 中,把 /etc/gophers 目录下的文件作为设备,因此需要将其挂载到 Pod 里。
确保 i-device-plugin 已经启动。
[root@test ~]# kubectl -n kube-system get po

i-device-plugin-vnw6z            1/1     Running   0          17s
初始化
在该 Demo 中,把 /etc/gophers 目录下的文件作为设备,因此我们只需要到 /etc/gophers 目录下创建文件,模拟有新的设备接入即可。
mkdir /etc/gophers

touch /etc/gophers/g1
查看 device plugin 日志
[root@test ~]# kubectl -n kube-system logs -f i-device-plugin-vnw6z

I0719 13:52:24.674737       1 main.go:10] device plugin starting

I0719 13:52:24.675440       1 device_monitor.go:33] /etc/gophers is dir,skip

I0719 13:52:24.675679       1 device_monitor.go:49] watching devices

I0719 13:52:24.682141       1 api.go:22] find devices []

I0719 13:52:24.682315       1 api.go:29] waiting for device update

I0719 13:53:09.369381       1 device_monitor.go:70] fsnotify device event: /etc/gophers/g1 CREATE

I0719 13:53:09.370394       1 device_monitor.go:79] find new device [g1]

I0719 13:53:09.370445       1 device_monitor.go:70] fsnotify device event: /etc/gophers/g1 CHMOD

I0719 13:53:09.370659       1 api.go:32] device update,new device list [g1]
可以看到,已经感知到新增的设备了。
不出意外的话可以在 node 上看到新资源了
[root@test gophers]# k get node n1 -oyaml|grep  capacity -A 7

  capacity:

    cpu: "4"

    ephemeral-storage: 20960236Ki

    hugepages-1Gi: "0"

    hugepages-2Mi: "0"

    lixueduan.com/gopher: "1"

    memory: 8154984Ki

    pods: "110"
果然,node capacity 中新增了lixueduan.com/gopher: "1"。
创建测试 Pod
接下来创建一个 Pod 申请该资源试试
apiVersion: v1

kind: Pod

metadata:

  name: gopher-pod

spec:

  containers:

  - name: gopher-container

    image: busybox

    command: ["sh", "-c", "echo Hello, Kubernetes! && sleep 3600"]

    resources:

      requests:

        lixueduan.com/gopher: "1"

      limits:

        lixueduan.com/gopher: "1"
Pod 启动成功
[root@test ~]# kubectl get po

NAME         READY   STATUS    RESTARTS   AGE

gopher-pod   1/1     Running   0          27s
之前分配设备是添加 Gopher=xxx 这个环境变量,现在看下是否正常分配
[root@test ~]# kubectl exec -it gopher-pod -- env|grep Gopher

Gopher=g1
ok,环境变量存在,可以看到分配给该 Pod 的设备是 g1。
新增设备
使用同样的 yaml 改下名称再创建一个 Pod
[root@test ~]# k get po

NAME          READY   STATUS    RESTARTS   AGE

gopher-pod    1/1     Running   0          3m9s

gopher-pod2   0/1     Pending   0          2s
因为只有一个 gopher 资源,因此第二个 Pod pending 了。
Events:

  Type     Reason            Age   From               Message

  ----     ------            ----  ----               -------

  Warning  FailedScheduling  7s    default-scheduler  0/1 nodes are available: 1 Insufficient lixueduan.com/gopher. preemption: 0/1 nodes are available: 1 No preemption victims found for incoming pod..
在创建一个设备
touch /etc/gophers/g2
device plugin 立马感知到了设备变化,相关日志如下:
I0719 14:01:00.308599       1 device_monitor.go:70] fsnotify device event: /etc/gophers/g2 CREATE

I0719 14:01:00.308986       1 device_monitor.go:79] find new device [g2]

I0719 14:01:00.309017       1 device_monitor.go:70] fsnotify device event: /etc/gophers/g2 CHMOD

I0719 14:01:00.309141       1 api.go:32] device update,new device list [g2,g1]
node 上的资源数量也更新为 2
[root@argo-1 ~]# k get node argo-1 -oyaml|grep  capacity -A 7

  capacity:

    cpu: "4"

    ephemeral-storage: 20960236Ki

    hugepages-1Gi: "0"

    hugepages-2Mi: "0"

    lixueduan.com/gopher: "2"

    memory: 8154984Ki

    pods: "110"
然后 pod2 也可以正常启动了
[root@test ~]# kubectl get po

NAME          READY   STATUS    RESTARTS   AGE

gopher-pod    1/1     Running   0          4m31s

gopher-pod2   1/1     Running   0          84s
删除设备
然后删除 g2 设备
rm -rf /etc/gophers/g2
device plugin 也是能正常感知到,相关日志
I0719 14:03:55.904983       1 device_monitor.go:70] fsnotify device event: /etc/gophers/g2 REMOVE

I0719 14:03:55.905203       1 device_monitor.go:84] device [g2] removed

I0719 14:03:55.905267       1 api.go:32] device update,new device list [g1]
查看 Node 上的资源数量更新没有
[root@test ~]# k get node argo-1 -oyaml|grep  capacity -A 7

  capacity:

    cpu: "4"

    ephemeral-storage: 20960236Ki

    hugepages-1Gi: "0"

    hugepages-2Mi: "0"

    lixueduan.com/gopher: "1"

    memory: 8154984Ki

    pods: "110"
对应资源也变成 1 个了,一切正常。
5. 小结
本文主要分析了 k8s 中的 Device Plugin 机制的工作原理,并实现了一个简单的 i-device-plugin来进一步加深理解。
Device Plugin 的工作原理其实不复杂,可以分为 插件注册 和 kubelet 调用插件两部分:
- 插件注册:DevicePlugin 启动时会想节点上的 Kubelet 发起注册,这样 Kubelet就可以感知到该插件的存在了
- kubelet 调用插件:注册完成后,当有 Pod 申请对于资源时,kubelet 就会调用该插件 API 实现具体功能
【Kubernetes 系列】持续更新中,搜索公众号【探索云原生】订阅,阅读更多文章。
6. 参考
https://github.com/NVIDIA/k8s-device-plugin
Kubernetes开发知识–device-plugin的实现
自定义资源支持:K8s Device Plugin 从原理到实现的更多相关文章
- k8s device plugin
基本概念入门: Device Manager Proposal Device plugin offical Doc(中文) device-plugins offical Doc(En) Go thro ...
- 从零开始入门 K8s | GPU 管理和 Device Plugin 工作机制
作者 | 车漾 阿里巴巴高级技术专家 本文整理自<CNCF x Alibaba 云原生技术公开课>第 20 讲. 关注"阿里巴巴云原生"公众号,回复关键词" ...
- 第20 章 : GPU 管理和 Device Plugin 工作机制
GPU 管理和 Device Plugin 工作机制 本文将主要分享以下几个方面的内容: 需求来源 GPU 的容器化 Kubernetes 的 GPU 管理 工作原理 课后思考与实践 需求来源 201 ...
- 在VC项目中使用自定义资源
这是我看到的比较实用性的技巧,分享给大家 一.前言 在VC环境中除了我们所常用的Dialog.Menu和Bitmap等标准资源类型之外,它还支持自定义资源类型(Custom Resource),我们自 ...
- Shiro第二篇【介绍Shiro、认证流程、自定义realm、自定义realm支持md5】
什么是Shiro shiro是apache的一个开源框架,是一个权限管理的框架,实现 用户认证.用户授权. spring中有spring security (原名Acegi),是一个权限框架,它和sp ...
- shiro自定义realm支持MD5算法认证(六)
1.1 散列算法 通常需要对密码 进行散列,常用的有md5.sha, 对md5密码,如果知道散列后的值可以通过穷举算法,得到md5密码对应的明文. 建议对md5进行散列时加salt(盐),进行 ...
- 第21件事 资源支持离不开RACI表
十步法的第九步寻求资源支持.资源主要包括人力资源.物力资源和财力资源.人力资源,即需要多少人:物力资源,即需要多少软硬件设备:财力资源,即需要多少预算.根据产品或项目目标,资源估算时要考虑需要什么样的 ...
- 自定义ScrollView 支持添加头部
自定义ScrollView 支持添加头部并且对头部ImageView支持放大缩小,上滑头部缩小,下滑头部显示放大 使用方式: scrollView = (MyScrollView) findViewB ...
- delphi中使用自定义资源的方法
如果要在delphi中使用自定义资源文件*.res文件,比如一个光标,此时可以采用下列步骤: 1,创建包含相应的资源文件,这里是创建一个包含自定义光标的res文件. 2,在主窗体的pas文件中加入编译 ...
- nginx支持websocket及websocket部分原理介绍
nginx支持websocket及websocket部分原理介绍最近ipc通过websocket与server进行通行,经过无法通过nginx进行反向代理,只有直连nodejs端口.而且部署到阿里云用 ...
随机推荐
- 如何使用Java在Word中插入表格
序言 各位好啊,我是会编程的蜗牛,作为java开发者,有时候需要操作word或者excel.这里面比较常用的框架是POI,我之前用过POI来读写excel,也有用过alibaba easy excel ...
- [TK] 一心净士 hzoj-tg-937-2
万元申万的(不是) 嗯... 另外,这道题其实叫一心净士(shi) 而不是一心净土. 剖析 我们注意到题目要让我们使最小的自然数最大,那么我们的每一个区间都要从零开始放. 显然,假如我们所有区间里最小 ...
- Android应用启动全流程分析(源码深度剖析)
目录 1.前言 2.大纲 3. Input触控事件处理流程 3.1 系统机制分析 3.2 结合Systrace分析 4. 应用进程的创建与启动 4.2 创建应用进程 4.2.1 AMS 发送socke ...
- iOS本地化NSLocalizedString的使用小结
在iOS设备,包括iPhone和iPad是全球可用.显然,iOS用户都来自不同国家,说着不同的语言.为了提供出色的用户体验,你可能希望以多种语言提供您的应用程序.适应应用程序以支持特定语言的过程通常被 ...
- iOS键盘通知弹框使用小结
项目开发中文本框输入的时候经常会用到键盘弹框遮挡的问题.解决办法就是根据底部键盘弹出的高度动态的改变对应view的位置.这里以多行文本框输入为例,效果图如下. //第一步,注册监听键盘通知 [[NSN ...
- 全局和局部混入 mixins
使用 mixins 混入 的目的 :复用代码,维护代码 : 局部混入: 全局混入 + 按钮权限控制 : ps:定义一个方法 ,checkPermission (str) str 是按钮的权限标识 , ...
- kotlin协程——>组合挂起函数
默认顺序调用 假设我们在不同的地⽅定义了两个进⾏某种调⽤远程服务或者进⾏计算的挂起函数.我们只假设它们都是有⽤的,但是实际上它们在这个⽰例中只是为了该⽬的⽽延迟了⼀秒钟: suspend fun do ...
- windows涉及所有协议及默认端口
名称 协议 端口 说明 echo tcp/udp 7 echo服务 discard tcp/udp 9 用于连接测试的空服务 systat tcp/udp 11 链接端口系统状态 daytime tc ...
- 【小 w 的代数】(提供一种 n^2 log 的解法)
前言: 卖点 记录 CTH 的发言 CTH:你这真是 n^3 的 CTH:我也不知道你线段树优化个啥,\(n^3 \log n\) CTH:你优化到哪了啊 CTH:······你从赛时打这个题到现在 ...
- nginx实现资源文件动静分离的记录
Nginx 动静分离简单来说就是把动态跟静态请求分开,不能理解成只是单纯的把动态页面和静态页面物理分离.严格意义上说应该是动态请求跟静态请求分开,可以理解成使用 Nginx 处理静态页面,Tomcat ...