
Linux下RIAD的实现及mdadm命令的基本用法
一、RAID简述
磁盘阵列(Redundant Arrays of Independent Disks,RAID),是把多个物理磁盘组成一个阵列,当作一个逻辑磁盘使用,它将数据以分段或条带的方式储存在不同的磁盘中,这样可以通过在多个磁盘上同时存储和读取数据来大幅提高存储系统的数据吞吐量
二、RAID分类
1、外接式磁盘阵列:常被使用在大型服务器上,专业的硬件磁盘阵列盘柜,价格昂贵,主要厂商:IBM、HP、EMC等
2、内接式磁盘阵列:需要技术人员来使用操作,同时需要配备硬件RAID卡或者阵列卡
3、软件仿真式磁盘阵列:通过操作系统自身提供的磁盘管理功能(软件功能实现)将多个硬盘配置成逻辑盘,价格相对较便宜
三、RAID级别
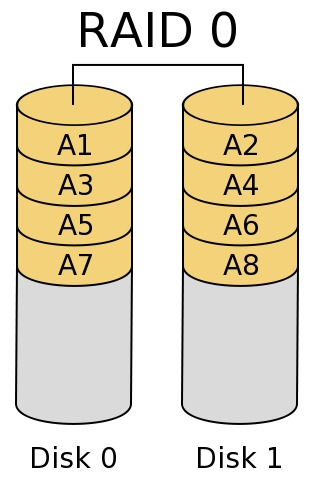
1、RAID 0
最早出现的RAID模式,属于条带模式,至少需要两块磁盘,成本低,可以提高整个磁盘的性能和吞吐量;但是没有容错机制,磁盘损坏易丢失数据
2、RAID 1
磁盘镜像模式,数据在写入一块磁盘的同时,会在另一块闲置的磁盘上生成镜像文件,通过二次读写实现磁盘镜像,磁盘控制器的负载也相当大,所以多磁盘控制器使用可以缓解读写负载

3、RAID 1 + 0
高可靠性与高效磁盘结构,下层是两个RAID 1,两个RAID 1之上是RAID 0,至少四块硬盘
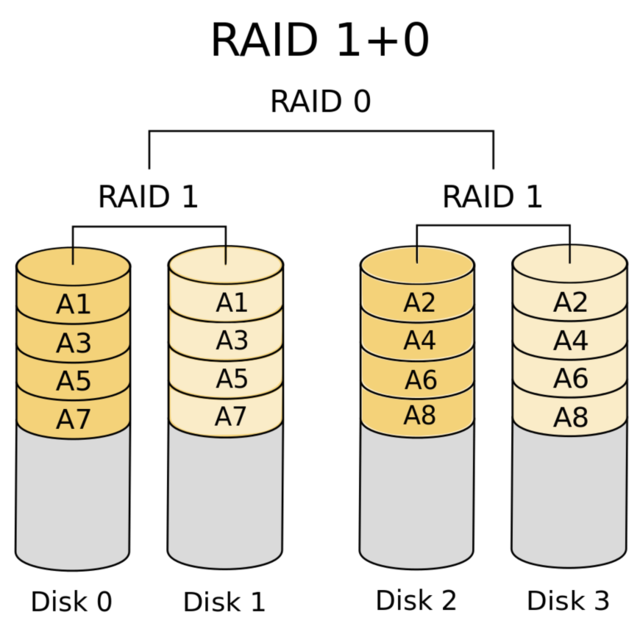
4、RAID 0 + 1
高效率与高性能磁盘结构, 下层是两个RAID 0,两个RAID 1之上是RAID 1,至少四块硬盘

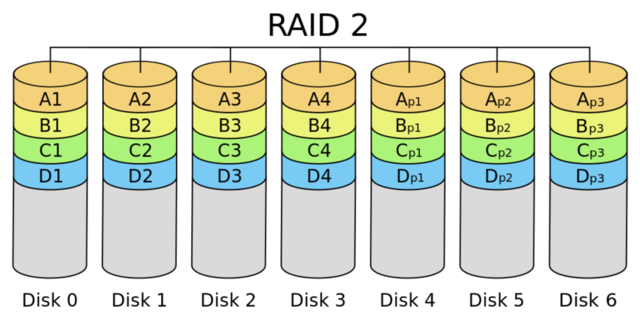
5、RAID 2
带海明码校验,这种编码技术需要多个磁盘存放检查及恢复信息,使得RAID 2技术实施更复杂,商业中用的比较少
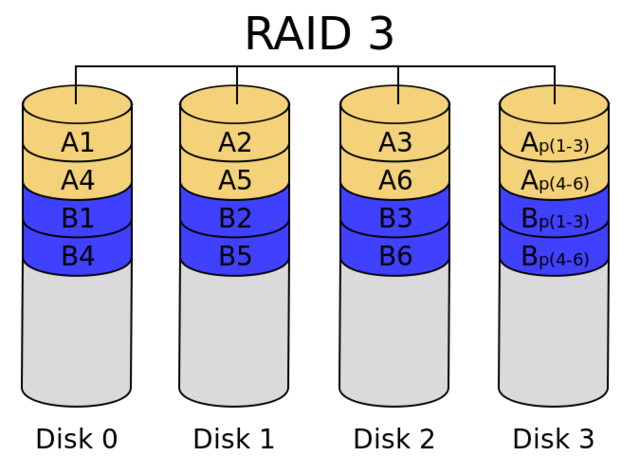
6、RAID 3
带奇偶校验码的并行传送,只能查错不能纠错
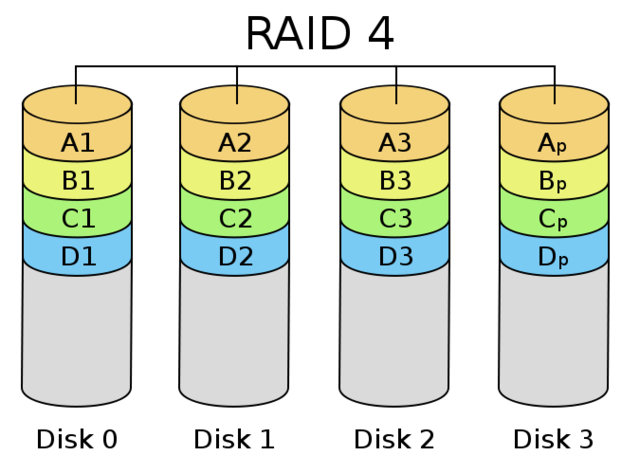
7、RAID 4
它对数据的访问是按数据块进行的,也就是按磁盘进行的,每次是一个盘。在图上可以这么看,RAID3是一次一横条,而RAID4一次一竖条
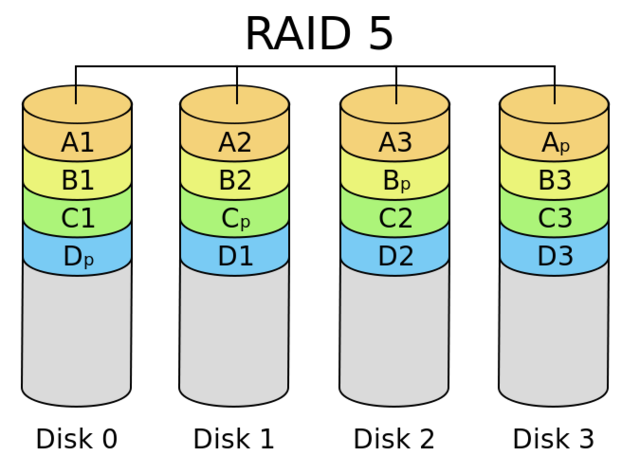
8、RAID 5
分布式奇偶校验的独立磁盘结构,可靠性强,只损坏一块硬盘时,系统会根据存储的奇偶校验位重建数据,如果同时损坏两块硬盘时数据将完全损坏
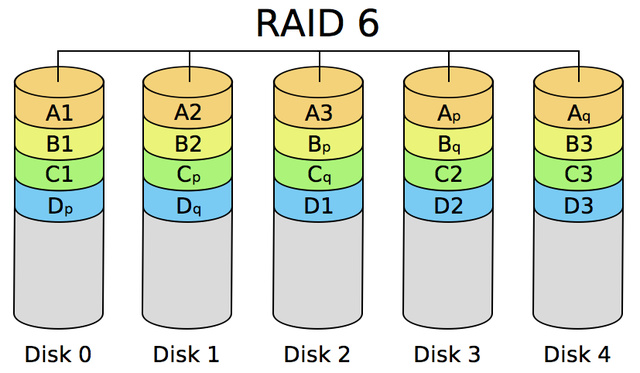
9、RAID 6
带有两种分布存储的奇偶校验码的独立磁盘结构,多一种校验主要是用于要求数据绝对不能出错的场合
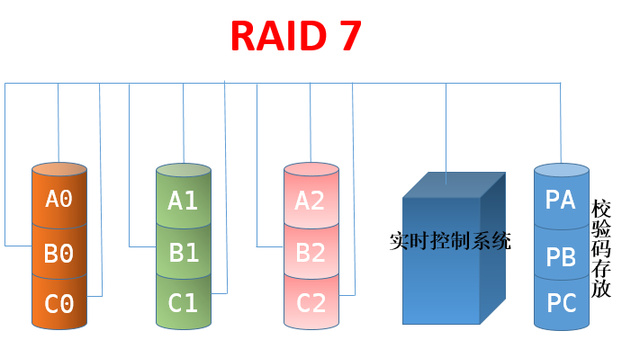
10、RAID 7
所有的I/O传送均是同步进行的,可以分别控制,这样提高了系统的并行性,提高系统访问数据的速度,带有高速缓冲存储器,由于采用并行结构和高速缓冲存储器,因此数据访问效率大大提高
四、常见RAID级别总结
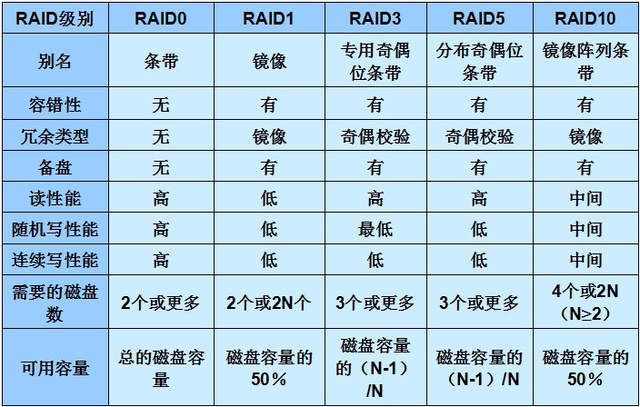
以上内容来源于网络
了解了raid的级别和各个级别下的优缺点后,我们在Linux下怎么实现raid呢
接下来我们介绍一款软件mdadm (multiple devices admin的简称),它是Linux下的一款标准的软件 RAID 管理工具,作者是Neil Brown,它能够诊断、监控和收集详细的阵列信息 ,在linux系统中目前以MD(Multiple Devices)虚拟块设备的方式实现软件RAID,利用多个底层的块设备虚拟出一个新的虚拟设备,并且利用条带化(stripping)技术将数据块均匀分布到多个磁盘上来提高虚拟设备的读写性能,利用不同的数据冗祭算法来保护用户数据不会因为某个块设备的故障而完全丢失,而且还能在设备被替换后将丢失的数据恢复到新的设备上.
目前MD支持linear,multipath,raid0(stripping),raid1(mirror),raid4,raid5,raid6,raid10等不同的冗余级别和级成方式,当然也能支持多个RAID陈列的层叠组成raid1 0,raid5 1等类型的陈列。
五、在Linux上创建一个raid5的一个磁盘阵列,并有一块盘作为热备份盘(也就是说当我阵列里有一块盘坏了,这块盘马上就替上去,把坏了的盘替换下来)。
首先我们要创建一个raid5的磁盘阵列,我们至少需要3块盘,这里我们创建4块盘,有一块作为热备盘。接下来我们使用fdisk 来对/dev/sdb 进行分区(这里的分区来模拟磁盘)
[root@test ~]# fdisk /dev/sdb

WARNING: DOS-compatible mode is deprecated. It's strongly recommended to

         switch off the mode (command 'c') and change display units to

         sectors (command 'u').

Command (m for help): m

Command action

   a   toggle a bootable flag

   b   edit bsd disklabel

   c   toggle the dos compatibility flag

   d   delete a partition

   l   list known partition types

   m   print this menu

   n   add a new partition

   o   create a new empty DOS partition table

   p   print the partition table

   q   quit without saving changes

   s   create a new empty Sun disklabel

   t   change a partition's system id

   u   change display/entry units

   v   verify the partition table

   w   write table to disk and exit

   x   extra functionality (experts only)

Command (m for help): p

Disk /dev/sdb: 21.5 GB, 21474836480 bytes

255 heads, 63 sectors/track, 2610 cylinders

Units = cylinders of 16065 * 512 = 8225280 bytes

Sector size (logical/physical): 512 bytes / 512 bytes

I/O size (minimum/optimal): 512 bytes / 512 bytes

Disk identifier: 0xaebe4f2c

   Device Boot      Start         End      Blocks   Id  System

/dev/sdb1               1        1306    10490413+   5  Extended

Command (m for help): n

Command action

   l   logical (5 or over)

   p   primary partition (1-4)

l

First cylinder (1-1306, default 1):

Using default value 1

Last cylinder, +cylinders or +size{K,M,G} (1-1306, default 1306): +2G

Command (m for help): n

Command action

   l   logical (5 or over)

   p   primary partition (1-4)

l

First cylinder (263-1306, default 263):

Using default value 263

Last cylinder, +cylinders or +size{K,M,G} (263-1306, default 1306): +2G

Command (m for help): n

Command action

   l   logical (5 or over)

   p   primary partition (1-4)

l

First cylinder (525-1306, default 525):

Using default value 525

Last cylinder, +cylinders or +size{K,M,G} (525-1306, default 1306): +2G

Command (m for help): n

Command action

   l   logical (5 or over)

   p   primary partition (1-4)

l

First cylinder (787-1306, default 787):

Using default value 787

Last cylinder, +cylinders or +size{K,M,G} (787-1306, default 1306): +2G

Command (m for help): p

Disk /dev/sdb: 21.5 GB, 21474836480 bytes

255 heads, 63 sectors/track, 2610 cylinders

Units = cylinders of 16065 * 512 = 8225280 bytes

Sector size (logical/physical): 512 bytes / 512 bytes

I/O size (minimum/optimal): 512 bytes / 512 bytes

Disk identifier: 0xaebe4f2c

   Device Boot      Start         End      Blocks   Id  System

/dev/sdb1               1        1306    10490413+   5  Extended

/dev/sdb5               1         262     2104452   83  Linux

/dev/sdb6             263         524     2104483+  83  Linux

/dev/sdb7             525         786     2104483+  83  Linux

/dev/sdb8             787        1048     2104483+  83  Linux
提示:我们在/dev/sdb上面分了4块2G大小的分区,接下来我们要对其分区的类型更改为Linux raid auto
Command (m for help): m

Command action

   a   toggle a bootable flag

   b   edit bsd disklabel

   c   toggle the dos compatibility flag

   d   delete a partition

   l   list known partition types

   m   print this menu

   n   add a new partition

   o   create a new empty DOS partition table

   p   print the partition table

   q   quit without saving changes

   s   create a new empty Sun disklabel

   t   change a partition's system id

   u   change display/entry units

   v   verify the partition table

   w   write table to disk and exit

   x   extra functionality (experts only)

Command (m for help): t

Partition number (1-8): 5

Hex code (type L to list codes): L

 0  Empty           24  NEC DOS         81  Minix / old Lin bf  Solaris

 1  FAT12           39  Plan 9          82  Linux swap / So c1  DRDOS/sec (FAT-

 2  XENIX root      3c  PartitionMagic  83  Linux           c4  DRDOS/sec (FAT-

 3  XENIX usr       40  Venix 80286     84  OS/2 hidden C:  c6  DRDOS/sec (FAT-

 4  FAT16 <32M      41  PPC PReP Boot   85  Linux extended  c7  Syrinx

 5  Extended        42  SFS             86  NTFS volume set da  Non-FS data

 6  FAT16           4d  QNX4.x          87  NTFS volume set db  CP/M / CTOS / .

 7  HPFS/NTFS       4e  QNX4.x 2nd part 88  Linux plaintext de  Dell Utility

 8  AIX             4f  QNX4.x 3rd part 8e  Linux LVM       df  BootIt

 9  AIX bootable    50  OnTrack DM      93  Amoeba          e1  DOS access

 a  OS/2 Boot Manag 51  OnTrack DM6 Aux 94  Amoeba BBT      e3  DOS R/O

 b  W95 FAT32       52  CP/M            9f  BSD/OS          e4  SpeedStor

 c  W95 FAT32 (LBA) 53  OnTrack DM6 Aux a0  IBM Thinkpad hi eb  BeOS fs

 e  W95 FAT16 (LBA) 54  OnTrackDM6      a5  FreeBSD         ee  GPT

 f  W95 Ext'd (LBA) 55  EZ-Drive        a6  OpenBSD         ef  EFI (FAT-12/16/

10  OPUS            56  Golden Bow      a7  NeXTSTEP        f0  Linux/PA-RISC b

11  Hidden FAT12    5c  Priam Edisk     a8  Darwin UFS      f1  SpeedStor

12  Compaq diagnost 61  SpeedStor       a9  NetBSD          f4  SpeedStor

14  Hidden FAT16 <3 63  GNU HURD or Sys ab  Darwin boot     f2  DOS secondary

16  Hidden FAT16    64  Novell Netware  af  HFS / HFS+      fb  VMware VMFS

17  Hidden HPFS/NTF 65  Novell Netware  b7  BSDI fs         fc  VMware VMKCORE

18  AST SmartSleep  70  DiskSecure Mult b8  BSDI swap       fd  Linux raid auto

1b  Hidden W95 FAT3 75  PC/IX           bb  Boot Wizard hid fe  LANstep

1c  Hidden W95 FAT3 80  Old Minix       be  Solaris boot    ff  BBT

1e  Hidden W95 FAT1

Hex code (type L to list codes): fd

Changed system type of partition 5 to fd (Linux raid autodetect)

Command (m for help): t

Partition number (1-8): 6

Hex code (type L to list codes): fd

Changed system type of partition 6 to fd (Linux raid autodetect)

Command (m for help): t

Partition number (1-8): 7

Hex code (type L to list codes): fd

Changed system type of partition 7 to fd (Linux raid autodetect)

Command (m for help): t

Partition number (1-8): 8

Hex code (type L to list codes): fd

Changed system type of partition 8 to fd (Linux raid autodetect)

Command (m for help): p

Disk /dev/sdb: 21.5 GB, 21474836480 bytes

255 heads, 63 sectors/track, 2610 cylinders

Units = cylinders of 16065 * 512 = 8225280 bytes

Sector size (logical/physical): 512 bytes / 512 bytes

I/O size (minimum/optimal): 512 bytes / 512 bytes

Disk identifier: 0xaebe4f2c

   Device Boot      Start         End      Blocks   Id  System

/dev/sdb1               1        1306    10490413+   5  Extended

/dev/sdb5               1         262     2104452   fd  Linux raid autodetect

/dev/sdb6             263         524     2104483+  fd  Linux raid autodetect

/dev/sdb7             525         786     2104483+  fd  Linux raid autodetect

/dev/sdb8             787        1048     2104483+  fd  Linux raid autodetect

Command (m for help): w

The partition table has been altered!

Calling ioctl() to re-read partition table.

Syncing disks.
查看分区情况,并通知内核
[root@test ~]# fdisk -l

Disk /dev/sda: 42.9 GB, 42949672960 bytes

255 heads, 63 sectors/track, 5221 cylinders

Units = cylinders of 16065 * 512 = 8225280 bytes

Sector size (logical/physical): 512 bytes / 512 bytes

I/O size (minimum/optimal): 512 bytes / 512 bytes

Disk identifier: 0x00058c8c

   Device Boot      Start         End      Blocks   Id  System

/dev/sda1   *           1          52      409600   83  Linux

Partition 1 does not end on cylinder boundary.

/dev/sda2              52        4457    35388416   83  Linux

/dev/sda3            4457        5222     6144000   82  Linux swap / Solaris

Disk /dev/sdb: 21.5 GB, 21474836480 bytes

255 heads, 63 sectors/track, 2610 cylinders

Units = cylinders of 16065 * 512 = 8225280 bytes

Sector size (logical/physical): 512 bytes / 512 bytes

I/O size (minimum/optimal): 512 bytes / 512 bytes

Disk identifier: 0xaebe4f2c

   Device Boot      Start         End      Blocks   Id  System

/dev/sdb1               1        1306    10490413+   5  Extended

/dev/sdb5               1         262     2104452   fd  Linux raid autodetect

/dev/sdb6             263         524     2104483+  fd  Linux raid autodetect

/dev/sdb7             525         786     2104483+  fd  Linux raid autodetect

/dev/sdb8             787        1048     2104483+  fd  Linux raid autodetect

Disk /dev/md0: 2152 MB, 2152857600 bytes

2 heads, 4 sectors/track, 525600 cylinders

Units = cylinders of 8 * 512 = 4096 bytes

Sector size (logical/physical): 512 bytes / 512 bytes

I/O size (minimum/optimal): 512 bytes / 512 bytes

Disk identifier: 0x00000000

[root@test ~]# partx -a /dev/sdb5 /dev/sdb

[root@test ~]# partx -a /dev/sdb6 /dev/sdb

[root@test ~]# partx -a /dev/sdb7 /dev/sdb

[root@test ~]# partx -a /dev/sdb8 /dev/sdb
创建好分区和分区类型后,我们就开始在Linux上创建raid5
[root@test ~]# mdadm -C /dev/md0 -l 5 -n 3 -x 1 /dev/sdb{5,6,7,8}

mdadm: /dev/sdb5 appears to be part of a raid array:

       level=raid1 devices=2 ctime=Thu Nov  1 18:08:48 2018

mdadm: /dev/sdb6 appears to be part of a raid array:

       level=raid1 devices=2 ctime=Thu Nov  1 18:08:48 2018

mdadm: /dev/sdb7 appears to be part of a raid array:

       level=raid1 devices=2 ctime=Thu Nov  1 18:08:48 2018

Continue creating array? y

mdadm: Defaulting to version 1.2 metadata

mdadm: array /dev/md0 started.
查看创建好的raid信息
[root@test ~]# cat /proc/mdstat

Personalities : [raid1] [raid6] [raid5] [raid4]

md0 : active raid5 sdb7[4] sdb8[3](S) sdb6[1] sdb5[0]

      4204544 blocks super 1.2 level 5, 512k chunk, algorithm 2 [3/2] [UU_]

      [>....................]  recovery =  3.9% (83552/2102272) finish=0.8min speed=41776K/sec

unused devices: <none>

[root@test ~]# mdadm -D /dev/md0

/dev/md0:

        Version : 1.2

  Creation Time : Thu Nov  1 19:27:13 2018

     Raid Level : raid5

     Array Size : 4204544 (4.01 GiB 4.31 GB)

  Used Dev Size : 2102272 (2.00 GiB 2.15 GB)

   Raid Devices : 3

  Total Devices : 4

    Persistence : Superblock is persistent

    Update Time : Thu Nov  1 19:27:23 2018

          State : clean, degraded, recovering

 Active Devices : 2

Working Devices : 4

 Failed Devices : 0

  Spare Devices : 2

         Layout : left-symmetric

     Chunk Size : 512K

 Rebuild Status : 43% complete

           Name : test:0  (local to host test)

           UUID : f1c7f735:ac34fde5:8ee6bb5b:55189221

         Events : 7

    Number   Major   Minor   RaidDevice State

       0       8       21        0      active sync   /dev/sdb5

       1       8       22        1      active sync   /dev/sdb6

       4       8       23        2      spare rebuilding   /dev/sdb7

       3       8       24        -      spare   /dev/sdb8
提示:可以看出3块盘用于阵列,还有一块盘空闲状态。
到此我们在Linux上创建raid5 就创建完成了,接下来我们要想使用其磁盘阵列,就得先格式化文件系统(就是指定其磁盘的文件系统类型),然后在挂着至根文件系统我们就可以正常使用了
格式化磁盘阵列,需要注意的是创建好的磁盘真列,在Linux里就是以/dev/md0 命名的,当然我们格式化指定也是/dev/md0,当然我们这里是使用的md0 也可以使用其他的,比如md1 md2都可以,这个要看你创建raid是使用的那个了,一般我们都是顺序来,方便记忆。
[root@test ~]# mke2fs -t ext3 /dev/md0

mke2fs 1.41.12 (17-May-2010)

Filesystem label=

OS type: Linux

Block size=4096 (log=2)

Fragment size=4096 (log=2)

Stride=128 blocks, Stripe width=256 blocks

262944 inodes, 1051136 blocks

52556 blocks (5.00%) reserved for the super user

First data block=0

Maximum filesystem blocks=1077936128

33 block groups

32768 blocks per group, 32768 fragments per group

7968 inodes per group

Superblock backups stored on blocks:

	32768, 98304, 163840, 229376, 294912, 819200, 884736

Writing inode tables: done

Creating journal (32768 blocks): done

Writing superblocks and filesystem accounting information: done

This filesystem will be automatically checked every 34 mounts or

180 days, whichever comes first.  Use tune2fs -c or -i to override.
挂载和查看其挂着情况
[root@test ~]# mkdir test/raid5 -p

[root@test ~]# mount /dev/md0 test/raid5

[root@test ~]# ll test/raid5/

total 16

drwx------ 2 root root 16384 Nov  1 19:35 lost+found

[root@test ~]# df -h

Filesystem      Size  Used Avail Use% Mounted on

/dev/sda2        34G  1.6G   30G   6% /

tmpfs           1.9G     0  1.9G   0% /dev/shm

/dev/sda1       380M   41M  320M  12% /boot

/dev/md0        4.0G  137M  3.7G   4% /root/test/raid5
提示:可以看出我们创建的raid5 就挂载至根文件系统了,当然这里要提示下,我们现在挂载的,系统重新启动后就会消失,要想其永久生效,我们可以把挂载信息写入/etc/fstab 里面。这样重新启动系统会默认去读/etc/fstab文件里的内容。这里说下/etc/fstab 这个配置文件的格式,第一个字段是要挂载的设备,第二个字段是挂载点,第三个字段是挂载的文件系统类型,第四个是挂载的选项,默认是defaults如果要开启acl或其他选项需要用逗号隔开,第五个字段是转储频率(每多少天做一次完全备份),第6个字段是文件系统检测次序(只有根可以为1),了解了其配置文件的格式后我们就可以把我们刚才的raid5 写入配置文件
/dev/md0 /root/test/raid5 ext3 defaults 0 0
提示:要挂载的设备也可以使用uuid
接下来我们来模拟其raid5 坏了一块盘的情况,看看我们准备的热备盘是否能够顶替其坏了的磁盘。
[root@test ~]# mdadm /dev/md0 --fail /dev/sdb6

mdadm: set /dev/sdb6 faulty in /dev/md0

[root@test ~]# mdadm -D /dev/md0

/dev/md0:

        Version : 1.2

  Creation Time : Thu Nov  1 19:27:13 2018

     Raid Level : raid5

     Array Size : 4204544 (4.01 GiB 4.31 GB)

  Used Dev Size : 2102272 (2.00 GiB 2.15 GB)

   Raid Devices : 3

  Total Devices : 4

    Persistence : Superblock is persistent

    Update Time : Thu Nov  1 19:55:51 2018

          State : clean, degraded, recovering

 Active Devices : 2

Working Devices : 3

 Failed Devices : 1

  Spare Devices : 1

         Layout : left-symmetric

     Chunk Size : 512K

 Rebuild Status : 5% complete

           Name : test:0  (local to host test)

           UUID : f1c7f735:ac34fde5:8ee6bb5b:55189221

         Events : 20

    Number   Major   Minor   RaidDevice State

       0       8       21        0      active sync   /dev/sdb5

       3       8       24        1      spare rebuilding   /dev/sdb8

       4       8       23        2      active sync   /dev/sdb7

       1       8       22        -      faulty   /dev/sdb6

[root@test ~]# cat /proc/mdstat

Personalities : [raid1] [raid6] [raid5] [raid4]

md0 : active raid5 sdb7[4] sdb8[3] sdb6[1](F) sdb5[0]

      4204544 blocks super 1.2 level 5, 512k chunk, algorithm 2 [3/2] [U_U]

      [====>................]  recovery = 21.4% (450048/2102272) finish=0.4min speed=56256K/sec

unused devices: <none>
提示:可以看出我们给的热备盘在其阵列中有坏的磁盘后,会自动顶替其坏的磁盘。顶替上去后,磁盘自动会恢复其阵列里的数据,以保证其阵列能够正常使用。
移除坏的盘
[root@test ~]# mdadm -D /dev/md0

/dev/md0:

        Version : 1.2

  Creation Time : Thu Nov  1 19:27:13 2018

     Raid Level : raid5

     Array Size : 4204544 (4.01 GiB 4.31 GB)

  Used Dev Size : 2102272 (2.00 GiB 2.15 GB)

   Raid Devices : 3

  Total Devices : 4

    Persistence : Superblock is persistent

    Update Time : Thu Nov  1 19:56:20 2018

          State : clean

 Active Devices : 3

Working Devices : 3

 Failed Devices : 1

  Spare Devices : 0

         Layout : left-symmetric

     Chunk Size : 512K

           Name : test:0  (local to host test)

           UUID : f1c7f735:ac34fde5:8ee6bb5b:55189221

         Events : 37

    Number   Major   Minor   RaidDevice State

       0       8       21        0      active sync   /dev/sdb5

       3       8       24        1      active sync   /dev/sdb8

       4       8       23        2      active sync   /dev/sdb7

       1       8       22        -      faulty   /dev/sdb6

[root@test ~]# mdadm /dev/md0 --remove /dev/sdb6

mdadm: hot removed /dev/sdb6 from /dev/md0

[root@test ~]# mdadm -D /dev/md0

/dev/md0:

        Version : 1.2

  Creation Time : Thu Nov  1 19:27:13 2018

     Raid Level : raid5

     Array Size : 4204544 (4.01 GiB 4.31 GB)

  Used Dev Size : 2102272 (2.00 GiB 2.15 GB)

   Raid Devices : 3

  Total Devices : 3

    Persistence : Superblock is persistent

    Update Time : Thu Nov  1 19:59:54 2018

          State : clean

 Active Devices : 3

Working Devices : 3

 Failed Devices : 0

  Spare Devices : 0

         Layout : left-symmetric

     Chunk Size : 512K

           Name : test:0  (local to host test)

           UUID : f1c7f735:ac34fde5:8ee6bb5b:55189221

         Events : 38

    Number   Major   Minor   RaidDevice State

       0       8       21        0      active sync   /dev/sdb5

       3       8       24        1      active sync   /dev/sdb8

       4       8       23        2      active sync   /dev/sdb7
接下来我们在添加一块盘至raid里(这里不再演示怎么去重新分区,我们这里就用/dev/sdb6就可以)
[root@test ~]# mdadm /dev/md0 --add /dev/sdb6

mdadm: added /dev/sdb6

[root@test ~]# mdadm --detail /dev/md0

/dev/md0:

        Version : 1.2

  Creation Time : Thu Nov  1 19:27:13 2018

     Raid Level : raid5

     Array Size : 4204544 (4.01 GiB 4.31 GB)

  Used Dev Size : 2102272 (2.00 GiB 2.15 GB)

   Raid Devices : 3

  Total Devices : 4

    Persistence : Superblock is persistent

    Update Time : Thu Nov  1 20:03:12 2018

          State : clean

 Active Devices : 3

Working Devices : 4

 Failed Devices : 0

  Spare Devices : 1

         Layout : left-symmetric

     Chunk Size : 512K

           Name : test:0  (local to host test)

           UUID : f1c7f735:ac34fde5:8ee6bb5b:55189221

         Events : 39

    Number   Major   Minor   RaidDevice State

       0       8       21        0      active sync   /dev/sdb5

       3       8       24        1      active sync   /dev/sdb8

       4       8       23        2      active sync   /dev/sdb7

       5       8       22        -      spare   /dev/sdb6
停止raid
[root@test ~]# mdadm -S /dev/md0

mdadm: Cannot get exclusive access to /dev/md0:Perhaps a running process, mounted filesystem or active volume group?

[root@test ~]# umount /dev/md0

[root@test ~]# df -h

Filesystem      Size  Used Avail Use% Mounted on

/dev/sda2        34G  1.6G   30G   6% /

tmpfs           1.9G     0  1.9G   0% /dev/shm

/dev/sda1       380M   41M  320M  12% /boot

[root@test ~]# mdadm -S /dev/md0

mdadm: stopped /dev/md0

[root@test ~]# mdadm -D /dev/md0

mdadm: cannot open /dev/md0: No such file or directory

[root@test ~]# cat /proc/mdstat

Personalities : [raid6] [raid5] [raid4]

unused devices: <none>

[root@test ~]#
提示:要想停止其阵列,首先要卸载其文件系统,然后在停止,通过上面的例子我们可以看出,当我们停止掉md0后,其/dev/md0文件也不存在。也就是说我们停止掉其磁盘阵列,也就把其磁盘阵列的组合关系给解散了,所以对其的文件也会相应消失。这样一来我们如果要想再使用其阵列怎么办呢?只有重新创建磁盘阵列或装配,在创建好后,我们要做一件事 ,就是把其raid信息保存至配置文件,这样我们以后就算停止掉其raid磁盘阵列,也可以快速进行装配。
[root@test ~]# fdisk -l

Disk /dev/sda: 42.9 GB, 42949672960 bytes

255 heads, 63 sectors/track, 5221 cylinders

Units = cylinders of 16065 * 512 = 8225280 bytes

Sector size (logical/physical): 512 bytes / 512 bytes

I/O size (minimum/optimal): 512 bytes / 512 bytes

Disk identifier: 0x00058c8c

   Device Boot      Start         End      Blocks   Id  System

/dev/sda1   *           1          52      409600   83  Linux

Partition 1 does not end on cylinder boundary.

/dev/sda2              52        4457    35388416   83  Linux

/dev/sda3            4457        5222     6144000   82  Linux swap / Solaris

Disk /dev/sdb: 21.5 GB, 21474836480 bytes

255 heads, 63 sectors/track, 2610 cylinders

Units = cylinders of 16065 * 512 = 8225280 bytes

Sector size (logical/physical): 512 bytes / 512 bytes

I/O size (minimum/optimal): 512 bytes / 512 bytes

Disk identifier: 0xaebe4f2c

   Device Boot      Start         End      Blocks   Id  System

/dev/sdb1               1        1306    10490413+   5  Extended

/dev/sdb5               1         262     2104452   fd  Linux raid autodetect

/dev/sdb6             263         524     2104483+  fd  Linux raid autodetect

/dev/sdb7             525         786     2104483+  fd  Linux raid autodetect

/dev/sdb8             787        1048     2104483+  fd  Linux raid autodetect

[root@test ~]# mdadm  -C /dev/md0 -l 5 -n 3 -x 1 /dev/sdb{5,6,7,8}

mdadm: /dev/sdb5 appears to be part of a raid array:

       level=raid5 devices=3 ctime=Thu Nov  1 19:27:13 2018

mdadm: /dev/sdb6 appears to be part of a raid array:

       level=raid5 devices=3 ctime=Thu Nov  1 19:27:13 2018

mdadm: /dev/sdb7 appears to be part of a raid array:

       level=raid5 devices=3 ctime=Thu Nov  1 19:27:13 2018

mdadm: /dev/sdb8 appears to be part of a raid array:

       level=raid5 devices=3 ctime=Thu Nov  1 19:27:13 2018

Continue creating array? y

mdadm: Defaulting to version 1.2 metadata

mdadm: array /dev/md0 started.

[root@test ~]# mdadm -D /dev/md0

/dev/md0:

        Version : 1.2

  Creation Time : Thu Nov  1 20:20:44 2018

     Raid Level : raid5

     Array Size : 4204544 (4.01 GiB 4.31 GB)

  Used Dev Size : 2102272 (2.00 GiB 2.15 GB)

   Raid Devices : 3

  Total Devices : 4

    Persistence : Superblock is persistent

    Update Time : Thu Nov  1 20:21:03 2018

          State : clean, degraded, recovering

 Active Devices : 2

Working Devices : 4

 Failed Devices : 0

  Spare Devices : 2

         Layout : left-symmetric

     Chunk Size : 512K

 Rebuild Status : 68% complete

           Name : test:0  (local to host test)

           UUID : 6074e103:c5bae142:7c9fa17c:8cc5495d

         Events : 11

    Number   Major   Minor   RaidDevice State

       0       8       21        0      active sync   /dev/sdb5

       1       8       22        1      active sync   /dev/sdb6

       4       8       23        2      spare rebuilding   /dev/sdb7

       3       8       24        -      spare   /dev/sdb8

[root@test ~]# cat /proc/mdstat

Personalities : [raid1] [raid6] [raid5] [raid4]

md0 : active raid5 sdb7[4] sdb8[3](S) sdb6[1] sdb5[0]

      4204544 blocks super 1.2 level 5, 512k chunk, algorithm 2 [3/3] [UUU]

unused devices: <none>

[root@test ~]# mdadm -D --scan > /etc/mdadm.conf

[root@test ~]# cat /etc/mdadm.conf

ARRAY /dev/md0 metadata=1.2 spares=1 name=test:0 UUID=6074e103:c5bae142:7c9fa17c:8cc5495d
提示:以上是重新创建md0,在我们使用mdadm这个工具时,它有个模式可以方便我们重新装载-A
[root@test ~]# cat /proc/mdstat

Personalities : [raid1] [raid6] [raid5] [raid4]

md0 : active raid5 sdb7[4] sdb8[3](S) sdb6[1] sdb5[0]

      4204544 blocks super 1.2 level 5, 512k chunk, algorithm 2 [3/3] [UUU]

unused devices: <none>

[root@test ~]# mdadm  -S /dev/md0

mdadm: stopped /dev/md0

[root@test ~]# cat /proc/mdstat

Personalities : [raid1] [raid6] [raid5] [raid4]

unused devices: <none>

[root@test ~]# mdadm -A /dev/md0 /dev/sdb{5,6,7,8}

mdadm: /dev/md0 has been started with 3 drives and 1 spare.

[root@test ~]# cat /proc/mdstat

Personalities : [raid1] [raid6] [raid5] [raid4]

md0 : active raid5 sdb5[0] sdb8[3](S) sdb7[4] sdb6[1]

      4204544 blocks super 1.2 level 5, 512k chunk, algorithm 2 [3/3] [UUU]

unused devices: <none>

[root@test ~]#
提示:当我们保存的有配置文件信息我们也可直接进行装配,不需要指定其磁盘信息。
[root@test ~]# mdadm -D /dev/md0

/dev/md0:

        Version : 1.2

  Creation Time : Thu Nov  1 20:20:44 2018

     Raid Level : raid5

     Array Size : 4204544 (4.01 GiB 4.31 GB)

  Used Dev Size : 2102272 (2.00 GiB 2.15 GB)

   Raid Devices : 3

  Total Devices : 4

    Persistence : Superblock is persistent

    Update Time : Thu Nov  1 20:21:13 2018

          State : clean

 Active Devices : 3

Working Devices : 4

 Failed Devices : 0

  Spare Devices : 1

         Layout : left-symmetric

     Chunk Size : 512K

           Name : test:0  (local to host test)

           UUID : 6074e103:c5bae142:7c9fa17c:8cc5495d

         Events : 18

    Number   Major   Minor   RaidDevice State

       0       8       21        0      active sync   /dev/sdb5

       1       8       22        1      active sync   /dev/sdb6

       4       8       23        2      active sync   /dev/sdb7

       3       8       24        -      spare   /dev/sdb8

[root@test ~]# cat /proc/mdstat

Personalities : [raid1] [raid6] [raid5] [raid4]

md0 : active raid5 sdb5[0] sdb8[3](S) sdb7[4] sdb6[1]

      4204544 blocks super 1.2 level 5, 512k chunk, algorithm 2 [3/3] [UUU]

unused devices: <none>

[root@test ~]# mdadm -S /dev/md0

mdadm: stopped /dev/md0

[root@test ~]# cat /proc/mdstat

Personalities : [raid1] [raid6] [raid5] [raid4]

unused devices: <none>

[root@test ~]# mdadm -D /dev/md0

mdadm: cannot open /dev/md0: No such file or directory

[root@test ~]# mdadm -A /dev/md0

mdadm: /dev/md0 has been started with 3 drives and 1 spare.

[root@test ~]# cat /proc/mdstat

Personalities : [raid1] [raid6] [raid5] [raid4]

md0 : active raid5 sdb5[0] sdb8[3](S) sdb7[4] sdb6[1]

      4204544 blocks super 1.2 level 5, 512k chunk, algorithm 2 [3/3] [UUU]

unused devices: <none>

[root@test ~]# mdadm -D /dev/md0

/dev/md0:

        Version : 1.2

  Creation Time : Thu Nov  1 20:20:44 2018

     Raid Level : raid5

     Array Size : 4204544 (4.01 GiB 4.31 GB)

  Used Dev Size : 2102272 (2.00 GiB 2.15 GB)

   Raid Devices : 3

  Total Devices : 4

    Persistence : Superblock is persistent

    Update Time : Thu Nov  1 20:21:13 2018

          State : clean

 Active Devices : 3

Working Devices : 4

 Failed Devices : 0

  Spare Devices : 1

         Layout : left-symmetric

     Chunk Size : 512K

           Name : test:0  (local to host test)

           UUID : 6074e103:c5bae142:7c9fa17c:8cc5495d

         Events : 18

    Number   Major   Minor   RaidDevice State

       0       8       21        0      active sync   /dev/sdb5

       1       8       22        1      active sync   /dev/sdb6

       4       8       23        2      active sync   /dev/sdb7

       3       8       24        -      spare   /dev/sdb8

[root@test ~]#
提示:当我们有保存的有装载的配置信息,我们就直接重新装载,不用指定其磁盘,以上就是最最基本的管理raid以及创建raid,当然我们也可以创建多个不同级别的raid,其方法同上。
以上是我个人的一些总结和看法,如有错误,欢迎大家指出,谢谢大家。
Linux下RIAD的实现及mdadm命令的基本用法的更多相关文章
- 构建LINUX下的入侵检测系统——LIDS 系统管理命令--vlock
构建LINUX下的入侵检测系统——LIDS 系统管理命令--vlock http://blog.chinaunix.net/uid-306663-id-2440200.html LIDS官方网站: ...
- Linux下如何保持gnome-terminal窗口执行命令后停留而不立刻关闭(gnome-terminal -x)
Linux下如何保持gnome-terminal窗口执行命令后停留而不立刻关闭(gnome-terminal -x) 转自:http://jakfruit.blog.163.com/blog/stat ...
- Linux下df与du两个命令的差别?
Linux下df与du两个命令的差别? 一.df显示文件系统的使用情况,与du比較,就是更全盘化. 最经常使用的就是 df -T,显示文件系统的使用情况并显示文件系统的类型. 举比例如以下: [roo ...
- linux 下文件重命名/移动/复制命令(转)
linux 下文件重命名/移动/复制命令(转) linux下重命名文件:使用mv命令就可以了, 例:要把名为:abc 重命名为:123 可以这样操作: 重命名:MV命令 1.进入你的文件目录,运行 ...
- linux下使用script和scriptreplay对命令行操作进行录像
转自:linux下用script和scriptreplay对命令行操作录像 在Linux中可以使用script命令来记录命令行的操作过程,并使用scriptreplay命令对命令操作进行回放,操作步骤 ...
- linux下查看动态链接库依赖关系的命令 x86: ldd *.so arm: arm-linux-readelf -d *.so 实际例子: 以项目中用到的库librtsp.so分析: lijun@ubuntu:~/workspace$ arm-hisiv100nptl-linux-ld -d librtsp.so arm-hisiv100nptl-linux-ld:
linux下查看动态链接库依赖关系的命令 x86:ldd *.so arm:arm-linux-readelf -d *.so 实际例子:以项目中用到的库librtsp.so分析:l ...
- Linux下mysql使用systemctl restart mysqld命令失败
Linux下mysql使用systemctl restart mysqld命令失败: 解决方法:将mysql赋予root的权限 vim /etc/passwd 找到mysql开头的一行文件mysql: ...
- Linux下的压缩zip,解压缩unzip命令详解及实例
实例:压缩服务器上当前目录的内容为xxx.zip文件 zip -r xxx.zip ./* 解压zip文件到当前目录 unzip filename.zip ====================== ...
- Linux下更好用的帮助命令—cheat
导读 Linux系统中,我们经常会用man命令来帮助查看这个命令的具体用法,man是很强大的,但是英语不好的同学用man用起来可能不那么顺手,自然而然的就出现了cheat命令,cheat命令就是通过简 ...
随机推荐
- Python基础库之jieba库的使用(第三方中文词汇函数库)
各位学python的朋友,是否也曾遇到过这样的问题,举个例子如下: “I am proud of my motherland” 如果我们需要提取中间的单词要走如何做? 自然是调用string中的spl ...
- Flash安全总结
ActionScript AS是基于ECMAScript的语言,为了交互的需要flash应用引入ActionScript.ActionScript一共有三个版本,其中3.0较之前两个版本变化很大.Ac ...
- web安全之XSS基础-常见编码科普
0x01常用编码 html实体编码(10进制与16进制): 如把尖括号编码[ < ] -----> html十进制: < html十六进制:< javascript的八进制 ...
- 解决seajs ie8 对象不支持charAt 属性。
在使用 seajs做项目,今天偶然发现在ie9以下的ie版本会 报出 对象不支持charAt 属性.刚开始还以为是自己写的js部分出了问题,经过几个小时的奋战.最终找到了其根源.在sea-debug. ...
- ES6入门之变量的解构赋值(二)
前言 在上一章 ES6入门之let和const命令中我们对ES6的相关语法已经有了初步了解,上一章中我们主要学习了三大部分的内容,let命令的使用,块级作用域,const命令的使用,那么从本篇博客将进 ...
- Unity - Raycast 射线检测
本文简要分析了Unity中射线检测的基本原理及用法,包括: Ray 射线 RaycastHit 光线投射碰撞信息 Raycast 光线投射 SphereCast 球体投射 OverlapSphere ...
- 常用函数-String
/************************************************************************ 函数功能:将字符串中str的old_value子字符 ...
- CVE-2016-5159 利用脏牛漏洞Linux提权复现
当前路径: /var/www 磁盘列表: / 系统信息: Linux zico 3.2.0-23-generic #36-Ubuntu SMP Tue Apr 10 20:39:51 UTC 2012 ...
- python学习-模块与包(九)
9.4查看模块内容 dir(): 返回模块或类所包含的全部程序单元(包括变量.函数.类和方法等) __all__:模块本身提供的变量,不会展示以下划线开头的程序单元.另使用from xx import ...
- git jenkins 基本部署 gitlab私有仓库
从代码私有性方面来看,公司不希望员工获取到全部的代码,这个时候 GitLab 无疑是最佳的选择.但对于开源项目而言,GitHub 依然是代码托管的首选平台. 1.安装gitlab[root@gitla ...