
android界面设计之布局管理
谈到android界面设计,各种布局样式不得不提!传统的布局方式有6种,我们会一一介绍。
在android studio2.2版本之后出现了一款超棒的布局方式,真正意义上的所见即所得,后面我们也会讲到!
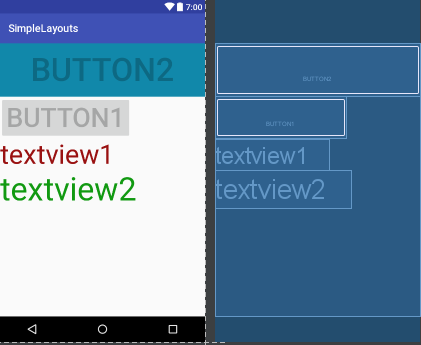
1.LinearLayout:线性布局:线性布局又有两种,“垂直布局”和“水平布局”。
垂直布局每一行只能有一个控件(自己嵌套的不算);
水平布局只有一行,所有的控件依次从左向右排列;
linearLayout中有一个重要的属性 android:layout_weight="",这个weight在垂直布局时,代表行距;水平的时候代表列宽;weight值越大就越大,当把所有控件的weight都设置为相同值,比如1的时候,这些控件会平分父类控件的区域。
举个栗子:
 <?xml version="1.0" encoding="utf-8"?>

 <LinearLayout xmlns:android="http://schemas.android.com/apk/res/android"

     android:orientation="vertical"

     android:layout_width="match_parent"

     android:layout_height="match_parent">

     <Button

         android:layout_width="match_parent"

         android:layout_height="100dp"

         android:text="button2"

         android:textSize="60dp"

         android:background="#1188aa"

         android:enabled="false"/>

     <Button

         android:layout_width="wrap_content"

         android:layout_height="wrap_content"

         android:text="button1"

         android:textSize="50dp"

         android:enabled="false"/>

     <TextView

         android:layout_width="wrap_content"

         android:layout_height="wrap_content"

         android:text="textview1"

         android:textSize="50dp"

         android:textColor="#991111"/>

     <TextView

         android:layout_width="wrap_content"

         android:layout_height="wrap_content"

         android:text="textview2"

         android:textSize="60dp"

         android:textColor="#119911"/>

 </LinearLayout>
以上代码运行结果如下图:
2.FrameLayout:帧布局:这个比较简单,说白了就是在屏幕上定义一块空白的区域(当然也可以是整个屏幕)。
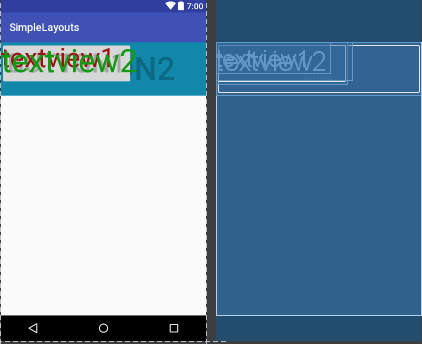
在这个空白的区域中,所有的控件都是在区域的左上角排列的,也就是说你没有办法指定这个区域里面控件的位置,后一个控件会一个接着一个的顶到左上角,这样就会覆盖前面的控件。
举个栗子:
 <?xml version="1.0" encoding="utf-8"?>

 <FrameLayout xmlns:android="http://schemas.android.com/apk/res/android"

     android:orientation="vertical"

     android:layout_width="match_parent"

     android:layout_height="match_parent">

     <Button

         android:layout_width="match_parent"

         android:layout_height="100dp"

         android:text="button2"

         android:textSize="60dp"

         android:background="#1188aa"

         android:enabled="false"/>

     <Button

         android:layout_width="wrap_content"

         android:layout_height="wrap_content"

         android:text="button1"

         android:textSize="50dp"

         android:enabled="false"/>

     <TextView

         android:layout_width="wrap_content"

         android:layout_height="wrap_content"

         android:text="textview1"

         android:textSize="50dp"

         android:textColor="#991111"/>

     <TextView

         android:layout_width="wrap_content"

         android:layout_height="wrap_content"

         android:text="textview2"

         android:textSize="60dp"

         android:textColor="#119911"/>

 </FrameLayout>
以上代码运行如下图,细心的你可能会发现上述的button中有一个enable属性,如果把这行代码去掉,那么button就会覆盖textview,这与我们之前讲的后一个组件会覆盖前一个组件是相违背的,你问我为什么,我也不知道,如知内情,望相告之:
3.RelativeLayout:相对布局:相对布局可以理解为某一个元素为参照物,来定位的布局方式,这个稍微复杂一些,因为其属性比较多,一个一个来看:
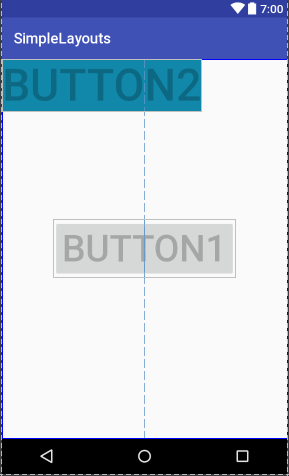
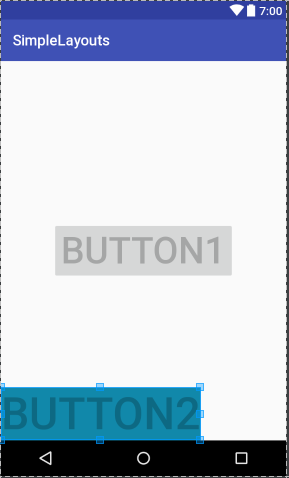
首先,我们定义两个button,并且把btn1放在屏幕的最中间,如图1,
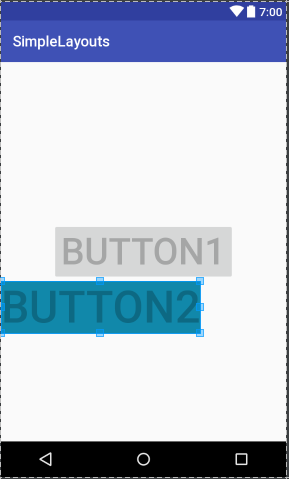
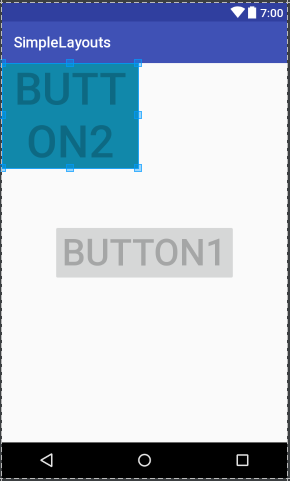
我们在btn2中添加一行代码:android:layout_below="@+id/btn1",如图2,
把这行代码换成:android:layout_alignBottom="@+id/btn1",如图3,
再换一下:android:layout_alignParentBottom="true",如图4,
再换一下:android:layout_marginRight="200dp",如图5,连btn2的形状都挤变形了,是不是很神奇,想要真正领悟,必须上代码亲自试探试探!
 <?xml version="1.0" encoding="utf-8"?>

 <RelativeLayout xmlns:android="http://schemas.android.com/apk/res/android"

     android:layout_width="match_parent"

     android:layout_height="match_parent">

     <Button

         android:layout_width="wrap_content"

         android:layout_height="wrap_content"

         android:layout_centerInParent="true"

         android:id="@+id/btn1"

         android:text="button1"

         android:textSize="50dp"

         android:enabled="false"/>

     <Button

         android:layout_width="wrap_content"

         android:layout_height="wrap_content"

         android:id="@+id/btn2"

         android:layout_marginRight="200dp"

         android:text="button2"

         android:textSize="60dp"

         android:background="#1188aa"

         android:enabled="false"/>

     <!--<TextView

         android:layout_width="wrap_content"

         android:layout_height="wrap_content"

         android:id="@+id/tv1"

         android:text="textview1"

         android:textSize="50dp"

         android:textColor="#991111"/>

     <TextView

         android:layout_width="wrap_content"

         android:layout_height="wrap_content"

         android:id="@+id/tv2"

         android:text="textview2"

         android:textSize="60dp"

         android:textColor="#119911"/>-->

 </RelativeLayout>
4.AbsoluteLayout:绝对布局:这个也很简单,主要属性就两个 layout_x 和 layout_y 分别定义 这个组件的绝对位置。 即,以屏幕左上角为(0,0)的坐标轴的x,y值,当向下或向右移动时,坐标值将变大。这个使用较少,因为其在不同设备上的显示大相径庭。但我还是举例说明吧!
 <?xml version="1.0" encoding="utf-8"?>

 <AbsoluteLayout xmlns:android="http://schemas.android.com/apk/res/android"

     android:layout_width="match_parent"

     android:layout_height="match_parent">

     <Button

         android:layout_width="wrap_content"

         android:layout_height="wrap_content"

         android:id="@+id/btn1"

         android:text="button1"

         android:textSize="50dp"

         android:layout_x="100dp"

         android:layout_y="50dp"/>

     <Button

         android:layout_width="match_parent"

         android:layout_height="wrap_content"

         android:id="@+id/btn2"

         android:text="button2"

         android:textSize="50dp"

         android:textColor="#ff1111"

         android:layout_x="100dp"

         android:layout_y="150dp"/>

 </AbsoluteLayout>
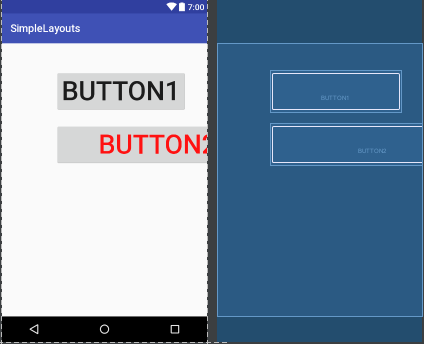
我们把btn2的宽度设置为填满整个父控件,可以发现结果如上图,看来,这个x和y针对的是控件的左上定点,并非控件中心点,这个需要注意。
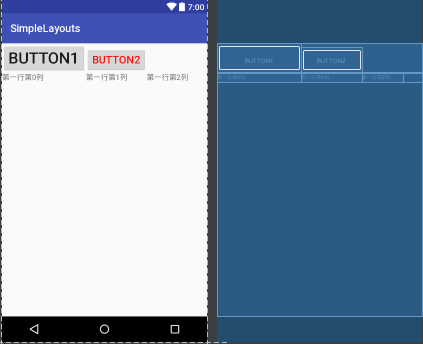
5.TableLayout:表格布局:表格布局类似Html里面的Table。每一个TableLayout里面有表格行TableRow,TableRow里面可以具体定义每一个元素。
表格由列和行组成许多的单元格。表格允许单元格为空。单元格不能跨列,这与HTML 中的不一样。TabRow只论行,不论列(列自定义)。
举例说明:
 <?xml version="1.0" encoding="utf-8"?>

 <TableLayout xmlns:android="http://schemas.android.com/apk/res/android"

     android:layout_width="match_parent"

     android:layout_height="match_parent">

     <TableRow>

         <Button

             android:layout_width="wrap_content"

             android:layout_height="wrap_content"

             android:id="@+id/btn1"

             android:text="button1"

             android:textSize="30dp"

             android:layout_x="100dp"

             android:layout_y="50dp"/>

         <Button

             android:layout_width="wrap_content"

             android:layout_height="wrap_content"

             android:id="@+id/btn2"

             android:text="button2"

             android:textSize="20dp"

             android:textColor="#ff1111"

             android:layout_x="100dp"

             android:layout_y="150dp"/>

     </TableRow>

     <TableRow>

         <TextView android:text="第一行第0列"

             android:layout_width="wrap_content"

             android:layout_height="wrap_content"/>

         <TextView android:text="第一行第1列"

             android:layout_width="wrap_content"

             android:layout_height="wrap_content"/>

         <TextView android:text="第一行第2列"

             android:layout_width="wrap_content"

             android:layout_height="wrap_content"/>

     </TableRow>

 </TableLayout>
6.GridLayout:网格布局:网格布局是android4.0之后提出来的一种布局方式,使用它的理由有两个:1,减少布局嵌套层次从而提高性能;2,对需要复杂对齐的布局,非他莫属。不使用它的理由:由于太灵活导致学习难度比较大。在这里就不详细解释了,大家可以参考文档:http://www.jianshu.com/p/441d60be7d8a。
举个栗子吧:
<?xml version="1.0" encoding="utf-8"?>

<GridLayout xmlns:android="http://schemas.android.com/apk/res/android"

    android:layout_width="wrap_content"

    android:layout_height="wrap_content"

    android:orientation="horizontal"

    android:rowCount="5"

    android:columnCount="4">

    <Button

        android:id="@+id/one"

        android:text="1"/>

      <Button

    android:id="@+id/two"

    android:text="2"/>

       <Button

    android:id="@+id/three"

    android:text="3"/>

      <Button

    android:id="@+id/devide"

    android:text="/"/>

      <Button

    android:id="@+id/four"

    android:text="4"/>

      <Button

    android:id="@+id/five"

    android:text="5"/>

      <Button

    android:id="@+id/six"

    android:text="6"/>

      <Button

    android:id="@+id/multiply"

    android:text="×"/>

      <Button

    android:id="@+id/seven"

    android:text="7"/>

      <Button

    android:id="@+id/eight"

    android:text="8"/>

      <Button

    android:id="@+id/nine"

    android:text="9"/>

    <Button

        android:id="@+id/minus"

        android:text="-"/>

    <Button

        android:id="@+id/zero"

        android:layout_columnSpan="2"

        android:layout_gravity="fill"

        android:text="0"/>

      <Button

    android:id="@+id/point"

    android:text="."/>

    <Button

        android:id="@+id/plus"

        android:layout_rowSpan="2"

        android:layout_gravity="fill"

        android:text="+"/>

    <Button

        android:id="@+id/equal"

        android:layout_columnSpan="3"

        android:layout_gravity="fill"

        android:text="="/>

</GridLayout>
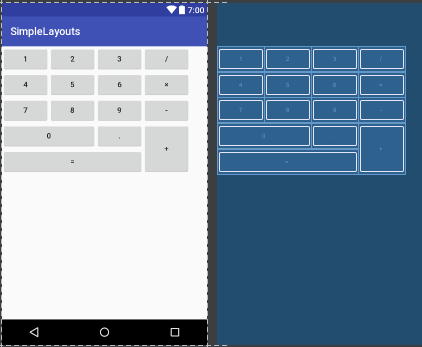
7.ConstraintLayout:谷歌在2016年的IO大会上推出的一种新的布局方式—-ConstraintLayout,这局是一种约束型的布局方式。这绝对是你最应该了解的神器,有了它,天黑都不怕!这里隆重献上一个大神的作品,必须要读,必须要读,必须要读啊!
这个讲的非常清晰,我就不多废话了:
Android新特性介绍,ConstraintLayout完全解析
android界面设计之布局管理的更多相关文章
- Android界面设计适配不同屏幕的尺寸和密度解读
Android是运行在各种提供不同的屏幕尺寸和密度的设备.Android系统提供跨设备的统一开发环境和处理大部分的工作,以调整每个应用程序的用户界面,以在其上显示的画面. 同时,该系统提供了API,允 ...
- android 界面设计基本知识Ⅲ
本章继续讲述在android界面设计中相关的知识点.介绍内容包括BroadcastReceiver(广播),Service(服务),Widget(小部件),WebView(网页加载控件). 1.Bro ...
- Android UI组件:布局管理器
为了更好的管理Android应用的用户界面中的组件,Android提供了布局管理器.通过使用布局管理器,Android应用的图形用户界面具有良好的平台无关性.通常,推荐使用布局管理器来管理组件的分布. ...
- 【Android 应用开发】AndroidUI设计之 布局管理器 - 详细解析布局实现
写完博客的总结 : 以前没有弄清楚的概念清晰化 父容器与本容器属性 : android_layout...属性是本容器的属性, 定义在这个布局管理器的LayoutParams内部类中, 每个布局管理器 ...
- 让你大开眼界的10款Android界面设计
根据调查显示, iOS与Android的市场份额差距正越来越大.Android设备正在成为手机应用市场的主力军.如何从设计层面创造一个优美的app界面来吸引用户已然成为广大App开发者们必做的功课之一 ...
- android 界面设计基本知识Ⅱ
上一章讲述了Android界面设计时,一些基本控件的使用,本章主要讲述自定义控件,Fragment和Headler线程机制. 1.自定义控件 (1)基本知识 dp.sp和dx px:像素点 ...
- android 界面设计基本知识
一个好的APP不仅有美观,好看的界面,更需要良好的性能和稳定性.作为一名开发人员,需要理解界面设计原则并写出优秀的界面设计代码. 本章主要讲述基本控件的使用,界面布局及一些常用的界面设计属性. 1.常 ...
- AndroidUI设计之 布局管理器 - 详细解析布局实现
写完博客的总结 : 以前没有弄清楚的概念清晰化 父容器与本容器属性 : android_layout...属性是本容器的属性, 定义在这个布局管理器的LayoutParams内部类中, 每个布局管理器 ...
- android中常用的布局管理器(二)
接上篇博客 (3)LinearLayout 线性布局管理器 线性布局管理器是将放入其中的组件按照垂直或水平方向来布局,每一行或每一列只能放一个组件,并且不会换行,当组件排列到窗体的边缘后,后面 ...
随机推荐
- AdobeFlashBuilder还不如AdobeFlashProfessional写actionscript体验好
AdobeFlashBuilder还不如AdobeFlashProfessional写actionscript体验好. 这真是奇怪了.
- Linux tail,cat,head命令
tail命令用于将文件的最后部分输出到标准设备,通常是终端,也可以支持更新操作,当文档内容发生变化时,tail会自己主动刷新,确保你看到最新的档案内容. 1.tail -f filename 监视fi ...
- SSH 面试题集锦
1. BeanFactory的作用是什么? [中] BeanFactory是配置.创建.管理bean的容器,有时候也称为bean上下文.Bean与bean的依赖关系,也是由BeanFactory ...
- 洛谷 [P2774] 方格取数问题
二分图最大点权独立集 通过题目描述我们可以很明显的看出要通过二分图建模,二分图求最大独立点集很容易,就是建立二分图求n-最小割,然而这里加入了权值,而且权值是在点上的,那么我们对于每个点连一条到源点或 ...
- BZOJ 2287. [HZOI 2015]疯狂的机器人 [FFT 组合计数]
2287. [HZOI 2015]疯狂的机器人 题意:从原点出发,走n次,每次上下左右不动,只能在第一象限,最后回到原点方案数 这不煞笔提,组合数写出来发现卷积NTT,然后没考虑第一象限gg 其实就是 ...
- c# 利用IMap 收取163邮件
最近我要做一个爬虫.这个爬虫需要如下几个步骤: 1 填写注册内容(需要邮箱注册) 2 过拖拽验证码(geetest) 3 注册成功会给邮箱发一封确认邮箱 4 点击确认邮箱中的链接 完成注册 我这里就采 ...
- centos7时间同步
用ntpdate从时间服务器更新时间 1.如果你的linux系统根本没有ntpdate这个命令 yum install -y ntp 2.安装完了之后,你不要做什么配置,也不需要,直接测试一下 [ro ...
- 分布式代码管理系统Git实践
1.1 版本管理工具介绍 什么是版本管理工具 为什么要使用版本管理工具? 老板要求小明写一个可行性报告,当他写完给老板看后,结果-- Git简介 早先linux内核代码托管在B ...
- 【Unity3D技术文档翻译】第1.1篇 AssetBundle 工作流
译者前言:本章是关于从创建到加载,再到使用 AssetBundle 的整个流程的概述.阅读本章将对 AssetBundle 的工作流程有个简单而全面的了解. 本章原文所在章节:[Unity Manua ...
- 在mac上安装Docker
1.进入一下地址进行下载docker https://download.docker.com/mac/stable/Docker.dmg 进入后进行下载后进行安装 2.将其拖动到Appliaction ...