
android中常用的布局管理器(二)
接上篇博客
(3)LinearLayout 线性布局管理器
线性布局管理器是将放入其中的组件按照垂直或水平方向来布局,每一行或每一列只能放一个组件,并且不会换行,当组件排列到窗体的边缘后,后面的组件就不会显示出来。
常用属性:
常用属性:
android:orientation(horizontal 水平,vertical 垂直)
android:gravity(对齐方式) 设置组件的对齐位置
android:layout_witdth(宽) (默认为0,当输入一个大于0 的数字时,每个组件对父容器的剩余空间进行分割)
android:layout_height(高)
android:id
android:background(背景)
案列:
android:orientation="horizontal" 水平线性管理器
<?xml version="1.0" encoding="utf-8"?>

<LinearLayout xmlns:android="http://schemas.android.com/apk/res/android"

    xmlns:app="http://schemas.android.com/apk/res-auto"

    xmlns:tools="http://schemas.android.com/tools"

    android:layout_width="match_parent"

    android:layout_height="match_parent"

    android:orientation="horizontal"

    tools:context=".MainActivity">

    <Button

        android:layout_width="wrap_content"

        android:layout_height="wrap_content"

        android:text="按钮1"

        />

    <Button

        android:layout_width="wrap_content"

        android:layout_height="wrap_content"

        android:text="按钮2"

         />

    <Button

        android:layout_width="wrap_content"

        android:layout_height="wrap_content"

        android:text="按钮3"

         />

    <Button

        android:layout_width="wrap_content"

        android:layout_height="wrap_content"

        android:text="按钮4" />

    <Button

        android:layout_width="wrap_content"

        android:layout_height="wrap_content"

        android:text="按钮5" />

</>

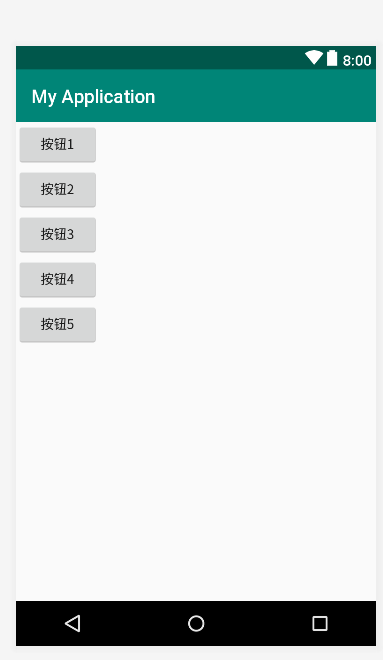
android:orientation="vertical" 垂直水平管理器
<?xml version="1.0" encoding="utf-8"?>

<LinearLayout xmlns:android="http://schemas.android.com/apk/res/android"

    xmlns:app="http://schemas.android.com/apk/res-auto"

    xmlns:tools="http://schemas.android.com/tools"

    android:layout_width="match_parent"

    android:layout_height="match_parent"

    android:orientation="vertical"

    tools:context=".MainActivity">

    <Button

        android:layout_width="wrap_content"

        android:layout_height="wrap_content"

        android:text="按钮1"

        />

    <Button

        android:layout_width="wrap_content"

        android:layout_height="wrap_content"

        android:text="按钮2"

         />

    <Button

        android:layout_width="wrap_content"

        android:layout_height="wrap_content"

        android:text="按钮3"

         />

    <Button

        android:layout_width="wrap_content"

        android:layout_height="wrap_content"

        android:text="按钮4" />

    <Button

        android:layout_width="wrap_content"

        android:layout_height="wrap_content"

        android:text="按钮5" />

</>
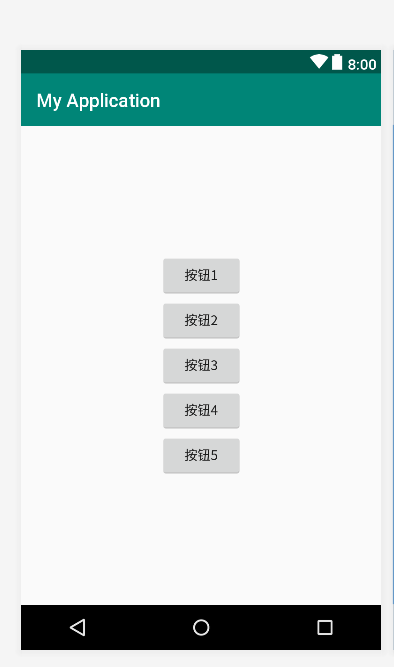
android:gravity="center" 设置组件的对其你方式
<?xml version="1.0" encoding="utf-8"?>

<LinearLayout xmlns:android="http://schemas.android.com/apk/res/android"

    xmlns:app="http://schemas.android.com/apk/res-auto"

    xmlns:tools="http://schemas.android.com/tools"

    android:layout_width="match_parent"

    android:layout_height="match_parent"

    android:orientation="vertical"

    android:gravity="center"

    tools:context=".MainActivity">

    <Button

        android:layout_width="wrap_content"

        android:layout_height="wrap_content"

        android:text="按钮1"

        />

    <Button

        android:layout_width="wrap_content"

        android:layout_height="wrap_content"

        android:text="按钮2"

         />

    <Button

        android:layout_width="wrap_content"

        android:layout_height="wrap_content"

        android:text="按钮3"

         />

    <Button

        android:layout_width="wrap_content"

        android:layout_height="wrap_content"

        android:text="按钮4" />

    <Button

        android:layout_width="wrap_content"

        android:layout_height="wrap_content"

        android:text="按钮5" />

</>
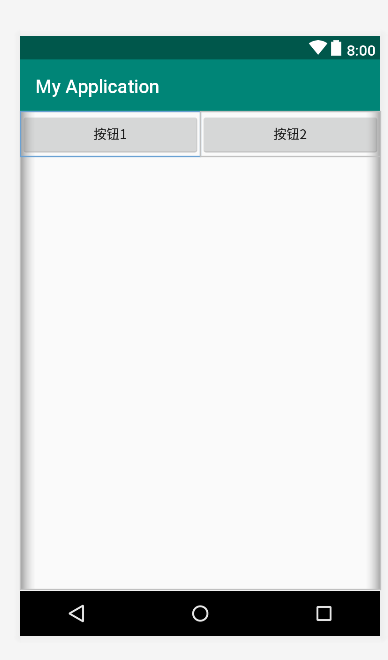
android:layout_weight="1"
<?xml version="1.0" encoding="utf-8"?>

<LinearLayout xmlns:android="http://schemas.android.com/apk/res/android"

    xmlns:app="http://schemas.android.com/apk/res-auto"

    xmlns:tools="http://schemas.android.com/tools"

    android:layout_width="match_parent"

    android:layout_height="match_parent"

    android:orientation="horizontal"

    tools:context=".MainActivity">

    <Button

        android:layout_width="wrap_content"

        android:layout_height="wrap_content"

        android:text="按钮1"

        android:layout_weight="1"

        />

    <Button

        android:layout_width="wrap_content"

        android:layout_height="wrap_content"

        android:text="按钮2"

        android:layout_weight="1"

         />

</>
(4)FrameLayout 帧布局管理器
帧布局(FrameLayout)在屏幕上开辟了一块区域,在这块区域中可以添加多个子控件,但是所有的子控件都会被对齐到屏幕的左上角。帧布局的大小由其下属子控件中尺寸最大的那个子控 件来控制。如果子控件的大小都一样,同一时刻只能看到最上面的子控件,其他的则被其遮挡(在进行选项卡设计时会用到帧布局)。
注意:在FrameLayout中,子控件是通过栈来绘制的,所以后添加的子控件会被绘制在上层。
FrameLayout继承自ViewGroup类,除了继承自父类的属性和方法,FrameLayout类中也包含了自己特有的一些属性和方法,见下表:
| 属性名称 | 对应方法 | 描述 |
| android:foreground | setForeground(Drawable) | 设置绘制在所有子控件之上的内容 |
| android:foregroundGravity | setForegroundGravity(int) | 设置绘制在所有子控件之上内容的gravity属性 |
android中常用的布局管理器(二)的更多相关文章
- android中常用的布局管理器
Android中的几种常用的布局,主要介绍内容有: View视图 RelativeLayout 相对布局管理器 LinearLayout 线性布局管理器 FrameLayout ...
- Android UI组件:布局管理器
为了更好的管理Android应用的用户界面中的组件,Android提供了布局管理器.通过使用布局管理器,Android应用的图形用户界面具有良好的平台无关性.通常,推荐使用布局管理器来管理组件的分布. ...
- Android开发5:布局管理器2(表格布局TableLayout)
版本:Android4.3 API18 学习整理:liuxinming 概念 TableLayout继承了LinearLayout,因此它的本质依然是线性布局管理器. 表格布局采 ...
- Android学习笔记(10).布局管理器
布局管理器的几个类都是ViewGroup派生的,用于管理组件的分布和大小,使用布局管理器能够非常好地解决屏幕适配问题. 布局管理器本身也是一个UI组件,布局管理器能够相互嵌套使用,以下是布局管理器的类 ...
- Android中常用的布局
一般分为5大类. Android中所有的空间第一字母都是大写 1.线性布局 LinearLayout 2.相对布局 RelativeLayout 3.帧布局--分层显示 FrameLayout 4. ...
- Android 中常用的布局
一.线性布局----LinearLayout horizontal 水平 <?xml version="1.0" encoding="utf-8"?& ...
- 四种方式写按钮点击事件和Android 中常用的布局
1.匿名内部类的方式 2.创建一个类实现onClickListener,实现onClick方法,设置控件点击时传一个类的对象 3.让当前类实现onClickListener,设置控件点击事件时传递一个 ...
- 【java】浅析java组件中的布局管理器
这篇博文笔者介绍一下java组件中,常用的布局管理器.java组件中的布局方式有好几十种,所有的这些布局管理器都实现了java.awt.LayoutManager接口.接下来笔者介绍一下常用的5种布局 ...
- Android 布局管理器
为了更好地管理Android应用程序的用户界面组件,Android它提供了一个布局管理.通过使用布局管理,Android具有良好的平台无关的图形用户界面应用程序. 平时,推荐布局管理器来管理分布式组件 ...
随机推荐
- Android触摸事件传递机制,这一篇就够了
整个触摸事件牵涉到的是,Activity,View,ViewGroup三者的传递机制. 这个触摸事件就是从外层往内层一层层的传递. 整个传递机制,分为3个步骤:分发,拦截,和消费. 1. 触摸事件的类 ...
- Codeforces_733_C
http://codeforces.com/problemset/problem/733/C 从后往前一个个b对应一组组a. #include<iostream> #include< ...
- pyinstaller相关问题 & pygame文件打包成exe文件 & 武装飞船 & 飞机大战
自己照书写了一个飞机大战游戏的python程序,想把它打包成一个exe文件,在查阅相关教程并经过数次尝试后终于成功. 安装打包应用 pyinstaller 在cmd命令窗口下pip install p ...
- Asp.Net Core IdentityServer4 管理面板集成
前言 IdentityServer4(以下简称 Id4) 是 Asp.Net Core 中一个非常流行的 OpenId Connect 和 OAuth 2.0 框架,可以轻松集成到 Asp.Net C ...
- Spring Cloud(六):服务网关zuul
通过前面几篇文章的介绍,Spring Cloud微服务架构可通过Eureka实现服务注册与发现,通过Ribbon或Feign来实现服务间的负载均衡调用,通过Hystrix来为服务调用提供服务降级.熔断 ...
- C++:重载前置++/--返回引用,重载后置++/--返回临时对象
标准库中iterator对++/--的重载代码如下: _Myiter& operator++() { // preincrement ++*(_Mybase *)this; return (* ...
- 总结JavaScript对象的深浅拷贝
十四.对象的浅拷贝与深拷贝 什么是对象的拷贝? 将一个对象赋值给另外一个对象, 我们称之为对象的拷贝 什么是深拷贝, 什么是浅拷贝? 我们假设将A对象赋值给B对象 浅拷贝是指, 修改B对象的属性和方法 ...
- Python Special Methods - 特殊方法
特殊方法 特殊方法的存在是为了给 Python 解释器调用的,通常自己并不需要直接调用它们.也就是说不应该使用 my_object.__len__() 这种写法,而应该使用 len(my_object ...
- 【WPF学习】第四十六章 效果
WPF提供了可应用于任何元素的可视化效果.效果的目标是提供一种简单的声明式方法,从而改进文本.图像.按钮以及其他控件的外观.不是编写自己的绘图代码,而是使用某个继承自Effect的类(位于System ...
- linux shell 操作 mysql命令(不进入mysql操作界面)
由于需要,需要将一系列mysql的操作制作成.sh文件,只需要shell操作bash命令就可以傻瓜式的完成黑盒任务. #!/bin/bash mysql -uroot -p??? -e "c ...