
Python Face Detect Offline
python版本 3.7.0

1、 安装 cmake
pip install cmake

2、安装 boost
pip install boost

3、安装 dlib
pip install dlib

4、安装 face_recognition
pip install face_recognition

5、验证
face_recognition 本地模型路径 要识别图片路径
输出:文件名 识别的人名

注意:文件名以人名命名
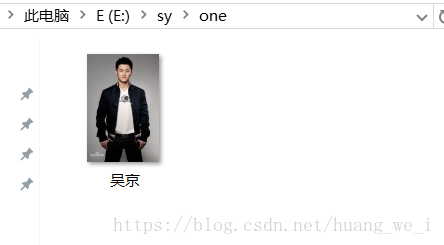
6、寻找人脸位置
face_detection “路径”
输出:人脸像素坐标

7、调整灵敏度
face_recognition –tolerance 灵敏度 本地模型路径 要识别图片路径
注:默认0.6,识别度越低识别难度越高

8、计算每次面部距离
face_recognition –show-distance true 本地模型路径 要识别图片路径

9、只是想知道每张照片中人物的姓名,却不关心文件名,可以这样做:
face_recognition 本地模型路径 要识别图片路径 | cut -d ‘,’ -f2

10、加速识别
face_recognition –cpus 使用内核数 本地模型路径 要识别图片路径
使用四核识别:
face_recognition –cpus 4 本地模型路径 要识别图片路径 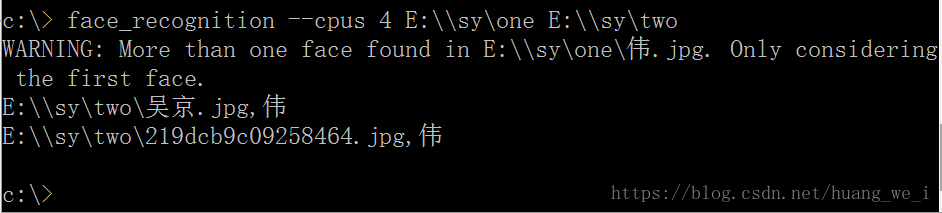
使用全部内核识别:
face_recognition –cpus -1 本地模型路径 要识别图片路径

11、自动查找图像中的所有面孔
import face_recognition
image = face_recognition.load_image_file(“吴京.jpg”)
face_locations = face_recognition.face_locations(image)
import face_recognition

import cv2

import numpy as np

# This is a demo of running face recognition on live video from your webcam. It's a little more complicated than the

# other example, but it includes some basic performance tweaks to make things run a lot faster:

#   1. Process each video frame at 1/4 resolution (though still display it at full resolution)

#   2. Only detect faces in every other frame of video.

# PLEASE NOTE: This example requires OpenCV (the `cv2` library) to be installed only to read from your webcam.

# OpenCV is *not* required to use the face_recognition library. It's only required if you want to run this

# specific demo. If you have trouble installing it, try any of the other demos that don't require it instead.

# Get a reference to webcam #0 (the default one)

video_capture = cv2.VideoCapture(0)

# Load a sample picture and learn how to recognize it.

obama_image = face_recognition.load_image_file("obama.jpg")

obama_face_encoding = face_recognition.face_encodings(obama_image)[0]

# Load a second sample picture and learn how to recognize it.

biden_image = face_recognition.load_image_file("biden.jpg")

biden_face_encoding = face_recognition.face_encodings(biden_image)[0]

# Create arrays of known face encodings and their names

known_face_encodings = [

    obama_face_encoding,

    biden_face_encoding

]

known_face_names = [

    "Barack Obama",

    "Joe Biden"

]

# Initialize some variables

face_locations = []

face_encodings = []

face_names = []

process_this_frame = True

while True:

    # Grab a single frame of video

    ret, frame = video_capture.read()

    # Resize frame of video to 1/4 size for faster face recognition processing

    small_frame = cv2.resize(frame, (0, 0), fx=0.25, fy=0.25)

    # Convert the image from BGR color (which OpenCV uses) to RGB color (which face_recognition uses)

    rgb_small_frame = small_frame[:, :, ::-1]

    # Only process every other frame of video to save time

    if process_this_frame:

        # Find all the faces and face encodings in the current frame of video

        face_locations = face_recognition.face_locations(rgb_small_frame)

        face_encodings = face_recognition.face_encodings(rgb_small_frame, face_locations)

        face_names = []

        for face_encoding in face_encodings:

            # See if the face is a match for the known face(s)

            matches = face_recognition.compare_faces(known_face_encodings, face_encoding)

            name = "Unknown"

            # # If a match was found in known_face_encodings, just use the first one.

            # if True in matches:

            #     first_match_index = matches.index(True)

            #     name = known_face_names[first_match_index]

            # Or instead, use the known face with the smallest distance to the new face

            face_distances = face_recognition.face_distance(known_face_encodings, face_encoding)

            best_match_index = np.argmin(face_distances)

            if matches[best_match_index]:

                name = known_face_names[best_match_index]

            face_names.append(name)

    process_this_frame = not process_this_frame

    # Display the results

    for (top, right, bottom, left), name in zip(face_locations, face_names):

        # Scale back up face locations since the frame we detected in was scaled to 1/4 size

        top *= 4

        right *= 4

        bottom *= 4

        left *= 4

        # Draw a box around the face

        cv2.rectangle(frame, (left, top), (right, bottom), (0, 0, 255), 2)

        # Draw a label with a name below the face

        cv2.rectangle(frame, (left, bottom - 35), (right, bottom), (0, 0, 255), cv2.FILLED)

        font = cv2.FONT_HERSHEY_DUPLEX

        cv2.putText(frame, name, (left + 6, bottom - 6), font, 1.0, (255, 255, 255), 1)

    # Display the resulting image

    cv2.imshow('Video', frame)

    # Hit 'q' on the keyboard to quit!

    if cv2.waitKey(1) & 0xFF == ord('q'):

        break

# Release handle to the webcam

video_capture.release()

cv2.destroyAllWindows()
彩蛋
import cv2

import threading

import face_recognition

import numpy as np

import os

class camThread(threading.Thread):

    def __init__(self, previewName, camID):

        threading.Thread.__init__(self)

        self.previewName = previewName

        self.camID = camID

    def run(self):

        print("Starting " + self.previewName)

        camPreview(self.previewName, self.camID)

def camPreview(previewName, camID):

    cv2.namedWindow(previewName)

    video_capture = cv2.VideoCapture(camID)

    if video_capture.isOpened():

        rval, frame = video_capture.read()

    else:

        rval = False

    known_face_encodings = []

    known_face_names = []

    imagelist = os.listdir('./face/')

    for imagename in imagelist:

        image = face_recognition.load_image_file("./face/"+imagename)

        face_encoding = face_recognition.face_encodings(image)[0]

        known_face_encodings.append(face_encoding)

        subname=imagename.split('.')[0]

        known_face_names.append(subname)

        face_locations = []

        face_encodings = []

        face_names = []

        process_this_frame = True

    while rval:

        #cv2.imshow(previewName, frame)

        rval, frame = video_capture.read()

        small_frame = cv2.resize(frame, (0, 0), fx=0.25, fy=0.25)

        rgb_small_frame = small_frame[:, :, ::-1]

        if process_this_frame:

            face_locations = face_recognition.face_locations(rgb_small_frame)

            face_encodings = face_recognition.face_encodings(rgb_small_frame, face_locations)

            face_names = []

            for face_encoding in face_encodings:

                matches = face_recognition.compare_faces(known_face_encodings, face_encoding)

                name = "Unknown"

                face_distances = face_recognition.face_distance(known_face_encodings, face_encoding)

                best_match_index = np.argmin(face_distances)

                if matches[best_match_index]:

                    name = known_face_names[best_match_index]

                face_names.append(name)

        process_this_frame = not process_this_frame

        for (top, right, bottom, left), name in zip(face_locations, face_names):

            top *= 4

            right *= 4

            bottom *= 4

            left *= 4

            cv2.rectangle(frame, (left, top), (right, bottom), (0, 0, 255), 2)

            cv2.rectangle(frame, (left, bottom - 35), (right, bottom), (0, 0, 255), cv2.FILLED)

            font = cv2.FONT_HERSHEY_DUPLEX

            cv2.putText(frame, name, (left + 6, bottom - 6), font, 1.0, (255, 255, 255), 1)

        cv2.imshow(previewName, frame)

        if cv2.waitKey(1) & 0xFF == ord('q'):

            break

    cv2.destroyWindow(previewName)

thread1 = camThread("Camera 1", 0)

thread2 = camThread("Camera 2", 1)

thread1.start()

thread2.start()
Python Face Detect Offline的更多相关文章
- python flask detect browser language
python flask detect browser language No problem. We won't show you that ad again. Why didn't you l ...
- appium+python自动化40-adb offline(5037端口被占)
前言 adb连手机的时候经常会出现offline的情况,一般杀掉adb,然后重启adb可以解决. 如果发现不管怎么重启adb都连不上,一直出现offlie的情况,这个时候很大可能就是adb的5037端 ...
- appium+python自动化-adb offline(5037端口被占)
前言 adb连手机的时候经常会出现offline的情况,一般杀掉adb,然后重启adb可以解决. 如果发现不管怎么重启adb都连不上,一直出现offlie的情况,这个时候很大可能就是adb的5037端 ...
- [Python]pip install offline 如何离线pip安装包
痛点:目标机器无法连接公网,但是能使用rz.sz传输文件 思路:在能上网的机器是使用pip下载相关依赖包,然后传输至目标机器,进行安装 0. Install pip: http://pip-cn.re ...
- Runtime.getRuntime().exec()实现Java调用python程序
使用Runtime.getRuntime().exec()来实现Java调用python,调用代码如下所示: import java.io.BufferedReader; import java.io ...
- 【python】使用plotly生成图表数据
安装 在 ubuntu 环境下,安装 plotly 很简单 python 版本2.7+ pip install plotly 绘图 在 plotly 网站注册后,可以直接将生成的图片保存到网站上,便于 ...
- Linux下monit进程管理操作梳理
Monit对运维人员来说可谓神器,它是一款功能非常丰富的进程.文件.目录和设备的监测工具,用于Unix平台.它可以自动修复那些已经停止运作的程序,特使适合处理那些由于多种原因导致的软件错误.Monit ...
- github上Devstack的一些变动,截至8.20
从github下直接clone下来的代码在执行之前须要对一些文件进行改动,否则会出现关于REQUIREMENTS的错误 说明:代码前边是"-"号的,须要删除,代码前边是" ...
- 【Python项目】使用Face++的人脸识别detect API进行本地图片情绪识别并存入excel
准备工作 首先,需要在Face++的主页注册一个账号,在控制台去获取API Key和API Secret. 然后在本地文件夹准备好要进行情绪识别的图片/相片. 代码 介绍下所使用的第三方库 ——url ...
随机推荐
- JAVA 探究NIO
事情的开始 1.4版本开始,java提供了另一套IO系统,称为NIO,(New I/O的意思),NIO支持面向缓冲区的.基于通道的IO操作. 1.7版本的时候,java对NIO系统进行了极大的扩展,增 ...
- netstat命令总结
nestat介绍 netstat是一款命令行工具,可用于列出系统上所有的网络套接字连接情况,包括 tcp, udp 以及 unix 套接字,另外它还能列出处于监听状态(即等待接入请求)的套接字. 使用 ...
- Tushare模块
.TuShare简介和环境安装 TuShare是一个著名的免费.开源的python财经数据接口包.其官网主页为:TuShare -财经数据接口包.该接口包如今提供了大量的金融数据,涵盖了股票.基本面. ...
- Asp.Net Web APi 路由的特点
在ASP.NET Web API中,路由是基于HTTP协议 GET请求路由到以GET开头的控制器方法,POST请求路由到以POST开头的控制器方法中,GET方法和GetProducts,都能与GET请 ...
- 2017-2018年Scrum状态调查报告
HOW SCRUM IS USED 在2017年的报告中,Scrum的应用范围在扩大,已经从其发源的IT部门扩展到了相距甚远的业务部门.2017-2018年度报告的其中一个主要目标就是关注更广泛的敏捷 ...
- MVC 中的@Html.Raw 的用法
@Html.Raw 定义:在有些情况下,需要显式地渲染一些不应该采用HTML编码的值,这时可以采用Html.Raw方法来保证该值不被编码:简单来说:就是使用了Html.Raw后,字符串会以一个html ...
- .net简介(一)
什么是.NET 微软的开发平台,包含规范.编程语言.标准类.工具等.一般认为.net就是微软的软件开发技术.同时微软的所有产品也提供.NET类型的API. .NET概览 .net的组成: 开发语言,遵 ...
- Android破解学习之路(十四)——【Unity3D】王牌大作战破解
一.前言 今天带来的是王牌大作战的破解教程,游戏下载的话,我是直接去TapTap官网下载的 支付宝内购破解用老套了,今天学点破解的新花样吧!! 二.支付宝内购破解 支付宝的内购破解已经很熟悉了, 直接 ...
- STL源码剖析-vector
STL(Standard Template Library) C++标准模板库,acm选手一定对它不陌生,除了算法,那几乎是“吃饭的家伙了”.我们使用库函数非常方便,且非常高效(相对于自己实现来说). ...
- Java:配置环境(Mac)——JDK
1.下载JDK 官网 打开后,直接下载最新版本. 选择dmg文件下载 2.开始安装,一直下一步. 3.打开终端,查询安装路径:/usr/libexec/java_home,复制备用. 4.配置Java ...