图解教你如何使用ANT打包java程序
1:在eclipse中建立如下的工程
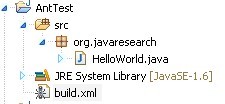
值得注意的就是build.xml文件(这个是重点后面会提到) ,其他HelloWorld中的就是一句简单的输出语句
2: 使用build打包(右键然后选择运行),运行后在console下可以看到如下图的过程
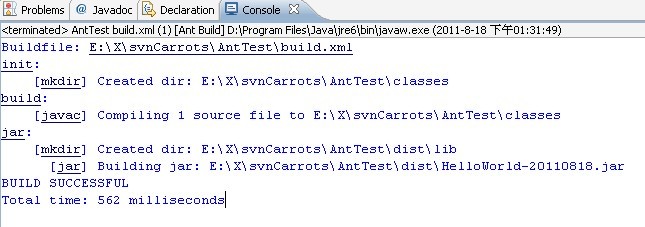
当看到了BUILD SUCCESSFUL 表面打包成功了!!!!
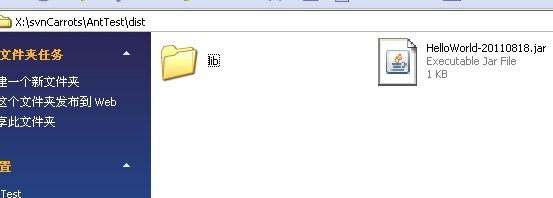
3:然后来到你的**\dist下可以看到刚刚打包成功的包 如下图 :
4:ANT很智能的,如果你已经实现了上面三个过程的打包,再次打包的话它会默认的执行空的操作 (如下图)

5:最重要的bulid.xml文件(此中有很多ANT内置的命令可以具体参考一下ant的用法)
- <project name="HelloWorld" default="jar" basedir=".">
- <description>
- building HelloWorld!
- </description>
- <!-- set global properties for this build -->
- <property name="src" location="src"/>
- <property name="build" location="classes"/>
- <property name="dist" location="dist"/>
- <property name="user.name" value="qiuqiu"/>
- <target name="init">
- <!-- Create the time stamp -->
- <tstamp/>
- <!-- Create the classes directory structure used by compile -->
- <mkdir dir="${build}"/>
- </target>
- <target name="build" depends="init" description="build the source code" >
- <!-- Compile the java code from ${src} into ${build} -->
- <javac srcdir="${src}" destdir="${build}"/>
- </target>
- <target name="jar" depends="build"
- description="generate the distribution" >
- <!-- Create the distribution directory -->
- <mkdir dir="${dist}/lib"/>
- <!-- Put everything in ${build} into the MyProject-${DSTAMP}.jar file -->
- <jar destfile="${dist}/HelloWorld-${DSTAMP}.jar" basedir="${build}">
- <manifest>
- <attribute name="Built-By" value="${user.name}"/>
- <attribute name="Main-Class" value="org.javaresearch.HelloWorld"/>
- </manifest>
- </jar>
- </target>
- <target name="run" depends="build" description="run HelloWorld">
- <java classpath="${build}" classname="org.javaresearch.HelloWorld"></java>
- </target>
- <target name="runjar" depends="jar" description="run HelloWorld in jar file">
- <java jar="${dist}/HelloWorld-${DSTAMP}.jar"
- fork="true"
- failonerror="true"
- maxmemory="128m"
- >
- <arg value="-h"/>
- <classpath>
- <pathelement location="${dist}/HelloWorld-${DSTAMP}.jar"/>
- <pathelement path="${java.class.path}"/>
- </classpath>
- </java>
- </target>
- <target name="clean"
- description="clean up" >
- <!-- Delete the ${build} and ${dist} directory trees -->
- <delete dir="${build}"/>
- <delete dir="${dist}"/>
- </target>
- </project>
<project name="HelloWorld" default="jar" basedir=".">

    <description>

        building HelloWorld!

    </description>

  <!-- set global properties for this build -->

  <property name="src" location="src"/>

  <property name="build" location="classes"/>

  <property name="dist"  location="dist"/>

  <property name="user.name" value="qiuqiu"/>

  <target name="init">

    <!-- Create the time stamp -->

    <tstamp/>

    <!-- Create the classes directory structure used by compile -->

    <mkdir dir="${build}"/>

  </target>

  <target name="build" depends="init"  description="build the source code" >

    <!-- Compile the java code from ${src} into ${build} -->

    <javac srcdir="${src}" destdir="${build}"/>

  </target>

  <target name="jar" depends="build"

        description="generate the distribution" >

    <!-- Create the distribution directory -->

    <mkdir dir="${dist}/lib"/>

    <!-- Put everything in ${build} into the MyProject-${DSTAMP}.jar file -->

  <jar destfile="${dist}/HelloWorld-${DSTAMP}.jar" basedir="${build}">

   <manifest>

    <attribute name="Built-By" value="${user.name}"/>

    <attribute name="Main-Class" value="org.javaresearch.HelloWorld"/>

   </manifest>

  </jar>

 </target>

  <target name="run" depends="build" description="run HelloWorld">

    <java classpath="${build}" classname="org.javaresearch.HelloWorld"></java>

  </target>

  <target name="runjar" depends="jar" description="run HelloWorld in jar file">

         <java jar="${dist}/HelloWorld-${DSTAMP}.jar"

           fork="true"

           failonerror="true"

           maxmemory="128m"

           >

         <arg value="-h"/>

         <classpath>

           <pathelement location="${dist}/HelloWorld-${DSTAMP}.jar"/>

           <pathelement path="${java.class.path}"/>

         </classpath>

       </java>

  </target>

  <target name="clean"

        description="clean up" >

    <!-- Delete the ${build} and ${dist} directory trees -->

    <delete dir="${build}"/>

    <delete dir="${dist}"/>

  </target>

</project>
6:ant使用指南(为了方便没有资源分的朋友下载,这里给大家0资源分): http://download.csdn.net/source/3529167
有不足之处欢迎指正
图解教你如何使用ANT打包java程序的更多相关文章
- 使用Ant打包Java后台程序
概述 本文通过一个简单的Java Application例子描述如何用ANT完成基本的程序打包工作.包含文件拷贝.编译.打包三部分:完成这三部就可以得到一个可运行的程序包了. ANT的安装,环境变量的 ...
- 使用exe4j打包Java程序
工具: exe4j软件(云盘存) 可以运行的Java程序的jar包 打开我们已经安装好的exe4j软件,首先看到的是一个欢迎界面,我们直接[next]就可以了: 2 在第二步中我们选择[JAR in ...
- idea 打包java程序
创建maven项目 在pom.xml中添加: <build> <plugins> <plugin> <groupId>org.apache.maven. ...
- 打包java程序生成exe
打包java程序生成exe 目标 我们知道c++的控制台程序编译运行以后就会生成一个exe可执行文件,在电脑上可以直接双击运行,但是java是跨平台的语言,编译运行以后的字节码文件.class是和平台 ...
- 在Linux下通过rpm打包发布Java程序
这个东西涉及的内容较多,根据下面这些文章慢慢学习 一个简单的例子 http://blog.csdn.net/king_on/article/details/7169384 按照文章中的步骤来,打包之后 ...
- JAVA程序打包成exe文件详细图解
我们都知道Java可以将二进制程序打包成可执行jar文件,双击这个jar和双击exe效果是一样一样的,但感觉还是不同.其实将java程序打包成exe也需要这个可执行jar文件. 准备: eclipse ...
- 一招教你IDEA中Java程序如何打包,以及打包后如何运行
前言 编写程序 程序打包 测试运行 IDEA作为目前按最主流的Java程序项目编写工具,越来越受到开发人员的青睐.idea因为其五花八门的功能,让你在开发过程中效率显著提高.那么对于初学者来说,如何通 ...
- 用Ant实现Java项目的自动构建和部署
原文地址:http://tech.it168.com/j/2007-11-09/200711091344781.shtml 本文请勿转载! Ant是一个Apache基金会下的跨平台的构 ...
- 不会用ant打包、部署项目的工程师,不是一个好程序员(测试)
副标题:利用ant脚本 自动构建svn增量/全量 系统程序升级包 首先请允许我这样说,作为开发或测试,你一定要具备这种本领.你可以手动打包.部署你的工程,但这不是最好的方法.最好的方式就是全自动化的方 ...
随机推荐
- 5.docker image (镜像)
1.image 是什么 是文件和 meta data 的集合 (root filesystem) 是分层的,并且每一层都可以添加改变删除文件,成为一个新的image 不同的image可以共享相同的la ...
- InsertionSort(插入排序)原理及C++代码实现
插入排序是最常用的排序之一. 在输入规模较小的时候,插入排序的性能较好. 最好情况下插入排序的时间复杂度是O(n),平均情况则为O(n2). 插入排序是稳定的排序算法之一. 基本思路为从第二个元素开始 ...
- zabbix3.4--监控TCP十一种状态
1.客户端自定义key[root@web01 /etc/zabbix/zabbix_agentd.d]#vim iotps.conf UserParameter=TCP_STATUS_ESTABLIS ...
- webfrom 控件
服务器基本控件: button: text属性 linkbutton:text属性,它是一个超链接模样的普通button hyperlink: navigateurl:链接地址,相当于<a> ...
- 脚手架搭建vue项目
1.安装安装node.js: 2.cnpm install vue-cli -g (全局安装,需要注意的是我这里是用淘宝镜像安装的,没有安装cnpm的需要先去安装一下) 3.vue --version ...
- Durandal入门
参考:http://www.360doc.com/content/14/1223/11/13819_435123743.shtml 示例代码下载地址:http://durandaljs.com/ver ...
- play framework在eclipse中自动的预编译生成precompiled文件
一.修改 eclipe 中的启动文件属性eclipse/*.launch 中的最后一条:加入参数 -Dprecompile=yes 将会在启动项目时,进行项目的预编译 (将在项目中生成 precom ...
- Sam format
reference:https://davetang.org/wiki/tiki-index.php?page=SAM @SQ SN:contig1 LN:9401 (序列ID及长度) 参考序列名,这 ...
- LIS 问题 二分查找优化
按n=5,a-{4,2,3,1,5}为例 dp的值依次是: INF INF INF INF INF 4 INF INF INF INF 2 INF INF INF INF 2 ...
- python学习笔记(19)-切片
转自https://www.jianshu.com/p/15715d6f4dad 在利用python解决各种实际问题的过程中,经常会遇到从某个对象中抽取部分值的情况,切片操作正是专门用于完成这一操作的 ...