实战 迁移学习 VGG19、ResNet50、InceptionV3 实践 猫狗大战 问题
实战 迁移学习 VGG19、ResNet50、InceptionV3 实践 猫狗大战 问题
一、实践流程
1、数据预处理
主要是对训练数据进行随机偏移、转动等变换图像处理,这样可以尽可能让训练数据多样化
另外处理数据方式采用分批无序读取的形式,避免了数据按目录排序训练
- #数据准备
- def DataGen(self, dir_path, img_row, img_col, batch_size, is_train):
- if is_train:
- datagen = ImageDataGenerator(rescale=1./255,
- zoom_range=0.25, rotation_range=15.,
- channel_shift_range=25., width_shift_range=0.02, height_shift_range=0.02,
- horizontal_flip=True, fill_mode='constant')
- else:
- datagen = ImageDataGenerator(rescale=1./255)
- generator = datagen.flow_from_directory(
- dir_path, target_size=(img_row, img_col),
- batch_size=batch_size,
- shuffle=is_train)
- return generator
2、载入现有模型
这个部分是核心工作,目的是使用ImageNet训练出的权重来做我们的特征提取器,注意这里后面的分类层去掉
- base_model = InceptionV3(weights='imagenet', include_top=False, pooling=None,
- input_shape=(img_rows, img_cols, color),
- classes=nb_classes)
然后是冻结这些层,因为是训练好的
- for layer in base_model.layers:
- layer.trainable = False
而分类部分,需要我们根据现有需求来新定义的,这里可以根据实际情况自己进行调整,比如这样
- x = base_model.output
- # 添加自己的全链接分类层
- x = GlobalAveragePooling2D()(x)
- x = Dense(1024, activation='relu')(x)
- predictions = Dense(nb_classes, activation='softmax')(x)
或者
- x = base_model.output
- #添加自己的全链接分类层
- x = Flatten()(x)
- predictions = Dense(nb_classes, activation='softmax')(x)
3、训练模型
这里我们用fit_generator函数,它可以避免了一次性加载大量的数据,并且生成器与模型将并行执行以提高效率。比如可以在CPU上进行实时的数据提升,同时在GPU上进行模型训练
- history_ft = model.fit_generator(
- train_generator,
- steps_per_epoch=steps_per_epoch,
- epochs=epochs,
- validation_data=validation_generator,
- validation_steps=validation_steps)
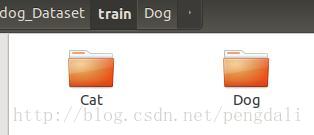
二、猫狗大战数据集
训练数据540M,测试数据270M,大家可以去官网下载
https://www.kaggle.com/c/dogs-vs-cats-redux-kernels-edition/data
下载后把数据分成dog和cat两个目录来存放
三、训练
训练的时候会自动去下权值,比如vgg19_weights_tf_dim_ordering_tf_kernels_notop.h5,但是如果我们已经下载好了的话,可以改源代码,让他直接读取我们的下载好的权值,比如在resnet50.py中

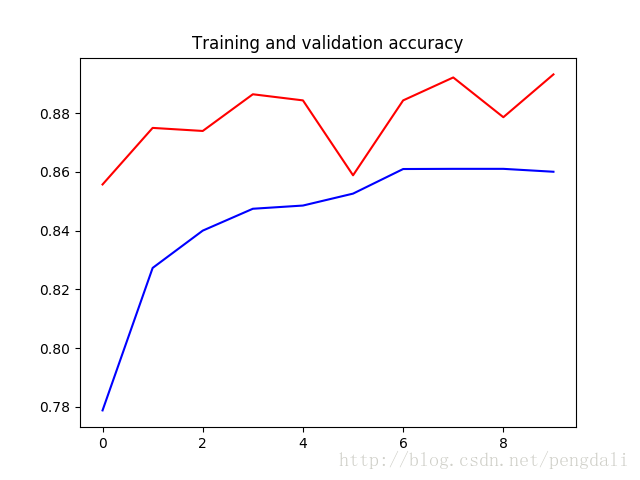
1、VGG19
vgg19的深度有26层,参数达到了549M,原模型最后有3个全连接层做分类器所以我还是加了一个1024的全连接层,训练10轮的情况达到了89%
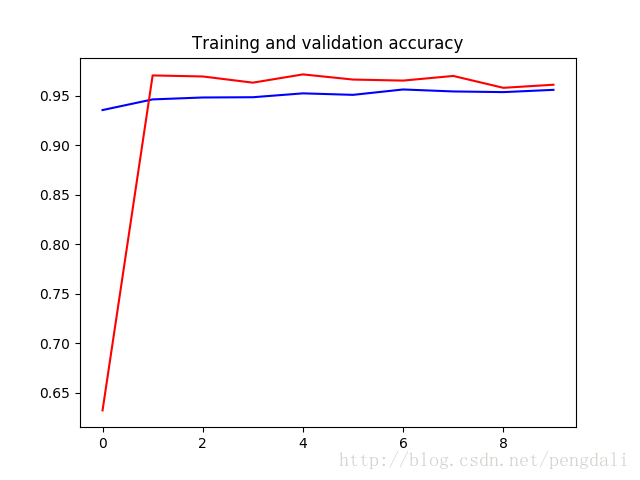
2、ResNet50
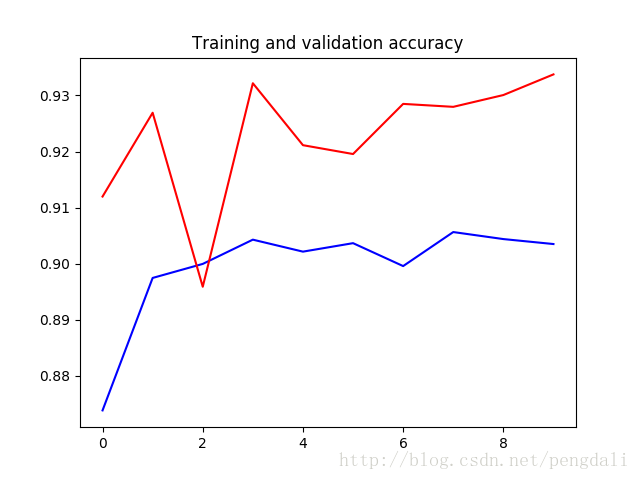
ResNet50的深度达到了168层,但是参数只有99M,分类模型我就简单点,一层直接分类,训练10轮的达到了96%的准确率
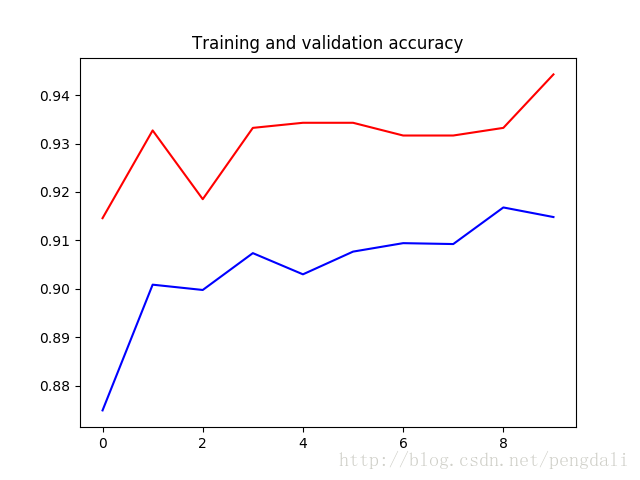
3、inception_v3
InceptionV3的深度159层,参数92M,训练10轮的结果
这是一层直接分类的结果
这是加了一个512全连接的,大家可以随意调整测试
四、完整的代码
- # -*- coding: utf-8 -*-
- import os
- from keras.utils import plot_model
- from keras.applications.resnet50 import ResNet50
- from keras.applications.vgg19 import VGG19
- from keras.applications.inception_v3 import InceptionV3
- from keras.layers import Dense,Flatten,GlobalAveragePooling2D
- from keras.models import Model,load_model
- from keras.optimizers import SGD
- from keras.preprocessing.image import ImageDataGenerator
- import matplotlib.pyplot as plt
- class PowerTransferMode:
- #数据准备
- def DataGen(self, dir_path, img_row, img_col, batch_size, is_train):
- if is_train:
- datagen = ImageDataGenerator(rescale=1./255,
- zoom_range=0.25, rotation_range=15.,
- channel_shift_range=25., width_shift_range=0.02, height_shift_range=0.02,
- horizontal_flip=True, fill_mode='constant')
- else:
- datagen = ImageDataGenerator(rescale=1./255)
- generator = datagen.flow_from_directory(
- dir_path, target_size=(img_row, img_col),
- batch_size=batch_size,
- #class_mode='binary',
- shuffle=is_train)
- return generator
- #ResNet模型
- def ResNet50_model(self, lr=0.005, decay=1e-6, momentum=0.9, nb_classes=2, img_rows=197, img_cols=197, RGB=True, is_plot_model=False):
- color = 3 if RGB else 1
- base_model = ResNet50(weights='imagenet', include_top=False, pooling=None, input_shape=(img_rows, img_cols, color),
- classes=nb_classes)
- #冻结base_model所有层,这样就可以正确获得bottleneck特征
- for layer in base_model.layers:
- layer.trainable = False
- x = base_model.output
- #添加自己的全链接分类层
- x = Flatten()(x)
- #x = GlobalAveragePooling2D()(x)
- #x = Dense(1024, activation='relu')(x)
- predictions = Dense(nb_classes, activation='softmax')(x)
- #训练模型
- model = Model(inputs=base_model.input, outputs=predictions)
- sgd = SGD(lr=lr, decay=decay, momentum=momentum, nesterov=True)
- model.compile(loss='categorical_crossentropy', optimizer=sgd, metrics=['accuracy'])
- #绘制模型
- if is_plot_model:
- plot_model(model, to_file='resnet50_model.png',show_shapes=True)
- return model
- #VGG模型
- def VGG19_model(self, lr=0.005, decay=1e-6, momentum=0.9, nb_classes=2, img_rows=197, img_cols=197, RGB=True, is_plot_model=False):
- color = 3 if RGB else 1
- base_model = VGG19(weights='imagenet', include_top=False, pooling=None, input_shape=(img_rows, img_cols, color),
- classes=nb_classes)
- #冻结base_model所有层,这样就可以正确获得bottleneck特征
- for layer in base_model.layers:
- layer.trainable = False
- x = base_model.output
- #添加自己的全链接分类层
- x = GlobalAveragePooling2D()(x)
- x = Dense(1024, activation='relu')(x)
- predictions = Dense(nb_classes, activation='softmax')(x)
- #训练模型
- model = Model(inputs=base_model.input, outputs=predictions)
- sgd = SGD(lr=lr, decay=decay, momentum=momentum, nesterov=True)
- model.compile(loss='categorical_crossentropy', optimizer=sgd, metrics=['accuracy'])
- # 绘图
- if is_plot_model:
- plot_model(model, to_file='vgg19_model.png',show_shapes=True)
- return model
- # InceptionV3模型
- def InceptionV3_model(self, lr=0.005, decay=1e-6, momentum=0.9, nb_classes=2, img_rows=197, img_cols=197, RGB=True,
- is_plot_model=False):
- color = 3 if RGB else 1
- base_model = InceptionV3(weights='imagenet', include_top=False, pooling=None,
- input_shape=(img_rows, img_cols, color),
- classes=nb_classes)
- # 冻结base_model所有层,这样就可以正确获得bottleneck特征
- for layer in base_model.layers:
- layer.trainable = False
- x = base_model.output
- # 添加自己的全链接分类层
- x = GlobalAveragePooling2D()(x)
- x = Dense(1024, activation='relu')(x)
- predictions = Dense(nb_classes, activation='softmax')(x)
- # 训练模型
- model = Model(inputs=base_model.input, outputs=predictions)
- sgd = SGD(lr=lr, decay=decay, momentum=momentum, nesterov=True)
- model.compile(loss='categorical_crossentropy', optimizer=sgd, metrics=['accuracy'])
- # 绘图
- if is_plot_model:
- plot_model(model, to_file='inception_v3_model.png', show_shapes=True)
- return model
- #训练模型
- def train_model(self, model, epochs, train_generator, steps_per_epoch, validation_generator, validation_steps, model_url, is_load_model=False):
- # 载入模型
- if is_load_model and os.path.exists(model_url):
- model = load_model(model_url)
- history_ft = model.fit_generator(
- train_generator,
- steps_per_epoch=steps_per_epoch,
- epochs=epochs,
- validation_data=validation_generator,
- validation_steps=validation_steps)
- # 模型保存
- model.save(model_url,overwrite=True)
- return history_ft
- # 画图
- def plot_training(self, history):
- acc = history.history['acc']
- val_acc = history.history['val_acc']
- loss = history.history['loss']
- val_loss = history.history['val_loss']
- epochs = range(len(acc))
- plt.plot(epochs, acc, 'b-')
- plt.plot(epochs, val_acc, 'r')
- plt.title('Training and validation accuracy')
- plt.figure()
- plt.plot(epochs, loss, 'b-')
- plt.plot(epochs, val_loss, 'r-')
- plt.title('Training and validation loss')
- plt.show()
- if __name__ == '__main__':
- image_size = 197
- batch_size = 32
- transfer = PowerTransferMode()
- #得到数据
- train_generator = transfer.DataGen('data/cat_dog_Dataset/train', image_size, image_size, batch_size, True)
- validation_generator = transfer.DataGen('data/cat_dog_Dataset/test', image_size, image_size, batch_size, False)
- #VGG19
- #model = transfer.VGG19_model(nb_classes=2, img_rows=image_size, img_cols=image_size, is_plot_model=False)
- #history_ft = transfer.train_model(model, 10, train_generator, 600, validation_generator, 60, 'vgg19_model_weights.h5', is_load_model=False)
- #ResNet50
- model = transfer.ResNet50_model(nb_classes=2, img_rows=image_size, img_cols=image_size, is_plot_model=False)
- history_ft = transfer.train_model(model, 10, train_generator, 600, validation_generator, 60, 'resnet50_model_weights.h5', is_load_model=False)
- #InceptionV3
- #model = transfer.InceptionV3_model(nb_classes=2, img_rows=image_size, img_cols=image_size, is_plot_model=True)
- #history_ft = transfer.train_model(model, 10, train_generator, 600, validation_generator, 60, 'inception_v3_model_weights.h5', is_load_model=False)
- # 训练的acc_loss图
- transfer.plot_training(history_ft)
实战 迁移学习 VGG19、ResNet50、InceptionV3 实践 猫狗大战 问题的更多相关文章
- keras系列︱迁移学习:利用InceptionV3进行fine-tuning及预测、完美案例(五)
引自:http://blog.csdn.net/sinat_26917383/article/details/72982230 之前在博客<keras系列︱图像多分类训练与利用bottlenec ...
- 基于深度学习和迁移学习的识花实践——利用 VGG16 的深度网络结构中的五轮卷积网络层和池化层,对每张图片得到一个 4096 维的特征向量,然后我们直接用这个特征向量替代原来的图片,再加若干层全连接的神经网络,对花朵数据集进行训练(属于模型迁移)
基于深度学习和迁移学习的识花实践(转) 深度学习是人工智能领域近年来最火热的话题之一,但是对于个人来说,以往想要玩转深度学习除了要具备高超的编程技巧,还需要有海量的数据和强劲的硬件.不过 Tens ...
- 1、VGG16 2、VGG19 3、ResNet50 4、Inception V3 5、Xception介绍——迁移学习
ResNet, AlexNet, VGG, Inception: 理解各种各样的CNN架构 本文翻译自ResNet, AlexNet, VGG, Inception: Understanding va ...
- 1 如何使用pb文件保存和恢复模型进行迁移学习(学习Tensorflow 实战google深度学习框架)
学习过程是Tensorflow 实战google深度学习框架一书的第六章的迁移学习环节. 具体见我提出的问题:https://www.tensorflowers.cn/t/5314 参考https:/ ...
- Google Tensorflow 迁移学习 Inception-v3
附上代码加数据地址 https://github.com/Liuyubao/transfer-learning ,欢迎参考. 一.Inception-V3模型 1.1 详细了解模型可参考以下论文: [ ...
- 【深度学习系列】迁移学习Transfer Learning
在前面的文章中,我们通常是拿到一个任务,譬如图像分类.识别等,搜集好数据后就开始直接用模型进行训练,但是现实情况中,由于设备的局限性.时间的紧迫性等导致我们无法从头开始训练,迭代一两百万次来收敛模型, ...
- 迁移学习︱艺术风格转化:Artistic style-transfer+ubuntu14.0+caffe(only CPU)
说起来这门技术大多是秀的成分高于实际,但是呢,其也可以作为图像增强的工具,看到一些比赛拿他作训练集扩充,还是一个比较好的思路.如何在caffe上面实现简单的风格转化呢? 好像网上的博文都没有说清楚,而 ...
- TensorFlow从1到2(九)迁移学习
迁移学习基本概念 迁移学习是这两年比较火的一个话题,主要原因是在当前的机器学习中,样本数据的获取是成本最高的一块.而迁移学习可以有效的把原有的学习经验(对于模型就是模型本身及其训练好的权重值)带入到新 ...
- 『TensorFlow』迁移学习
完全版见github:TransforLearning 零.迁移学习 将一个领域的已经成熟的知识应用到其他的场景中称为迁移学习.用神经网络的角度来表述,就是一层层网络中每个节点的权重从一个训练好的网络 ...
随机推荐
- RTL级低功耗设计
重点:门控时钟和操作数隔离 1.并行与流水的选择 并行与流水都是用面积换速度,但是有时可以降低功耗 并行处理常用于数字信号处理部分,采用并行处理,也已降低系统工作频率从而降低功耗 用两个乘法器取代原设 ...
- scikit_learn (sklearn)库中NearestNeighbors(最近邻)函数的各参数说明
NearestNeighbors(n_neighbors=5, radius=1.0, algorithm='auto', leaf_size=30, metric='minkowski', p=2, ...
- C# 篇基础知识7——字符串
文字是信息的主要表达方式,因此文字处理是计算机的一项重要功能之一.现在来深入研究C#中字符串的各种特性.正则表达式的基本概念以及如何用正则表达式进行文本匹配. 1.char结构 C#中的字符用Syst ...
- centos7安装mariadb(mysql)
centos7 默认可以yum -y install mariadb-server mariadb mariadb-client mariadb-devel 如果出现错误 GPG key retrie ...
- Django(十七):静态文件、中间件
一.静态文件 参考:https://www.cnblogs.com/jiajiaba/p/10584329.html 参考:https://docs.djangoproject.com/zh-hans ...
- 吴裕雄--天生自然JAVA数据库编程:CallableStatement接口
DELIMITER // DROP PROCEDURE myproc // -- 删除过程 CREATE PROCEDURE myproc(IN p1 int,INOUT p2 int,OUT p3 ...
- js 中 一些重要的数组方法
今天在学Vue的时候,看到了好多JS的数组方法,但是我不知道,我以为是Vue的方法,结果找了半天资料也没找出来,最后才发现这是JS的数组对象方法,于是就想做一下笔记,加深一下印象. Array 对象方 ...
- 冰蝎动态二进制加密WebShell特征分析
概述 冰蝎一款新型加密网站管理客户端,在实际的渗透测试过程中有非常不错的效果,能绕过目前市场上的大部分WAF.探针设备.本文将通过在虚拟环境中使用冰蝎,通过wireshark抓取冰蝎通信流量,结合平时 ...
- 018.CI4框架CodeIgniter数据库操作之:Delete删除一条数据
01. 在Model中写数据库操作语句,代码如下: <?php namespace App\Models\System; use CodeIgniter\Model; class User_mo ...
- pom.xml报unknown error
1. 从https://start.spring.io/的spring initializr生成demo,使用默认的2.1.6.release(2019年7月10日) 2. 在eclipse加载后,p ...