
keras系列︱迁移学习:利用InceptionV3进行fine-tuning及预测、完美案例(五)
引自:http://blog.csdn.net/sinat_26917383/article/details/72982230
之前在博客《keras系列︱图像多分类训练与利用bottleneck features进行微调(三)》一直在倒腾VGG16的fine-tuning,然后因为其中的Flatten层一直没有真的实现最后一个模块的fine-tuning。
看到github上有一份InceptionV3的fine-tuning并且可以实现。我看到的keras微调的方式分为以下两种:
fine-tuning方式一:使用预训练网络的bottleneck特征
fine-tuning方式二:要调整权重,并训练
.
整个流程分为以下几个步骤:
- 一、定义函数以及加载模块
- 二、数据准备
- 三、 fine-tuning方式一:使用预训练网络的bottleneck特征
- 四、fine-tuning方式二:要调整权重,并训练
- 五、画图函数
- 六、预测
.
Keras系列:
1、keras系列︱Sequential与Model模型、keras基本结构功能(一)
2、keras系列︱Application中五款已训练模型、VGG16框架(Sequential式、Model式)解读(二)
3、keras系列︱图像多分类训练与利用bottleneck features进行微调(三)
4、keras系列︱人脸表情分类与识别:opencv人脸检测+Keras情绪分类(四)
5、keras系列︱迁移学习:利用InceptionV3进行fine-tuning及预测、完整案例(五)
一、定义函数以及加载模块
其中的get_nb_files函数为得到文件数量,个数。
其中,from keras.applications.inception_v3_matt import InceptionV3中,我有自己改,不然就会每次都从网上下载。
import os

import sys

import glob

import argparse

import matplotlib.pyplot as plt

from keras import __version__

# from keras.applications.inception_v3 import InceptionV3, preprocess_input

from keras.applications.inception_v3_matt import InceptionV3, preprocess_input

from keras.models import Model

from keras.layers import Dense, GlobalAveragePooling2D

from keras.preprocessing.image import ImageDataGenerator

from keras.optimizers import SGD

def get_nb_files(directory):

  """Get number of files by searching directory recursively"""

  if not os.path.exists(directory):

    return 0

  cnt = 0

  for r, dirs, files in os.walk(directory):

    for dr in dirs:

      cnt += len(glob.glob(os.path.join(r, dr + "/*")))

  return cnt

# get_nb_files('/home/ubuntu/keras/animal5/train')
.
二、数据准备
数据放在不同的文件夹下即可,很方便。本文实践的数据是我上次博客的数据《keras系列︱图像多分类训练与利用bottleneck features进行微调(三)》的第二节。

同时原作者在.flow_from_directory函数中,好像漏写了class_mode=’categorical’,一开始导致最后训练的时候,val_acc一直在0.2徘徊。
# 数据准备

IM_WIDTH, IM_HEIGHT = 299, 299 #InceptionV3指定的图片尺寸

FC_SIZE = 1024                # 全连接层的节点个数

NB_IV3_LAYERS_TO_FREEZE = 172  # 冻结层的数量

train_dir = '/home/ubuntu/keras/animal5/train'  # 训练集数据

val_dir = '/home/ubuntu/keras/animal5/validation' # 验证集数据

nb_classes= 5

nb_epoch = 3

batch_size = 16

nb_train_samples = get_nb_files(train_dir)      # 训练样本个数

nb_classes = len(glob.glob(train_dir + "/*"))  # 分类数

nb_val_samples = get_nb_files(val_dir)       #验证集样本个数

nb_epoch = int(nb_epoch)                # epoch数量

batch_size = int(batch_size)

# 图片生成器

train_datagen =  ImageDataGenerator(

  preprocessing_function=preprocess_input,

  rotation_range=30,

  width_shift_range=0.2,

  height_shift_range=0.2,

  shear_range=0.2,

  zoom_range=0.2,

  horizontal_flip=True

)

test_datagen = ImageDataGenerator(

  preprocessing_function=preprocess_input,

  rotation_range=30,

  width_shift_range=0.2,

  height_shift_range=0.2,

  shear_range=0.2,

  zoom_range=0.2,

  horizontal_flip=True

)

# 训练数据与测试数据

train_generator = train_datagen.flow_from_directory(

train_dir,

target_size=(IM_WIDTH, IM_HEIGHT),

batch_size=batch_size,class_mode='categorical')

validation_generator = test_datagen.flow_from_directory(

val_dir,

target_size=(IM_WIDTH, IM_HEIGHT),

batch_size=batch_size,class_mode='categorical')
.
三、 fine-tuning方式一:使用预训练网络的bottleneck特征
# 添加新层

def add_new_last_layer(base_model, nb_classes):

  """

  添加最后的层

  输入

  base_model和分类数量

  输出

  新的keras的model

  """

  x = base_model.output

  x = GlobalAveragePooling2D()(x)

  x = Dense(FC_SIZE, activation='relu')(x) #new FC layer, random init

  predictions = Dense(nb_classes, activation='softmax')(x) #new softmax layer

  model = Model(input=base_model.input, output=predictions)

  return model

# 冻上base_model所有层,这样就可以正确获得bottleneck特征

def setup_to_transfer_learn(model, base_model):

  """Freeze all layers and compile the model"""

  for layer in base_model.layers:

    layer.trainable = False

  model.compile(optimizer='rmsprop', loss='categorical_crossentropy', metrics=['accuracy'])

# 定义网络框架

base_model = InceptionV3(weights='imagenet', include_top=False) # 预先要下载no_top模型

model = add_new_last_layer(base_model, nb_classes)              # 从基本no_top模型上添加新层

setup_to_transfer_learn(model, base_model)                      # 冻结base_model所有层

# 模式一训练

history_tl = model.fit_generator(

train_generator,

nb_epoch=nb_epoch,

samples_per_epoch=nb_train_samples,

validation_data=validation_generator,

nb_val_samples=nb_val_samples,

class_weight='auto')
训练时候报错:
main:15: UserWarning: Update your Model call to the Keras 2 API: Model(outputs=Tensor("de..., inputs=Tensor("in...)
没有关系。
有过这样的报错 :
Epoch 1/3
25/25 [==============================] - 37s - loss: 12.6398 - acc: 0.1900 - val_loss: 12.8990 - val_acc: 0.1997
Epoch 2/3
25/25 [==============================] - 34s - loss: 12.8945 - acc: 0.2000 - val_loss: 12.8718 - val_acc: 0.2014
Epoch 3/3
25/25 [==============================] - 34s - loss: 12.8945 - acc: 0.2000 - val_loss: 12.8877 - val_acc: 0.2004
一般是我在设置错了分类时候会出现的情况
出错在:之前少加了class_mode
train_generator = train_datagen.flow_from_directory(
train_dir,
target_size=(IM_WIDTH, IM_HEIGHT),
batch_size=batch_size,class_mode=’categorical’)
.
四、fine-tuning方式二:要调整权重,并训练
那么fine-tuning模式一与模式二区别在于,模式一冻结了base_model所有层,只有新添加的层才能训练,调整权重。但是模式二,在base_model内开放了一部分。
类似的可以看到官方VGG16的两种模式的区别: 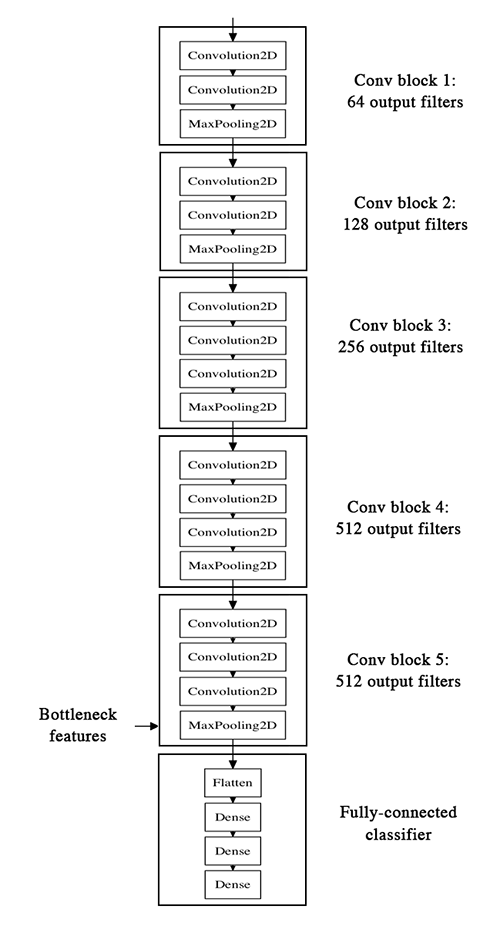
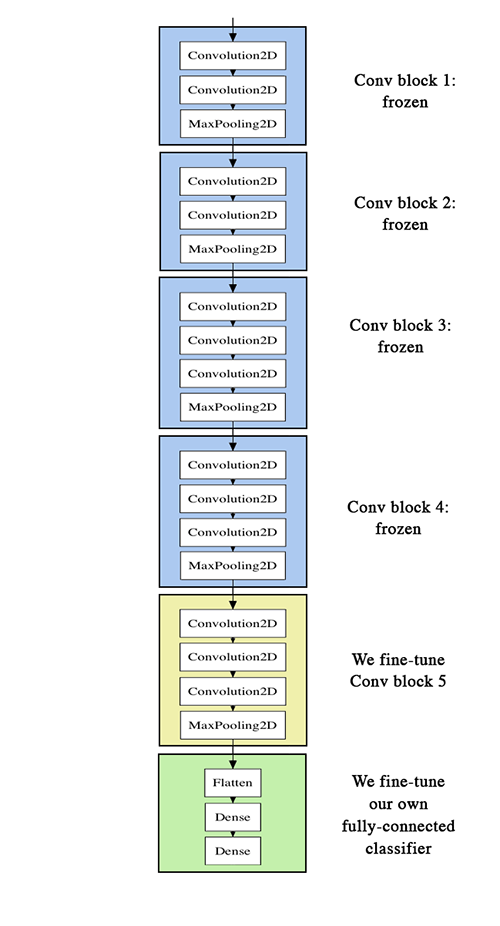
第一张图就是模式一,冻结了base_model层;第二张图就是模式二,base_model一些层都开放了。
# 冻上NB_IV3_LAYERS之前的层

def setup_to_finetune(model):

  """Freeze the bottom NB_IV3_LAYERS and retrain the remaining top layers.

  note: NB_IV3_LAYERS corresponds to the top 2 inception blocks in the inceptionv3 arch

  Args:

    model: keras model

  """

  for layer in model.layers[:NB_IV3_LAYERS_TO_FREEZE]:

     layer.trainable = False

  for layer in model.layers[NB_IV3_LAYERS_TO_FREEZE:]:

     layer.trainable = True

  model.compile(optimizer=SGD(lr=0.0001, momentum=0.9), loss='categorical_crossentropy', metrics=['accuracy'])

# 设置网络结构

setup_to_finetune(model)

# 模式二训练

history_ft = model.fit_generator(

train_generator,

samples_per_epoch=nb_train_samples,

nb_epoch=nb_epoch,

validation_data=validation_generator,

nb_val_samples=nb_val_samples,

class_weight='auto')

# 模型保存

model.save(args.output_model_file)
# 正确

Epoch 1/3

25/25 [==============================] - 38s - loss: 0.0589 - acc: 0.9850 - val_loss: 0.0084 - val_acc: 0.9986

Epoch 2/3

25/25 [==============================] - 37s - loss: 0.0196 - acc: 0.9925 - val_loss: 0.0150 - val_acc: 0.9965

Epoch 3/3

25/25 [==============================] - 37s - loss: 0.0349 - acc: 0.9875 - val_loss: 0.0101 - val_acc: 0.9979
.
五、画图函数
# 画图

def plot_training(history):

  acc = history.history['acc']

  val_acc = history.history['val_acc']

  loss = history.history['loss']

  val_loss = history.history['val_loss']

  epochs = range(len(acc))

  plt.plot(epochs, acc, 'r.')

  plt.plot(epochs, val_acc, 'r')

  plt.title('Training and validation accuracy')

  plt.figure()

  plt.plot(epochs, loss, 'r.')

  plt.plot(epochs, val_loss, 'r-')

  plt.title('Training and validation loss')

  plt.show()

# 训练的acc_loss图

plot_training(history_ft)
.
六、预测
# 定义层

import sys

import argparse

import numpy as np

from PIL import Image

import requests

from io import BytesIO

import matplotlib.pyplot as plt

from keras.preprocessing import image

from keras.models import load_model

from keras.applications.inception_v3 import preprocess_input

# 狂阶图片指定尺寸

target_size = (229, 229) #fixed size for InceptionV3 architecture

# 预测函数

# 输入:model,图片,目标尺寸

# 输出:预测predict

def predict(model, img, target_size):

  """Run model prediction on image

  Args:

    model: keras model

    img: PIL format image

    target_size: (w,h) tuple

  Returns:

    list of predicted labels and their probabilities

  """

  if img.size != target_size:

    img = img.resize(target_size)

  x = image.img_to_array(img)

  x = np.expand_dims(x, axis=0)

  x = preprocess_input(x)

  preds = model.predict(x)

  return preds[0]

# 画图函数

# 预测之后画图,这里默认是猫狗,当然可以修改label

labels = ("cat", "dog")

def plot_preds(image, preds,labels):

  """Displays image and the top-n predicted probabilities in a bar graph

  Args:

    image: PIL image

    preds: list of predicted labels and their probabilities

  """

  plt.imshow(image)

  plt.axis('off')

  plt.figure()

  plt.barh([0, 1], preds, alpha=0.5)

  plt.yticks([0, 1], labels)

  plt.xlabel('Probability')

  plt.xlim(0,1.01)

  plt.tight_layout()

  plt.show()

# 载入模型

model = load_model(args.model)

# 本地图片

img = Image.open(image)

preds = predict(model, img, target_size)

plot_preds(img, preds)

# 图片URL

response = requests.get(image_url)

img = Image.open(BytesIO(response.content))

preds = predict(model, img, target_size)

plot_preds(img, preds)
延伸一:fine-tuning时如何加载No_top的权重
场景:你要用自己的训练完的模型,作为下一个模型初始化的权重,譬如inceptionv3中的no_top版本。
如果你需要加载权重到不同的网络结构(有些层一样)中,例如fine-tune或transfer-learning,你可以通过层名字来加载模型:
model.load_weights(‘my_model_weights.h5’, by_name=True)
例如:
假如原模型为:
    model = Sequential()

    model.add(Dense(2, input_dim=3, name="dense_1"))

    model.add(Dense(3, name="dense_2"))

    ...

    model.save_weights(fname)
# new model
model = Sequential()
model.add(Dense(2, input_dim=3, name="dense_1")) # will be loaded
model.add(Dense(10, name="new_dense")) # will not be loaded
# load weights from first model; will only affect the first layer, dense_1.
model.load_weights(fname, by_name=True)keras系列︱迁移学习:利用InceptionV3进行fine-tuning及预测、完美案例(五)的更多相关文章
- 深度学习应用系列(二) | 如何使用keras进行迁移学习,以训练和识别自己的图片集
本文的keras后台为tensorflow,介绍如何利用预编译的模型进行迁移学习,以训练和识别自己的图片集. 官网 https://keras.io/applications/ 已经介绍了各个基于Im ...
- keras系列︱图像多分类训练与利用bottleneck features进行微调(三)
引自:http://blog.csdn.net/sinat_26917383/article/details/72861152 中文文档:http://keras-cn.readthedocs.io/ ...
- keras系列︱Sequential与Model模型、keras基本结构功能(一)
引自:http://blog.csdn.net/sinat_26917383/article/details/72857454 中文文档:http://keras-cn.readthedocs.io/ ...
- keras系列︱人脸表情分类与识别:opencv人脸检测+Keras情绪分类(四)
引自:http://blog.csdn.net/sinat_26917383/article/details/72885715 人脸识别热门,表情识别更加.但是表情识别很难,因为人脸的微表情很多,本节 ...
- keras系列︱Application中五款已训练模型、VGG16框架(Sequential式、Model式)解读(二)
引自:http://blog.csdn.net/sinat_26917383/article/details/72859145 中文文档:http://keras-cn.readthedocs.io/ ...
- 【深度学习系列】迁移学习Transfer Learning
在前面的文章中,我们通常是拿到一个任务,譬如图像分类.识别等,搜集好数据后就开始直接用模型进行训练,但是现实情况中,由于设备的局限性.时间的紧迫性等导致我们无法从头开始训练,迭代一两百万次来收敛模型, ...
- 基于深度学习和迁移学习的识花实践——利用 VGG16 的深度网络结构中的五轮卷积网络层和池化层,对每张图片得到一个 4096 维的特征向量,然后我们直接用这个特征向量替代原来的图片,再加若干层全连接的神经网络,对花朵数据集进行训练(属于模型迁移)
基于深度学习和迁移学习的识花实践(转) 深度学习是人工智能领域近年来最火热的话题之一,但是对于个人来说,以往想要玩转深度学习除了要具备高超的编程技巧,还需要有海量的数据和强劲的硬件.不过 Tens ...
- 实战 迁移学习 VGG19、ResNet50、InceptionV3 实践 猫狗大战 问题
实战 迁移学习 VGG19.ResNet50.InceptionV3 实践 猫狗大战 问题 参考博客:::https://blog.csdn.net/pengdali/article/detail ...
- keras系列︱利用fit_generator最小化显存占用比率/数据Batch化
本文主要参考两篇文献: 1.<深度学习theano/tensorflow多显卡多人使用问题集> 2.基于双向LSTM和迁移学习的seq2seq核心实体识别 运行机器学习算法时,很多人一开始 ...
随机推荐
- Ios开发中UILocalNotification实现本地通知实现提醒功能
这两天在做一个日程提醒功能,用到了本地通知的功能,记录相关知识如下: 1.本地通知的定义和使用: 本地通知是UILocalNotification的实例,主要有三类属性: scheduled time ...
- 《跟老男孩学Linux运维:Web集群实战》读书笔记
Linux 介绍 Linux 安装 Linux 调优 Web 基础 Nginx 应用 LNMP 应用 PHP 缓存加速 Nginx 调优 MySQL 应用 NFS 网络文件共享 Nginx 反向代理与 ...
- Linux版迅雷(Xware)安装配置方法
Linux版迅雷下载请见:Xware下载 解压下载的压缩包 核对MD5或SHA1校验值 解压得到以下三个文件 安装文件 在/usr/local/下创建thunder文件夹,将上面的三个文件放入,然后运 ...
- Mac 设置环境变量
前天配置好了SVN,这里赞下Versions,确实好用! CO了淘宝的TAE,跑startServer.sh时报错: JAVA_HOME does not point at a JDK or JRE. ...
- 解决 slf4j + log4j 在云服务上打印乱码
由于云服务器的环境是纯英文的 虽然在eclipse中可以打印日志显示中文,但是实用putty的时候查看却是乱码,下载日志也同样是乱码 那么只要设置utf-8即可
- Objective的头文件@interface属性
源码:http://files.cnblogs.com/ios8/TestPropertyDemo.zip 1 前言 最近有个疑惑 @interface中的属性和@property声明的属性有什么区别 ...
- node调试的两种方法
刚开始学node.js的时候,一直在用node-inspector,虽然很麻烦,但聊胜于无.后面公司牛人推荐使用node-webkit,就再也没用过node-inspector.再后来node.js版 ...
- 深入浅出HTTPS基本原理
基础知识准备:在了解HTTPS的基本原理之前,需要先了解如下的基本知识. 一.什么是HTTPS,TLS,SSL HTTPS,也称作HTTP over TLS.TLS的前身是SSL,TLS 1.0通常被 ...
- Gartner 2018新技术成熟度曲线
https://blog.csdn.net/BtB5e6Nsu1g511Eg5XEg/article/details/82047719 近日,Gartner发布了2018年新技术成熟度曲线,首次将生物 ...
- cuteftp 9 显示中文乱码
当用FTP连接空间时,中文命名的文件名会显示乱码,原来是编码设置错误.怎么修改呢? 修改方法如下: 选择. 工具--> 全局选项->传输:1. 传输方法: ASCII2. SFTP档案名称 ...