Unity3D-RayMarch-几何图元-3添加阴影
效果图:
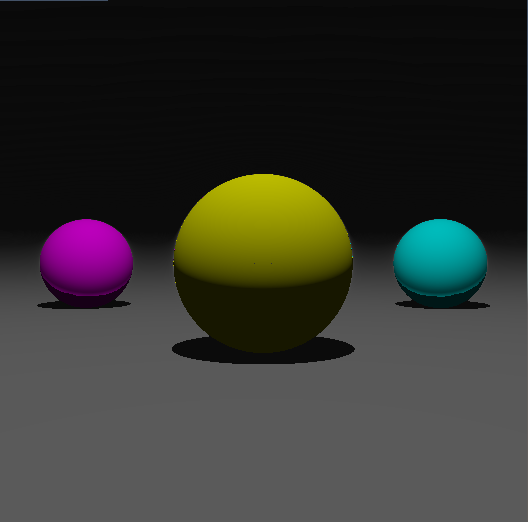
在RayMarch渲染算法中计算阴影非常简单,当射线碰撞到物体,从碰撞点逆着光源方向再次执行射线步进算法,如果这一过程中碰撞到了其他物体,则碰撞点被其他物体遮挡,该处具有阴影。
shader代码:
// Upgrade NOTE: replaced '_Object2World' with 'unity_ObjectToWorld'

Shader "RayMarch/Primitives1_phong"
{
    Properties
    {
        _MainTex("Texture", 2D) = "white" {}
    }
        SubShader
    {
        Tags{ "RenderType" = "Opaque" }
        LOD

        Pass
    {
        CGPROGRAM
#pragma vertex vert
#pragma fragment frag

#include "UnityCG.cginc"
#include "Lighting.cginc"

#define PointLightPos fixed3(0, 6, 0)
#define LightColor float3(1,1,1)
#define GlobalAmibent float3(0.01,0.01,0.01)

        struct appdata
    {
        float4 vertex : POSITION;
        float2 uv : TEXCOORD0;
    };

    struct v2f
    {
        float2 uv : TEXCOORD0;
        float4 vertex : SV_POSITION;
    };

    sampler2D _MainTex;
    float4 _MainTex_ST;

    //###################################################################################
    //sdf:define primitives
    float sdPlane(float3 p,float planeYPos)
    {
        return p.y - planeYPos;
    }

    float sdSphere(float3 p, float3 spherePos, float radius)
    {
        return length(p - spherePos) - radius;
    }
    //###################################################################################

    //###################################################################################
    //primitives boolean operation
    //求并集
    float2 opU(float2 d1, float2 d2)
    {
        return (d1.x<d2.x) ? d1 : d2;
    }
    //###################################################################################

    // define the scene
    float2 map(in float3 pos)
    {
        //plane
        //float2(x,y)的第二个参数定义了该物体的材质id,在render环节,可以根据id做不同处理
        float2 plane = float2(sdPlane(pos, -);
        float2 ball_1 = float2(sdSphere(pos, float3(, , ), );
        float2 ball_2 = float2(sdSphere(pos, float3(, , ), );
        float2 ball_3 = float2(sdSphere(pos, float3(-, , ), );
        //求物体的并集
        float2 res = opU(opU(opU(ball_1, ball_2), ball_3),plane);
        return res;
    }

    float2 castRay(in float3 ro, in float3 rd)
    {
        float tmin = 1.0;
        //射线最大允许经过的距离
        float tmax = 100.0;
        ;
        //当前已经过的距离
        float t = tmin;
        //材质id
        float m = -1.0;
        //最大迭代次数定位64
        ; i<; i++)
        {
            //距离精度随距离的增加而减小
            float precis = 0.0005*t;
            //获得场景中物体距离该点的距离,及距离最近物体的材质id
            float2 res = map(ro + rd*t);
            //如果与场景物体发生碰撞,或者射线行进距离超出最大范围,则跳出迭代
            if (res.x<precis || t>tmax) break;
            t += res.x;
            m = res.y;
        }
        if (t > tmax) {
            m = -clamp((t - tmax) / (tmaxmax - tmax), , );
        }
        return float2(t, m);
    }

    int IsInShadow(in float3 ro, in float3 rd) {
        ;
        float tmax = distance(ro, PointLightPos);
        ;
        ; i < ; i++) {
            float precis = 0.0005*t;
            float2 res = map(ro + rd*t);
            if (res.x < precis) {
                result = ;
                break;
            }
            if (t >= tmax) {
                result = ;
                break;
            }
            t += res.x;
        }
        return result;
    }

    //计算碰撞点处物体表面的法线
    float3 calcNormal(in float3 pos)
    {
        float3 eps = float3(0.0005, 0.0, 0.0);
        float3 nor = float3(
            map(pos + eps.xyy).x - map(pos - eps.xyy).x,
            map(pos + eps.yxy).x - map(pos - eps.yxy).x,
            map(pos + eps.yyx).x - map(pos - eps.yyx).x);
        return normalize(nor);
    }

    void BasicPhong(fixed3 lightDir, fixed3 normalDir, fixed3 viewDir, float matIndex, out float3 color1, out float3 color2) {
        , Kd = , Ks = , Shininess = ;
        float3 matColor = float3();
        switch (matIndex) {
        :
            //极远处
            matColor = float3(, , );
            Ka = ; Ks = ; Kd = ;
            break;
        :
            matColor = float3(0.1, 0.1, 0.1);
            Ks = ;
            break;
        :
            matColor = float3(); Shininess = ;
            break;
        :
            matColor = float3(, 0.5, 0.5);
            break;
        :
            matColor = float3(, 0.5);
            break;
        default:
            break;
        }
         && matIndex >-) {
            Kd = lerp(Kd, , -matIndex);
            Ks = lerp(Ks, , -matIndex);
            Ka = lerp(Ka, , -matIndex);
        }
        float3 amibent = Ka * GlobalAmibent * matColor;
        float3 diffuse = Kd * LightColor * clamp(dot(normalDir, lightDir), , ) * matColor;
        fixed3 reflectDir = reflect(-lightDir, normalDir);
        float3 specular = Ks * LightColor * pow(clamp(dot(viewDir, reflectDir), , ), Shininess) * matColor;
        color1 = amibent;
        color2 = diffuse + specular;
    }

    float3 render(in float3 ro, in float3 rd)
    {
        //投掷射线,获得与所场景物体的碰撞信息
        float2 res = castRay(ro, rd);
        float t = res.x;
        float m = res.y;
        float3 pos = ro + t*rd;
        float3 nor = calcNormal(pos);
        fixed3 lightPos = PointLightPos;
        fixed3 lightDir = normalize(lightPos - pos);

        float3 c1, c2;
        BasicPhong(lightDir, nor, rd, m, c1, c2);
        float isInShadow = IsInShadow(pos, lightDir);
        float3 color = c1 + isInShadow * c2;
        return color;
    }

    v2f vert(appdata v)
    {
        v2f o;
        o.vertex = UnityObjectToClipPos(v.vertex);
        o.uv = TRANSFORM_TEX(v.uv, _MainTex);
        return o;
    }

    fixed4 frag(v2f i) : SV_Target
    {
        //虚拟摄像机坐标
        float3 ro = float3(,,-);
        //投影面某点坐标
        float3 p = float3(i.uv - float2();
        //投掷射线
        float3 rd = normalize(p - ro);
        fixed4 col = fixed4(render(ro, rd).rgb, );
        // gamma校正
        col.rgb = pow(col.rgb, float3(0.4545, 0.4545, 0.4545));
        return col;
    }
        ENDCG
    }
    }
}
Unity3D-RayMarch-几何图元-3添加阴影的更多相关文章
- TextView的一些高级应用(自定义字体、显示多种颜色、添加阴影)
1. 自定义字体可以使用setTypeface(Typeface)方法来设置文本框内文本的字体,而android的Typeface又使用TTF字体文件来设置字体所以,我们可以在程序中放入TTF字 ...
- osg 基本几何图元
转自:osg 基本几何图元 //osg 基本几何图元 // ogs中所有加入场景中的数据都会加入到一个Group类对象中,几何图元作为一个对象由osg::Geode类来组织管理. // 绘制几何图元对 ...
- iOS--为视图添加阴影
iOS–为视图添加阴影 情况一:视图添加圆角,在添加阴影 //阴影视图 self.viewShadow = [[UIView alloc]initWithFrame:CGRectMake(0, 0, ...
- view添加阴影无效
需求:需要给cell里的imageview添加阴影 问题:按照标准的代码添加阴影,然并卵:代码如下: imageview.layer.shadowColor = [[UIColor blackColo ...
- Swift - 给图片和按钮添加阴影边框
最近比较忙,想要做的事情有很多,能做出来的就只有一部份,我觉得也许是我没有计划和规律造成的,我需要坚持下去,今天写了一个swift2.0给按钮或者图片添加阴影的效果,就当做笔记吧:-) Swift C ...
- iOS TabBar添加阴影
效果图如下所示: 直接上代码 //移除顶部线条 self.tabBar.backgroundImage = [UIImage new]; self.tabBar.shadowImage = [UIIm ...
- CSS3 --添加阴影(盒子阴影、文本阴影的使用)
CSS3 - 给div或者文字添加阴影(盒子阴影.文本阴影的使用)CSS3定义了两种阴影:盒子阴影和文本阴影.其中盒子阴影需要IE9及其更新版本,而文本阴影需要IE10及其更新版本.下面分别介绍两种 ...
- css 添加阴影
添加阴影,分为内阴影和外阴影. inset:内阴影. 不写默认外阴影. box-shadow: 水平位移 垂直位移 模糊半径 #box-shadow{ -moz-box-shadow:5px 5p ...
- ios开发之--为父view上的子view添加阴影
项目中碰到一个问题,在tableview的headerview里面有很一个子view,设计师的要求是在下方添加一个阴影,效果如下: 以前的实现思路就是,代码如下: 添加阴影 调用视图的 layer C ...
随机推荐
- webstorm2016.3注册码,License server更新方式,webstorm2017.1版本可用
以前的webstorm和phpstorm的激活码和地址,今天打开的时候过期了 (your license has expored) 以前是用activation code的更新方式: 后来搜了下,换个 ...
- mysql导入excel表格
https://jingyan.baidu.com/album/fc07f9891cb56412ffe5199a.html?picindex=1
- Java爬虫——常用的maven依赖
java实现爬虫常用的第三方包: httpclient,for http jsoup,for dom rhino,for js jackson,for json pom.xml摘录 <depen ...
- Python学习日记 --day2
Python学习日记 --day2 1.格式化输出:% s d (%为占位符 s为字符串类型 d为数字类型) name = input('请输入姓名') age = int(input('请输入年龄 ...
- mybatis mapper.xml的特殊操作符
select * from test where id<>1; 但是mybatis报错 <> 应该转义 <> select * from test where i ...
- 注意UTF-8-BOM 这个编码格式
有时候文本文件处理出现异常,找不到其他原因的时候,注意查看下文件的编码: Notepad:编码菜单 如果发现是UTF-8-BOM,需要改成UTF-8
- Flyway数据表迁移框架的使用
目录 1. 概述 2. Maven配置 3. SQL文件规范 4. 命令 5. 总结 1. 概述 Flyway是一个根据表结构快速生成数据表的工具,类似于Hibernate的自动生成表的特性. 官网: ...
- CSS预处器的了解
到目前为止,在众多优秀的CSS预处理器语言中就属Sass.LESS和Stylus最优秀,讨论的也多,对比的也多. 1.Sass背景介绍 Sass是对CSS(层叠样式表)的语法的一种扩充,诞生于2007 ...
- jquery中的 jquery.contains(a,b)
jquery.contains(a,b) 判断元素 a中是否包含 b 元素: 源码: contains = isNative(docElem.contains) || docElem.compareD ...
- SQL Server 常用SQL
--查询所有表 select * from sysobjects where xtype='u' ORDER BY name ASC