OpenDayLight——HelloWorld
OpenDayLight——HelloWorld
既然学习OpenDayLight编程这个鬼,就得像学语言一样来一个HelloWorld来试试水,经过几天的折腾,总算成功输出HelloWorld了,这里记录下整个过程以供后续参考。
一、实验环境描述
本次实验是在win7 64位+8G内存环境下实现;java版本为1.8.0_131;maven版本为3.5.0;这些安装过程就不记录了!
二、构建项目
1、执行如下命令构建项目;
mvn archetype:generate -DarchetypeGroupId=org.opendaylight.controller -DarchetypeArtifactId=opendaylight-startup-archetype -DarchetypeRepository=http://nexus.opendaylight.org/content/repositories/opendaylight.release -DarchetypeCatalog=remote -DarchetypeVersion=1.3.0-Carbon

图 1
2、按下回车后,一会屏幕中需要你输入一些如下信息,需要你输入的:
Define value for property 'groupId': org.opendaylight.hello

Define value for property 'artifactId': hello

[INFO] Using property: version = 0.1.0-SNAPSHOT

Define value for property 'package' org.opendaylight.hello: :

Define value for property 'classPrefix' Hello: : hello

Define value for property 'copyright': no

[INFO] Using property: copyrightYear = 2017

Confirm properties configuration:

groupId: org.opendaylight.hello

artifactId: hello

version: 0.1.0-SNAPSHOT

package: org.opendaylight.hello

classPrefix: hello

copyright: No

copyrightYear: 2017

 Y: : Y
如图2所示:
图 2
3、输入完成后,按下回车等待片刻即可出现如下页面,则完成项目框架的生成:
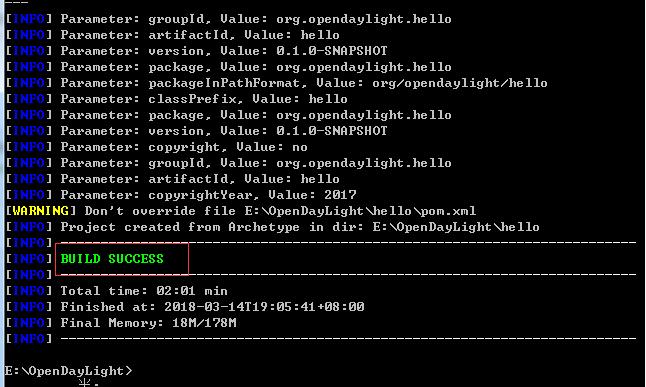
图 3
4、输入如下命令构建项目,命令第一次执行过程很长,笔者需要执行3个小时。执行成功后如图4所示
mvn clean install -DskipTests

图 4
三、添加HelloWorld RPC API
1、编辑api/src/main/yang/hello.yang文件,增加如下内容:
module hello {

    yang-version 1;

    namespace "urn:opendaylight:params:xml:ns:yang:hello";

    prefix "hello";

    revision "2015-01-05" {

        description "Initial revision of hello model";

    }

    rpc hello-world {

        input {

            leaf name {

                type string;

            }

        }

        output {

            leaf greeting {

                type string;

            }

        }

    }

}
增加完之后执行如下指令,生成相应的接口文件:
mvn clean install -DskipTests
执行成功后,如图5所示:
图 5
修改如上的yang文件后,生成如下几个类
impl/src/main/java/org/opendaylight/hello/impl/helloProvider.java
impl/src/main/resources/org/opendaylight/blueprint/impl-blueprint.xml
api/target/classes/org/opendaylight/yang/gen/v1/urn/opendaylight/params/xml/ns/yang/hello/rev150105/HelloService.java
2、绑定MD-SAL
在impl/src/main/resources/org/opendaylight/blueprint/impl-blueprint.xml中添加如下代码
<?xml version="1.0" encoding="UTF-8"?>

<!-- vi: set et smarttab sw=4 tabstop=4: -->

<!--

Copyright © 2017 no and others. All rights reserved.

This program and the accompanying materials are made available under the

terms of the Eclipse Public License v1.0 which accompanies this distribution,

and is available at http://www.eclipse.org/legal/epl-v10.html

-->

<blueprint xmlns="http://www.osgi.org/xmlns/blueprint/v1.0.0"

  xmlns:odl="http://opendaylight.org/xmlns/blueprint/v1.0.0"

  odl:use-default-for-reference-types="true">

  <reference id="dataBroker"

    interface="org.opendaylight.controller.md.sal.binding.api.DataBroker"

    odl:type="default" />

  <reference id="rpcRegistry"

             interface="org.opendaylight.controller.sal.binding.api.RpcProviderRegistry"/>

  <bean id="provider"

    class="org.opendaylight.hello.impl.helloProvider"

    init-method="init" destroy-method="close">

    <argument ref="dataBroker" />

    <argument ref="rpcRegistry" />

  </bean>

</blueprint>
在impl/src/main/java/org/opendaylight/hello/impl/目录下新建HelloWorldImpl.java文件,代码如下,注释不可省略,否则编译报错:
/*

 * Copyright © 2017 no and others.  All rights reserved.

 *

 * This program and the accompanying materials are made available under the

 * terms of the Eclipse Public License v1.0 which accompanies this distribution,

 * and is available at http://www.eclipse.org/legal/epl-v10.html

 */

package org.opendaylight.hello.impl;

import java.util.concurrent.Future;

import org.opendaylight.yang.gen.v1.urn.opendaylight.params.xml.ns.yang.hello.rev150105.HelloService;

import org.opendaylight.yang.gen.v1.urn.opendaylight.params.xml.ns.yang.hello.rev150105.HelloWorldInput;

import org.opendaylight.yang.gen.v1.urn.opendaylight.params.xml.ns.yang.hello.rev150105.HelloWorldOutput;

import org.opendaylight.yang.gen.v1.urn.opendaylight.params.xml.ns.yang.hello.rev150105.HelloWorldOutputBuilder;

import org.opendaylight.yangtools.yang.common.RpcResult;

import org.opendaylight.yangtools.yang.common.RpcResultBuilder;

public class HelloWorldImpl implements HelloService{

    @Override

    public Future<RpcResult<HelloWorldOutput>> helloWorld(HelloWorldInput input) {

        HelloWorldOutputBuilder helloBuilder = new HelloWorldOutputBuilder();

        helloBuilder.setGreeting("Hello " + input.getName());

        return RpcResultBuilder.success(helloBuilder.build()).buildFuture();

    }

}
在impl/src/main/java/org/opendaylight/hello/impl/目录下修改helloProvider文件,增加如下代码
/*

 * Copyright © 2017 no and others.  All rights reserved.

 *

 * This program and the accompanying materials are made available under the

 * terms of the Eclipse Public License v1.0 which accompanies this distribution,

 * and is available at http://www.eclipse.org/legal/epl-v10.html

 */

package org.opendaylight.hello.impl;

import org.opendaylight.controller.md.sal.binding.api.DataBroker;

import org.opendaylight.controller.sal.binding.api.BindingAwareBroker.RpcRegistration;

import org.opendaylight.controller.sal.binding.api.RpcProviderRegistry;

import org.opendaylight.yang.gen.v1.urn.opendaylight.params.xml.ns.yang.hello.rev150105.HelloService;

import org.slf4j.Logger;

import org.slf4j.LoggerFactory;

public class helloProvider {

    private static final Logger LOG = LoggerFactory.getLogger(helloProvider.class);

    private final DataBroker dataBroker;

    private final RpcProviderRegistry rpcProviderRegistry;

    private RpcRegistration<HelloService> serviceRegistration;

    public helloProvider(final DataBroker dataBroker, RpcProviderRegistry rpcProviderRegistry) {

        this.dataBroker = dataBroker;

        this.rpcProviderRegistry = rpcProviderRegistry;

    }

    /**

     * Method called when the blueprint container is created.

     */

    public void init() {

        serviceRegistration = rpcProviderRegistry.addRpcImplementation(HelloService.class, new HelloWorldImpl());

        LOG.info("helloProvider Session Initiated");

    }

    /**

     * Method called when the blueprint container is destroyed.

     */

    public void close() {

        serviceRegistration.close();

        LOG.info("helloProvider Closed");

    }

}
四、编译及验证
1、执行如下指令,对刚才所修改的代码进行编译
mvn clean install -DskipTests
2、编译完成后,启动OpenDayLight,如图6所示:
F:\OpenDayLight\hello\karaf\target\assembly\bin>karaf
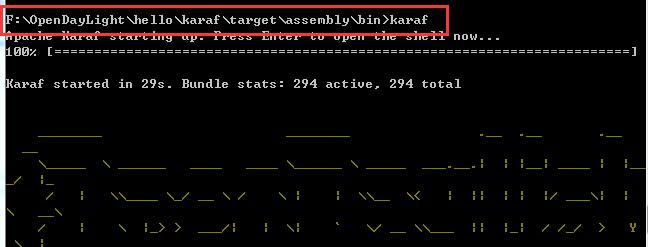
图 6
3、在浏览器中输入如下地址(账号密码:admin\admin)
http://localhost:8181/apidoc/explorer/index.html
显示如图7所示,找到新增的hello
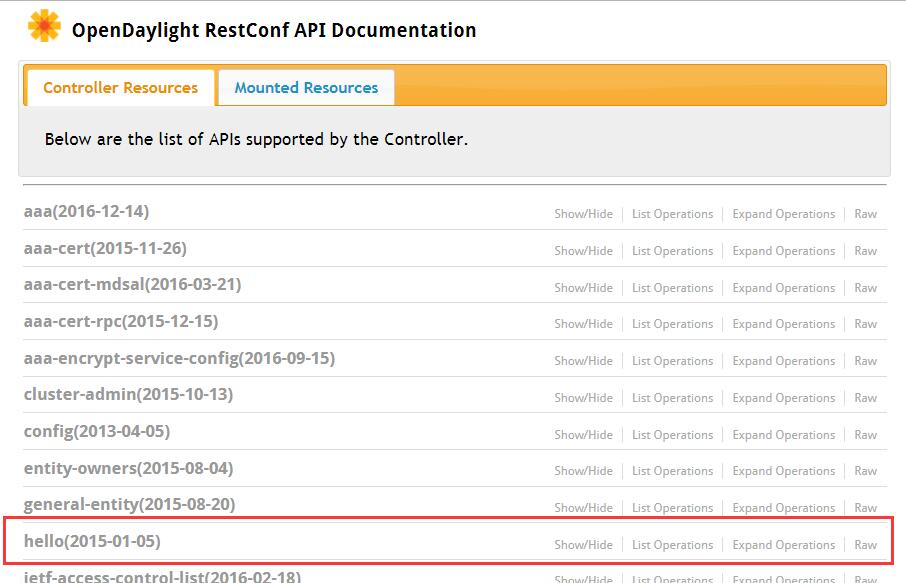
图 7
4、双击hello栏,如图8显示

图 8
5、在Value中输入如下的值后,点击Try it out,返回如图9结果,即验证HelloWorld成功。
{"hello:input": { "name":"hello"}}
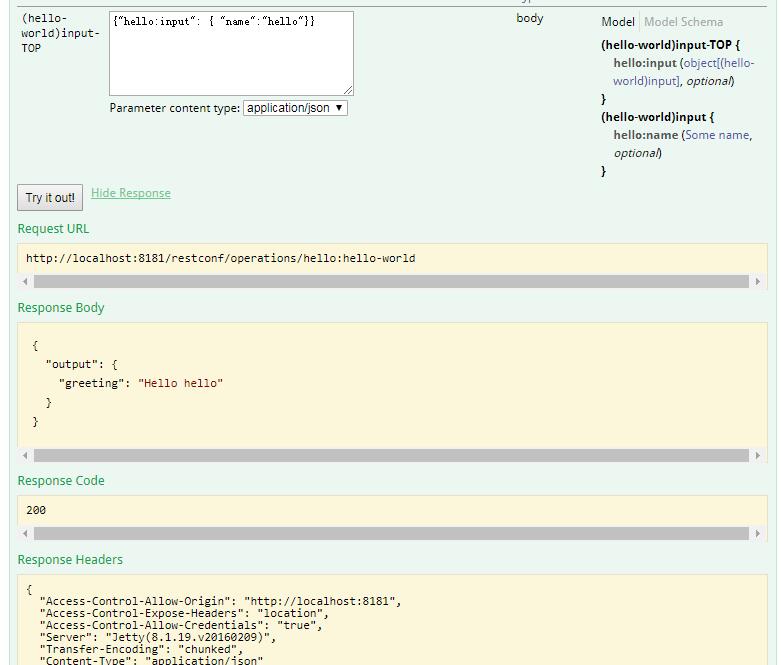
图 9
OpenDayLight——HelloWorld的更多相关文章
- OpenDaylight开发hello-world项目之功能实现
OpenDaylight开发hello-world项目之开发环境搭建 OpenDaylight开发hello-world项目之开发工具安装 OpenDaylight开发hello-world项目之代码 ...
- OpenDaylight开发hello-world项目之代码框架搭建
OpenDaylight开发hello-world项目之开发环境搭建 OpenDaylight开发hello-world项目之开发工具安装 OpenDaylight开发hello-world项目之代码 ...
- OpenDaylight开发hello-world项目之开发环境搭建
OpenDaylight开发hello-world项目之开发环境搭建 OpenDaylight开发hello-world项目之开发工具安装 OpenDaylight开发hello-world项目之代码 ...
- OpenDaylight开发hello-world项目之开发工具安装
OpenDaylight开发hello-world项目之开发环境搭建 OpenDaylight开发hello-world项目之开发工具安装 OpenDaylight开发hello-world项目之代码 ...
- 在OpenDaylight controller上开发App
安装环境:Ubuntu18.04 一.安装依赖 1. 安装JDK: sudo apt update sudo apt install openjdk-8-jdk-headless 选择默认的 JDK: ...
- 使用webstorm+webpack构建简单入门级“HelloWorld”的应用&&引用jquery来实现alert
使用webstorm+webpack构建简单入门级"HelloWorld"的应用&&构建使用jquery来实现 1.首先你自己把webstorm安装完成. 请参考这 ...
- Idea下用SBT搭建Spark Helloworld
没用过IDEA工具,听说跟Eclipse差不多,sbt在Idea其实就等于maven在Eclipse.Spark运行在JVM中,所以要在Idea下运行spark,就先要安装JDK 1.8+ 然后加入S ...
- 菜鸟学Struts2——HelloWorld
写在前面 自从工作后就过上了只有一个月记忆的生活,太健忘,很多学过的东西因为用得少便忘记了,第二次学习struts,为了以后便于查阅,开始自己的博客之旅.Struts的学习还是从Hello World ...
- 初识AngularJS 之 HelloWorld和数据绑定
1.Hello World 我用的开发工具是 atom ,大家有需要的话可以找我要安装包嘻嘻 第一步: 写入以下代码: <!DOCTYPE html> <html ng-ap ...
随机推荐
- poj-1386(欧拉回路)
题意:给你n个单词,每个单词可以和另一个单词连接,前提是(这个单词的尾字母等下一个单词的首字母),问你有没有一种连法能够连接所有的单词: 解题思路:每个单词可以看成是首字母指向尾字母的一条边,那么就变 ...
- Ubuntu16.04安装使用wps
Ubuntu16.04安装使用wps 1.wps官网下载并安装wps 此处以Debian安装包为例,官网下载路径 http://www.wps.cn/product/wpslinux/# 直接安装: ...
- Spring Security 学习总结
Spring Security Spring Security是基于Spring提供声明式安全保护的安全性框架.Spring Security提供了完整的安全性解决方案,能够在Web请求级别和方法调用 ...
- 「中国剩余定理CRT」学习笔记
设正整数$m_1, m_2, ... , m_r$两两互素,对于同余方程组 $x ≡ a_1 \ (mod \ m_1)$ $x ≡ a_2 \ (mod \ m_2)$ $...$ $x ≡ a_r ...
- 解决sublime text3 中文字符乱码
前言 由于系统编码问题导致的中文乱码解决,linux和windows解决方式都一样. 流程 linux下两步都需要,windows下只需要第二步. 1.在package install中搜索安装:co ...
- composer阿里云短信服务不支持传参为数值--为2017年短信接口,2018阿里云有更新http://www.cnblogs.com/q1104460935/p/8916096.html
composer 阿里云短信服务使用 xuying/aliyun_mns 更新到2017年初,不再更新 ){;, ); }; } ; }; }; }} 以下为发送成功返回对象 object(A ...
- Linux 日志分析脚本
#### 以下代码,若出现无法使用,请根据底下图片,更改参数.根据 apache 日志格式修改 查看 apache 进程ps aux | grep httpd | grep -v grep | wc ...
- FlatList
FlatList 之前使用的组件是ListView,当时要添加一个下拉刷新,上拉加载的功能,所以对ListView做了一些封装,但是后来看官方文档,不建议再使用ListView,因为效率问题,做过An ...
- Hdoj 1421.搬寝室 题解
Problem Description 搬寝室是很累的,xhd深有体会.时间追述2006年7月9号,那天xhd迫于无奈要从27号楼搬到3号楼,因为10号要封楼了.看着寝室里的n件物品,xhd开始发呆, ...
- BSGS算法及扩展
BSGS算法 \(Baby Step Giant Step\)算法,即大步小步算法,缩写为\(BSGS\) 拔山盖世算法 它是用来解决这样一类问题 \(y^x = z (mod\ p)\),给定\(y ...