Bullet物理引擎的安装与使用
图形赋予游戏一种视觉的吸引力,但是能够让游戏的世界鲜活起来的还应该是内部的物理引擎。物理引擎是游戏引擎中的子模块,是一种软件组件,可仿真物理系统。它根据牛顿力学定律,计算游戏中物体的合理的物理位置,并将计算结果提供给渲染引擎,从而展示出真实的渲染效果。物理引擎的仿真包括柔性体和刚体力学、流体力学以及碰撞检测。以游戏为中心的物理引擎侧重于实时近似,而科学仿真中的物理引擎则更多地侧重于精确计算以获得高准确性。科学物理引擎依赖于超级计算机的处理能力,而游戏物理引擎则可运行于资源受限的平台(比如手持型游戏设备和移动手机)。
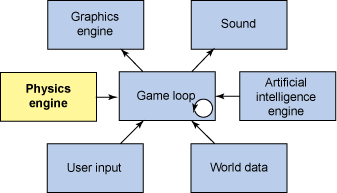
图 1. 游戏应用中的物理引擎
Bullet Physics SDK: real-time collision detection and multi-physics simulation for VR, games, visual effects, robotics, machine learning etc.
- Build bullet
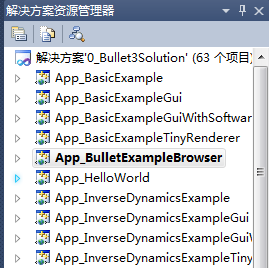
下载Bullet的源代码 https://github.com/bulletphysics/bullet3/releases/latest,然后将其解压到合适的路径下。可以选择运行批处理文件生成VisualStudio工程,这里运行build_visual_studio.bat生成VS2010工程。

在Debug模式下生成解决方案,解压后的bullet3-2.86.1目录中会出现bin文件夹,其中包含了生成的静态库文件和可执行文件。
- HelloWorld example
新建一个空的控制台程序,然后在源文件目录中加入HelloWorld.cpp文件:
#include <btBulletDynamicsCommon.h>
#include <stdio.h>
#include <iostream>
#include <fstream>
using namespace std; /// This is a Hello World program for running a basic Bullet physics simulation int main(int argc, char** argv)
{ btBroadphaseInterface* broadphase = new btDbvtBroadphase(); ///collision configuration contains default setup for memory, collision setup. Advanced users can create their own configuration.
btDefaultCollisionConfiguration* collisionConfiguration = new btDefaultCollisionConfiguration(); ///use the default collision dispatcher. For parallel processing you can use a differnt dispatcher
btCollisionDispatcher* dispatcher = new btCollisionDispatcher(collisionConfiguration); ///the default constraint solver. For parallel processing you can use a different solver
btSequentialImpulseConstraintSolver* solver = new btSequentialImpulseConstraintSolver; ///instantiate the dynamics world
btDiscreteDynamicsWorld* dynamicsWorld = new btDiscreteDynamicsWorld(dispatcher, broadphase, solver, collisionConfiguration); ///sets the gravity. We have chosen the Y axis to be "up".
dynamicsWorld->setGravity(btVector3(,-,)); btCollisionShape* groundShape = new btStaticPlaneShape(btVector3(, , ), );
btCollisionShape* fallShape = new btSphereShape(); //The btDefaultMotionState provides a common implementation to synchronize world transforms with offsets.
btDefaultMotionState* groundMotionState = new btDefaultMotionState(btTransform(btQuaternion(, , , ), btVector3(, -, ))); ///instantiate the ground. Its orientation is the identity, Bullet quaternions are specified in x,y,z,w form.
btRigidBody::btRigidBodyConstructionInfo groundRigidBodyCI(, groundMotionState, groundShape, btVector3(, , )); ///Bullet considers passing a mass of zero equivalent to making a body with infinite mass - it is immovable
btRigidBody* groundRigidBody = new btRigidBody(groundRigidBodyCI); ///add the ground to the world
dynamicsWorld->addRigidBody(groundRigidBody); //The btTransform class supports rigid transforms with only translation and rotation
btDefaultMotionState* fallMotionState = new btDefaultMotionState(btTransform(btQuaternion(, , , ), btVector3(, , ))); btScalar mass = ;
btVector3 fallInertia(, , );
fallShape->calculateLocalInertia(mass, fallInertia); ///when bodies are constructed, they are passed certain parameters. This is done through a special structure Bullet provides for this.
///rigid body is dynamic if and only if mass is non zero, otherwise static
btRigidBody::btRigidBodyConstructionInfo fallRigidBodyCI(mass, fallMotionState, fallShape, fallInertia);
btRigidBody* fallRigidBody = new btRigidBody(fallRigidBodyCI);
dynamicsWorld->addRigidBody(fallRigidBody); ofstream outfile("C:\\Users\\KC\\Desktop\\height.csv", ios::out);
for (int i = ; i < ; i++) { /* prototype:
btDynamicsWorld::stepSimulation(btScalar timeStep, int maxSubSteps=1,
btScalar fixedTimeStep=btScalar(1.)/btScalar(60.));
*/ //It's important that timeStep is always less than maxSubSteps*fixedTimeStep
//The first and third parameters to stepSimulation are measured in seconds
//By decreasing the size of fixedTimeStep, you are increasing the "resolution" of the simulation.
//When you pass Bullet maxSubSteps > 1, it will interpolate movement for you
dynamicsWorld->stepSimulation( / .f, ); btTransform trans;
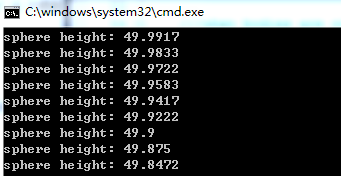
fallRigidBody->getMotionState()->getWorldTransform(trans); std::cout << "sphere height: " << trans.getOrigin().getY() << std::endl;
outfile<<trans.getOrigin().getY()<<endl;
} outfile.close(); delete fallShape;
delete groundShape; delete dynamicsWorld;
delete solver;
delete dispatcher;
delete collisionConfiguration;
delete broadphase; printf("Press a key to exit\n");
getchar();
}
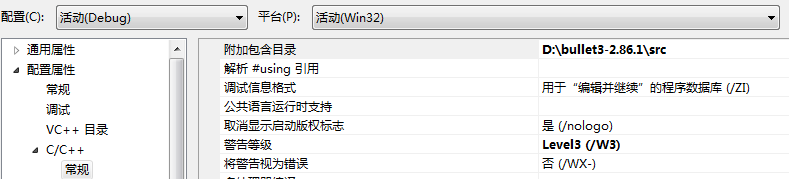
在项目属性——>C/C++ ——>常规——>附加包含目录中添加头文件的路径:D:\bullet3-2.86.1\src
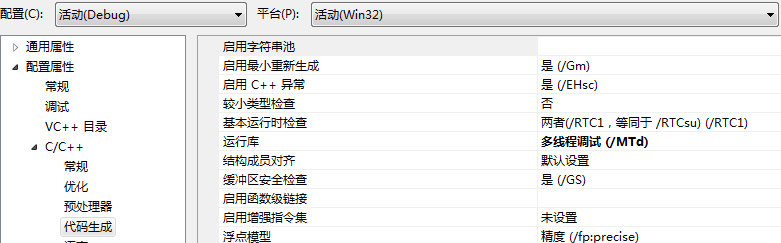
在C/C++ ——>常规——>代码生成——>运行库选项中选择:多线程调试(/MTd)。Make sure the run-time library is the same as in your project. By default it is set to the multi-threaded, static version. 即之前在build bullet时默认生成的是静态库,则在编译debug程序时应选择/MTd。一个程序中若混合了不同的运行时库(静态库和动态库,调试库和非调试库),可能会产生冲突,所以一个程序中应该使用相同的运行时库。
在链接器——>常规——>附加库目录中输入静态库路径:D:\bullet3-2.86.1\bin

然后在链接器——>输入——>附加依赖项中添加必须的静态库(release版的静态库文件名中没有_debug后缀)

设置完成开始运行。上面的代码将创建一个半径为1的球体和一个静态地面,球中心距地面高度为50m,球的质量为1Kg。然后模拟重力(重力加速度沿Y轴负方向,大小为10m/s2)作用下的自由落体运动,仿真步长为1/60s,即每秒计算60次,运行300步(5s)。虽然仿真需要大量的设置,但是当定义了仿真环境之后,物理引擎就会在幕后为你完成全部的繁重工作。仿真时每运行一步输出球中心的高度数据:
将数据记录在CSV文件中,画出高度随时间变化的曲线如下图所示:
- Build and install pybullet
pybullet is an easy to use Python module for physics simulation, robotics and machine learning based on the Bullet Physics SDK. With pybullet you can load articulated bodies from URDF, SDF and other file formats. pybullet provides forward dynamics simulation, inverse dynamics computation, forward and inverse kinematics and collision detection and ray intersection queries. Aside from physics simulation, pybullet supports to rendering, with a CPU renderer and OpenGL visualization and support for virtual reality headsets. 安装pybullet有好几种方式,下面在https://pypi.python.org/pypi/pybullet网站上下载源文件pybullet-0.1.6.tar.gz并解压,切换到原文件目录中运行:python setup.py install。不过这时提示:Microsoft Visual C++ 9.0 is required Unable to find vcvarsall.bat,解决办法是可以安装一个Micorsoft Visual C++ Compiler for Python 2.7的包。经过一段时间编译(中途会弹出好多警告),在源文件目录的build\lib.win-amd64-2.7文件夹下可以找到pybullet.pyd,将其复制到C:\Python27\Lib\site-packages中。
下面的Python代码运行时作为客户端与Physics Engine服务端进行通信(pybullet is designed around a command-status driven API, with a client sending commands and a physics server returning the status. pybullet has some build-in physics servers: DIRECT and GUI. The DIRECT connection sends the commands directly to the physics engine, without using any transport layer, and directly returns the status after executing the command. The GUI connection will create a new graphical user interface with OpenGL rendering, within the same process space as pybullet)
import pybullet as p
from time import sleep physicsClient = p.connect(p.GUI)
p.setGravity(0,0,-10) # The loadURDF will send a command to the physics server to load a physics model from a URDF File
planeId = p.loadURDF("D:/bullet3-2.86.1/data/plane.urdf") cubeStartPos = [0,0,2]
cubeStartOrientation = p.getQuaternionFromEuler([0,0,0]) # The pybullet API uses quaternions to represent orientations.
boxId = p.loadURDF("D:/bullet3-2.86.1/data/sphere2.urdf",cubeStartPos, cubeStartOrientation) while 1:
# stepSimulation will perform all the actions in a single forward dynamics simulation step such as collision detection,
# constraint solving and integration. By default, the physics server will not step the simulation, unless you explicitly
# send a 'stepSimulation' command. This way you can maintain control determinism of the simulation.
p.stepSimulation() # reports the current position and orientation of the base of the body in Cartesian world coordinates
# returns the position list of 3 floats and orientation as list of 4 floats in [x,y,z,w] order.
# Use getEulerFromQuaternion to convert the quaternion to Euler if needed.
cubePos, cubeOrn = p.getBasePositionAndOrientation(boxId)
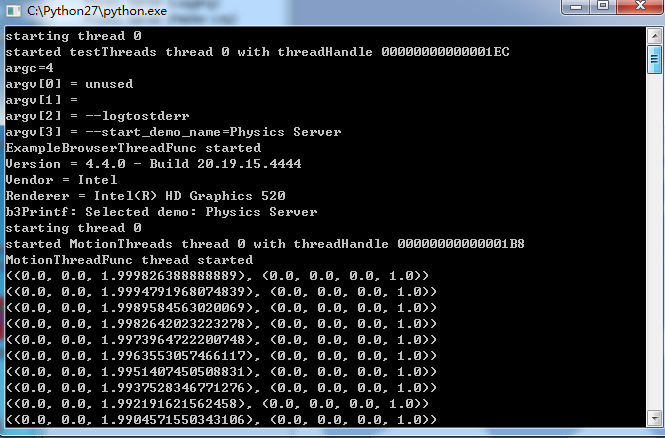
print(cubePos,cubeOrn)
sleep(0.01) # Time in seconds. p.disconnect() # disconnect from a physics server. A 'DIRECT' or 'GUI' physics server will shutdown
运行时服务端将显示对应的图形界面,仿真每进行一步输出球的质心位置和姿态
参考:
Creating a project from scratch
Visual Studio运行时库MT、MTd、MD、MDd的研究
Bullet物理引擎的安装与使用的更多相关文章
- Bullet物理引擎在OpenGL中的应用
Bullet物理引擎在OpenGL中的应用 在开发OpenGL的应用之时, 难免要遇到使用物理来模拟OpenGL中的场景内容. 由于OpenGL仅仅是一个关于图形的开发接口, 因此需要通过第三方库来实 ...
- 将 Android* Bullet 物理引擎移植至英特尔® 架构
简单介绍 因为眼下的移动设备上可以使用更高的计算性能.移动游戏如今也可以提供震撼的画面和真实物理(realistic physics). 枪战游戏中的手雷爆炸效果和赛车模拟器中的汽车漂移效果等便是由物 ...
- 转:Bullet物理引擎不完全指南(Bullet Physics Engine not complete Guide)
write by 九天雁翎(JTianLing) -- blog.csdn.net/vagrxie 讨论新闻组及文件 前言 Bullet据称为游戏世界占有率为第三的物理引擎,也是前几大引擎目前唯一能够 ...
- bullet物理引擎与OpenGL结合 导入3D模型进行碰撞检测 以及画三角网格的坑
原文作者:aircraft 原文链接:https://www.cnblogs.com/DOMLX/p/11681069.html 一.初始化世界以及模型 /// 冲突配置包含内存的默认设置,冲突设置. ...
- 【Bullet引擎】Bullet物理引擎简单说明
说明 Bullet是一款开源的物理模拟计算引擎,包括刚体.柔体.弹性体等,是世界三大物理模拟引擎之一(包括Havok和PhysX),被广泛应用于游戏开发(GTA5等)和电影(2012等)制作中. Bu ...
- 链接收藏:bullet物理引擎不完全指南
这个也是博客园的文章,编辑得也很好,就不copy了,结尾还有PDF: https://www.cnblogs.com/skyofbitbit/p/4128347.html 完结
- 【AwayPhysics学习笔记】:Away3D物理引擎的简介与使用
首先我们要了解的是AwayPhysics这个物理引擎并不是重头开始写的新物理引擎,而是使用Flascc技术把一个已经很成熟的Bullet物理引擎引入到了Flash中,同时为了让as3可以使用这个C++ ...
- HTML5之2D物理引擎 Box2D for javascript Games 系列 第一部分
我要的是能在H5页面上跑的javascript版的Box2D啊!!! 最近想学习Javascript版本的Box2D JS物理引擎,无奈搜了半天也没找到相对比较系统的资料 官方网站也只是简单的介绍,A ...
- ROS数据可视化工具Rviz和三维物理引擎机器人仿真工具V-rep Morse Gazebo Webots USARSimRos等概述
ROS数据可视化工具Rviz和三维物理引擎机器人仿真工具V-rep Morse Gazebo Webots USARSimRos等概述 Rviz Rviz是ROS数据可视化工具,可以将类似字符串文本等 ...
随机推荐
- 读取web.config和app.config配置文件
app.config: <add key="Password" value="123456"/> C#: string TQpwd ...
- 步步为营-11-List<T>泛型的简单练习
using System; using System.Collections.Generic; using System.Linq; using System.Text; using System.T ...
- 小米note开启调试模式
1.刷机为开发版本. 2.拨电话界面输入 *#*#717717#*#* 开启调试模式. 3.驱动好像会自己安装.
- zjoi 2017 树状数组
题解: 感觉相比仙人掌简单了很多啊.. 首先会发现那个其实就是后缀和 然后其实就是判断一下两个位置的元素想不想等 然后l=1是要特判的 之后一个易错的地方就是去维护每个数是0/1的概率 因为这样概率是 ...
- 配置apache和php mysql的一些问题
关于"Windows不能在本地计算机启动Apache2.......并参考特定服务错误代码1"问题解决 apache的httpd.conf文件配置“LoadModule php5_ ...
- 2018年商业版idea破解安装介绍
1. IntelliJ IDEA 2018商业版-安装 首先去官网http://www.jetbrains.com/idea/download/#section=windows下载Ultimate版( ...
- T9 HDU1298
就是字典树加dfs 把所有操作封在结构体里面 #include <cstdio> #include <cstring> #include <algorithm> # ...
- 6-16 单词 uva10129
了解了欧拉回路和欧拉道路的性质 : 欧拉道路 最多只有两个奇点(不可能只有一个奇点) 并且当有两个奇点的时候 一个奇点入比出多一 一个奇点出比入多一 采用并查集查看是否连同 如果连 ...
- printf的执行顺序
printf()函数的参数,在printf()函数读取时是从左往右读取的,然后将读取到的参数放到栈里面去, 最后读取到的就放在栈顶,处理参数的时候是从栈顶开始的,所以是从右边开始处理的. --prin ...
- Python爬虫之正则表达式的使用(三)
正则表达式的使用 re.match(pattern,string,flags=0) re.match尝试从字符串的起始位置匹配一个模式,如果不是起始位置匹配成功的话,match()就返回none 参数 ...