centos7 LANMP 安装
没有开头语。
操作系统:CentOs7.6 64位。
Nginx:系统自带 nginx1.12.2包。
Mysql:系统自带 MariaDB 5.6 ,更换为 Mysql5.6
PHP:系统php5.6包,更换为7.2
软件包:https://pan.baidu.com/s/1Gb4iz5mqLqNVWvvZdBiOMQ 提取码: xrhx
把软件包放在/usr/src文件夹下
首先更新一下系统自带包,安装依赖
yum update
yum install gcc gcc-c++ pcre pcre-devel zlib zlib-devel openssl openssl-devel gd gd-devle libxml2 libxml2-devel curl-devel libjpeg libjpeg-devel libpng libpng-devel freetype-devel apr apr-util
一、安装nginx
下载源码包并解压
cd /usr/local/src

wget http://nginx.org/download/nginx-1.12.2.tar.gz

tar -zxvf nginx-1.12..tar.gz
进入目录
cd nginx-1.12.
编译安装 ,因为上边yum安装了二进制的openssl zlib 和pcre ,所以configure 配置 --with-pcre等就不用指定目录了
./configure \

--prefix=/usr/local/nginx/ \

--user=www \

--group=www \

--with-http_stub_status_module \

--with-http_ssl_module \

--with-http_sub_module \

--with-http_realip_module \

--with-http_image_filter_module \
make && make install
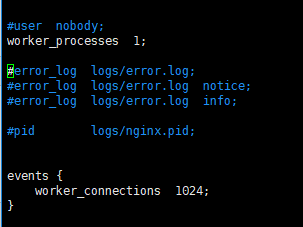
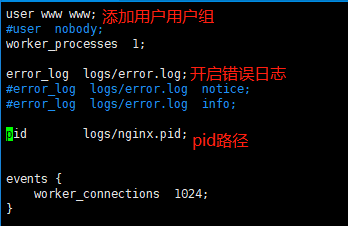
修改nginx.conf
cd /usr/local/nginx/conf/

cp nginx.conf nginx.conf.bak

vim nginx.conf
配置nginx 脚本控制
vim /etc/init.d/nginx
代码是复制的,路径需要根据自己的改一下
#!/bin/sh

#

# nginx - this script starts and stops the nginx daemon

#

# chkconfig: - 85 15

# description: Nginx is an HTTP(S) server, HTTP(S) reverse \

# proxy and IMAP/POP3 proxy server

# processname: nginx

# config: /etc/nginx/nginx.conf

# config: /usr/local/nginx/conf/nginx.conf

# pidfile: /usr/local/nginx/logs/nginx.pid

# Source function library.

. /etc/init.d/functions

# Source networking configuration.

. /etc/sysconfig/network

# Check that networking is up.

[ "$NETWORKING" = "no" ] && exit 0

nginx="/usr/local/nginx/sbin/nginx"

prog=$(basename $nginx)

NGINX_CONF_FILE="/usr/local/nginx/conf/nginx.conf"

[ -f /etc/sysconfig/nginx ] && . /etc/sysconfig/nginx

lockfile=/var/lock/subsys/nginx

make_dirs() {

    # make required directories

    user=`$nginx -V 2>&1 | grep "configure arguments:" | sed 's/[^*]*--user=\([^ ]*\).*/\1/g' -`

    if [ -z "`grep $user /etc/passwd`" ]; then

    useradd -M -s /bin/nologin $user

    fi

    options=`$nginx -V 2>&1 | grep 'configure arguments:'`

    for opt in $options; do

    if [ `echo $opt | grep '.*-temp-path'` ]; then

    value=`echo $opt | cut -d "=" -f 2`

    if [ ! -d "$value" ]; then

    # echo "creating" $value

    mkdir -p $value && chown -R $user $value

    fi

    fi

    done

}

start() {

    [ -x $nginx ] || exit 5

    [ -f $NGINX_CONF_FILE ] || exit 6

    make_dirs

    echo -n $"Starting $prog: "

    daemon $nginx -c $NGINX_CONF_FILE

    retval=$?

    echo

    [ $retval -eq 0 ] && touch $lockfile

    return $retval

}

stop() {

    echo -n $"Stopping $prog: "

    killproc $prog -QUIT

    retval=$?

    echo

    [ $retval -eq 0 ] && rm -f $lockfile

    return $retval

}

restart() {

    #configtest || return $?

    stop

    sleep 1

    start

}

reload() {

    #configtest || return $?

    echo -n $"Reloading $prog: "

    killproc $nginx -HUP

    RETVAL=$?

    echo

}

force_reload() {

    restart

}

configtest() {

    $nginx -t -c $NGINX_CONF_FILE

}

rh_status() {

    status $prog

}

rh_status_q() {

    rh_status >/dev/null 2>&1

}

case "$1" in

start)

rh_status_q && exit 0

$1

;;

stop)

rh_status_q || exit 0

$1

;;

restart|configtest)

$1

;;

reload)

rh_status_q || exit 7

$1

;;

force-reload)

force_reload

;;

status)

rh_status

;;

condrestart|try-restart)

rh_status_q || exit 0

;;

*)

echo $"Usage: $0 {start|stop|status|restart|condrestart|try-restart|reload|force-reload|configtest}"

exit 2

esac
设置脚本权限,设置开启启动,启动nginx
chmod  /etc/rc.d/init.d/nginx

chkconfig nginx on

/etc/rc.d/init.d/nginx start
添加nginx到系统变量
echo 'export PATH=$PATH:/usr/local/nginx/sbin'>>/etc/profile && source /etc/profile
二、安装Apache
apache安装需要依赖pcre ,apr 和apr-util ,上边已经安装了二进制文件
下载源码包并进入
cd /usr/local/src

wget https://mirrors.tuna.tsinghua.edu.cn/apache/httpd/httpd-2.4.38.tar.gz

cd httpd-2.4.
配置
./configure --prefix=/usr/local/apache \

--sysconfdir=/usr/local/apache/conf \

--enable-so \

--enable-rewrite \

--with-pcre
编译安装
make && make install
复制脚本、修改权限
cp /usr/local/apache/bin/apachectl /etc/init.d/httpd
cd /etc/init.d/

chmod  httpd
添加两行内容到htppd,添加在第二三行即可
vim httpd
# chkconfig:

# description: Apache
其中,所增加的第二行中三个数字,第一个表示在运行级别2345下启动Apache,第二、三是关于启动和停止的优先级配置。
设置开机启动
chkconfig httpd on
加入环境变量
echo 'export PATH=$PATH:/usr/local/apache/bin'>>/etc/profile && source /etc/profile
启动apache (因为nginx开启后,80端口被占用,此处需要关闭nginx服务,或者修改apache端口为8080,然后重启apache服务)
./httpd start
三、卸载MariaDB安装Mysql
1.查看当前安装列表
rpm -qa | grep mariadb

2.卸载mariadb
rpm -e --nodeps mariadb-libs-5.5.-.el7_5.x86_64

检查有没有卸载干净
rpm -qa | grep mariadb
3.安装mysql5.6
下载mysql的repo源
wget http://repo.mysql.com/mysql-community-release-el7-5.noarch.rpm
安装mysql-community-release-el7-5.noarch.rpm包
sudo rpm -ivh mysql-community-release-el7-.noarch.rpm
安装完这个包后,会获得两个mysql的yum repo源:/etc/yum.repos.d/mysql-community.repo,/etc/yum.repos.d/mysql-community-source.repo。
安装mysql
sudo yum install mysql-server
4.配置开机启动
systemctl enable mysqld
5.启动mysql
systemctl start mysqld
6.重置密码

7.授权远程登录
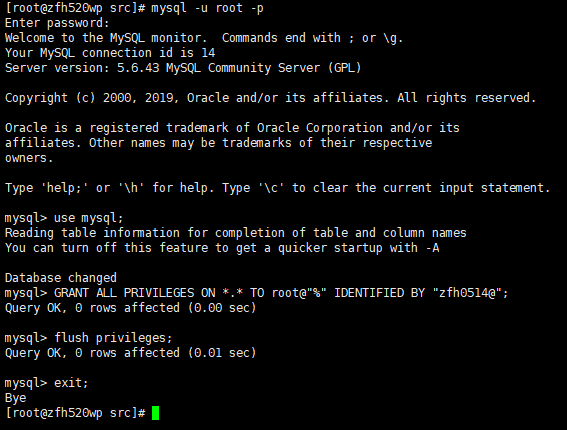
mysql -u root -p
use mysql;
GRANT ALL PRIVILEGES ON *.* TO root@"%" IDENTIFIED BY "root";
刷新权限
flush privileges;
exit;
四、安装php7.2
groupadd -r www && useradd -r -g www -s /bin/false -d /usr/local/php -M php
cd /usr/src

tar -zxvf php-7.2..tar.gz
cd php-7.2.0
编译安装
./configure \

--prefix=/usr/local/php \

--exec-prefix=/usr/local/php \

--bindir=/usr/local/php/bin \

--sbindir=/usr/local/php/sbin \

--includedir=/usr/local/php/include \

--libdir=/usr/local/php/lib/php \

--mandir=/usr/local/php/php/man \

--with-config-file-path=/usr/local/php/etc \

--with-mysql-sock=/var/lib/mysql/mysql.sock \

--with-mhash \

--with-openssl \

--with-mysqli=shared,mysqlnd \

--with-pdo-mysql=shared,mysqlnd \

--with-gd \

--with-iconv \

--with-zlib \

--enable-zip \

--enable-inline-optimization \

--disable-debug \

--disable-rpath \

--enable-shared \

--enable-xml \

--enable-bcmath \

--enable-shmop \

--enable-sysvsem \

--enable-mbregex \

--enable-mbstring \

--enable-ftp \

--enable-pcntl \

--enable-sockets \

--with-xmlrpc \

--enable-soap \

--without-pear \

--with-gettext \

--enable-session \

--with-curl \

--with-jpeg-dir=/usr/lib \

--with-freetype-dir \

--enable-opcache \

--enable-fpm \

--with-fpm-user=www \

--with-fpm-group=www \

--without-gdbm \

--with-apxs2=/usr/local/apache/bin/apxs

make && make install
cp php.ini-development /usr/local/php/etc/php.ini

cp php.ini-development /etc/php.ini

cp /usr/local/php/sbin/php-fpm /etc/init.d/php-fpm

cp /usr/local/php/etc/php-fpm.d/www.conf.default /usr/local/php/etc/php-fpm.d/www.conf
vim /usr/local/php/etc/php-fpm.conf
去掉 pid = run/php-fpm.pid 前面的‘;’
配置全局环境变量
vim /etc/profile
在最后一行加入
export PATH=$PATH:/usr/local/php/bin
刷新
source /etc/profile
执行 /etc/init.d/php-fpm
centos7 LANMP 安装的更多相关文章
- centos7中安装wdcp管理系统(用于网站搭设)
首先我们进入官网看下安装方法https://www.wdlinux.cn/wdcp/install.html 可以看到,实际上有两张安装方式,一种是源码进行安装,还有一种是RPM包安装,显然第二种安装 ...
- 在centos7上安装Jenkins
在centos7上安装Jenkins 安装 添加yum repos,然后安装 sudo wget -O /etc/yum.repos.d/jenkins.repo http://pkg.jenkins ...
- CentOS7 Jenkins安装
CentOS7 Jenkins安装 CentOS7 Jenkins安装 Download 从Jenkins下载apache-tomcat-8.0.18.tar.gz Install 安装 上传RPM文 ...
- 在 CentOS7 上安装 zookeeper-3.4.9 服务
在 CentOS7 上安装 zookeeper-3.4.9 服务 1.创建 /usr/local/services/zookeeper 文件夹: mkdir -p /usr/local/service ...
- 在 CentOS7 上安装 MongoDB
在 CentOS7 上安装 MongoDB 1 通过 SecureCRT 连接至 CentOS7 服务器: 2 进入到 /usr/local/ 目录: cd /usr/local 3 在当前目录下创建 ...
- 在 CentOS7 上安装 MySQL5.7
在 CentOS7 上安装 MySQL5.7 1 通过 SecureCRT 连接到阿里云 CentOS7 服务器: 2 进入到目录 /usr/local/ 中: cd /usr/local/ 3 创建 ...
- 在 CentOS7 上安装 Tomcat9
在 CentOS7 上安装 Tomcat9 1 通过 SecureCRT 连接到阿里云 CentOS7 服务器: 2 进入到目录 /usr/local/ 中: cd /usr/local/ 3 创建目 ...
- 在CentOS7上安装JDK1.8
在CentOS7上安装JDK1.8 1 通过 SecureCRT 连接到阿里云 CentOS7 服务器: 2 进入到目录 /usr/local/ 中: cd /usr/local/ 3 创建目录 to ...
- centos7.0 安装字体库
最近在centos7.0下用itextpdf将word文档转成pdf时出现字体丢失的情况.网上找了很多资料,各式各样的原因和解决方法.后来经过一番测试发现是centos7.0 minimal没有安装相 ...
随机推荐
- Android中Bundle和Intent的区别
Bundle的作用,以及和Intent的区别: 一.Bundle: A mapping from String values to various Parcelable types 键值对的集合 类继 ...
- WPF背景图
方法一:xaml中:<控件> <控件.Background><ImageBrush ImageSource="/程序集;component/images/xx ...
- RHEL磁盘修复
0. 1.基础工具:e2label /device/xxx [new label name] 显示/设定设备的label名称 2.e2fsck 修复工具,用-b 指定备用的superblock位置 ...
- rman输出日志的几种方法(转)
在使用rman的时候经常会碰到以下两种场景,需要把rman的日志输出到文件中: 1.显示的日志太多,导致一个屏幕显示不完,影响了问题的诊断,这时候需要把rman的log输出到文本中,整个的诊断过程就相 ...
- Certificate Formats | Converting Certificates between different Formats
Different Platforms & Devices requires SSL certificates in different formatseg:- A Windows Serve ...
- android下使用tcpdump抓包
tcpdump是linux下的抓包工具,在android中没有,需要下载对应的工具. 下载地址:https://www.androidtcpdump.com/android-tcpdump/downl ...
- C++赋值兼容原则
C++赋值兼容原则(派生类对象是基类对象,反之不成立) –基类指针强制转换成派生类指针 –派生类中重定义基类成员(同名覆盖) 假设, 一个基类 "普通人", 一个派生类 " ...
- 【Spark 深入学习 01】 Spark是什么鬼?
经过一段时间的学习和测试,是时候给spark的学习经历做一个总结了,对于spark的了解相对晚了写.春节期间(预计是无大事),本博准备推出20篇左右spark系列原创文章(先把牛吹出去再说) ,尽量将 ...
- tomcat启动时非常慢,启动时 一直卡在Root WebApplicationContext: initialization completed
每次重启自己的服务tomcat都需要卡住很长时间,每次都是日志停在 Root WebApplicationContext: initialization completed in 744 ms这个地方 ...
- ubuntu将GNU nano换成vim
ubuntu默认编辑器为gnu nano,使用方法是ctrl+字母键 但是gnu nano没有vim好用,我们把它切换到vim 在终端下输入以下命令 sudo update-alternatives ...