
ABP 源码分析汇总之 AutoMapper
AutoMapper 是一个对象映射工具,
安装时只需要安装 如下即可:

有关于它的介绍,参考官网:http://automapper.org/
AutoMapper使用比较简单,还是直奔主题,看一下ABP是如何使用它的:
首先Abp使用AutoMapper专门写的了一个模块Abp.AutoMapper,如下:
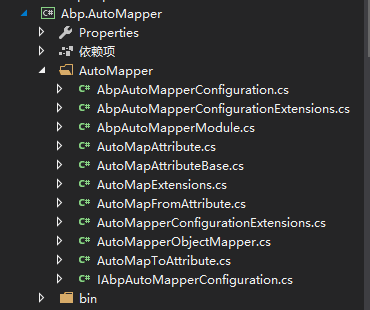
跟其它模块一样,有一个继承自AbpModule的AbpAutoMapperModule类。
在ABP自动生成的项目中,是在应用层依赖这个模块,从而对AutoMapper进行了初始化的配置:
    [DependsOn(typeof(AuditCoreModule), typeof(AbpAutoMapperModule))]  //这里

    public class AuditApplicationModule : AbpModule

    {

        public override void PreInitialize()

        {

        }

        public override void Initialize()

        {

            IocManager.RegisterAssemblyByConvention(Assembly.GetExecutingAssembly());

        }

    }
在AbpAutoMapperModule类中,我们看到这句:
public override void PreInitialize()

        {

            IocManager.Register<IAbpAutoMapperConfiguration, AbpAutoMapperConfiguration>();

            Configuration.ReplaceService<ObjectMapping.IObjectMapper, AutoMapperObjectMapper>();//这句

            Configuration.Modules.AbpAutoMapper().Configurators.Add(CreateCoreMappings);

        }
原来只要实现了IObjectMapper的对象映射工具,可以在abp项目中使用。
再来看看,模块是如何创建映射配置的,CreateMappings方法调用FindAndAutoMapTypes()
[DependsOn(typeof(AbpKernelModule))]

    public class AbpAutoMapperModule : AbpModule

    {

        private readonly ITypeFinder _typeFinder;

        private static volatile bool _createdMappingsBefore;

        private static readonly object SyncObj = new object();

        public AbpAutoMapperModule(ITypeFinder typeFinder)

        {

            _typeFinder = typeFinder;

        }

public override void PostInitialize()

        {

            CreateMappings();

        }

        private void CreateMappings()

        {

            lock (SyncObj)

            {

                Action<IMapperConfigurationExpression> configurer = configuration =>

                {

                    FindAndAutoMapTypes(configuration);

                    foreach (var configurator in Configuration.Modules.AbpAutoMapper().Configurators)

                    {

                        configurator(configuration);

                    }

                };

                if (Configuration.Modules.AbpAutoMapper().UseStaticMapper)

                {

                    //We should prevent duplicate mapping in an application, since Mapper is static.

                    if (!_createdMappingsBefore)

                    {

                        Mapper.Initialize(configurer);

                        _createdMappingsBefore = true;

                    }

                    IocManager.IocContainer.Register(

                        Component.For<IMapper>().Instance(Mapper.Instance).LifestyleSingleton()

                    );

                }

                else

                {

                    var config = new MapperConfiguration(configurer);

                    IocManager.IocContainer.Register(

                        Component.For<IMapper>().Instance(config.CreateMapper()).LifestyleSingleton()

                    );

                }

            }

        }

        private void FindAndAutoMapTypes(IMapperConfigurationExpression configuration)

        {

            var types = _typeFinder.Find(type =>

                {

                    var typeInfo = type.GetTypeInfo();

                    return typeInfo.IsDefined(typeof(AutoMapAttribute)) ||

                           typeInfo.IsDefined(typeof(AutoMapFromAttribute)) ||

                           typeInfo.IsDefined(typeof(AutoMapToAttribute));

                }

            );

            Logger.DebugFormat("Found {0} classes define auto mapping attributes", types.Length);

            foreach (var type in types)

            {

                Logger.Debug(type.FullName);

                configuration.CreateAutoAttributeMaps(type);

            }

        }

    }
FindAndAutoMapTypes方法中_typeFinder.Find(),看名字就知道是根据里面的条件,找到符合条件的类型。看一下源码,它是如何找的,
 public AbpAutoMapperModule(ITypeFinder typeFinder)

        {

            _typeFinder = typeFinder;

        }
typeFinder是接口,那它默认实现就是TypeFinder,我们在源码中很快找到了它:
    public class TypeFinder : ITypeFinder

    {public TypeFinder(IAssemblyFinder assemblyFinder)

        {

            _assemblyFinder = assemblyFinder;

            Logger = NullLogger.Instance;

        }

        public Type[] Find(Func<Type, bool> predicate)

        {

            return GetAllTypes().Where(predicate).ToArray();

        }

private Type[] GetAllTypes()

        {

            if (_types == null)

            {

                lock (_syncObj)

                {

                    if (_types == null)

                    {

                        _types = CreateTypeList().ToArray();

                    }

                }

            }

            return _types;

        }

        private List<Type> CreateTypeList()

        {

            var allTypes = new List<Type>();

            var assemblies = _assemblyFinder.GetAllAssemblies().Distinct();

            foreach (var assembly in assemblies)

            {

                try

                {

                    Type[] typesInThisAssembly;

                    try

                    {

                        typesInThisAssembly = assembly.GetTypes();

                    }

                    catch (ReflectionTypeLoadException ex)

                    {

                        typesInThisAssembly = ex.Types;

                    }

                    if (typesInThisAssembly.IsNullOrEmpty())

                    {

                        continue;

                    }

                    allTypes.AddRange(typesInThisAssembly.Where(type => type != null));

                }

                catch (Exception ex)

                {

                    Logger.Warn(ex.ToString(), ex);

                }

            }

            return allTypes;

        }

    }
可以看到_assemblyFinder.GetAllAssemblies().Distinct();
通过_assemblyFinder 是接口IAssemblyFinder,那它的实现是谁呢,看下面的代码。 这里是castle Windsor实现注册的方式之一。
internal class AbpCoreInstaller : IWindsorInstaller

    {

        public void Install(IWindsorContainer container, IConfigurationStore store)

        {

            container.Register(

                Component.For<IAbpModuleManager, AbpModuleManager>().ImplementedBy<AbpModuleManager>().LifestyleSingleton(),

                Component.For<IAssemblyFinder, AbpAssemblyFinder>().ImplementedBy<AbpAssemblyFinder>().LifestyleSingleton(),

                );

        }

    }
我们看到AbpAssemblyFinder是我们要找到的类。
public class AbpAssemblyFinder : IAssemblyFinder

    {

        private readonly IAbpModuleManager _moduleManager;

        public AbpAssemblyFinder(IAbpModuleManager moduleManager)

        {

            _moduleManager = moduleManager;

        }

        public List<Assembly> GetAllAssemblies()

        {

            var assemblies = new List<Assembly>();

            foreach (var module in _moduleManager.Modules)

            {

                assemblies.Add(module.Assembly);

                assemblies.AddRange(module.Instance.GetAdditionalAssemblies());

            }

            return assemblies.Distinct().ToList();

        }

    }
看到这里就可以知道,ABP是通过module来找到assemblies的。 我们可以 AbpModuleManager : IAbpModuleManager这个类得到所有的模块。
得到assemblies之后,可以得到所有Type信息,再根据过滤条件,得到autoMapper需要映射的类。
再来看来这里的过滤条件:
 var types = _typeFinder.Find(type =>

                {

                    var typeInfo = type.GetTypeInfo();

                    return typeInfo.IsDefined(typeof(AutoMapAttribute)) ||

                           typeInfo.IsDefined(typeof(AutoMapFromAttribute)) ||

                           typeInfo.IsDefined(typeof(AutoMapToAttribute));

                }

            );
三个Attribute. AutoMapAttribute, AutoMapFromAttribute, AutoMapToAttribute,通过名称可以知道它们的用途。
此外,ABP还给我们提供了一个有用的扩展AutoMapExtensions,使用起来更加方便
public static class AutoMapExtensions

    {

        /// <summary>

        /// Converts an object to another using AutoMapper library. Creates a new object of <typeparamref name="TDestination"/>.

        /// There must be a mapping between objects before calling this method.

        /// </summary>

        /// <typeparam name="TDestination">Type of the destination object</typeparam>

        /// <param name="source">Source object</param>

        public static TDestination MapTo<TDestination>(this object source)

        {

            return Mapper.Map<TDestination>(source);

        }

        /// <summary>

        /// Execute a mapping from the source object to the existing destination object

        /// There must be a mapping between objects before calling this method.

        /// </summary>

        /// <typeparam name="TSource">Source type</typeparam>

        /// <typeparam name="TDestination">Destination type</typeparam>

        /// <param name="source">Source object</param>

        /// <param name="destination">Destination object</param>

        /// <returns></returns>

        public static TDestination MapTo<TSource, TDestination>(this TSource source, TDestination destination)

        {

            return Mapper.Map(source, destination);

        }

    }
ABP 源码分析汇总之 AutoMapper的更多相关文章
- ABP 源码分析汇总之 IOC
IOC的优点: 1. 依赖接口,而非实现,如下代码, 这样的好处就是,客户端根本不知道PersonService的存在,如果我们换一下IPersonService的实现,客户端不用任何修改, 说的简单 ...
- ABP源码分析三十一:ABP.AutoMapper
这个模块封装了Automapper,使其更易于使用. 下图描述了改模块涉及的所有类之间的关系. AutoMapAttribute,AutoMapFromAttribute和AutoMapToAttri ...
- ABP源码分析一:整体项目结构及目录
ABP是一套非常优秀的web应用程序架构,适合用来搭建集中式架构的web应用程序. 整个Abp的Infrastructure是以Abp这个package为核心模块(core)+15个模块(module ...
- ABP源码分析二:ABP中配置的注册和初始化
一般来说,ASP.NET Web应用程序的第一个执行的方法是Global.asax下定义的Start方法.执行这个方法前HttpApplication 实例必须存在,也就是说其构造函数的执行必然是完成 ...
- ABP源码分析三:ABP Module
Abp是一种基于模块化设计的思想构建的.开发人员可以将自定义的功能以模块(module)的形式集成到ABP中.具体的功能都可以设计成一个单独的Module.Abp底层框架提供便捷的方法集成每个Modu ...
- ABP源码分析四:Configuration
核心模块的配置 Configuration是ABP中设计比较巧妙的地方.其通过AbpStartupConfiguration,Castle的依赖注入,Dictionary对象和扩展方法很巧妙的实现了配 ...
- ABP源码分析五:ABP初始化全过程
ABP在初始化阶段做了哪些操作,前面的四篇文章大致描述了一下. 为个更清楚的描述其脉络,做了张流程图以辅助说明.其中每一步都涉及很多细节,难以在一张图中全部表现出来.每一步的细节(会涉及到较多接口,类 ...
- ABP源码分析六:依赖注入的实现
ABP的依赖注入的实现有一个本质两个途径:1.本质上是依赖于Castle这个老牌依赖注入的框架.2.一种实现途径是通过实现IConventionalDependencyRegistrar的实例定义注入 ...
- ABP源码分析七:Setting 以及 Mail
本文主要说明Setting的实现以及Mail这个功能模块如何使用Setting. 首先区分一下ABP中的Setting和Configuration. Setting一般用于需要通过外部配置文件(或数据 ...
随机推荐
- 剑指Offer——数值的整数次方
题目描述: 给定一个double类型的浮点数base和int类型的整数exponent.求base的exponent次方. 分析: 快速幂,简单解释下, 当e的二进制为1001011, b^e=b^( ...
- c++拷贝构造函数,深拷贝,浅拷贝,对象内存
https://blog.csdn.net/lwbeyond/article/details/6202256 防止默认拷贝发生 通过对对象复制的分析,我们发现对象的复制大多在进行“值传递”时发生,这里 ...
- Ubuntu安装Python3 和卸载
Python2中文的解决 在py文件第一行添加 #coding=utf-8 1 规范的应该这么写 #-*- coding:utf-8 -*- 1 安装python 系统默认安装Python2 安装Py ...
- 我不想用for循环
为什么要挑战自己在代码里不写for loop?因为这样可以迫使你去使用比较高级.地道的语法或库.文中以python为例子,讲了不少大家其实在别人的代码里都见过.但自己很少用的语法. 这是一个挑战.我要 ...
- 聊聊高并发(三十四)Java内存模型那些事(二)理解CPU快速缓存的工作原理
在上一篇聊聊高并发(三十三)从一致性(Consistency)的角度理解Java内存模型 我们说了Java内存模型是一个语言级别的内存模型抽象.它屏蔽了底层硬件实现内存一致性需求的差异,提供了对上层的 ...
- Python高级教程-多重继承
多重继承 继承是面向对象编程的一个重要的方式,因为通过继承,子类可以扩展父类的功能. Animal类的层次设计,假设要实现以下4中动物: Dog - 狗狗: Bat - 蝙蝠: Parrot - 鹦鹉 ...
- 2.AS入门教程
AndroidStudio 本文是关于androidStudio的一些基础知识 介绍 Google官方的Android集成开发环境(IDE = Integrated Development Envir ...
- sscanf,sscanf
在#include<stdio.h> 定义函数 int sscanf (const char *str,const char * format,........); 函数说明: sscan ...
- phpstudy2016 redis扩展 windows
第一步,查看环境的信息. 第二步,根据线程是否安全.架构32位或64位下载redis扩展. http://pecl.php.net/package-stats.php 第三步,php_redis.dl ...
- Python(面向对象5——高级)
面向对象进阶 一 isinstance(obj,cls)和issubclass(sub,super) isinstance(obj,cls)检查是否obj是否是类 cls 的对象 1 class Fo ...