
WebApi使用JWT认证(二)
这是第二部:实现NetCore上的WebApi使用JWT认证
1、NetCore新建一个WebApi的项目
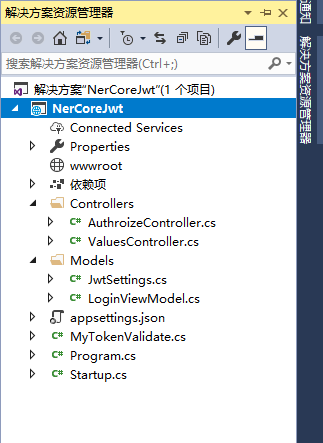
2、打开AppSettings.json,添加Jwt的信息,这里为了演示而已
{

  "Logging": {

    "IncludeScopes": false,

    "Debug": {

      "LogLevel": {

        "Default": "Warning"

      }

    },

    "Console": {

      "LogLevel": {

        "Default": "Warning"

      }

    }

  },

  "JwtSettings": {

    "Issuer": "XXX",

    "Audience": "XXXX",

    "SecretKey": "To live is to change the world!"

  }

}
3、Models下新建两个类,一个用于登录,一个用于获取配置文件中的值
 namespace NerCoreJwt.Models

 {

     public class LoginViewModel

     {

         public string UserName { get; set; } = "wangshibang";

         public string Password { get; set; } = "";

     }

 }
 namespace NerCoreJwt.Models

 {

     public class JwtSettings

     {

         /// <summary>

         /// 证书颁发者

         /// </summary>

         public string Issuer { get; set; }

         /// <summary>

         /// 允许使用的角色

         /// </summary>

         public string Audience { get; set; }

         /// <summary>

         /// 加密字符串

         /// </summary>

         public string SecretKey { get; set; }

     }

 }
4、新建一个Controller,用来写登录后生成Token逻辑
 using Microsoft.AspNetCore.Mvc;

 using Microsoft.Extensions.Options;

 using Microsoft.IdentityModel.Tokens;

 using NerCoreJwt.Models;

 using System;

 using System.IdentityModel.Tokens.Jwt;

 using System.Security.Claims;

 using System.Text;

 namespace NerCoreJwt.Controllers

 {

     [Route("api/[controller]/[action]")]

     public class AuthorizeController : Controller

     {

         private JwtSettings setting;

         public AuthorizeController(IOptions<JwtSettings> options)

         {

             setting = options.Value;

         }

         [HttpPost]

         public IActionResult Login(LoginViewModel login)

         {

             if (ModelState.IsValid)

             {

                 if (login.UserName == "wangshibang" && login.Password == "")

                 {

                     var claims = new Claim[] {

                         new Claim(ClaimTypes.Name, login.UserName),

                         new Claim(ClaimTypes.Role, "admin, Manage")

                     };

                     var key = new SymmetricSecurityKey(Encoding.UTF8.GetBytes(setting.SecretKey));

                     var creds = new SigningCredentials(key, SecurityAlgorithms.HmacSha256);

                     var token = new JwtSecurityToken(

                         setting.Issuer,

                         setting.Audience,

                         claims,

                         DateTime.Now,

                         DateTime.Now.AddMinutes(),

                         creds);

                     return Ok(new { Token = new JwtSecurityTokenHandler().WriteToken(token) });

                 }

             }

             return BadRequest();

         }

         [HttpGet]

         public IActionResult NoValidate()

         {

             return Ok();

         }

     }

 }
5、StartUp类里面添加从Configure<JwtSettings>中获取Section才可以使用IOptions获取里面的内容,为了省事就全部贴出来了
 using Microsoft.AspNetCore.Authentication.JwtBearer;

 using Microsoft.AspNetCore.Builder;

 using Microsoft.AspNetCore.Hosting;

 using Microsoft.Extensions.Configuration;

 using Microsoft.Extensions.DependencyInjection;

 using NerCoreJwt.Models;

 using System.Linq;

 using System.Threading.Tasks;

 namespace NerCoreJwt

 {

     public class Startup

     {

         public Startup(IConfiguration configuration)

         {

             Configuration = configuration;

         }

         public IConfiguration Configuration { get; }

         // This method gets called by the runtime. Use this method to add services to the container.

         public void ConfigureServices(IServiceCollection services)

         {

             services.Configure<JwtSettings>(Configuration.GetSection("JwtSettings"));

             JwtSettings setting = new JwtSettings();

             Configuration.Bind("JwtSettings", setting);

             services.AddAuthentication(option =>

             {

                 option.DefaultAuthenticateScheme = JwtBearerDefaults.AuthenticationScheme;

                 option.DefaultChallengeScheme = JwtBearerDefaults.AuthenticationScheme;

             }).AddJwtBearer(config =>

             {

                 /*

                 config.TokenValidationParameters = new Microsoft.IdentityModel.Tokens.TokenValidationParameters

                 {

                     ValidAudience = setting.Audience,

                     ValidIssuer = setting.Issuer,

                     IssuerSigningKey = new SymmetricSecurityKey(Encoding.UTF8.GetBytes(setting.SecretKey))

                 };

                 */

                 config.SecurityTokenValidators.Clear();

                 config.SecurityTokenValidators.Add(new MyTokenValidate());

                 config.Events = new JwtBearerEvents()

                 {

                     OnMessageReceived = context =>

                     {

                         var token = context.Request.Headers["myToken"];

                         context.Token = token.FirstOrDefault();

                         return Task.CompletedTask;

                     }

                 };

             });

             services.AddMvc();

         }

         // This method gets called by the runtime. Use this method to configure the HTTP request pipeline.

         public void Configure(IApplicationBuilder app, IHostingEnvironment env)

         {

             if (env.IsDevelopment())

             {

                 app.UseDeveloperExceptionPage();

             }

             app.UseAuthentication();

             app.UseMvc();

         }

     }

 }
6、Token生成了,可以用PostMan调用接口试试,把生成的Token粘到jwt.io官网看看里面的信息
下面我们来进行授权
7、为了自定义授权方法,我们需要新建一个类,继承自ISecurityTokenValidator接口
 using Microsoft.AspNetCore.Authentication.JwtBearer;

 using Microsoft.IdentityModel.Tokens;

 using System.IdentityModel.Tokens.Jwt;

 using System.Linq;

 using System.Security.Claims;

 namespace NerCoreJwt

 {

     public class MyTokenValidate : ISecurityTokenValidator

     {

         public bool CanValidateToken => true;

         public int MaximumTokenSizeInBytes { get ; set ; }

         public bool CanReadToken(string securityToken)

         {

             return true;

         }

         public ClaimsPrincipal ValidateToken(string securityToken, TokenValidationParameters validationParameters, out SecurityToken validatedToken)

         {

             ClaimsPrincipal principal;

             try

             {

                 validatedToken = null;

                 //这里需要验证生成的Token

                 /*

 eyJhbGciOiJIUzI1NiIsInR5cCI6IkpXVCJ9.eyJodHRwOi8vc2NoZW1hcy54bWxzb2FwLm9yZy93cy8yMDA1LzA1L2lkZW50aXR5L2NsYWltcy9uYW1lIjoid2FuZ3NoaWJhbmciLCJodHRwOi8vc2NoZW1hcy5taWNyb3NvZnQuY29tL3dzLzIwMDgvMDYvaWRlbnRpdHkvY2xhaW1zL3JvbGUiOiJhZG1pbiwgTWFuYWdlIiwibmJmIjoxNTIyOTI0MDgxLCJleHAiOjE1MjI5MjU4ODEsImlzcyI6Imh0dHA6Ly9sb2NhbGhvc3Q6NTAwMCIsImF1ZCI6Imh0dHA6Ly9sb2NhbGhvc3Q6NTAwMCJ9.fa0jDYt_MqHFcwQfsMS30eCsjEwQt_uiv96bGtMQJBE

                 */

                 var token = new JwtSecurityToken(securityToken);

                 //获取到Token的一切信息

                 var payload = token.Payload;

                 var role = (from t in payload where t.Key == ClaimTypes.Role select t.Value).FirstOrDefault();

                 var name = (from t in payload where t.Key == ClaimTypes.Name select t.Value).FirstOrDefault();

                 var issuer = token.Issuer;

                 var key = token.SecurityKey;

                 var audience = token.Audiences;

                 var identity = new ClaimsIdentity(JwtBearerDefaults.AuthenticationScheme);

                 identity.AddClaim(new Claim(ClaimTypes.Name, name.ToString()));

                 identity.AddClaim(new Claim(ClaimsIdentity.DefaultRoleClaimType, "admin"));

                 principal = new ClaimsPrincipal(identity);

             }

             catch

             {

                 validatedToken = null;                 principal = null;

             }

             return principal;

         }

     }

 }
8、然后注释掉上面代码我注册的部分,因为这是原生的Authorize验证特性,添加后面的自定义验证逻辑
9、在接口上面添加Authorize特性,用PostMan调用接口传入生成的Token,设置断点看看效果吧
 using Microsoft.AspNetCore.Authorization;

 using Microsoft.AspNetCore.Mvc;

 using System.Collections.Generic;

 namespace NerCoreJwt.Controllers

 {

     [Route("api/[controller]")]

     public class ValuesController : Controller

     {

         // GET api/values

         [Authorize(Roles = "admin")]

         [HttpGet]

         public IEnumerable<string> Get()

         {

             return new string[] { "value1", "value2" };

         }

         // GET api/values/5

         [HttpGet("{id}")]

         public string Get(int id)

         {

             return "value";

         }

         // POST api/values

         [HttpPost]

         public void Post([FromBody]string value)

         {

         }

         // PUT api/values/5

         [HttpPut("{id}")]

         public void Put(int id, [FromBody]string value)

         {

         }

         // DELETE api/values/5

         [HttpDelete("{id}")]

         public void Delete(int id)

         {

         }

     }

 }
WebApi使用JWT认证(二)的更多相关文章
- WebApi使用JWT认证(一)
这是第一部:先实现NetFramework上的WebApi使用JWT认证 1.VS新建一个WebApi项目 2.项目右键----管理Nuget程序包----找到JWT,然后安装 3.Model文件夹下 ...
- WebApi使用JWT认证
https://www.cnblogs.com/wangyulong/p/8727683.html https://blog.csdn.net/kebi007/article/details/7286 ...
- .NetCore WebApi——基于JWT的简单身份认证与授权(Swagger)
上接:.NetCore WebApi——Swagger简单配置 任何项目都有权限这一关键部分.比如我们有许多接口.有的接口允许任何人访问,另有一些接口需要认证身份之后才可以访问:以保证重要数据不会泄露 ...
- ASP.NET Core 基于JWT的认证(二)
ASP.NET Core 基于JWT的认证(二) 上一节我们对 Jwt 的一些基础知识进行了一个简单的介绍,这一节我们将详细的讲解,本次我们将详细的介绍一下 Jwt在 .Net Core 上的实际运用 ...
- ASP.NET WebApi 基于JWT实现Token签名认证
一.前言 明人不说暗话,跟着阿笨一起玩WebApi!开发提供数据的WebApi服务,最重要的是数据的安全性.那么对于我们来说,如何确保数据的安全将会是需要思考的问题.在ASP.NET WebServi ...
- NetCore+Dapper WebApi架构搭建(六):添加JWT认证
WebApi必须保证安全,现在来添加JWT认证 1.打开appsettings.json添加JWT认证的配置信息 2.在项目根目录下新建一个Models文件夹,添加一个JwtSettings.cs的实 ...
- Dotnet core使用JWT认证授权最佳实践(二)
最近,团队的小伙伴们在做项目时,需要用到JWT认证.遂根据自己的经验,整理成了这篇文章,用来帮助理清JWT认证的原理和代码编写操作. 第一部分:Dotnet core使用JWT认证授权最佳实践(一) ...
- DRF JWT认证(二)
快速上手JWT签发token和认证,有这一篇就够了,DRF自带的和自定义的都帮你总结好了,拿去用~
- Asp.NetCore3.1 WebApi 使用Jwt 授权认证使用
1:导入NuGet包 Microsoft.AspNetCore.Authentication.JwtBearer 2:配置 jwt相关信息 3:在 startUp中 public void Confi ...
随机推荐
- 新Linux系统配置yum源
新的Linux系统安装好以后,yum的源还是需要配置一下的,我使用的是redhat6.6版本,同时为了不注册而使用更多的yum源的资源,也需要做一下的修改. 1. 删除redhat原有的yum源 # ...
- python中拷贝对象的区别
一.赋值.引用 在python中赋值语句总是建立对象的引用值,而不是复制对象.因此,python变量更像是指针,而不是数据存储区域 这点和大多数语音类似吧,比如C++.Java等 1.先看个例子: v ...
- UIWebView---iOS-Apple苹果官方文档翻译
CHENYILONG Blog UIWebView---iOS-Apple苹果官方文档翻译 UIWebView 技术博客http://www.cnblogs.com/ChenYilong/ 新浪微博h ...
- indexof()函数
js 判断字符串是否包含某字符串,String对象中查找子字符,indexOf, 成功,返回索引值,失败返回 -1. 转载: http://www.cnblogs.com/fishtreeyu/arc ...
- redis笔记之两种持久化备份方式(RDB & AOF)
Redis支持的两种持久化备份方式(RDB & AOF) redis支持两种持久化方式,一种是RDB,一种是AOF. RDB是根据指定的规则定时将内存中的数据备份到硬盘上,AOF是在每次执行命 ...
- Batch Gradient Descent vs. Stochastic Gradient Descent
梯度下降法(Gradient Descent)是用于最小化代价函数的方法. When $a \ne 0$, there are two solutions to \(ax^2 + bx + c = 0 ...
- linux学习记录.2.hello world.c
安装vim,指令: sudo apt-get install vim 建立一个子目录WorkSpace,指令 mkdir WorkSpace 转到该目录下,指令 cd WorkSpace 新建c文件, ...
- js_网页导出pdf文件
打印当前页面,一开始我认为是需要输出pdf的,后来了解的需求是能够打印就可以了.需求既然都研究了,记录下. 更好的打印方式,window.print();会弹出打印对话框,打印的是window.doc ...
- thinkphp中的验证器
- 初窥ThinkPHP
MVC全称(Model View Controller) Model:模型(可以理解位数据库操作模型) View:视图(视图显示) Controller:(控制器) 简单的说框架就是一个类的集合.集合 ...