
WebApi使用JWT认证(一)
这是第一部:先实现NetFramework上的WebApi使用JWT认证
1、VS新建一个WebApi项目
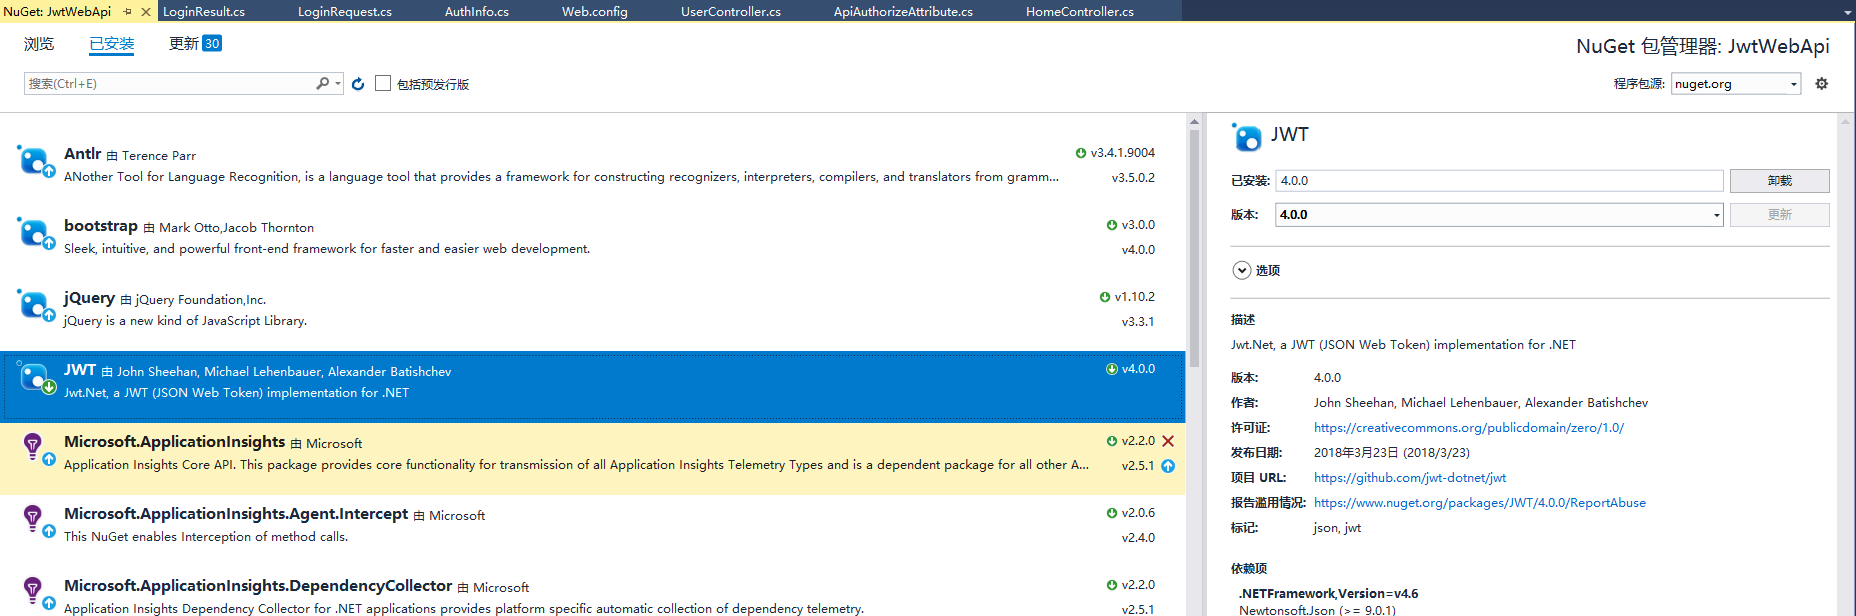
2、项目右键----管理Nuget程序包----找到JWT,然后安装
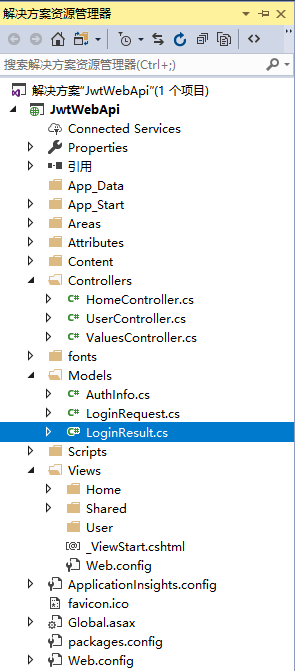
3、Model文件夹下新建三个类LoginResult,LoginRequest,AuthInfo
 namespace JwtWebApi.Models

 {

     public class LoginResult

     {

         public bool Success { get; set; }

         public string Token { get; set; }

         public string Message { get; set; }

     }

 }
 namespace JwtWebApi.Models

 {

     public class LoginRequest

     {

         public string UserName { get; set; }

         public string Password { get; set; }

     }

 }
 using System.Collections.Generic;

 namespace JwtWebApi.Models

 {

     public class AuthInfo

     {

         //模拟JWT的payload

         public string UserName { get; set; }

         public List<string> Roles { get; set; }

         public bool IsAdmin { get; set; }

     }

 }
4、在Controllers文件夹中的HomeController(没有就新建一个)中添加一个Post方法,这是生成JWT Token方法的地方,一般应放在登录的Action下
 using JWT;

 using JWT.Algorithms;

 using JWT.Serializers;

 using JwtWebApi.Models;

 using System;

 using System.Collections.Generic;

 using System.Web.Http;

 namespace JwtWebApi.Controllers

 {

     public class HomeController : ApiController

     {

         public LoginResult Post([FromBody]LoginRequest request)

         {

             LoginResult rs = new LoginResult();

             //这是是获取用户名和密码的,这里只是为了模拟

             if (request.UserName == "wangshibang" && request.Password == "")

             {

                 AuthInfo info = new AuthInfo { UserName = "wangshibang", Roles = new List<string> { "Admin", "Manage" }, IsAdmin = true };

                 try

                 {

                     const string secret = "To Live is to change the world";

                     //secret需要加密

                     IJwtAlgorithm algorithm = new HMACSHA256Algorithm();

                     IJsonSerializer serializer = new JsonNetSerializer();

                     IBase64UrlEncoder urlEncoder = new JwtBase64UrlEncoder();

                     IJwtEncoder encoder = new JwtEncoder(algorithm, serializer, urlEncoder);

                     var token = encoder.Encode(info, secret);

                     rs.Message = "XXXXX";

                     rs.Token = token;

                     rs.Success = true;

                 }

                 catch (Exception ex)

                 {

                     rs.Message = ex.Message;

                     rs.Success = false;

                 }

             }

             else

             {

                 rs.Message = "fail";

                 rs.Success = false;

             }

             return rs;

         }

     }

 }
5、项目下添加一个Attributes文件夹,需要写个权限拦截器,新建一个ApiAuthorizeAttribute类继承自AuthorizeAttribute类
 using JWT;

 using JWT.Serializers;

 using JwtWebApi.Models;

 using System;

 using System.Linq;

 using System.Web.Http;

 using System.Web.Http.Controllers;

 namespace JwtWebApi.Attributes

 {

     public class ApiAuthorizeAttribute : AuthorizeAttribute

     {

         protected override bool IsAuthorized(HttpActionContext actionContext)

         {

             var authHeader = from t in actionContext.Request.Headers where t.Key == "auth" select t.Value.FirstOrDefault();

             if (authHeader != null)

             {

                 string token = authHeader.FirstOrDefault();

                 if (!string.IsNullOrEmpty(token))

                 {

                     try

                     {

                         const string secret = "To Live is to change the world";

                         //secret需要加密

                         IJsonSerializer serializer = new JsonNetSerializer();

                         IDateTimeProvider provider = new UtcDateTimeProvider();

                         IJwtValidator validator = new JwtValidator(serializer, provider);

                         IBase64UrlEncoder urlEncoder = new JwtBase64UrlEncoder();

                         IJwtDecoder decoder = new JwtDecoder(serializer, validator, urlEncoder);

                         var json = decoder.DecodeToObject<AuthInfo>(token, secret, verify: true);

                         if (json != null)

                         {

                             actionContext.RequestContext.RouteData.Values.Add("auth", json);

                             return true;

                         }

                         return false;

                     }

                     catch (Exception ex)

                     {

                         return false;

                     }

                 }

             }

             return false;

         }

     }

 }
6、Controllers文件夹中新建一个UserController,新建一个Get的Action,需要加上ApiAuthorize特性
 using JwtWebApi.Attributes;

 using JwtWebApi.Models;

 using System.Web.Http;

 namespace JwtWebApi.Controllers

 {

     public class UserController : ApiController

     {

         // GET: User

         [ApiAuthorize]

         public string Get()

         {

             AuthInfo info = RequestContext.RouteData.Values["auth"] as AuthInfo;

             if (info == null)

             {

                 return "获取不到,失败";

             }

             else

             {

                 return $"获取到了,Auth的Name是 {info.UserName}";

             }

         }

     }

 }
7、然后用PostMan测试
下面是解决接口调用的跨域问题,有两种,一种是用CORS,另外一种就是修改WebConfig添加自定义options谓词处理模块
我只用了自定义Options谓词处理
 <system.webServer>

     <handlers>

       <!--开启options谓词处理模块-->

       <remove name="ExtensionlessUrlHandler-Integrated-4.0" />

       <!--<remove name="OPTIONSVerbHandler" />-->

       <remove name="TRACEVerbHandler" />

       <add name="ExtensionlessUrlHandler-Integrated-4.0" path="*." verb="*" type="System.Web.Handlers.TransferRequestHandler" preCondition="integratedMode,runtimeVersionv4.0" />

     </handlers>

     <httpProtocol>

       <customHeaders>

         <!--添加自定义options谓词处理模块-->

         <add name="Access-Control-Allow-Origin" value="http://localhost:8057"/>

         <add name="Access-Control-Allow-Headers" value="accept, auth"/>

         <add name="Access-Control-Allow-Methods" value="GET, OPTIONS"/>

       </customHeaders>

     </httpProtocol>

     <validation validateIntegratedModeConfiguration="false" />

     <modules>

       <remove name="ApplicationInsightsWebTracking" />

       <add name="ApplicationInsightsWebTracking" type="Microsoft.ApplicationInsights.Web.ApplicationInsightsHttpModule, Microsoft.AI.Web" preCondition="managedHandler" />

     </modules>

   </system.webServer>
好了,现在把你的WebApi部署到服务器上,然后用另一个跨域页面调取接口访问吧
 <!DOCTYPE html>

 <html>

 <head>

     <meta http-equiv="Content-Type" content="text/html; charset=utf-8" />

     <title></title>

     <meta charset="utf-8" />

     <script src="jquery-3.3.1.min.js"></script>

 </head>

 <body>

     <fieldset>

         <legend>身份验证</legend>

         <form>

             <label for="UserName">用户名:</label><input type="text" name="userName" id="userName" value="admin" />

             <br />

             <br />

             <label for="Password">密码:</label><input type="password" name="password" id="password" value="123" />

             <br />

             <br />

         </form>

         <button id="login">登录</button>

     </fieldset>

     <br />

     <fieldset>

         <legend>调用接口</legend>

         <button id="invoke">调用接口</button>

     </fieldset>

     <script>

         $(function () {

             //调用api站点的登录接口,接口在登录成功后返回一个token。

             $("#login").on("click", function () {

                 $.ajax({

                     url: "http://localhost:8056/api/home",

                     data: $("form").serialize(),

                     method: "post",

                     success: function (data) {

                         if (data.Success) {

                             //为简单起见,将token保存在全局变量中。

                             window.token = data.Token;

                             alert("登录成功");

                         } else {

                             alert("登录失败:" + data.Message);

                         }

                     }

                 });

             });

             //调用api站点的获取数据的接口,该接口要求身份验证。

             $("#invoke").on("click", function () {

                 console.log(window.token);

                 $.ajax({

                     url: "http://localhost:8056/api/user",

                     method: "get",

                     headers: { "auth": window.token },//通过请求头来发送token,放弃了通过cookie的发送方式

                     complete: function (jqXHR,textStatus) {

                         alert(jqXHR.responseText);

                     },

                 });

             });

         });

     </script>

 </body>

 </html>
本文参考链接:https://www.cnblogs.com/lwhkdash/p/6686999.html
WebApi使用JWT认证(一)的更多相关文章
- WebApi使用JWT认证(二)
这是第二部:实现NetCore上的WebApi使用JWT认证 1.NetCore新建一个WebApi的项目 2.打开AppSettings.json,添加Jwt的信息,这里为了演示而已 { " ...
- WebApi使用JWT认证
https://www.cnblogs.com/wangyulong/p/8727683.html https://blog.csdn.net/kebi007/article/details/7286 ...
- .NetCore WebApi——基于JWT的简单身份认证与授权(Swagger)
上接:.NetCore WebApi——Swagger简单配置 任何项目都有权限这一关键部分.比如我们有许多接口.有的接口允许任何人访问,另有一些接口需要认证身份之后才可以访问:以保证重要数据不会泄露 ...
- ASP.NET WebApi 基于JWT实现Token签名认证
一.前言 明人不说暗话,跟着阿笨一起玩WebApi!开发提供数据的WebApi服务,最重要的是数据的安全性.那么对于我们来说,如何确保数据的安全将会是需要思考的问题.在ASP.NET WebServi ...
- NetCore+Dapper WebApi架构搭建(六):添加JWT认证
WebApi必须保证安全,现在来添加JWT认证 1.打开appsettings.json添加JWT认证的配置信息 2.在项目根目录下新建一个Models文件夹,添加一个JwtSettings.cs的实 ...
- Asp.NetCore3.1 WebApi 使用Jwt 授权认证使用
1:导入NuGet包 Microsoft.AspNetCore.Authentication.JwtBearer 2:配置 jwt相关信息 3:在 startUp中 public void Confi ...
- asp.net core 自定义401和异常显示内容(JWT认证、Cookie Base认证失败显示内容)
asp.net core 2.0使用JWT认证园子里已经有挺多帖子了,但开发中发现认证未授权情况下返回的401状态码是没有任何信息的,业务中可能有需要返回一串错误的Json信息.在这里我分享一个自定义 ...
- ASP.NET Core WebApi基于JWT实现接口授权验证
一.ASP.Net Core WebApi JWT课程前言 我们知道,http协议本身是一种无状态的协议,而这就意味着如果用户向我们的应用提供了用户名和密码来进行用户认证,那么下一次请求时,用户还要再 ...
- ASP.Net Core 3.0 中使用JWT认证
JWT认证简单介绍 关于Jwt的介绍网上很多,此处不在赘述,我们主要看看jwt的结构. JWT主要由三部分组成,如下: HEADER.PAYLOAD.SIGNATURE HEADER包 ...
随机推荐
- LinuxI/O 性能分析
.I/O linux 命令: ostat 监视I/O子系统 iostat [参数][时间][次数] 通过iostat方便查看CPU.网卡.tty设备.磁盘.CD-ROM 等等设备的活动情况, 负载信息 ...
- eclipse搭建struts2环境及所遇到的问题
最近几天一直在搭建struts2框架,本身struts2框架的搭建是非常简单的,但不知道为什么最近就是总是报错,报了一大串的错 首先就是每次在类的根路径下创建struts.xml时,就报错,也不知道为 ...
- Unity即将内置骨骼动画插件Anima2D
Unity一直在寻找新的方法来帮助开发者,并为他们提供最好的工具.在此我们向大家宣布,Unity将内置流行的骨骼动画插件Anima2D,从2017年1月开始免费供所有Unity开发者使用! 同时也欢迎 ...
- php页面的基本语法
概述: 1. PHP 脚本在服务器上执行,然后将纯 HTML 结果发送回浏览器. 2. PHP 脚本以 <?php 开始,以 ?> 结束,可以放到文档中的任何位置. 3. 当 PHP 解析 ...
- 判断RadioButtonList是否选中
RadioButtonList有很多指示用户选择项的属性,如SelectedIndex 当该属性 = -1时表示用户没选择项SelectedItem 当该属性为null时也表示用户没选择项
- 简述Markdown的使用方法
MarkdownPad Document Markdown的使用技巧 一.标题 一个”#“表示H1.“##”表示H2... 二.列表 第一点 第二点 注意1.2. -与文本之间要有一个空格 这一点 三 ...
- JsonConvert.SerializeObject 空值处理
var settings = new JsonSerializerSettings() { ContractResolver= new NullToEmptyStringResolver() }; v ...
- 【转】从源码浅析MVC的MvcRouteHandler、MvcHandler和MvcHttpHandler
原文:http://www.cnblogs.com/jeffwongishandsome/archive/2012/01/08/2316521.html 熟悉WebForm开发的朋友一定都知道,Pag ...
- 子类覆写的变量被private隐藏,强制转换方式通过子类访问父类的被覆写变量:
import static java.lang.System.*; public class SuperParent{ public static void main(String[] args){ ...
- mysql 导入导出摘要
1.导入by数据文件. mysql>load data infile '文件路径' into table 表名 fields terminated by '字段分隔符' lines termin ...