
转 maven jetty 插件
本机环境
JDK 7 Maven 3.2 Jetty 9.2 Eclipse Luna
pom.xml 配置
<build>
<plugins>
<plugin>
<groupId>org.eclipse.jetty</groupId>
<artifactId>jetty-maven-plugin</artifactId>
<version>9.2.8.v20150217</version>
</plugin>
</plugins>
</build>
[...]
启动 & 停止
命令行方式启动 jetty mvn jetty:run,可以通过 Ctrl + C 停止 jetty 服务。
或者,在 eclipse 中选中项目 --> 右键 --> Run As --> Maven build...,在 Goals 栏输入 jetty:run(与命令行方式相比,仅仅是
少了 mvn 前缀,为方便起见,以下均以命令行方式介绍。) 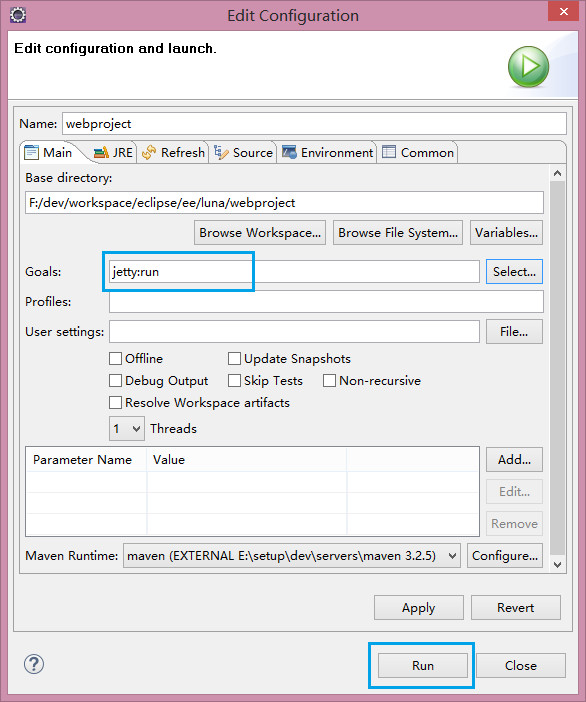
如果你希望通过命令 mvn jetty:stop 执行关闭 jetty 服务,你需要像下面一样在你的 pom.xml 配置文件中添加一个特殊的端口和控制键:
[...]
<stopKey>shutdown</stopKey>
<stopPort>9966</stopPort>
[...]
</configuration>
你仍可以通过 mvn jetty:run 启动 jetty 服务,可以通过 mvn jetty:stop 来停止 jetty 服务。
取消文件映射缓存
jetty 默认开启了 useFileMappedBuffer,在 jetty 运行期间,页面所使用的静态文件(如 css 文件等)不允许修改。如果你尝试去修改它
们,保存的时候就会出现 Save could not be completed. 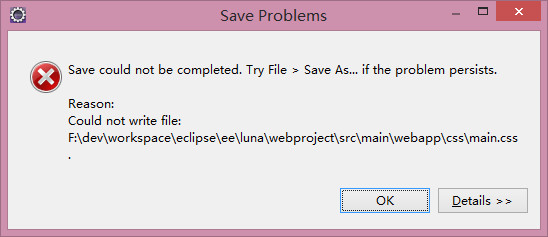
本地的 maven 仓库的目录,另外,将 9.2.8.v20150217 换成你所使用的版本)。用压缩工具打开它, 找到 jetty-webapp-9.2.8.v2015021
7.jar/org/eclipse/jetty/webapp/webdefault.xml,将 webdefault.xml 文件解压缩一份出来,用文本编辑器打开它,搜索找到
useFileMappedBuffer 配置的行,将 true 改成 false 以禁掉缓存。
<param-name>useFileMappedBuffer</param-name>
<param-value>false</param-value>
</init-param>
才那份修改好的 webdefault.xml 文件重新压缩进去即可。
端口配置
jetty 默认使用的端口是 8080,命令行的方式修改端口的命令是:mvn -Djetty.port=8081 jetty:run 。pom.xml 配置方式如下:
[...]
<httpConnector>
<port>8081</port>
</httpConnector>
[...]
</configuration>
自动热部署
在你的 pom.xml 中添加如下配置:
[...]
<scanIntervalSeconds>2</scanIntervalSeconds>
[...]
</configuration>
默认值是 0。大于 0 的数值表示开启,0 表示关闭,单位为秒。以配置数值为一个周期,自动的扫描文件检查其内容是否有变化,如果发现文件的
内容被改变,则自动重新部署运用。命令行的方式:mvn -Djetty.scanIntervalSeconds=2 jetty:run 。
手动重加载
在你的 pom.xml 文件中添加如下配置,reload 的可选值 :[automatic|manual]
[...]
<reload>manual</reload>
[...]
</configuration>
内容并保存时,不会马上触发自动扫描和重部署的动作,你还可以继续的修改,直至你在 Console 或命令行中敲回车键(Enter)的时候才触发重
新加载的动作。这样可以更加的方便调试修改。命令行的方式是:mvn -Djetty.reload=manual jetty:run 。
访问日志
在你的 pom.xml 文件添加如下配置:
[...]
<requestLog implementation="org.eclipse.jetty.server.NCSARequestLog">
<filename>target/access-yyyy_mm_dd.log</filename>
<filenameDateFormat>yyyy_MM_dd</filenameDateFormat>
<logDateFormat>yyyy-MM-dd HH:mm:ss</logDateFormat>
<logTimeZone>GMT+8:00</logTimeZone>
<append>true</append>
<logServer>true</logServer>
<retainDays>120</retainDays>
<logCookies>true</logCookies>
</requestLog>
[...]
</configuration>
org.eclipse.jetty.server.NCSARequestLog 是一种伪标准的 NCSA 日志格式。下面是一些节点参数的解释:
filename:日志文件的名称
filenameDateFormat:日志文件的名称的日期格式,它要求日志文件名必须含有 yyyy_mm_dd 串
logDateFormat:日志内容的时间格式
logTimeZone:时区
append:追加到日志
logServer:记录访问的主机名
retainDays:日志文件保存的天数, 超过删除
logCookies:记录 cookies
启动 jetty 服务,在项目的 target 目录下会生成一个 access-2015_06_23.log 文件,该文件中的其中一条记录如下:
"http://localhost:8081/" "Mozilla/5.0 (Windows NT 6.3; WOW64) AppleWebKit/537.36 (KHTML, like Gecko)
Chrome/35.0.1916.153 Safari/537.36 SE 2.X MetaSr 1.0" "JSESSIONID=2gyikovul2iz168116l2afo4f"
转储快照
在你的 pom.xml 文件添加如下配置:
[...]
<dumpOnStart>true</dumpOnStart>
[...]
</configuration>
WEB上下文
最常用的是 contextPath,它的配置如下:
[...]
<webApp>
<contextPath>/${project.artifactId}</contextPath>
</webApp>
[...]
</configuration>
contextPath 的默认值的 /,${project.artifactId} 引用了 <artifactId> 节点的值,即项目的名称。
项目的静态资源文件目录默认是 src/main/webapp,如果静态资源目录有多个,或者不在默认的 src/main/webapp 目录下,可做如下配置:
[...]
<webApp>
<contextPath>/${project.artifactId}</contextPath>
<resourceBases>
<resourceBase>${project.basedir}/src/main/webapp</resourceBase>
<resourceBase>${project.basedir}/commons</resourceBase>
</resourceBases>
</webApp>
[...]
</configuration>
引用静态资源文件时,路径不包含资源目录的名称,如 commons/main.css,引用方式为:<link href="main.css" rel="stylesheet" />
更多参数信息可参考 jetty-maven-plugin.html#configuring-your-webapp
完整的配置
附 pom.xml 文件中 jetty 插件的完整配置片段:
[...]
<plugins>
<plugin>
<groupId>org.eclipse.jetty</groupId>
<artifactId>jetty-maven-plugin</artifactId>
<version>9.2.8.v20150217</version>
<configuration>
<httpConnector>
<port>8081</port>
</httpConnector>
<stopKey>shutdown</stopKey>
<stopPort>9966</stopPort>
<!--
<scanIntervalSeconds>2</scanIntervalSeconds>
-->
<reload>manual</reload>
<dumpOnStart>true</dumpOnStart>
<webApp>
<contextPath>/${project.artifactId}</contextPath>
<!--
<resourceBases>
<resourceBase>${project.basedir}/src/main/webapp</resourceBase>
<resourceBase>${project.basedir}/commons</resourceBase>
</resourceBases>
-->
</webApp>
<requestLog implementation="org.eclipse.jetty.server.NCSARequestLog">
<filename>target/access-yyyy_mm_dd.log</filename>
<filenameDateFormat>yyyy_MM_dd</filenameDateFormat>
<logDateFormat>yyyy-MM-dd HH:mm:ss</logDateFormat>
<logTimeZone>GMT+8:00</logTimeZone>
<append>true</append>
<logServer>true</logServer>
<retainDays>120</retainDays>
<logCookies>true</logCookies>
</requestLog>
</configuration>
</plugin>
</plugins>
[...]
</build>
更多有关 jetty 的配置信息可参考 http://www.eclipse.org/jetty/documentation/current/jetty-maven-plugin.html
转 maven jetty 插件的更多相关文章
- 【转】Maven Jetty 插件的问题(css/js等目录死锁)的解决
Maven Jetty 插件的问题(css/js等目录死锁,不能自动刷新)的解决: 1. 打开下面的目录:C:\Users\用户名\.m2\repository\org\eclipse\jetty ...
- idea maven jetty插件热部署
maven tomcat插件好像无法进行热部署,jetty可以如下配置实现热部署,但是idea无法进行自动编译,所以需要如下快捷键 Ctrl+Shift+F9,编译 Ctrl+F9,生成项目 < ...
- Maven Jetty插件使用
本机环境 JDK8 Maven 3.5 Jetty 9.3 Eclipse Mars pom.xml配置 在你的 pom.xml 文件中添加 jetty 插件的描述信息 <build> & ...
- maven jetty 插件 允许修改 js
<!--允许修改js,css--> <servlet> <servlet-name>default</servlet-name> <init-pa ...
- maven jetty struts异常 There is no Action mapped for namespace [/] and action name [] associated with context path
毕业设计中用maven jetty插件调试时,struts出现这个错误,直接http://localhost:8080 无法进入默认主页,但换tomcat就没问题,最后在这篇文章找到答案 http:/ ...
- eclipse运行maven的jetty插件内存溢出
系统运行在Maven中的Jetty插件下,当在Eclipse运行clean jetty:run时,系统提示OutOfMemoryError: PermGen space.解决办法:设置run as - ...
- 在eclipse中使用jetty插件替代m2e开发调试maven web项目
第一步在相应的web项目上配置jetty插件,配置如下: <plugin> <groupId>org.mortbay.jetty</groupId> <art ...
- maven中jetty插件配置
maven中jetty插件的配置,可用于项目在内置jetty服务器中的部署. <plugin> <groupId>org.mortbay.jetty</groupId&g ...
- IDEA热部署(二)---jetty插件启动maven项目
jetty插件的配置 我们使用jetty插件来进行启动我们的maven项目,在pom.xml中进行配置: <plugins> <plugin> <groupId>o ...
随机推荐
- phpcms打印数据
<?php echo '<pre>'; var_dump($data); echo '</pre>'; ?>
- 兼容iOs7的自定义alertView
转载请注明出处. 升级到ios7后,旧项目中使用的继承UIAlertView的自定义alertview无法正常显示了,无奈只好换思路去实现,改成从当前keywindow下创建要显示的alertview ...
- javaScript之函数(基础篇)
函数定义 定义一: function a(x,y......){if(x>y){return x;}else{return y;}} 详细讲解:function是定义函数的关键字: a(x,y. ...
- 《DSP using MATLAB》示例Example 8.9
- #ifndef/#define/#endif以及#if defined/#else/#endif使用详解
1.#ifndef_WINDOWS_PLAYM4_H_ #define _WINDOWS_PLAYM4_H_ #endif 问题:想必很多人都看过"头文件中的 #ifndef/#d ...
- spring boot 使用spring.resources.static-locations 分离系统模版&&资源文件
方便我们将资源配置以及模版&&静态文件分离出来,而不是打包在一起,比如以下的一个demo 参考配置: server.port=8006 spring.application.name= ...
- erlang的调试配置
distel可以断点调试erlang,但是步骤非常繁琐 以下面的测试脚本为例说明 geometry.erl -module(geometry). -export([area/1]). area({re ...
- Spring入门一----HelloWorld
知识点: 简介 HelloWorld 简介: 百度百科 HelloWorld 项目结构图: 导入Spring支持包: 然后选中所有包,右键Build Path à Add to Buil ...
- FPGA图像加速解决方案来了
近日,百度云与联捷计算科技(CTAccel)共同推出基于FPGA的图像加速解决方案(CIP,CTAccel Image Processor),实现对JPEG转码JPEG.JPEG转码WebP(M6)等 ...
- (转)Inno Setup入门(十四)——替换安装程序和卸载程序的图标
本文转载自:http://blog.csdn.net/yushanddddfenghailin/article/details/17250937 通常Inno生成的安装文件的图标是一个光盘和显示器,如 ...