Tensorflow训练结果测试
代码参考(https://blog.csdn.net/disiwei1012/article/details/79928679)
import os
import sys
import random
import math
import numpy as np
import skimage.io
import matplotlib
import matplotlib.pyplot as plt
# import coco
from mrcnn import utils
from mrcnn import model as modellib
from mrcnn import visualize
from mrcnn.config import Config
#%matplotlib inline
# Root directory of the project
ROOT_DIR = os.getcwd()
# Directory to save logs and trained model
MODEL_DIR = os.path.join(ROOT_DIR, "logs")
# Local path to trained weights file
COCO_MODEL_PATH = "mask_rcnn_shapes_0001.h5"
# Directory of images to run detection on
IMAGE_DIR = os.path.join(ROOT_DIR, "images")
class ShapesConfig(Config):
"""Configuration for training on the toy shapes dataset.
Derives from the base Config class and overrides values specific
to the toy shapes dataset.
"""
# Give the configuration a recognizable name
NAME = "shapes"
# Train on 1 GPU and 8 images per GPU. We can put multiple images on each
# GPU because the images are small. Batch size is 8 (GPUs * images/GPU).
GPU_COUNT = 1
IMAGES_PER_GPU = 1
# Number of classes (including background)
NUM_CLASSES = 1 + 1 # background + 3 shapes
# Use small images for faster training. Set the limits of the small side
# the large side, and that determines the image shape.
IMAGE_MIN_DIM = 1024
IMAGE_MAX_DIM = 1280
# Use smaller anchors because our image and objects are small
RPN_ANCHOR_SCALES = (8 * 6, 16 * 6, 32 * 6, 64 * 6, 128 * 6) # anchor side in pixels
# Reduce training ROIs per image because the images are small and have
# few objects. Aim to allow ROI sampling to pick 33% positive ROIs.
TRAIN_ROIS_PER_IMAGE = 32
# Use a small epoch since the data is simple
STEPS_PER_EPOCH = 100
# use small validation steps since the epoch is small
VALIDATION_STEPS = 5
class InferenceConfig(ShapesConfig):
# Set batch size to 1 since we'll be running inference on
# one image at a time. Batch size = GPU_COUNT * IMAGES_PER_GPU
GPU_COUNT = 1
IMAGES_PER_GPU = 1
config = InferenceConfig()
config.display()
# Create model object in inference mode.
model = modellib.MaskRCNN(mode="inference", model_dir=MODEL_DIR, config=config)
# Load weights trained on MS-COCO
model.load_weights(COCO_MODEL_PATH, by_name=True)
# COCO Class names
# Index of the class in the list is its ID. For example, to get ID of
# the teddy bear class, use: class_names.index('teddy bear')
class_names = ['BG', 'mono']
# Load a random image from the images folder
file_names = next(os.walk(IMAGE_DIR))[2]
image = skimage.io.imread(os.path.join(IMAGE_DIR, random.choice(file_names)))
# Run detection
results = model.detect([image], verbose=1)
# Visualize results
r = results[0]
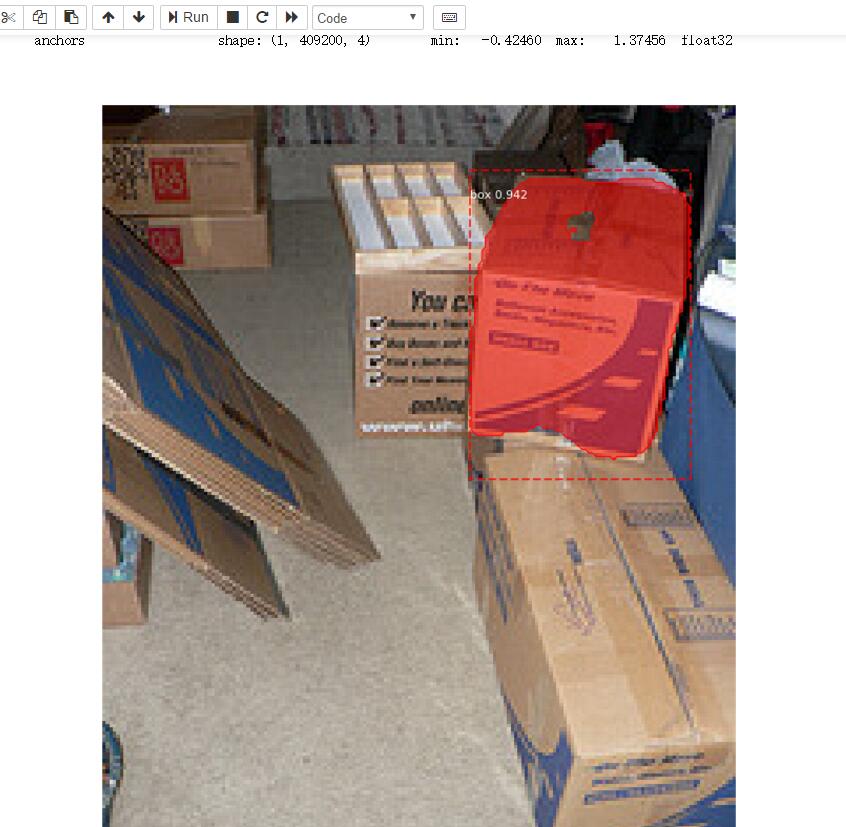
visualize.display_instances(image, r['rois'], r['masks'], r['class_ids'],
class_names, r['scores'])
print('OK')
Tensorflow训练结果测试的更多相关文章
- 不要怂,就是GAN (生成式对抗网络) (四):训练和测试 GAN
在 /home/your_name/TensorFlow/DCGAN/ 下新建文件 train.py,同时新建文件夹 logs 和文件夹 samples,前者用来保存训练过程中的日志和模型,后者用来保 ...
- TensorFlow 训练MNIST数据集(2)—— 多层神经网络
在我的上一篇随笔中,采用了单层神经网络来对MNIST进行训练,在测试集中只有约90%的正确率.这次换一种神经网络(多层神经网络)来进行训练和测试. 1.获取MNIST数据 MNIST数据集只要一行代码 ...
- 2、TensorFlow训练MNIST
装载自:http://www.tensorfly.cn/tfdoc/tutorials/mnist_beginners.html TensorFlow训练MNIST 这个教程的目标读者是对机器学习和T ...
- TensorFlow------单层(全连接层)实现手写数字识别训练及测试实例
TensorFlow之单层(全连接层)实现手写数字识别训练及测试实例: import tensorflow as tf from tensorflow.examples.tutorials.mnist ...
- tensorflow训练验证码识别模型
tensorflow训练验证码识别模型的样本可以使用captcha生成,captcha在linux中的安装也很简单: pip install captcha 生成验证码: # -*- coding: ...
- TensorFlow训练MNIST报错ResourceExhaustedError
title: TensorFlow训练MNIST报错ResourceExhaustedError date: 2018-04-01 12:35:44 categories: deep learning ...
- ensorflow学习笔记四:mnist实例--用简单的神经网络来训练和测试
http://www.cnblogs.com/denny402/p/5852983.html ensorflow学习笔记四:mnist实例--用简单的神经网络来训练和测试 刚开始学习tf时,我们从 ...
- 使用TensorFlow训练自己的语音识别AI
这次来训练一个基于CNN的语音识别模型.训练完成后,我们将尝试将此模型用于Hotword detection. 人类是怎样听懂一句话的呢?以汉语为例,当听到"wo shi"的录音时 ...
- Caffe初试(二)windows下的cafee训练和测试mnist数据集
一.mnist数据集 mnist是一个手写数字数据库,由Google实验室的Corinna Cortes和纽约大学柯朗研究院的Yann LeCun等人建立,它有60000个训练样本集和10000个测试 ...
随机推荐
- HihoCoder 1185 : 连通性·三(强连通缩点)
连通性·三 时间限制:10000ms 单点时限:1000ms 内存限制:256MB 描述 暑假到了!!小Hi和小Ho为了体验生活,来到了住在大草原的约翰家.今天一大早,约翰因为有事要出去,就拜托小Hi ...
- bzoj 4987 Tree
Written with StackEdit. Description 从前有棵树. 找出\(K\)个点\(A_1,A_2,-,A_K\). 使得\(∑dis(A_i,A_{i+1}),(1<= ...
- 重装Oracle时出现SID已存在问题的解决办法
重装Oracle时出现SID已存在问题的解决办法 手机打开 注意安装oracle服务器的环境,不稳定导致数据库出现问题,后果很严重! 方法如下: 1.开始->设置->控制面板-&g ...
- flask+mongodb开发restful API
Mac上安装mongodb 的方法:http://www.cnblogs.com/junqilian/p/4109580.html 实现博客的步骤 详细讲解步骤:https://blog.igevin ...
- Python 函数 -slice()
功能: slice() 函数实现切片对象,主要用在切片操作函数里的参数传递.返回一个切片对象. 语法: class slice(stop) class slice(start, stop[, step ...
- RK3288 模块单独编译
模块以Email为例: 1.执行build目录下的脚本文件envsetup.sh $ source ./build/envsetup.sh 2.选择版本(user为用户版本 eng为工程版本) $ ...
- nginx.conf几个示例
#user nobody; worker_processes 1; #error_log logs/error.log; #error_log logs/error.log notice; #erro ...
- appium 中swipe()方法向左滑动时
应该在UI Automator Viewer中读取到的例如ImageView [180,600][900,1320],如果要左滑,代码中应该是写为driver.swipe(900,1320,180,6 ...
- 源码编译安装ceph
标签(空格分隔): ceph,ceph安装,ceph运维 centos7系统,aarch64架构下安装最新版本的ceph(13.0.0),x86架构的环境无需修改脚本即可. 一,物理环境: 内核版本: ...
- xunsearch基本使用
目录 基本实践 异常捕获 XSDocument 文档 添加操作 ini 更新.修改文档 删除文档 清空索引 平滑重建索引 使用索引缓冲区 自定义 SCWS 词库 基本实践 <?php // 引入 ...