
Linux input子系统学习总结(一)---- 三个重要的结构体
一 、 总体架构 图
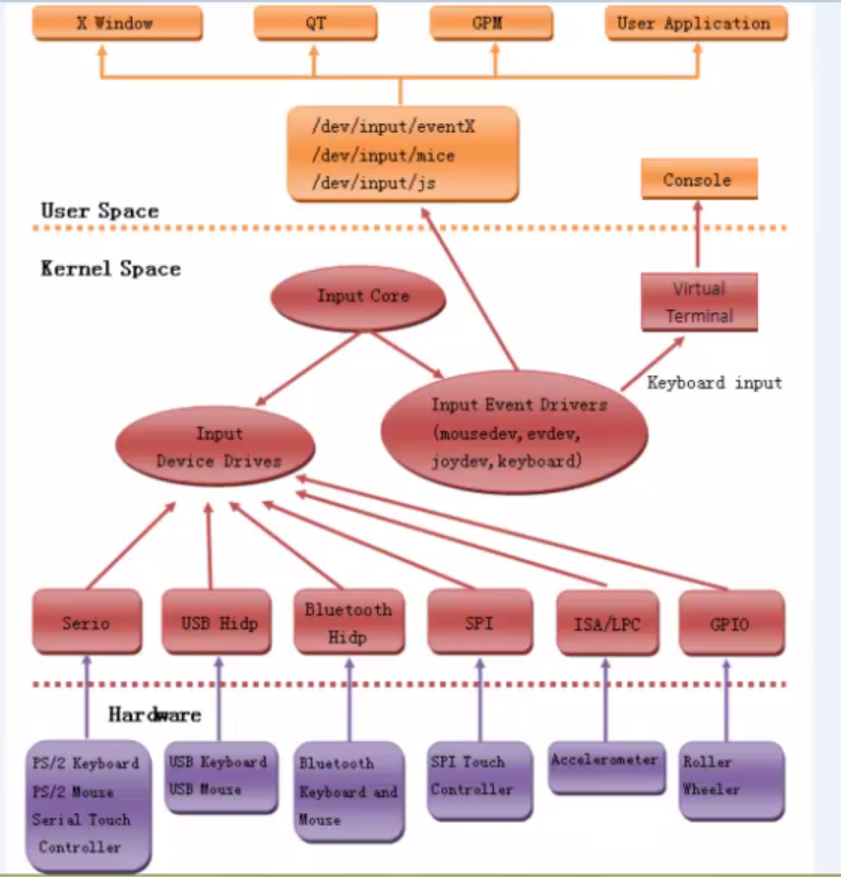
上层是图形界面和应用程序,通过监听设备节点,获取用户相应的输入事件,根据输入事件来做出相应的反应;eventX (X从0开始)表示 按键事件,mice 表示鼠标事件
Input core --- input 核心
Input event drivers --- input事件驱动(mousedev 、 evdev、keyboard)
Input device drivers --- input设备驱动(触摸屏、键盘、鼠标)

三个重要的结构体:
代码路径: include\linux\input.h (基于kernel4.0)
 struct input_dev {  ///代表 input 设备

     const char *name; /// 设备名称

     const char *phys; ////设备在系统结构中的物理路径

     const char *uniq; ///设备的唯一标识符

     struct input_id id; ///描述硬件设备属性的 ID

     unsigned long propbit[BITS_TO_LONGS(INPUT_PROP_CNT)];/// INPUT_PROP_CNT--0x20 ,一个long包含32bit,所以 propbit[1]

     unsigned long evbit[BITS_TO_LONGS(EV_CNT)]; ///设备支持的事件类型

     unsigned long keybit[BITS_TO_LONGS(KEY_CNT)];

     unsigned long relbit[BITS_TO_LONGS(REL_CNT)];

     unsigned long absbit[BITS_TO_LONGS(ABS_CNT)];

     unsigned long mscbit[BITS_TO_LONGS(MSC_CNT)];

     unsigned long ledbit[BITS_TO_LONGS(LED_CNT)];

     unsigned long sndbit[BITS_TO_LONGS(SND_CNT)];

     unsigned long ffbit[BITS_TO_LONGS(FF_CNT)];

     unsigned long swbit[BITS_TO_LONGS(SW_CNT)];

     unsigned int hint_events_per_packet;

     unsigned int keycodemax;

     unsigned int keycodesize;

     void *keycode;

     int (*setkeycode)(struct input_dev *dev,

               const struct input_keymap_entry *ke,

               unsigned int *old_keycode);

     int (*getkeycode)(struct input_dev *dev,

               struct input_keymap_entry *ke);

     struct ff_device *ff;

     unsigned int repeat_key;

     struct timer_list timer;

     int rep[REP_CNT];

     struct input_mt *mt;

     struct input_absinfo *absinfo;

     unsigned long key[BITS_TO_LONGS(KEY_CNT)];

     unsigned long led[BITS_TO_LONGS(LED_CNT)];

     unsigned long snd[BITS_TO_LONGS(SND_CNT)];

     unsigned long sw[BITS_TO_LONGS(SW_CNT)];

     int (*open)(struct input_dev *dev);///打开设备

     void (*close)(struct input_dev *dev);

     int (*flush)(struct input_dev *dev, struct file *file);

     int (*event)(struct input_dev *dev, unsigned int type, unsigned int code, int value);

     struct input_handle __rcu *grab;

     spinlock_t event_lock;

     struct mutex mutex;

     unsigned int users;

     bool going_away;

     struct device dev;///每个设备的基类

     struct list_head    h_list;

     struct list_head    node;

     unsigned int num_vals;

     unsigned int max_vals;

     struct input_value *vals;

     bool devres_managed;

 };
 struct input_handler {///代表输入设备的处理方法

     void *private;

     void (*event)(struct input_handle *handle, unsigned int type, unsigned int code, int value);

     void (*events)(struct input_handle *handle,

                const struct input_value *vals, unsigned int count);

     bool (*filter)(struct input_handle *handle, unsigned int type, unsigned int code, int value);///

     bool (*match)(struct input_handler *handler, struct input_dev *dev);

     int (*connect)(struct input_handler *handler, struct input_dev *dev, const struct input_device_id *id);

     void (*disconnect)(struct input_handle *handle);

     void (*start)(struct input_handle *handle);

     bool legacy_minors; ///是否遗留次设备号

     int minor;///次设备号

     const char *name;///名称

     const struct input_device_id *id_table;/// input_device 和 input_handle 通过id_table 进行匹配

     struct list_head    h_list;

     struct list_head    node;

 };
Match :在设备id 和handler 的id_table 匹配成功的时候调用; (called after comparing device's id with handler's id_table to perform fine-grained matching between device and handler)
Connect : 当一个handle 匹配到一个device 的时候执行(called when attaching a handler to an input device)
Start :当input 核心执行完 connect 以后调用(called by input core right after connect() method)
 struct input_handle { //// 用来关联input_dev 和 input_handler (links input device with an input handler)

     void *private;///私有成员变量

     int open;

     const char *name;

     struct input_dev *dev;

     struct input_handler *handler;

     struct list_head    d_node;

     struct list_head    h_node;

 };
如图,横轴表示一系列的input 设备,纵轴表示事件驱动event,中间的紫色圆点代表input_handle,通过input_handle来关联设备驱动和事件驱动

(注:以上图片均来自麦子学院 金鑫老师的课程,在此对其辛勤付出和无私分享表示真挚的感谢!)
Linux input子系统学习总结(一)---- 三个重要的结构体的更多相关文章
- Linux input子系统学习总结(三)----Input设备驱动
Input 设备驱动 ---操作硬件获取硬件寄存器中设备输入的数据,并把数据交给核心层: 一 .设备驱动的注册步骤: 1.分配一个struct input_dev : struct ...
- Linux input子系统学习总结(二)----Input事件驱动
Input 事件驱动: (主要文件 :drivers/input/evdev.c . drivers/input/input.h)基于kernel 4.0 一. 关键函数调用顺序: 1.inp ...
- Linux input子系统分析
输入输出是用户和产品交互的手段,因此输入驱动开发在Linux驱动开发中很常见.同时,input子系统的分层架构思想在Linux驱动设计中极具代表性和先进性,因此对Linux input子系统进行深入分 ...
- Linux防火墙iptables学习笔记(三)iptables命令详解和举例[转载]
Linux防火墙iptables学习笔记(三)iptables命令详解和举例 2008-10-16 23:45:46 转载 网上看到这个配置讲解得还比较易懂,就转过来了,大家一起看下,希望对您工作能 ...
- Linux input子系统 io控制字段【转】
转自:http://www.cnblogs.com/leaven/archive/2011/02/12/1952793.html http://blog.csdn.net/guoshaobei/arc ...
- input子系统学习笔记六 按键驱动实例分析下【转】
转自:http://blog.chinaunix.net/uid-20776117-id-3212095.html 本文接着input子系统学习笔记五 按键驱动实例分析上接续分析这个按键驱动实例! i ...
- Linux Input子系统浅析(二)-- 模拟tp上报键值【转】
转自:https://blog.csdn.net/xiaopangzi313/article/details/52383226 版权声明:本文为博主原创文章,未经博主允许不得转载. https://b ...
- Linux Input子系统
先贴代码: //input.c int input_register_handler(struct input_handler *handler) { //此处省略很多代码 list_for_each ...
- Linux input子系统简介
1.前言 本文主要对Linux下的input子系统进行介绍 2. 软件架构 图 input子系统结构图 input子系统主要包括三个部分:设备驱动层.核心层和事件层.我们可以分别理解为:具体的输入设备 ...
随机推荐
- Python 变量 (上)
Python通过变量引用内存中的值,变量的值占用多少空间是由变量的类型决定的.声明变量不需要指定变量的类型,解释器会自动根据值来判断.变量名称必须符合标识符的定义 标识符 标识符是由字母,数字和下划线 ...
- Python学习---列表,元组,字典
### 列表 list = [1,2,3,4,5,6] list.append(7) print(list) ===>>> [1, 2, 3, 4, 5, 6, 7] list[2] ...
- hdu3712 Detector Placement
题意:给一束激光,一个三棱柱,三棱柱会折射光,问这束激光最终是否会和y = 0相交: 分析:模拟题,为了方便处理折射角,事先求出每条边的向内和向外的法向量: findpoint : 找第一交点 ste ...
- 【BZOJ 3326】[Scoi2013]数数 数位dp+矩阵乘法优化
挺好的数位dp……先说一下我个人的做法:经过观察,发现这题按照以往的思路从后往前递增,不怎么好推,然后我就大胆猜想,从前往后推,发现很好推啊,维护四个变量,从开始位置到现在有了i个数 f[i]:所有数 ...
- eclipse 重装了tomcat后配置路径
在Windows->Preferences->Server->Runtime Environments把先前的工程Servers删除掉
- 【刷题】UOJ #207 共价大爷游长沙
火车司机出秦川,跳蚤国王下江南,共价大爷游长沙.每个周末,勤劳的共价大爷都会开车游历长沙市. 长沙市的交通线路可以抽象成为一个 \(n\) 个点 \(n−1\) 条边的无向图,点编号为 \(1\) 到 ...
- vmware中centos7设置静态IP
1.vmware—>Edit—>Virtual Network Editor,选中vmnet8-Nat设置,查看网关IP 2.在centos中设置: vi /etc/sysconfig/n ...
- python之旅:模块与包
一.模块介绍 前言:引用廖雪峰大神的,说的很好!!! 在计算机程序的开发过程中,随着程序代码越写越多,在一个文件里代码就会越来越长,越来越不容易维护. 为了编写可维护的代码,我们把很多函数分组,分别放 ...
- Linux系统之路Centos7.2——安装QQ 的一些问题(附VMware的安装)
1.首先安装wine 可以通过源码安装,注意在编译的时候加参数,编译64位(如果你的系统是64位哦!) 但是我建议直接rpm安装. 安装网络源: rpm -ivh epel-release-6-8.n ...
- Python中hashlib模块
介绍hashlib hashlib 是一个提供了一些流行的hash算法的 Python 标准库.其中所包括的算法有 md5, sha1, sha224, sha256, sha384, sha512. ...