安卓开发--探究碎片Fragment
简述:
最近做开发的时候又遇到了Fragment,发现太久没写,都快忘了,就抓紧写个笔记(我太懒的了233)
Fragment可以简单的看成迷你的活动,它和活动一样都有布局和生命周期,它可以嵌入活动之中,
这样在活动的这个大布局中,还可以嵌入碎片的布局,那么app的功能就可以多样化,实现碎片的方式也
很简单,因为碎片是个迷你的活动,那么肯定得和活动一样,搭配一个布局文件,所以做法是先创建
对应碎片的布局文件,然后新建碎片类继承Fragment类,把碎片布局加载进来,然后再把这个碎片
加载到对应我们想要嵌入的活动中,因为碎片表现形式还是布局,所以我们是在活动的布局文件中
加入碎片,加载碎片的。
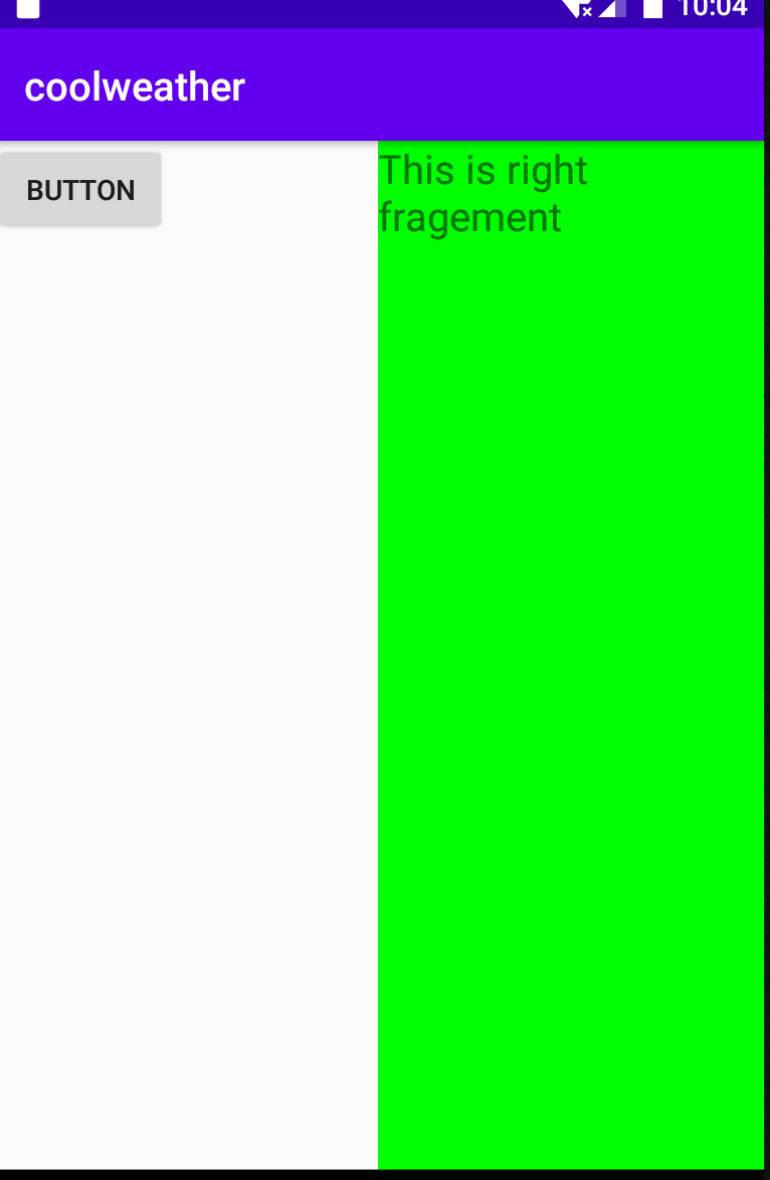
0x01:简单使用
新建两个布局文件,Left_fragment和Right_fragment.xml,
<?xml version="1.0" encoding="utf-8"?>

<LinearLayout xmlns:android="http://schemas.android.com/apk/res/android"

    android:layout_width="match_parent"

    android:layout_height="match_parent">

    <Button

        android:layout_width="wrap_content"

        android:layout_height="wrap_content"

        android:id="@+id/button"

        android:layout_gravity="center_horizontal"

        android:text="Button"/>

</LinearLayout>
<?xml version="1.0" encoding="utf-8"?>

<LinearLayout xmlns:android="http://schemas.android.com/apk/res/android"

    android:orientation="vertical"

    android:background="#00ff00"

    android:layout_width="match_parent"

    android:layout_height="match_parent">

    <TextView

        android:layout_width="wrap_content"

        android:layout_height="wrap_content"

        android:layout_gravity="center_horizontal"

        android:textSize="20sp"

        android:text="This is right fragement"/>

</LinearLayout>
然后新建两个碎片类,继承Fragment,
package com.example.coolweather;

import android.os.Bundle;

import android.view.LayoutInflater;

import android.view.View;

import android.view.ViewGroup;

import androidx.fragment.app.Fragment;

public class LeftFragment extends Fragment {

    public View onCreateView(LayoutInflater inflater, ViewGroup container, Bundle saveInstanceState)

    {

        View view=inflater.inflate(R.layout.left_fragment,container,false);

        return view;

    }

}
package com.example.coolweather;

import android.os.Bundle;

import android.view.LayoutInflater;

import android.view.View;

import android.view.ViewGroup;

import androidx.fragment.app.Fragment;

public class RightFragment extends Fragment {

    public View onCreateView(LayoutInflater inflater, ViewGroup container, Bundle savedInstanceState)

    {

        View view =inflater.inflate(R.layout.right_fragment,container,false);

        return view;

    }

}
重写一个Fragment类中的onCreateView方法,通过inflater.inflate加载碎片的布局,
然后最后就是将碎片嵌入到我们想要的活动之中(以布局的形式,所以还是在xml文件中加入)
<?xml version="1.0" encoding="utf-8"?>

<LinearLayout xmlns:android="http://schemas.android.com/apk/res/android"

    android:layout_width="match_parent"

    android:layout_height="match_parent">

    <fragment

        android:id="@+id/left_fragment"

        android:name="com.example.coolweather.LeftFragment"

        android:layout_width="0dp"

        android:layout_weight="1"

        android:layout_height="match_parent" />

    <fragment

        android:layout_width="0dp"

        android:layout_height="match_parent"

        android:layout_weight="1"

        android:id="@+id/right_fragment"

        android:name="com.example.coolweather.RightFragment"

         />

</LinearLayout>
然后打开模拟器就可以看到对应的效果了。
二.动态添加碎片,
新建另一个碎片布局文件,并创建碎片类,加载碎片布局
<?xml version="1.0" encoding="utf-8"?>

<LinearLayout xmlns:android="http://schemas.android.com/apk/res/android"

    android:layout_width="match_parent"

    android:orientation="vertical"

    android:background="#ffff00"

    android:layout_height="match_parent">

    <TextView

        android:layout_width="wrap_content"

        android:layout_height="wrap_content"

        android:layout_gravity="center_horizontal"

        android:textSize="20sp"

        android:text="This is another right fragment"

        />

</LinearLayout>
package com.example.coolweather;

import androidx.appcompat.app.AppCompatActivity;

import androidx.fragment.app.Fragment;

import androidx.fragment.app.FragmentManager;

import androidx.fragment.app.FragmentTransaction;

import android.content.Intent;

import android.os.Bundle;

import android.view.View;

import android.widget.Button;

import java.nio.channels.InterruptedByTimeoutException;

public class MainActivity extends AppCompatActivity {

    @Override

    protected void onCreate(Bundle savedInstanceState) {

        super.onCreate(savedInstanceState);

        setContentView(R.layout.layout);

        Button button=(Button)findViewById(R.id.button);

        button.setOnClickListener((View.OnClickListener) this);

    }

    public void onClick(View v)

    {

        switch(v.getId()) {

            case R.id.button:

                replaceFragment(new AnotherRightFragment());

                break;

            default:

        }

    }

    private void replaceFragment(Fragment fragment)

    {

        FragmentManager fragmentManager=getSupportFragmentManager();

        FragmentTransaction transaction=fragmentManager.beginTransaction();

        transaction.replace(R.id.right_layout,fragment);

        transaction.commit();

    }

}
replacefFragment这个方法是动态加载碎片的关键,先是调用getSupportFragmentManager()这个方法
返回FragmentManager对象,再通过FragManager对象调用beginTransaction开启事务,然后调用
replace方法,第一个参数是容器的id,第二个参数是碎片的实例,就可以了,运行代码就有效果出现了。
另外如果需要点击back按钮返回到上一个碎片的,话要额外再加一句代码,在replaceFragment中多加
一句就好了。
  private void replaceFragment(Fragment fragment)

    {

        FragmentManager fragmentManager=getSupportFragmentManager();

        FragmentTransaction transaction=fragmentManager.beginTransaction();

        transaction.replace(R.id.right_layout,fragment);

        transaction.addToBackStack(null)

        transaction.commit();

    }
安卓开发--探究碎片Fragment的更多相关文章
- 安卓开发笔记——Fragment+FragmentTabHost组件(实现新浪微博底部菜单)
记得之前写过2篇关于底部菜单的实现,由于使用的是过时的TabHost类,虽然一样可以实现我们想要的效果,但作为学习,还是需要来了解下这个新引入类FragmentTabHost 之前2篇文章的链接: 安 ...
- 安卓开发笔记——Fragment+ViewPager组件(高仿微信界面)
什么是ViewPager? 关于ViewPager的介绍和使用,在之前我写过一篇相关的文章<安卓开发复习笔记——ViewPager组件(仿微信引导界面)>,不清楚的朋友可以看看,这里就不再 ...
- Android开发:碎片Fragment完全解析fragment_main.xml/activity_main.xml
Android开发:碎片Fragment完全解析 为了让界面可以在平板上更好地展示,Android在3.0版本引入了Fragment(碎片)功能,它非常类似于Activity,可以像 Activi ...
- 学习安卓开发[2] - 在Activity中托管Fragment
目录 在上一篇学习安卓开发[1]-程序结构.Activity生命周期及页面通信中,学习了Activity的一些基础应用,基于这些知识,可以构建一些简单的APP了,但这还远远不够,本节会学习如何使用Ac ...
- 安卓Android碎片fragment实现静态加载
静态加载好后的界面如下,两个碎片分别位于一个活动的左边和右边: 左边和右边分别为一个碎片,这两个碎片正好将一整个活动布满.一个活动当中可以拥有多个碎片,碎片的含义就是可以在同一个UI界面下,将这个界面 ...
- 安卓开发_浅谈Fragment之ListFragment
ListFragment,即Fragment的一个子类,当我们用的一个Fragment只需要一个listview视图的时候使用 该类有几个特点: 1.ListFragment 本身具只有一个ListV ...
- Android利用碎片fragment实现底部标题栏(Github模板开源)
在安卓开发当中,一个十分重要的布局则是底部标题栏了,拥有了底部标题栏,我们就拥有了整个软件UI开发的框架,一般而言,整个软件的布局首先就是从底部标题栏开始构建,然后再开始其他模块的编写,组成一个完善的 ...
- 从0系统学Android--4.1探究碎片
从0系统学Android--4.1探究碎片 本系列文章目录:更多精品文章分类 本系列持续更新中.... 初级阶段内容参考<第一行代码> 第四章:手机平板要兼顾--探究碎片 平板电脑和手机最 ...
- 安卓开发_深入学习ViewPager控件
一.概述 ViewPager是android扩展包v4包(android.support.v4.view.ViewPager)中的类,这个类可以让用户左右切换当前的view. ViewPager特点: ...
随机推荐
- MyBatis 模糊查询的 4 种实现方式
引言 MyBatis 有 4 种方式可以实现模糊查询. 员工信息表 ( tb_employee ) 如下: id name sex email birthday address 001 张一凡 男 z ...
- selenium多表单切换以及多窗口切换、警告窗处理
selenium表单切换 在做UI自动化,有时候要定位的元素属性在页面上明明是唯一的.却怎么也不执行对元素的操作动作,这时候多半是iframe表单在作怪. 切入表单:iddriver.switch_t ...
- jsp表单传值后在页面中文显示乱码
主要通过添加以下代码来实现(前提是其他处的编码都设置成了utf-8): response.setContentType("text/html;charset=utf-8"); re ...
- 备份分区,备份文件切割保存 dd
cd /tmp wget dl.fedoraproject.org/pub/epel/6/x86_64/dcfldd-1.3.4.1-4.el6.x86_64.rpm sudo yum install ...
- Python小白的数学建模课-A1.2021年数维杯C题(运动会优化比赛模式探索)探讨
Python小白的数学建模课 A1-2021年数维杯C题(运动会优化比赛模式探索)探讨. 运动会优化比赛模式问题,是公平分配问题 『Python小白的数学建模课 @ Youcans』带你从数模小白成为 ...
- TVM Pass IR如何使用
TVM Pass IR如何使用 随着Relay / tir中优化遍数的增加,执行并手动维护其依赖关系变得很棘手.引入了一个基础结构来管理优化过程,并应用于TVM堆栈中IR的不同层. Relay / t ...
- NVIDIA安培架构
NVIDIA安培架构 NVIDIA Ampere Architecture In-Depth 在2020年英伟达GTC主题演讲中,英伟达创始人兼首席执行官黄仁勋介绍了基于新英伟达安培GPU架构的新英伟 ...
- 深入理解ES8的新特性SharedArrayBuffer
简介 ES8引入了SharedArrayBuffer和Atomics,通过共享内存来提升workers之间或者worker和主线程之间的消息传递速度. 本文将会详细的讲解SharedArrayBuff ...
- 11-05 File类
1. 通过File输出当前项目目录下的文件"myfile.txt"的名字,大小,最后修改时间. 最后修改时间格式如:2016-03-23 14:22:16 package com. ...
- Android系统编程入门系列之应用环境及开发环境介绍
作为移动端操作系统,目前最新的Android 11.0已经发展的比较完善了,现在也到了系统的整理一番的时间,接下来的系列文章将以Android开发者为中心,争取用归纳总结的态度对初级入门者所应 ...