Zabbix监控ActiveMQ
当我们在线上使用了ActiveMQ 后,我们需要对一些参数进行监控,比如 消息是否有阻塞,哪个消息队列阻塞了,总的消息数是多少等等。下面我们就通过 Zabbix 结合 Python 脚本来实现对 ActiveMQ的监控。
一、创建 Activemq Python 监控脚本
因为 CentOS 系统默认安装的是 Python2.7,为了避免麻烦,我们这里的脚本也是对应的 Python2
Python2 监控脚本
# -*- coding: utf-8 -*-

# @Time    : 2019/6/25 9:26

# @Author  : djx

# @Email   : djxlsp@163.com

# @File    : mointer_mq_python2.py

# @Software: PyCharm

# @Python_version: python2.7

import base64

import urllib2

import json

import logging

import sys

def activemq_mointer(userinfo_encode):

    # 总的消息阻塞数

    pending_queue_sum = 0

    # 阻塞消息的队列名称

    pending_queue_lists = ''

    # 总的消息数

    mq_sum = 0

    headers = {

        'Authorization': 'Basic {}'.format(userinfo_encode),

        'ua': 'Mozilla/5.0 (Windows NT 6.1; WOW64) AppleWebKit/537.36 (KHTML, like Gecko) Chrome/44.0.2403.125 Safari/537.36'

    }

    url = 'http://' + ip + ':' + port + \

          '/api/jolokia/read/org.apache.activemq:type=Broker,brokerName=localhost/Queues/'

    request = urllib2.Request(url=url, headers=headers)

    try:

        response = urllib2.urlopen(request)

    except Exception as e:

        logging.error(e)

        return {'pending_queue_sum': 110, 'pending_queue_lists': '110', 'mq_sum': 0}  # 当服务不可用时,返回预警数字,用于预警。

    activemq_info = response.read()

    activemq_info_json = json.loads(activemq_info)

    activemq_queues = activemq_info_json['value']

    for i in activemq_queues:

        queue_url = 'http://' + ip + ':' + port + \

            '/api/jolokia/read/' + i['objectName']

        queue_request = urllib2.Request(url=queue_url, headers=headers)

        try:

            queue_response = urllib2.urlopen(queue_request)

        except Exception as e:

            logging.error(e)

            return {'pending_queue_sum': 110, 'pending_queue_lists': '110', 'mq_sum': 0}

        queue_info = queue_response.read()

        info_dict = json.loads(queue_info)

        mq_sum += info_dict['value']['EnqueueCount']

        if int(info_dict['value']['QueueSize']

               ) > 0:  # 取值 QueueSize ,就是未消费的消息数量

            pending_queue_sum += info_dict['value']['QueueSize']

            pending_queue_lists += info_dict['value']['Name']

            pending_queue_lists += ' and '

            logging.info(

                "消息队列--{}--有阻塞消息--{} 条".format(

                    info_dict['value']['Name'],

                    info_dict['value']['QueueSize']))

    return {'pending_queue_sum': pending_queue_sum, 'pending_queue_lists': pending_queue_lists, 'mq_sum': mq_sum}

if __name__ == '__main__':

    # ActiveMQ 服务器信息

    username = 'admin'

    password = 'admin'

    ip = '127.0.0.1'

    port = '8161'

    userinfo = username + ':' + password

    userinfo_encode = base64.b64encode(userinfo.encode('utf8'))

    # 日志配置,注意下面日志文件的路径是采用绝对路径的。

    logging.basicConfig(

        filename="/var/log/activemq_mointer.log",

        filemode="a",

        format="%(asctime)s %(name)s:%(levelname)s:%(message)s",

        datefmt="%Y-%m-%d %H:%M:%S",

        level=logging.DEBUG)

    if len(sys.argv) == 2:

        mointer_argv = sys.argv[1]

        if mointer_argv in ('pending', 'pending_lists', 'queue_sum'):

            mq_re = activemq_mointer(userinfo_encode)

            if mointer_argv == 'pending':

                print(mq_re['pending_queue_sum'])

            elif mointer_argv == 'pending_lists':

                print(mq_re['pending_queue_lists'])

            else:

                print(mq_re['mq_sum'])

        else:

            # 错误提示

            print("Please enter the correct parameters pending|pending_lists|queue_sum")

    else:

        # 错误提示

        print("Please enter the correct parameters pending|pending_lists|queue_sum")
使用该脚本注意事项:
传入参数只能一个 ,而且只能是
pending,pending_lists,queue_sum,分别代表阻塞消息数、阻塞消息队列名称、总的消息数。脚本有日志记录和异常记录,注意设置 日志文件路径,假设脚本路径位于
/opt/scripts/,我们在该目录下进行执行脚本的话,activemq_mointer.log日志文件也就会产生在当前目录下。我们可以在路径中通过绝对路径来指定文件夹 形如/var/log/activemq_mointer.log该脚本是由
zabbix agent进行使用 ,所以我们需要设置该 脚本的权限,以及保证该脚本的用户有创建日志文件的权限(或者我们先前创建好对应权限日志文件)sudo chown zabbix:zabbix mointer_mq_python2.py
sudo chmod 744 mointer_mq_python2.py
sudo touch /var/log/activemq_mointer.log
sudo chown zabbix:zabbix /var/log/activemq_mointer.log # 这个一定得设置,不然会报没有权限的错误,也就收集不到数据了。 如果我们不想设置权限这一步,我们可以设置将日志写到 `/tmp/activemq_mointer.log`.
二 、设置 zabbix agent
设置 zabbix agent
# 将监控项配置写入配置文件

sudo echo "UserParameter=activemq.mointer[*],python /opt/scripts/mointer_mq_python2.py \$1 " >> /opt/zabbix-agent/etc/zabbix_agentd.conf

# 重启zabbix agent

sudo systemctl restart  zabbix-agent
三、导入监控项:
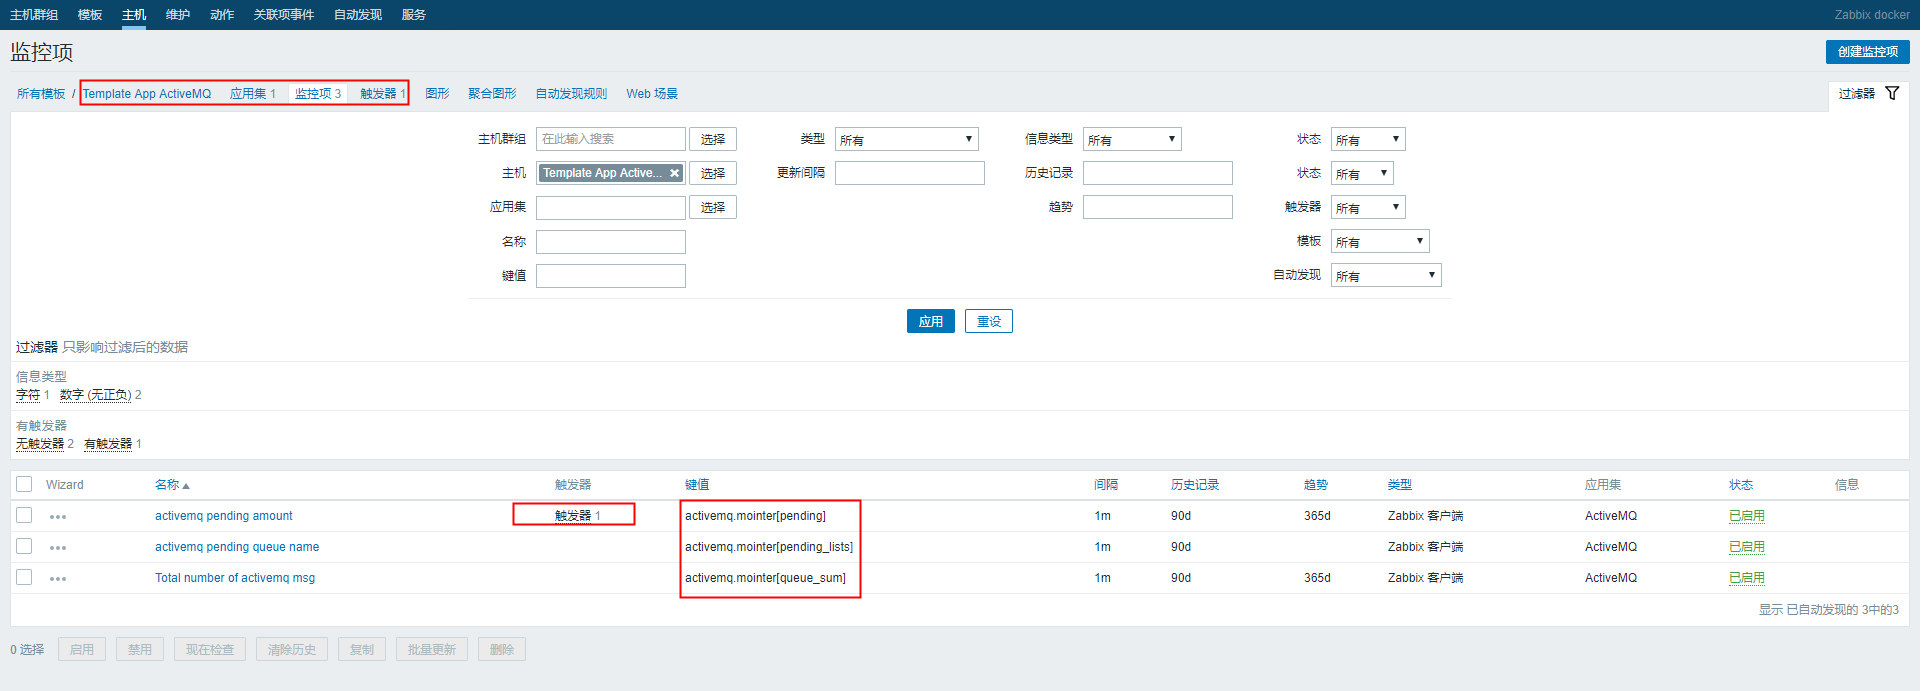
监控模板 xml 文件。(该监控模板包含三个监控项,一个触发器)
<?xml version="1.0" encoding="UTF-8"?>
<zabbix_export>
<version>4.0</version>
<date>2019-06-26T03:49:47Z</date>
<groups>
<group>
<name>AWS-1688</name>
</group>
<group>
<name>Fy-hbg</name>
</group>
</groups>
<templates>
<template>
<template>Template App ActiveMQ</template>
<name>Template App ActiveMQ</name>
<description/>
<groups>
<group>
<name>AWS-1688</name>
</group>
<group>
<name>Fy-hbg</name>
</group>
</groups>
<applications>
<application>
<name>ActiveMQ</name>
</application>
</applications>
<items>
<item>
<name>activemq pending amount</name>
<type>0</type>
<snmp_community/>
<snmp_oid/>
<key>activemq.mointer[pending]</key>
<delay>1m</delay>
<history>90d</history>
<trends>365d</trends>
<status>0</status>
<value_type>3</value_type>
<allowed_hosts/>
<units>条</units>
<snmpv3_contextname/>
<snmpv3_securityname/>
<snmpv3_securitylevel>0</snmpv3_securitylevel>
<snmpv3_authprotocol>0</snmpv3_authprotocol>
<snmpv3_authpassphrase/>
<snmpv3_privprotocol>0</snmpv3_privprotocol>
<snmpv3_privpassphrase/>
<params/>
<ipmi_sensor/>
<authtype>0</authtype>
<username/>
<password/>
<publickey/>
<privatekey/>
<port/>
<description/>
<inventory_link>0</inventory_link>
<applications>
<application>
<name>ActiveMQ</name>
</application>
</applications>
<valuemap/>
<logtimefmt/>
<preprocessing/>
<jmx_endpoint/>
<timeout>3s</timeout>
<url/>
<query_fields/>
<posts/>
<status_codes>200</status_codes>
<follow_redirects>1</follow_redirects>
<post_type>0</post_type>
<http_proxy/>
<headers/>
<retrieve_mode>0</retrieve_mode>
<request_method>0</request_method>
<output_format>0</output_format>
<allow_traps>0</allow_traps>
<ssl_cert_file/>
<ssl_key_file/>
<ssl_key_password/>
<verify_peer>0</verify_peer>
<verify_host>0</verify_host>
<master_item/>
</item>
<item>
<name>activemq pending queue name</name>
<type>0</type>
<snmp_community/>
<snmp_oid/>
<key>activemq.mointer[pending_lists]</key>
<delay>1m</delay>
<history>90d</history>
<trends>0</trends>
<status>0</status>
<value_type>1</value_type>
<allowed_hosts/>
<units/>
<snmpv3_contextname/>
<snmpv3_securityname/>
<snmpv3_securitylevel>0</snmpv3_securitylevel>
<snmpv3_authprotocol>0</snmpv3_authprotocol>
<snmpv3_authpassphrase/>
<snmpv3_privprotocol>0</snmpv3_privprotocol>
<snmpv3_privpassphrase/>
<params/>
<ipmi_sensor/>
<authtype>0</authtype>
<username/>
<password/>
<publickey/>
<privatekey/>
<port/>
<description/>
<inventory_link>0</inventory_link>
<applications>
<application>
<name>ActiveMQ</name>
</application>
</applications>
<valuemap/>
<logtimefmt/>
<preprocessing/>
<jmx_endpoint/>
<timeout>3s</timeout>
<url/>
<query_fields/>
<posts/>
<status_codes>200</status_codes>
<follow_redirects>1</follow_redirects>
<post_type>0</post_type>
<http_proxy/>
<headers/>
<retrieve_mode>0</retrieve_mode>
<request_method>0</request_method>
<output_format>0</output_format>
<allow_traps>0</allow_traps>
<ssl_cert_file/>
<ssl_key_file/>
<ssl_key_password/>
<verify_peer>0</verify_peer>
<verify_host>0</verify_host>
<master_item/>
</item>
<item>
<name>Total number of activemq msg</name>
<type>0</type>
<snmp_community/>
<snmp_oid/>
<key>activemq.mointer[queue_sum]</key>
<delay>1m</delay>
<history>90d</history>
<trends>365d</trends>
<status>0</status>
<value_type>3</value_type>
<allowed_hosts/>
<units>条</units>
<snmpv3_contextname/>
<snmpv3_securityname/>
<snmpv3_securitylevel>0</snmpv3_securitylevel>
<snmpv3_authprotocol>0</snmpv3_authprotocol>
<snmpv3_authpassphrase/>
<snmpv3_privprotocol>0</snmpv3_privprotocol>
<snmpv3_privpassphrase/>
<params/>
<ipmi_sensor/>
<authtype>0</authtype>
<username/>
<password/>
<publickey/>
<privatekey/>
<port/>
<description/>
<inventory_link>0</inventory_link>
<applications>
<application>
<name>ActiveMQ</name>
</application>
</applications>
<valuemap/>
<logtimefmt/>
<preprocessing/>
<jmx_endpoint/>
<timeout>3s</timeout>
<url/>
<query_fields/>
<posts/>
<status_codes>200</status_codes>
<follow_redirects>1</follow_redirects>
<post_type>0</post_type>
<http_proxy/>
<headers/>
<retrieve_mode>0</retrieve_mode>
<request_method>0</request_method>
<output_format>0</output_format>
<allow_traps>0</allow_traps>
<ssl_cert_file/>
<ssl_key_file/>
<ssl_key_password/>
<verify_peer>0</verify_peer>
<verify_host>0</verify_host>
<master_item/>
</item>
</items>
<discovery_rules/>
<httptests/>
<macros/>
<templates/>
<screens/>
</template>
</templates>
<triggers>
<trigger>
<expression>{Template App ActiveMQ:activemq.mointer[pending].avg(10m)}>=5</expression>
<recovery_mode>1</recovery_mode>
<recovery_expression>{Template App ActiveMQ:activemq.mointer[pending].avg(5m)}=0</recovery_expression>
<name>activemq queue pending on {HOST.NAME}</name>
<correlation_mode>0</correlation_mode>
<correlation_tag/>
<url/>
<status>0</status>
<priority>3</priority>
<description>activemq 消息发生阻塞,10分钟内平均阻塞消息数超过5条</description>
<type>0</type>
<manual_close>0</manual_close>
<dependencies/>
<tags/>
</trigger>
</triggers>
</zabbix_export>
将该监控模板链接到对应的主机。
我们可以看到我们监控的数据了。

至此,ActiveMQ 的监控项都已经配置好了。
Zabbix监控ActiveMQ的更多相关文章
- zabbix监控activemq队列脚本
公司业务使用activemq5.9.1消息队列,由于队列阻塞导致程序端口无响应,并且telnet无法连通.经过over 1 hour的排查,最终定位原因activemq导致.遂写了一个监控active ...
- 使用Zabbix监控Oracle数据库
Orabbix介绍 监控Oracle数据库我们需要安装第三方提供的Zabbix插件,我们先测试比较有名的Orabbix,http://www.smartmarmot.com/product/orabb ...
- Zabbix监控nginx-rtmp status(json版)
与前面的文章 zabbix监控nginx-rtmp status(html版)区别只在于取值的页面不一样 http://127.0.0.1:81/control/get/all_streams sta ...
- Zabbix监控mysql performance
介绍 zabbix监控mysql性能,使用zabbix自带的mysql监控模板,可以监控以下内容OPS(增删改查).mysql慢查询数量.mysql请求\响应流量带宽 配置 新建mysql监控用户 G ...
- zabbix监控Java 8080端口
linux下端口和服务是对应的,Java进程启动时默认监听8080端口,如果服务挂掉则8080端口就没有了. lsof -i:8080 端口,如果没有任何的输出,说明该端口不在工作. 想在zabbix ...
- zabbix监控报错zabbix server is not running解决方法
问题描述: 布置好zabbix监控,正常运行.但是重启了虚拟机服务器之后,页面出现如下的报错,而且设置的报信息也是失效的:
- Zabbix监控Tengine
title: Zabbix监控Tengine tags: zabbix,nginx,tengine author: Chinge Yang date: 2016-12-29 --- Zabbix监控T ...
- zabbix 监控web网站性能
一直在纠结用什么实例来给大家演示呢?想来想去还是官方的好,那我们怎么用zabbix监控web性能和可用性呢?我们这边分为几个步骤:打开网站.登陆.登陆验证.退出,一共4个小step,看实例. 检测流程 ...
- Zabbix监控disk performance
概述 zabbix获取/sys里面的磁盘信息并分析来监控disk performance sysfs是Linux内核中设计较新的一种虚拟的基于内存的文件系统,它的作用与 proc 有些类似(默认挂载在 ...
随机推荐
- 0-1分布(伯努利分布)、n 重伯努利分布(二项分布)
1. 0-1 分布(伯努利分布) 0-1分布又名两点分布,或叫伯努利分布. P{X=k}=pk(1−p)1−k 其中 k=0,1. 伯努利分布未必一定是 0-1 分布,也可能是 a-b 分布,只需满足 ...
- vs2008 命令窗口 命令窗口 和 反汇编窗口的使用
visual studio 的功能相当强大,用了一年多,也只是了解了皮毛.今天学习了一下VS2008 的 即时窗口 命令窗口 和 反汇编窗口的使用.之所以会想到要使用即时窗口是因为最近开发遇到了一个问 ...
- 给WPF示例图形加上方便查看大小的格子之完善版本
原文:给WPF示例图形加上方便查看大小的格子之完善版本 去年10月份, 我曾写过一篇"给WPF示例图形加上方便查看大小的格子"的BLOG(http://blog.csdn.net/ ...
- 细数 Windows Phone 灭亡的七宗罪(过程很详细,评论很精彩,但主要还是因为太慢了,生态跟不上,太贪了,厂商不愿意推广)
曾梦想仗剑走天涯,看一看世界的繁华 年少的心有些轻狂,如今你四海为家 曾让你心疼的姑娘,如今已悄然无踪影 犹记得上大学攒钱买了第一台智能手机Lumia 520时,下载的第一首歌曲<曾经的你> ...
- 测试了下boost的序列化反序列化功能
// testSerialization.cpp : Defines the entry point for the console application. // #include "st ...
- MySQL索引 专题
什么是索引 索引是存储引擎用于快速找到记录的一种数据结构,索引类似一本书的目录,我们可以快速的根据目录查找到我们想要的内容的所在页码,索引的优化应该是对查询性能优化最有效的手段了. 因此,首先你要明白 ...
- 【书单】matlab 科学计算、数值分析以及数学物理问题
1. 数学计算 MATLAB数值计算 MATLAB之父 : 编程实践 2. 数学物理问题 高等应用数学问题的MATLAB求解(第3版)(豆瓣评价极好) 3. 模式识别
- C# WPF 中用代码模拟鼠标和键盘的操作
原文:C# WPF 中用代码模拟鼠标和键盘的操作 原文地址 C#开发者都知道,在Winform开发中,SendKeys类提供的方法是很实用的.但是可惜的是,在WPF中不能使用这个方法了. 我们知道,在 ...
- WPF Binding妙处-既无Path也无Source
<Window x:Class="XamlTest.Window12" xmlns="http://schemas.microsoft.com/win ...
- C# 异步委托的使用
using System;using System.Collections.Generic;using System.Linq;using System.Text;using System.Threa ...