Eclipse配置Maven私服
Eclipse配置Maven私服
前言:
搭建Maven私有仓库的主要目的,是为了在团队多人开发时,只要内网的私有仓库有下载过依赖的jar包,就直接从私有仓库获取,不再通过外网的中央仓库。如果私服上面没有,就通过私服上面的索引到中央仓库中缓存到私服中。
配置方式:
Eclipse配置Maven私服有两种,一种是在pom.xml里面配置,只针对pom所在的工程;另一种是在Eclipse安装目录中的setting.xml中配置,这是针对Eclipse中所有工程;
一、配置私服的位置(从私服中下载jar);
1、 pom.xml中配置:
在pom.xml中的<project>中加入如下配置
1.    <repositories>

2.         <repository>

3.              <id>nexus</id>

4.              <name>nexus</name>

5.              <url>http://192.168.100.52:8081/nexus/content/groups/public/</url>

6.              <releases>

7.                   <enabled>true</enabled>

8.              </releases>

9.              <snapshots>

10.                   <enabled>true</enabled>

11.              </snapshots>

12.            </repository>

13.        </repositories>
url指向本地私服的仓库组,并启用了releases库(稳定版本库)以及snapshots(开发版本库);其实我们的仓库组中除了包含了这两个库之外还包含了第三方库(3rd parth)以及中央库(central);
2、setting.xml中配置:
setting中配置要比pom麻烦多一点,不过毕竟人家是针对eclipse中的所有工程:
先在<servers>标签中添加私服的权限
14.    <server>

15.         <id>nexus-releases</id>

16.         <username>admin</username>

17.         <password>admin123</password>

18.    </server>

19.    <server>

20.         <id>nexus-snapshots</id>

21.         <username>admin</username>

22.         <password>admin123</password>

23.    </server>
这里的权限是用于上传jar到私服的;
接下来继续在setting.xml找到<mirrors>标签,我们来配置一下私服的镜像:
24.    <mirror>

25.         <id>nexus-releases</id>

26.         <mirrorOf>*</mirrorOf>

27.         <url>http://192.168.100.52:8081/nexus/content/groups/public/</url>

28.    </mirror>

29.    <mirror>

30.         <id>nexus-snapshots</id>

31.         <mirrorOf>*</mirrorOf>

32.         <url>http://192.168.100.52:8081/nexus/content/repositories/snapshots/</url>

33.    </mirror>
这里的id与前面的权限的id其实……没什么关系。
接下来继续找到<profiles>标签,开始配置私服:
34.    <profile>

35.         <id>nexus</id>

36.         <repositories>

37.             <repository>

38.                 <id>nexus-releases</id>

39.                 <name>Nexus</name>

40.                 <url>http://nexus-releases</url> <!—这里要引入上面的镜像-->

41.                 <releases>

42.               <enabled>true</enabled>

43.               <updatePolicy>never</updatePolicy>

44.               <checksumPolicy>warn</checksumPolicy>

45.              </releases>

46.              <snapshots>

47.               <enabled>true</enabled>

48.              </snapshots>

49.                 </repository>

50.              <repository>

51.                  <id>nexus-snapshots</id>

52.               <name>Nexus</name>

53.               <url>http://nexus-snapshots</url> <!—同样引入上面的镜像-->

54.               <releases>

55.                 <enabled>true</enabled>

56.                 <updatePolicy>never</updatePolicy>

57.                 <checksumPolicy>warn</checksumPolicy>

58.               </releases>

59.               <snapshots>

60.                 <enabled>true</enabled>

61.               </snapshots>

62.             </repository>

63.           </repositories>

64.           <pluginRepositories>     <!—同样是插件的配置-->

65.            <pluginRepository>

66.              <id>nexus-releases</id>

67.              <name>Nexus</name>

68.              <url>http://nexus-releases</url> <!—同样引入上面的镜像-->

69.              <snapshots>

70.                 <enabled>true</enabled>

71.                 <updatePolicy>never</updatePolicy>

72.                 <checksumPolicy>warn</checksumPolicy>

73.                     </snapshots>

74.              <releases>

75.                <enabled>true</enabled>

76.              </releases>

77.             </pluginRepository>

78.                <pluginRepository>

79.               <id>nexus-snapshots</id>

80.               <name>Nexus</name>

81.               <url>http://nexus-snapshots</url> <!—同样引入上面的镜像-->

82.               <snapshots>

83.                    <enabled>true</enabled>

84.                 <updatePolicy>never</updatePolicy>

85.                 <checksumPolicy>warn</checksumPolicy>

86.               </snapshots>

87.               <releases>

88.                 <enabled>true</enabled>

89.               </releases>

90.          </pluginRepository>

91.         </pluginRepositories>

92.    </profile>
最后,根据配置id激活这些配置,
93.     <activeProfiles>

94.           <activeProfile>nexus</activeProfile>

95.      </activeProfiles>
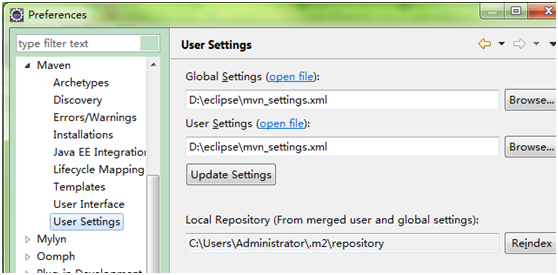
当然,如果你是新建一个setting.xml的话,要在eclipse里面更改setting.xml的路径,指向你新建的setting.xml
Window->Prederences ->Maven -> User Settings
二、上传jar到私服:
如果工程编译出的jar包要上传到私服,那就要在要上传的工程的pom.xml中的<project>下,增加
1.    <distributionManagement>

2.         <repository>

3.              <id>nexus-releases</id>

4.              <name>Nexus</name>

5.              <url>http://192.168.100.52:8081/nexus/content/repositories/releases/</url>

6.          </repository>

7.          <snapshotRepository>

8.              <id>nexus-snapshot</id>

9.              <name>Nexus</name>

10.              <url>http://192.168.100.52:8081/nexus/content/repositories/snapshots/</url>

11.            </snapshotRepository>

12.        </distributionManagement>
上传时,右键项目Run As->Run Configurations->Maven Build
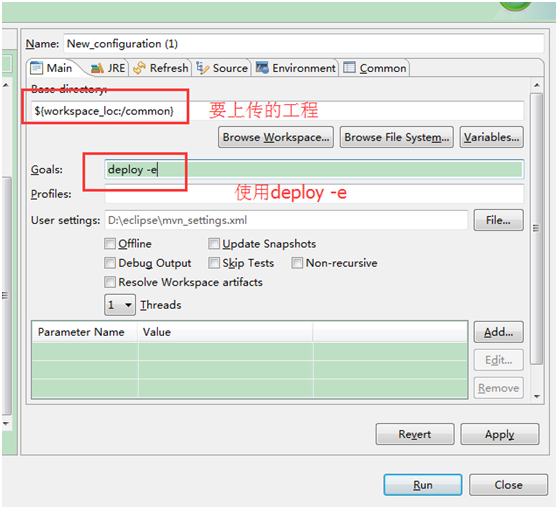
注:deploy后面的-e可以省略
扩展:
1、设置Maven的本地缓存:
Maven的本地缓存一般默认都是在C盘,这就有点让人难以接受了,不过还好,可以在setting.xml中配置一下缓存的位置:
<localRepository>D:\maven</localRepository>
2、配置在eclipse中配置jdk:
可以在setting.xml中的可以配置一下默认的jdk版本,这样就不用每个项目都去指定jdk的版本了
14.    <profile>

15.         <id>jdk-1.8</id>

16.         <activation>

17.              <activeByDefault>true</activeByDefault>

18.              <jdk>1.8</jdk>

19.         </activation>

20.           <properties>

21.            <maven.compiler.source>1.8</maven.compiler.source>

22.            <maven.compiler.target>1.8</maven.compiler.target>

23.            <maven.compiler.compilerVersion>1.8</maven.compiler.compilerVersion>

24.          </properties>

25.    </profile>
Eclipse配置Maven私服的更多相关文章
- 【项目管理和构建】十分钟教程,eclipse配置maven + 创建maven项目(三)
[项目管理和构建]十分钟教程,eclipse配置maven + 创建maven项目(三) 上篇博文中我们介绍了maven下载.安装和配置(二),这篇博文我们配置一下eclipse,将它和maven结合 ...
- eclipse配置maven + 创建maven项目(三)
上篇博文中我们介绍了maven下载.安装和配置(二),这篇博文我们配置一下eclipse,将它和maven结合,并我们创建一个maven的项目. 准备工作 在eclipse配置maven之前需要我们做 ...
- Eclipse配置maven环境
一.什么是maven? Maven是一个项目管理工具,它包含了一个项目对象模型 (Project Object Model),一组标准集合,一个项目生命周期(Project Lifecycle),一个 ...
- Eclipse配置maven环境1
一.什么是maven? Maven是一个项目管理工具,它包含了一个项目对象模型 (Project Object Model),一组标准集合,一个项目生命周期(Project Lifecycle),一个 ...
- Eclipse 配置Maven
Eclipse 配置Maven 下载Maven 首先在官网下载Maven:http://maven.apache.org/download.cgi 下载后将其解压到相应的位置 配置Maven环境变量 ...
- Mac中Eclipse配置Maven开发环境
1.下载Maven tar.gz包 http://maven.apache.org/download.cgi 2.解压tar包 随便一个路径都行 3.配置环境变量 bash设置~/.bash_prof ...
- eclipse配置maven + 创建maven项目
登录|注册 努力+坚持,而且还很年轻 目录(?)[+] 在现实的企业中,以低成本.高效率.高质量的完成项目,不仅仅需要技术大牛,企业更加需要管理大牛,管理者只懂技术是远远不够的.当 ...
- Eclipse配置Maven开发环境
前言: 现在Eclipse版本越来越高.高版本的Eclipse甚至已经集成了Maven像是SpringSource的哪个版本.用习惯了Eclipse.在开发中还是不想更换掉自己的IDE.如此一来就又了 ...
- Eclipse 安装Maven以及Eclipse配置Maven
安装Maven 1 下载 Downloading Apache Maven 3.5.0 选择 2 解压 3 配置环境变量 新建变量名:MAVEN_HOME 变量值:D:\SoftwareInstal ...
随机推荐
- PHP 防xss攻击
PHP直接输出html的,可以采用以下的方法进行过滤: 1.htmlspecialchars函数 2.htmlentities函数 3.HTMLPurifier.auto.php插件 4.Remove ...
- H3C SecPath U200-S 如何在内网使用外网IP地址访问内网服务器
H3C SecPath U200-S 如何在内网使用外网IP地址访问内网服务器 ------------------------------------------------------------ ...
- ASP.NET学习笔记01
ASP.NET初级工程师的核心要求:能够实现一个基本的网站. ASP.NET初级工程师面试主要要求: 1.基础的数据结构和算法 2.C#编程语言基础 3.网站基础(HTML,CSS,Javascrip ...
- spring datasource和mybatis的datasource来源在哪里
配置一个数据源 spring在第三方依赖包中包含了两个数据源的实现类包,其一是Apache的DBCP,其二是 C3P0.可以在Spring配置文件中利用这两者中任何一个配置数据源. 配置一个 ...
- hdu5319 Painter(模拟)
题目链接:点击打开链接 题目大意:给一个矩形.有两把刷子,一把刷红色,一把刷蓝色,红色的方向是东南,蓝色的方向是西北,红色加蓝色等于绿色,如今已知这面墙当前的状态.求从白墙到这个状态最少刷了多少次. ...
- UI设计师不可不知的安卓屏幕知识-安卓100分享
http://www.android100.org/html/201505/24/149342.html UI设计师不可不知的安卓屏幕知识-安卓100分享 不少设计师和工程师都被安卓设备纷繁的屏幕搞得 ...
- 均匀分布(uniform distribution)期望的最大似然估计(maximum likelihood estimation)
maximum estimator method more known as MLE of a uniform distribution [0,θ] 区间上的均匀分布为例,独立同分布地采样样本 x1, ...
- ROS-OPENCV
前言:opencv是一个开源的跨平台计算机视觉库. 前提:1.已下载并编译了相关功能包集,如还未下载,可通过git下载:https://github.com/huchunxu/ros_explorin ...
- Makefile经典教程(转)
转自:http://blog.csdn.net/ruglcc/article/details/7814546/ makefile很重要 什么是makefile?或许很多Winodws的程序员都不知道这 ...
- Mac 安装cmake小问题
今天用 brew install cmake. ==> Downloading https://homebrew.bintray.com/bottles/cmake-3.9.6.sierra.b ...