
Nokia Imaging SDK滤镜使用入门
简要说明:
通过对示例图片分别运用 LomoFilter和SketchFilter两个滤镜(Nokia Imaging SDK 内置),
来学习滤镜的基本使用和参数的设置。本工程的代码量比较少,也很容易理解。
版本 NokiaImagingSDK 1.0.272.0
下面是这个 demo 的完成步骤:
1)通过 Visual Studio 2012 新建一个Windows Phone 8 的工程,命名为“FilterParametersSample”:

2) 右键单击工程的“引用”,选择“管理 NuGet程序包”:

在右上角搜索框输入“Nokia Imaging SDK”,并安装该 SDK:

3)因为本次实验使用模拟器调试,所以需要在“配置管理器”选择“x86”(Visual Studio菜单 -> 生成 -> 配置管理器):
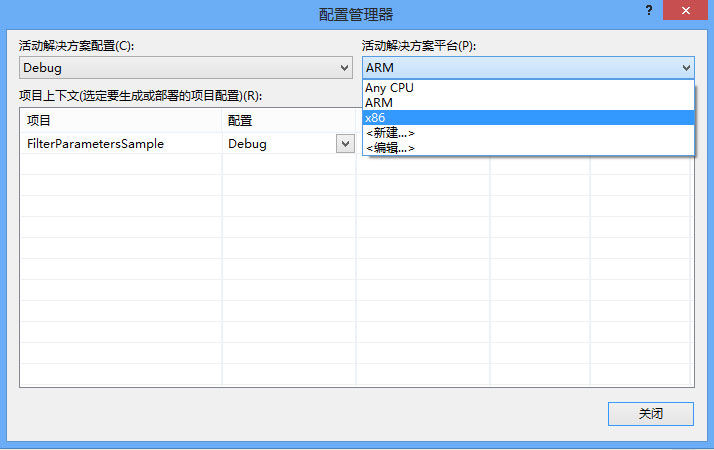
注:关于添加 Nokia Imaging SDK后 VS 的设置请参考:Download and add the libraries to the project
4)在项目的根目录下添加一张示例图片 “Sample.jpg”:

5)在 MainPage.xaml 页面中添加一个 Image 控件(显示原图)和两个 Button 控件,单击 Button 后,分别跳转
到 LomoFilterPage.xaml 和 SketchFilterPage.xaml页面。用下面的 XAML 替换掉 MainPage 页面中名为 LayoutRoot 的 grid:
 <!--LayoutRoot 是包含所有页面内容的根网格-->

    <Grid x:Name="LayoutRoot" Background="Transparent">

        <Image Source="/Sample.jpg" Margin="117,82,89,231"/>

        <Button Content="LomoFilter" HorizontalAlignment="Left" Margin="25,669,0,0" VerticalAlignment="Top"
                                            Width="209" Click="LomoFilter_Button_Click"/>

        <Button Content="Sketch" HorizontalAlignment="Left" Margin="239,669,0,0"
                                            VerticalAlignment="Top" Width="205" Click="SketchFilter_Button_Click"/>

    </Grid>
在 MainPage.xaml.cs 页面添加相应的按钮事件:
        // Lomo (自由滤镜)

        private void LomoFilter_Button_Click(object sender, RoutedEventArgs e)

        {

            NavigationService.Navigate(new Uri("/Pages/LomoFilterPage.xaml", UriKind.Relative));

        }

        // Sketch 素描滤镜
      private void SketchFilter_Button_Click(object sender, RoutedEventArgs e)

      {

         NavigationService.Navigate(new Uri("/Pages/SketchFilterPage.xaml", UriKind.Relative));

      }
6)新建一个名为“Pages”的文件夹,在页面中分别添加两个页面:
LomoFilterPage.xaml 和 SketchFilterPage.xaml,分别用来处理 Lomo 滤镜和 Sketch滤镜。
7)首先打开 SketchFilterPage.xaml 页面,在 XAML 页面添加一个 Image 控件和两个RadioButton 控件,
分别用来显示预览图和切换滤镜模式:
<Grid x:Name="LayoutRoot" Background="Transparent" Tap="LayoutRoot_Tap">

     <Image x:Name="PreviewImage"/>

     <Grid x:Name="gridControls" VerticalAlignment="Bottom" Background="#44ffffff" >

         <Grid.Resources>

             <Style TargetType="TextBlock">

                 <Setter Property="Margin" Value="20,0,0,0"/>

                 <Setter Property="Foreground" Value="#ffffffff"/>

                 <Setter Property="FontWeight" Value="ExtraBold"/>

             </Style>

         </Grid.Resources>

         <Grid.RowDefinitions>

             <RowDefinition Height="auto"/>

             <RowDefinition Height="auto"/>

         </Grid.RowDefinitions>

         <TextBlock Text="素描模式:"/>

         <StackPanel Orientation="Horizontal" Grid.Row="1" Background="{StaticResource PhoneAccentBrush}">

             <RadioButton Content="Gray" GroupName="Mode"  Checked="Gray_RadioButton_Checked"/>

             <RadioButton Content="Color" GroupName="Mode" Checked="Color_RadioButton_Checked"/>

         </StackPanel>

     </Grid>

 </Grid>
上面的 gridControls 用来作为“操作面板”,当单击 LayoutRoot 控件时,切换它的隐藏和显示:
// 切换控制面板

  private void LayoutRoot_Tap(object sender, System.Windows.Input.GestureEventArgs e)

  {

      e.Handled = true;

      if (gridControls.Visibility == System.Windows.Visibility.Collapsed)

      {

          gridControls.Visibility = System.Windows.Visibility.Visible;

      }

      else

      {

          gridControls.Visibility = System.Windows.Visibility.Collapsed;

      }

  }
8)另外在 SketchFilterPage.xaml.cs 页面中,声明三个变量:
// 使用滤镜

SketchMode _sketchMode = SketchMode.Gray;

Stream _imageStreamOrigin;// 保存图片的原始数据

WriteableBitmap _writeBitmap; //输出结果
9)在构造函数中,读取示例图片的流,用来稍后添加滤镜:
public SketchFilterPage()

 {

     InitializeComponent();

     // 获取 xap 包中的 图片

     StreamResourceInfo StreamInfo = App.GetResourceStream(new Uri("Sample.jpg", UriKind.Relative));

     // 先把未经过滤镜处理的示例图片显示出来

     BitmapImage bitmapImage = new BitmapImage();

     bitmapImage.SetSource(StreamInfo.Stream);

     _writeBitmap = new WriteableBitmap(bitmapImage);

     PreviewImage.Source = _writeBitmap;

     // 保存示例图片的流,用于接下来添加滤镜

     _imageStreamOrigin = StreamInfo.Stream;

 }
10)添加两个 RadioButton 的 Checked 事件,用来为图片运用不同的滤镜效果:
// 灰色

 private void Gray_RadioButton_Checked(object sender, RoutedEventArgs e)

 {

     _sketchMode = SketchMode.Gray;

     CreatePreviewImage();

 }

 // 彩色

 private void Color_RadioButton_Checked(object sender, RoutedEventArgs e)

 {

     _sketchMode = SketchMode.Color;

     CreatePreviewImage();

 }
11)最后添加 CreatePreviewImage() 方法,对图片运用滤镜效果:
public async void CreatePreviewImage()

{

    if (_imageStreamOrigin == null || _writeBitmap == null)

    {

        return;

    }

    _imageStreamOrigin.Position = ;

    // 运用这个滤镜效果

    var filters = new IFilter[]

    {

        new SketchFilter(_sketchMode)

    };

    using (var source = new StreamImageSource(_imageStreamOrigin))

    using (var filterEffect = new FilterEffect(source) { Filters = filters })

    using (var renderer = new WriteableBitmapRenderer(filterEffect, _writeBitmap))

    {

        await renderer.RenderAsync();

        PreviewImage.Source = _writeBitmap;

    }

}
12)当分别点击“草图滤镜”(SketchFilter)的两个 RadioButton 时,运行效果:

13) 接下来在LomoFilterPage.xaml 页面中,给示例图片添加 LomoFilter:
和上面一样,首先添加一个 Image 控件,用来显示图片预览;然后添加两个 Silder控件,分别调整滤镜的亮度、
饱和度;最后添加两组 RadioButton控件,分别用来调整滤镜的“光晕”模式和“颜色风格”,相应的 XAML如下:
<!--LayoutRoot 是包含所有页面内容的根网格-->

    <Grid x:Name="LayoutRoot" Background="Transparent" Tap="LayoutRoot_Tap">

        <Image x:Name="PreviewImage"/>

        <Grid x:Name="gridControls" Visibility="Collapsed" VerticalAlignment="Bottom" Background="#44ffffff" >

            <Grid.Resources>

                <Style TargetType="TextBlock">

                    <Setter Property="Margin" Value="20,0,0,0"/>

                    <Setter Property="Foreground" Value="#ffffffff"/>

                    <Setter Property="FontWeight" Value="ExtraBold"/>

                </Style>

            </Grid.Resources>

            <Grid.RowDefinitions>

                <RowDefinition Height="auto"/>

                <RowDefinition Height="auto"/>

                <RowDefinition Height="auto"/>

                <RowDefinition Height="auto"/>

                <RowDefinition Height="auto"/>

                <RowDefinition Height="auto"/>

                <RowDefinition Height="auto"/>

                <RowDefinition Height="auto"/>

            </Grid.RowDefinitions>

            <TextBlock Text="亮度:"/>

            <Slider Grid.Row="1" Value="0.5" Minimum="0" Maximum="1" ValueChanged="brightnessSlider_ValueChanged"/>

            <TextBlock Grid.Row="2" Text="饱和度:"/>

            <Slider Grid.Row="3" Value="0.5" Minimum="0" Maximum="1" ValueChanged="saturationSlider_ValueChanged"/>

            <TextBlock Grid.Row="4" Text="光晕:"/>

            <StackPanel Orientation="Horizontal" Grid.Row="5">

                <RadioButton Content="Low" GroupName="LomoVignetting" Checked="lowRadioButton_Checked"/>

                <RadioButton Content="Medium" GroupName="LomoVignetting" Checked="medRadioButton_Checked"/>

                <RadioButton Content="High" GroupName="LomoVignetting" Checked="highRadioButton_Checked"/>

            </StackPanel>

            <TextBlock Grid.Row="6" Text="风格:"/>

            <StackPanel Orientation="Horizontal" Grid.Row="7">

                <RadioButton Content="Red" GroupName="Style" Checked="Red_RadioButton_Checked"/>

                <RadioButton Content="Green"  GroupName="Style" Checked="Green_RadioButton_Checked"/>

                <RadioButton Content="Blue"  GroupName="Style" Checked="Blue_RadioButton_Checked"/>

                <RadioButton Content="Yellow"  GroupName="Style" Checked="Yellow_RadioButton_Checked"/>

            </StackPanel>

        </Grid>

    </Grid>
14)在相应的 C# 页面,首先声明 6个变量,分别保存原始图片流,和滤镜的设置参数:
  // 使用滤镜

  double _brightness = 0.5;

  double _saturation = 0.5;

  LomoVignetting _lomoVignetting = LomoVignetting.Medium; //光晕

  LomoStyle _lomoStyle = LomoStyle.Neutral;

  Stream _imageStreamOrigin;// 保存图片的原始数据

  WriteableBitmap _writeBitmap;// 输出结果
15)在构造函数中,首先读取示例图片的流,显示未经过滤镜处理的图片:
public LomoFilterPage()

 {

     InitializeComponent();

     // 获取 xap 包中的 图片

     StreamResourceInfo StreamInfo = App.GetResourceStream(new Uri("Sample.jpg", UriKind.Relative));

     // 先把未经过滤镜处理的示例图片显示出来

     BitmapImage bitmapImage = new BitmapImage();

     bitmapImage.SetSource(StreamInfo.Stream);

     _writeBitmap = new WriteableBitmap(bitmapImage);

     PreviewImage.Source = _writeBitmap;

     // 保存示例图片的流,用于接下来添加滤镜

     _imageStreamOrigin = StreamInfo.Stream;

 }
16)然后定义一个修改滤镜的方法,每当 Silder 控件或者 RadioButton 控件修改滤镜参数的时候,调用一次这个方法:
public async void CreatePreviewImage()

 {

     if (_imageStreamOrigin == null || _writeBitmap == null)

     {

         return;

     }

     _imageStreamOrigin.Position = ;

     // 运用这个滤镜效果

     var filters = new IFilter[]

     {

       new LomoFilter(_brightness, _saturation, _lomoVignetting, _lomoStyle)

     };

     using (var source = new StreamImageSource(_imageStreamOrigin))

     using (var filterEffect = new FilterEffect(source) { Filters = filters })

     using (var renderer = new WriteableBitmapRenderer(filterEffect, _writeBitmap))

     {

         await renderer.RenderAsync();

         PreviewImage.Source = _writeBitmap;

     }

 }
改进上面 CreatePreviewImage() 方法:
因为在给图片运用滤镜效果的时候,比如在拖动 Silder 的过程中,因为上一次方法调用还没有完成,
也就是当代码执行到 await renderer.RenderAsync(); 时,异步线程的操作还没有执行完,下一次
代码再次执行,就可能会引发 线程安全 的问题,所以用一个小技巧修改一下上面的代码,使用一个全局
的 IsBusying 布尔值,控制线程的调用:
        bool IsBusying = false;

        public async void CreatePreviewImage()

        {

            if (_imageStreamOrigin == null || _writeBitmap == null)

            {

                return;

            }

            if (IsBusying)

            {

                return; // 如果正在运用一组参数,则返回

            }

            IsBusying = true;

            _imageStreamOrigin.Position = ;

            // 运用这个滤镜效果

            var filters = new IFilter[]

            {

              new LomoFilter(_brightness, _saturation, _lomoVignetting, _lomoStyle)

            };

            using (var source = new StreamImageSource(_imageStreamOrigin))

            using (var filterEffect = new FilterEffect(source) { Filters = filters })

            using (var renderer = new WriteableBitmapRenderer(filterEffect, _writeBitmap))

            {

                await renderer.RenderAsync();

                //Windows.Foundation.IAsyncOperation<WriteableBitmap> ia = renderer.RenderAsync();

                //ia.Cancel();

                PreviewImage.Source = _writeBitmap;

            }

            IsBusying = false;

        }
当然,在调用复杂的情况时,可以使用 System.Threading.Semaphore 类 来限制访问同一资源的线程数量,
或者 System.Threading.AutoResetEvent 控制线程的事件执行。
17)下面添加 SIider 和 RadioButton 控件的事件触发的代码,下面的代码虽然比较多,但很容易理解:
#region 参数调整

 private void brightnessSlider_ValueChanged(object sender, RoutedPropertyChangedEventArgs<double> e)

 {

     _brightness = 1.0 - e.NewValue;

     CreatePreviewImage();

 }

 private void saturationSlider_ValueChanged(object sender, RoutedPropertyChangedEventArgs<double> e)

 {

     _saturation = e.NewValue;

     CreatePreviewImage();

 }

 protected void lowRadioButton_Checked(object sender, System.Windows.RoutedEventArgs e)

 {

     _lomoVignetting = LomoVignetting.Low;

     CreatePreviewImage();

 }

 protected void medRadioButton_Checked(object sender, System.Windows.RoutedEventArgs e)

 {

     _lomoVignetting = LomoVignetting.Medium;

     CreatePreviewImage();

 }

 protected void highRadioButton_Checked(object sender, System.Windows.RoutedEventArgs e)

 {

     _lomoVignetting = LomoVignetting.High;

     CreatePreviewImage();

 }

 private void Red_RadioButton_Checked(object sender, RoutedEventArgs e)

 {

     _lomoStyle = LomoStyle.Red;

     CreatePreviewImage();

 }

 private void Green_RadioButton_Checked(object sender, RoutedEventArgs e)

 {

     _lomoStyle = LomoStyle.Green;

     CreatePreviewImage();

 }

 private void Blue_RadioButton_Checked(object sender, RoutedEventArgs e)

 {

     _lomoStyle = LomoStyle.Blue;

     CreatePreviewImage();

 }

 private void Yellow_RadioButton_Checked(object sender, RoutedEventArgs e)

 {

     _lomoStyle = LomoStyle.Yellow;

     CreatePreviewImage();

 }

 #endregion
18)运行工程:

19) 总结:本实验代码量比较少,也很容易理解。有关 Nokia Imaging SDK 滤镜使用流程,请参考相关文档。
工程下载链接: http://pan.baidu.com/s/1eXV4q
在运行源代码时,会出现一个编译错误: Nokia Imaging SDK does not support the AnyCPU target platform.
因为 Nokia Imaging SDK 支持托管代码和本地代码,所以在编译前需要进行设置:
1)在模拟器上运行时:菜单 -> 生成 -> 配置管理器 -> 活动解决方案平台 -> x86 2)在真机上运行时: 菜单 -> 生成 -> 配置管理器 -> 活动解决方案平台 -> ARM
Nokia Imaging SDK滤镜使用入门的更多相关文章
- Nokia Imaging SDK 的高级使用—实时滤镜拍照
有关 Nokia Imaging SDK 的初级使用,可以参考:Nokia Imaging SDK滤镜使用入门 本文的主题: 1.如何 PhotoCaptureDevice 类使用,以及如何在 Med ...
- 使用 Nokia Imaging SDK 开发有滤镜功能的 Windows Phone 8 应用
说到滤镜应用,相信很多数开发者都对照片特效的经验都十分有限,通常都是去找一些三方的类库进行学习或移植,今天在这里给大家介绍下 Nokia 的 Imaging SDK, 相信大家对Nokia的自家图像软 ...
- Nokia Imaging SDK
Nokia Imaging SDK 目前为 beta 版本,是诺基亚在自己的图像应用中使用的技术同时提供给开发者 使用.这是一个运行在手机设备上处理图片数据的高效的类库.功能包括 JEPG 图片的编码 ...
- 无责任Windows Azure SDK .NET开发入门(二):使用Azure AD 进行身份验证
<編者按>本篇为系列文章,带领读者轻松进入Windows Azure SDK .NET开发平台.本文为第二篇,将教导读者使用Azure AD进行身分验证.也推荐读者阅读无责任Windows ...
- 无责任Windows Azure SDK .NET开发入门篇一[Windows Azure开发前准备工作]
一.Windows Azure开发前准备工作 首先我们需要了解什么是 Azure SDK for .NET?微软官方告诉我们:Azure SDK for .NET 是一套应用程序,其中包括 Visua ...
- 无责任Windows Azure SDK .NET开发入门篇(一):开发前准备工作
Windows Azure开发前准备工作 什么是 Azure SDK for .NET?微软官方告诉我们:Azure SDK for .NET 是一套应用程序,其中包括 Visual Studio 工 ...
- 29-ESP8266 SDK开发基础入门篇--编写TCP 客户端程序(Lwip RAW模式,非RTOS版,精简入门)
https://www.cnblogs.com/yangfengwu/p/11456667.html 由于上一节的源码长时间以后会自动断开,所以再做这一版非RTOS版的,咱直接用lua源码里面别人写的 ...
- 无责任Windows Azure SDK .NET开发入门篇三[使用Azure AD 管理用户信息]
三.使用Azure AD管理用户信息 在上一章我们采用OpenID的方案和Azure AD交互进行身份验证,本章节我们继续了解如何在Azure AD中创建用户,列出用户信息,修改用户信息和删除用户信息 ...
- 无责任Windows Azure SDK .NET开发入门篇二[使用Azure AD 进行身份验证-2.2身份验证开发]
2.2身份验证开发 在我们的案例中,我们是用户通过Web应用程序进行身份识别. 上面的图示说明了如下的一些概念 l Azure AD 是标识提供程序,负责对组织的目录中存在的用户和应用程序的标识进行验 ...
随机推荐
- Flink及主流流框架spark,storm比较
干货 | Flink及主流流框架比较 IT刊 百家号17-05-2220:16 引言 随着大数据时代的来临,大数据产品层出不穷.我们最近也对一款业内非常火的大数据产品 - Apache Flink做了 ...
- LaTeX排版设置图表的位置 Positioning images and tables
Positioning images and tables LATEX is an editing tool that takes care of the format so you only hav ...
- Flask 学习(一)概述及安装
Flask 概述及安装 Flask 简介 Flask是一个使用 Python 编写的轻量级 Web 应用框架.其 WSGI 工具箱采用 Werkzeug ,模板引擎则使用 Jinja2 . 官方网址 ...
- Spark Streaming中空batches处理的两种方法(转)
原文链接:Spark Streaming中空batches处理的两种方法 Spark Streaming是近实时(near real time)的小批处理系统.对给定的时间间隔(interval),S ...
- java学习笔记12--异常处理
java学习笔记系列: java学习笔记11--集合总结 java学习笔记10--泛型总结 java学习笔记9--内部类总结 java学习笔记8--接口总结 java学习笔记7--抽象类与抽象方法 j ...
- FrameWork数据权限浅析1之基于手工修改模型实现行级数据安全
1:环境 Cognos10.2.0,Oracle 2:实现过程 在设置Framework数据级别权限的时候,通常用到的就是在FM的设置数据安全的地方添加安全过滤器,如下图 step1:选中部门维度表→ ...
- (笔试题)N!尾部连续0的个数
题目: 对任意输入的正整数N,编写C程序求N!的尾部连续0的个数,并指出计算复杂度.如:18!=6402373705728000,尾部连续0的个数是3. (不用考虑数值超出计算机整数界限的问题) 思路 ...
- C++ 生成
1.重新生成,会导致所有cpp文件重新编译,然后连接. 2.使用生成,只会对需要重新编译的cpp文件,进行编译. a.修改cpp文件方法实现,只需要重新编译该cpp文件 b.修改h文件的接口部分,包含 ...
- C#应用视频教程3.1 USB工业相机测试
图像处理是工控很有价值的一个领域,比如人脸识别,车牌识别,还有产品的位置识别,瑕疵检测,对于个人学习来说,我们无法直接上手几万块的成熟工业相机(高端的康耐视要6万左右,而且是黑白的,要测试一些带颜色的 ...
- PHP出现Notice警告怎么办
如下所示,出现Notice警告 程序并没有大错,只是一些变量没有定义,你在代码的第一行加入这一句就可以了:error_reporting(E_ALL ^ E_NOTICE); 恢复正常了.