SpringBoot 2.x (13):整合ActiveMQ
ActiveMQ5.x不多做介绍了,主要是SpringBoot的整合
特点:
1)支持来自Java,C,C ++,C#,Ruby,Perl,Python,PHP的各种跨语言客户端和协议
2)支持许多高级功能,如消息组,虚拟目标,通配符和复合目标
3) 完全支持JMS 1.1和J2EE 1.4,支持瞬态,持久,事务和XA消息
4) Spring支持,ActiveMQ可以轻松嵌入到Spring应用程序中,并使用Spring的XML配置机制进行配置
5) 支持在流行的J2EE服务器(如TomEE,Geronimo,JBoss,GlassFish和WebLogic)中进行测试
6) 使用JDBC和高性能日志支持非常快速的持久化
下载:
http://activemq.apache.org/activemq-5153-release.html
实际开发推荐部署到Linux系统,具体操作网上也有教程
我这里为了方便,直接安装在本地Windows机器上
如果想了解更多,查看官方文档:
http://activemq.apache.org/getting-started.html
进入bin目录win64目录启动activemq.bat即可
访问localhost:8161进入首页
访问http://localhost:8161/admin/进入管理页面,默认用户名和密码都是admin
整合:
依赖
        <dependency>

            <groupId>org.springframework.boot</groupId>

            <artifactId>spring-boot-starter-activemq</artifactId>

        </dependency>
连接池
        <dependency>

            <groupId>org.apache.activemq</groupId>

            <artifactId>activemq-pool</artifactId>

        </dependency>
基本的配置
# ActiveMQ

spring.activemq.broker-url=tcp://127.0.0.1:61616

spring.activemq.user=admin

spring.activemq.password=admin

spring.activemq.pool.enabled=true

spring.activemq.pool.max-connections=100
使用ActiveMQ必须要在SpringBoot启动类中开启JMS,并进行配置
package org.dreamtech.avtivemq;

import javax.jms.ConnectionFactory;

import org.apache.activemq.ActiveMQConnectionFactory;

import org.springframework.beans.factory.annotation.Autowired;

import org.springframework.boot.SpringApplication;

import org.springframework.boot.autoconfigure.SpringBootApplication;

import org.springframework.context.annotation.Bean;

import org.springframework.core.env.Environment;

import org.springframework.jms.annotation.EnableJms;

import org.springframework.jms.core.JmsMessagingTemplate;

import org.springframework.jms.core.JmsTemplate;

@SpringBootApplication

@EnableJms

public class AvtivemqApplication {

    public static void main(String[] args) {

        SpringApplication.run(AvtivemqApplication.class, args);

    }

    @Autowired

    private Environment env;

    @Bean

    public ConnectionFactory connectionFactory() {

        ActiveMQConnectionFactory connectionFactory = new ActiveMQConnectionFactory();

        connectionFactory.setBrokerURL(env.getProperty("spring.activemq.broker-url"));

        connectionFactory.setUserName(env.getProperty("spring.activemq.user"));

        connectionFactory.setPassword(env.getProperty("spring.activemq.password"));

        return connectionFactory;

    }

    @Bean

    public JmsTemplate genJmsTemplate() {

        return new JmsTemplate(connectionFactory());

    }

    @Bean

    public JmsMessagingTemplate jmsMessageTemplate() {

        return new JmsMessagingTemplate(connectionFactory());

    }

}
点对点模型:
首先实现消息的发送
package org.dreamtech.avtivemq.service;

import javax.jms.Destination;

/**

 * 消息生产

 *

 * @author Xu Yiqing

 *

 */

public interface ProducerService {

    /**

     * 使用指定消息队列发送

     *

     * @param destination

     * @param message

     */

    void sendMsg(Destination destination, final String message);

}
package org.dreamtech.avtivemq.service.impl;

import javax.jms.Destination;

import org.dreamtech.avtivemq.service.ProducerService;

import org.springframework.beans.factory.annotation.Autowired;

import org.springframework.jms.core.JmsMessagingTemplate;

import org.springframework.stereotype.Service;

@Service

public class ProducerServiceImpl implements ProducerService {

    @Autowired

    private JmsMessagingTemplate jmsTemplate;

    @Override

    public void sendMsg(Destination destination, String message) {

        jmsTemplate.convertAndSend(destination, message);

    }

}
package org.dreamtech.avtivemq.controller;

import javax.jms.Destination;

import org.apache.activemq.command.ActiveMQQueue;

import org.dreamtech.avtivemq.service.ProducerService;

import org.springframework.beans.factory.annotation.Autowired;

import org.springframework.web.bind.annotation.GetMapping;

import org.springframework.web.bind.annotation.RestController;

@RestController

public class OrderController {

    @Autowired

    private ProducerService producerService;

    @GetMapping("/order")

    private Object order(String msg) {

        Destination destination = new ActiveMQQueue("order.queue");

        producerService.sendMsg(destination,msg);

        return "order";

    }

}
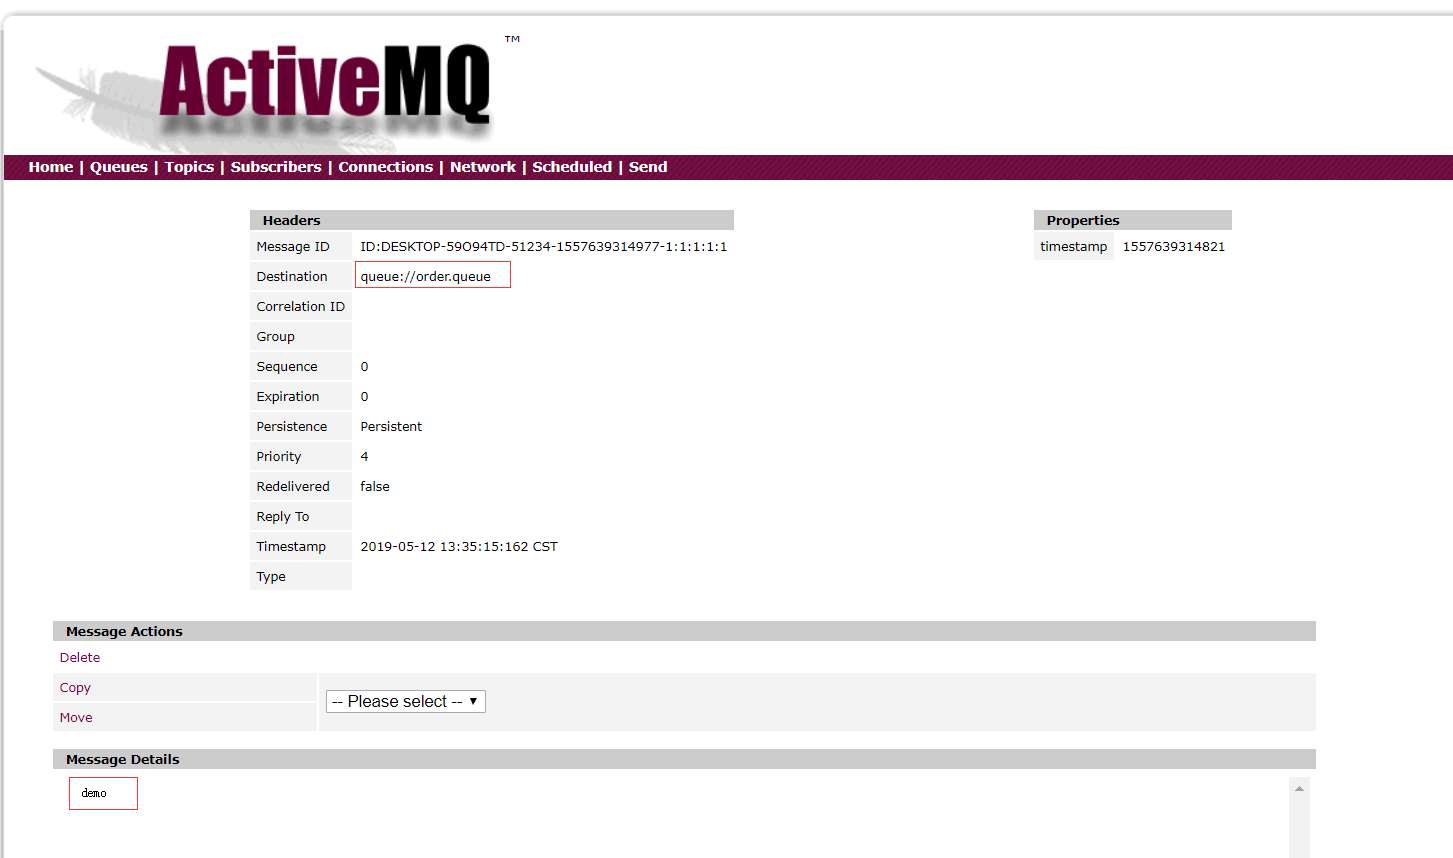
访问:http://localhost:8080/order?msg=demo,然后查看ActiveMQ界面:
有生产者就就有消费者:监听消息队列
package org.dreamtech.avtivemq.jms;

import org.springframework.jms.annotation.JmsListener;

import org.springframework.stereotype.Component;

@Component

public class OrderConsumer {

    /**

     * 监听指定消息队列

     *

     * @param text

     */

    @JmsListener(destination = "order.queue")

    public void receiveQueue(String text) {

        System.out.println("[ OrderConsumer收到的报文 : " + text + " ]");

    }

}
由于实时监听,一启动SpringBoot就会打印:
[ OrderConsumer收到的报文 : demo ]
发布订阅模型:比如抖音小视频,某网红发布新视频,多名粉丝收到消息
默认ActiveMQ只支持点对点模型,想要开启发布订阅模型,需要进行配置
spring.jms.pub-sub-domain=true
Spring管理主题对象
    @Bean

    public Topic topic() {

        return new ActiveMQTopic("demo.topic");

    }
发布者
    /**

     * 消息发布者

     *

     * @param msg

     */

    void publish(String msg);
    @Autowired

    private JmsMessagingTemplate jmsTemplate;

    @Autowired

    private Topic topic;

    @Override

    public void publish(String msg) {

        jmsTemplate.convertAndSend(topic, msg);

    }
    @Autowired

    private ProducerService producerService;

    @GetMapping("/topic")

    private Object topic(String msg) {

        producerService.publish(msg);

        return "success";

    }
订阅者(消费者):一人发布,多人订阅
package org.dreamtech.avtivemq.jms;

import org.springframework.jms.annotation.JmsListener;

import org.springframework.stereotype.Component;

@Component

public class TopicConsumer {

    @JmsListener(destination = "demo.topic")

    public void receiver1(String text) {

        System.out.println("TopicConsumer : receiver1 : " + text);

    }

    @JmsListener(destination = "demo.topic")

    public void receiver2(String text) {

        System.out.println("TopicConsumer : receiver2 : " + text);

    }

    @JmsListener(destination = "demo.topic")

    public void receiver3(String text) {

        System.out.println("TopicConsumer : receiver3 : " + text);

    }

}
启动项目,访问:
http://localhost:8080/topic?msg=666
打印如下
TopicConsumer : receiver1 : 666

TopicConsumer : receiver3 : 666

TopicConsumer : receiver2 : 666
那么点对点和发布订阅模型可以一起使用吗?
不可以
如何配置?
1.注释掉 #spring.jms.pub-sub-domain=true
2.加入Bean:给topic定义独立的JmsListenerContainer
    @Bean

    public JmsListenerContainerFactory<?> jmsListenerContainerTopic(ConnectionFactory activeMQConnectionFactory) {

        DefaultJmsListenerContainerFactory bean = new DefaultJmsListenerContainerFactory();

        bean.setPubSubDomain(true);

        bean.setConnectionFactory(activeMQConnectionFactory);

        return bean;

    }
3.@JmsListener如果不指定独立的containerFactory的话是只能消费queue消息
    @JmsListener(destination = "demo.topic", containerFactory = "jmsListenerContainerTopic")

    public void receiver1(String text) {

        System.out.println("TopicConsumer : receiver1 : " + text);

    }
SpringBoot 2.x (13):整合ActiveMQ的更多相关文章
- SpringBoot整合ActiveMQ和开启持久化
一.点对点 1.提供者目录展示 2.导入依赖 <dependency> <groupId>org.springframework.boot</groupId> &l ...
- Web项目容器集成ActiveMQ & SpringBoot整合ActiveMQ
集成tomcat就是随项目启动而启动tomcat,最简单的方法就是监听器监听容器创建之后以Broker的方式启动ActiveMQ. 1.web项目中Broker启动的方式进行集成 在这里采用Liste ...
- springboot整合ActiveMQ,配置问题
1.ActiveMQ的安装和相关配置修改 去官网下载安装包解压至文件夹 双击打开 打开浏览器输入 http://127.0.0.1:8161 到此activeMQ就安装好了 2.springboot工 ...
- 【springboot】之整合ActiveMQ
1.引入依赖的jar <parent> <groupId>org.springframework.boot</groupId> <artifactId> ...
- SpringBoot系列八:SpringBoot整合消息服务(SpringBoot 整合 ActiveMQ、SpringBoot 整合 RabbitMQ、SpringBoot 整合 Kafka)
声明:本文来源于MLDN培训视频的课堂笔记,写在这里只是为了方便查阅. 1.概念:SpringBoot 整合消息服务 2.具体内容 对于异步消息组件在实际的应用之中会有两类: · JMS:代表作就是 ...
- SpringBoot整合ActiveMQ快速入门
Spring Boot 具有如下特性: 为基于 Spring 的开发提供更快的入门体验 开箱即用,没有代码生成,也无需 XML 配置.同时也可以修改默认值来满足特定的需求. 提供了一些大型项目中常见的 ...
- SpringBoot第二十一篇:整合ActiveMQ
作者:追梦1819 原文:https://www.cnblogs.com/yanfei1819/p/11190048.html 版权声明:本文为博主原创文章,转载请附上博文链接! 引言 前一章节中 ...
- 解决Springboot整合ActiveMQ发送和接收topic消息的问题
环境搭建 1.创建maven项目(jar) 2.pom.xml添加依赖 <parent> <groupId>org.springframework.boot</group ...
- ActiveMQ 笔记(四)Spring\SpringBoot 整合 Activemq
个人博客网:https://wushaopei.github.io/ (你想要这里多有) 一.Spring 整合Activemq 1.所需jar包 <dependencies> &l ...
- springboot整合activemq加入会签,自动重发机制,持久化
消费者客户端成功接收一条消息的标志是:这条消息被签收. 消费者客户端成功接收一条消息一般包括三个阶段: 1.消费者接收消息,也即从MessageConsumer的receive方法返 ...
随机推荐
- 洛谷P1584 魔杖
题目描述 Smart在春游时意外地得到了一种好东西——一种非常珍贵的树枝.这些树枝可以用来做优质的魔杖! 选择怎样的切割方式来制作魔杖非常重要,关键问题是——一把魔杖既不能太长.又不能太短,且制作出来 ...
- TTY,Console以及Terminal
TTY可以理解是一种终端显示.可以在/dev文件夹看到多个tty开头的文件,可以通过alt+Fn(n=1~6)来进行切换.这个是不是和GUI场景下的多个Terminal窗口是一致的呢? 伪TTY是指一 ...
- 基于zookeeper的MySQL主主负载均衡的简单实现
1.先上原理图 2.说明 两个mysql采用主主同步的方式进行部署. 在安装mysql的服务器上安装客户端(目前是这么做,以后想在zookeeper扩展集成),客户端实时监控mysql应用的可用性,可 ...
- WPF TextBox PreviewTextInput handle IME (chinese)
今天调试自己写的WPF的Behavior, 是关于TextBox只能输入数据或者小数点的. 发现有个问题, 就是英文IME下字母等等都能过滤, 但是一旦切换到中文输入法, 就会发现在OnPreview ...
- 【win10激活问题】 从【win10专业工作站版】转为 数字许可证的【win10专业版】
今天安装了 win10 1903 (10.0.18362 暂缺 Build 18362) 安装时 选的 是[win10 专业工作站版] 却无法激活, (因为当初是从win7升级上win10的,只有关联 ...
- 点阵字体显示系列之一:ASCII码字库的显示
http://blog.csdn.net/subfate/article/details/6444578 起因: 早在阅读tslib源代码时就注意到里面有font_8x8.c和font_8x16.c两 ...
- QTreeWidget笔记
1.QTreeWidget继承自QTreeView. 2.头文件:QTreeWidget 3.简单使用: #include "mainwindow.h" #include < ...
- java之装箱拆箱
参考http://how2j.cn/k/number-string/number-string-wrap/22.html 封装类 所有的基本类型,都有对应的类类型 比如int对应的类是Integer ...
- phpstudy配置php7.1.11
php7.1.11下载地址 http://windows.php.net/download/ 下载之后,解压. 重名的为php-7.1.11-nts 移动到phpStudy的php目录下 然后重启ph ...
- tcpdump的使用总结
1. 监视所有发送到主机hostname的数据: tcpdump -i eth0 dst host hostname 2. 监视指定主机和端口的数据包(接收或发出的telnet包): tcpdump ...