5.2 odex文件
odex是OptimizedDEX的缩写,是优化过的dex文件
odex两种存在方式:
1. 从apk程序中提取,和apk文件放在一起,后缀 odex,此类文件多是AndroidRom系统文件
2. 在cache/dalvik-cache缓存文件,后缀 dex
a) Eg:system@app@calcuator.apk@classes.dex 安装在/system/app目录下calcuator.apk程序的odex文件
odex作用:
因为Dalvik每次加载从apk中读取classes.dex文件会消耗cpu时间,odex则已经包含了需要加载的库文件列表,Dalvik虚拟机加载时根据需要加载的库对照dex文件即可。
部分Android系统的ROM将系统odex文件与app放在同一目录,系统在启动加载这些程序会更省时间。
一、生成odex文件:
使用Android系统源码工具生成dex
将build/tools/dexpreopt/dexopt-wrapper下的dexopt-wrapper拷入真机adb push命令
给予777权限,将需要生成dex文件拷入到手机cd跳转该目录执行如下命令
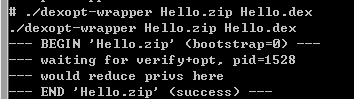
adb pull将文件拷出得到odex文件,文件位置默认为此时cmd的路径位置
分析odex文件:
文件结构体

Dalvik虚拟机将dex文件映射到内存后
500struct DexFile {
501 /* directly-mapped "opt" header */
502 const DexOptHeader* pOptHeader; // odex文件头
503
504 /* pointers to directly-mapped structs and arrays in base DEX */
505 const DexHeader* pHeader;
506 const DexStringId* pStringIds;
507 const DexTypeId* pTypeIds;
508 const DexFieldId* pFieldIds;
509 const DexMethodId* pMethodIds;
510 const DexProtoId* pProtoIds;
511 const DexClassDef* pClassDefs;
512 const DexLink* pLinkData;
513
514 /*
515 * 辅助数据段,记录文件被优化后添加的一些信息
517 */
518 const DexClassLookup* pClassLookup;
519 const void* pRegisterMapPool; // RegisterMapClassPool
520
521 /* points to start of DEX file data */
522 const u1* baseAddr;
523
524 /* track memory overhead for auxillary structures */
525 int overhead;
526
527 /* additional app-specific data structures associated with the DEX */
528 //void* auxData;
529};
DexFile结构中存入其他结构的指针,描述的是加载到内存的数据结构,还有些数据是不会加载到内存的
odex文件结构
struct ODEXFile{
DexOptHeader header;// odex文件头
DEXFile dexfile;// dex文件
Dependence deps;//依赖库列表
ChunkDexClassLoopup lookup;// 类查询结构
ChunkRegisterMapPool mappool;// 映射池
ChunkEnd end;// 结束标志
}
二、odex文件解析
DexOptHeader在DexFile.h文件中466/*
467 * Header added by DEX optimization pass. Values are always written in
468 * local byte and structure padding. The first field (magic + version)
469 * is guaranteed to be present and directly readable for all expected
470 * compiler configurations; the rest is version-dependent.
471 *
472 * Try to keep this simple and fixed-size.
473 */
474struct DexOptHeader {
475 u1 magic[8]; /* odex版本标示 目前固定“64 65 79 0A 30 33 36 00” dey 036 */
476
477 u4 dexOffset; /* dex文件头偏移 目前固定为“28 00 00 00”*/
478 u4 dexLength; /* dex文件总长度 */
479 u4 depsOffset; /* odex依赖库列表偏移 */
480 u4 depsLength; /* 依赖库列表总长度 */
481 u4 optOffset; /* 辅助数据偏移 */
482 u4 optLength; /* 辅助数据总长度 */
483
484 u4 flags; /* 标志,标识了Dalvik虚拟机加载odex时的优化与验证选项 */
485 u4 checksum; /* 依赖库与辅助数据的校验和*/
486
487 /* pad for 64-bit alignment if necessary */
488};
DexOptheader结构以下为DEXFile。
DEXFile下为Dependences结构,Dependences结构不会加载到内存,并且Android源码没有明确定义。
整理出来的结构
struct DexOptHeader{
u4 modWhen; // 时间戳
u4 crc; // 校验
u4 DALVIK_VM_BUILD; // Dalvik虚拟机版本号
u4 numDeps; // 依赖库的个数
struct{
u4 len; // name字符串长度
u1 name[len]; // 依赖库的名称,依赖库的完整路径
kSHA1DigestLen signature; // SHA-1 哈希值
}table[numDeps]; // numDeps决定了table连续的个数
};
Dependences结构的具体操作函数位置 dalvik\vm\analysis\DexPrepare.cpp 中的writeDependencies()1358/*
1359 * Write the dependency info to "fd" at the current file position.
1360 */
1361static int writeDependencies(int fd, u4 modWhen, u4 crc)
1362{
1363 u1* buf = NULL;
1364 int result = -1;
1365 ssize_t bufLen;
1366 ClassPathEntry* cpe;
1367 int numDeps;
1368
1369 /*
1370 * Count up the number of completed entries in the bootclasspath.
1371 */
1372 numDeps = 0;
1373 bufLen = 0;
1374 for (cpe = gDvm.bootClassPath; cpe->ptr != NULL; cpe++) {
1375 const char* cacheFileName =
1376 dvmPathToAbsolutePortion(getCacheFileName(cpe));
1377 assert(cacheFileName != NULL); /* guaranteed by Class.c */
1378
1379 ALOGV("+++ DexOpt: found dep '%s'", cacheFileName);
1380
1381 numDeps++;
1382 bufLen += strlen(cacheFileName) +1;
1383 }
1384
1385 bufLen += 4*4 + numDeps * (4+kSHA1DigestLen);
1386
1387 buf = (u1*)malloc(bufLen);
1388
1389 set4LE(buf+0, modWhen); // 写入时间戳 注意:modWhenhe和crc通过
1390 set4LE(buf+4, crc); // 写入crc校验 dexZipGetEntryInfo()获取的
1391 set4LE(buf+8, DALVIK_VM_BUILD); // 写入Dalvik虚拟机版本号
1392 set4LE(buf+12, numDeps); // 写入依赖库的个数
1393
1394 // TODO: do we want to add dvmGetInlineOpsTableLength() here? Won't
1395 // help us if somebody replaces an existing entry, but it'd catch
1396 // additions/removals.
1397
1398 u1* ptr = buf + 4*4; // 跳过前四个字段
1399 for (cpe = gDvm.bootClassPath; cpe->ptr != NULL; cpe++) { // 循环写入依赖库
1400 const char* cacheFileName =
1401 dvmPathToAbsolutePortion(getCacheFileName(cpe));
1402 assert(cacheFileName != NULL); /* guaranteed by Class.c */
1403
1404 const u1* signature = getSignature(cpe); // 计算SHA-1 哈希值
1405 int len = strlen(cacheFileName) +1;
1406
1407 if (ptr + 4 + len + kSHA1DigestLen > buf + bufLen) {
1408 ALOGE("DexOpt: overran buffer");
1409 dvmAbort();
1410 }
1411
1412 set4LE(ptr, len);
1413 ptr += 4;
1414 memcpy(ptr, cacheFileName, len); // 写入依赖库的名字
1415 ptr += len;
1416 memcpy(ptr, signature, kSHA1DigestLen); // 写入SHA-1哈希值
1417 ptr += kSHA1DigestLen;
1418 }
1419
1420 assert(ptr == buf + bufLen);
1421
1422 result = sysWriteFully(fd, buf, bufLen, "DexOpt dep info");
1423
1424 free(buf);
1425 return result;
1426}
dexZipGetEntryInfo()函数位于 /dalvik/libdex/ZipArchive.cpp 根据结构体分析二进制即可
Dalvik版本号:Android2.2.3 19
Android2.3~2.3.7 23
Android4.0~4.1 27
Dependences结构下有3个Chunk块。由/dalvik/vm/analysis/DexPrepare.cpp中的writeOptData()写入1474
1475 * Write opt data.
1476 *
1477 * We have different pieces, some of which may be optional. To make the
1478 * most effective use of space, we use a "chunk" format, with a 4-byte
1479 * type and a 4-byte length. We guarantee 64-bit alignment for the data,
1480 * so it can be used directly when the file is mapped for reading.
1481 */
1482static bool writeOptData(int fd, const DexClassLookup* pClassLookup,
1483 const RegisterMapBuilder* pRegMapBuilder)
1484{
1485 /* pre-computed class lookup hash table */
1486 if (!writeChunk(fd, (u4) kDexChunkClassLookup,
1487 pClassLookup, pClassLookup->size))
1488 {
1489 return false;
1490 }
1491
1492 /* register maps (optional) */
1493 if (pRegMapBuilder != NULL) {
1494 if (!writeChunk(fd, (u4) kDexChunkRegisterMaps,
1495 pRegMapBuilder->data, pRegMapBuilder->size))
1496 {
1497 return false;
1498 }
1499 }
1500
1501 /* write the end marker */
1502 if (!writeChunk(fd, (u4) kDexChunkEnd, NULL, 0)) {
1503 return false;
1504 }
1505
1506 return true;
1507}
数据是通过writeChunk()写入的,writeChunk()源码1429/*
1430 * Write a block of data in "chunk" format.
1431 *
1432 * header结构体占8字节,type字段为1一个kDexChunk开头的常量
1433 *
1434 */
1435static bool writeChunk(int fd, u4 type, const void* data, size_t size)
1436{
1437 union { /* save a syscall by grouping these together */
1438 char raw[8];
1439 struct {
1440 u4 type;
1441 u4 size;
1442 } ts;
1443 } header;
1444
1445 assert(sizeof(header) == 8);
1446
1447 ALOGV("Writing chunk, type=%.4s size=%d", (char*) &type, size);
1448
1449 header.ts.type = type;
1450 header.ts.size = (u4) size;
1451 if (sysWriteFully(fd, &header, sizeof(header),
1452 "DexOpt opt chunk header write") != 0)
1453 {
1454 return false;
1455 }
1456
1457 if (size > 0) {
1458 if (sysWriteFully(fd, data, size, "DexOpt opt chunk write") != 0)
1459 return false;
1460 }
1461
1462 /* if necessary, pad to 64-bit alignment */
1463 if ((size & 7) != 0) {
1464 int padSize = 8 - (size & 7);
1465 ALOGV("size was %d, inserting %d pad bytes", size, padSize);
1466 lseek(fd, padSize, SEEK_CUR);
1467 }
1468
1469 assert( ((int)lseek(fd, 0, SEEK_CUR) & 7) == 0);
1470
1471 return true;
1472}
writeChunk()方法中传入的type字段
188/* auxillary data section chunk codes */
189enum {
190 kDexChunkClassLookup = 0x434c4b50, /* CLKP */
191 kDexChunkRegisterMaps = 0x524d4150, /* RMAP */
192
193 kDexChunkEnd = 0x41454e44, /* AEND */
194};
writeOptData ()方法中传入DexClassLookup结构指针,Dalvik虚拟机通过DexClassLookup结构检索dex文件中的类
447/*
448 * Lookup table for classes. It provides a mapping from class name to
449 * class definition. Used by dexFindClass().
450 *
451 * We calculate this at DEX optimization time and embed it in the file so we
452 * don't need the same hash table in every VM. This is slightly slower than
453 * a hash table with direct pointers to the items, but because it's shared
454 * there's less of a penalty for using a fairly sparse table.
455 */
456struct DexClassLookup {
457 int size; // 本结构的字节数
458 int numEntries; // 接下来table结构的项数,通常值为2
459 struct {
460 u4 classDescriptorHash; // 类的哈希值
461 int classDescriptorOffset; // 类的描述
462 int classDefOffset; // 指向DexClassDef结构的指针
463 } table[1];// 用来描述类的信息
464};
465
根据上述源码总结出的ChunkDexClassLookup结构声明:
struct ChunkDexClassLookup{
Header header;
DexClassLookup lookup;
}
ChunkRegisterMapPool的结构体是writeOptData()函数向writeChunk()函数传递1个RegisterMapBuilder结构体指针。
RegisterMapBuilder结构体通过dvmGenerateRegisterMaps()函数填充。
dvmGenerateRegisterMaps()调用writeMapsAllClasses()填充所有类的映射信息,
writeMapsAllClasses()调用writeMapsAllMethods()填充所有方法映射信息
writeMapsAllMethods()调用writeMapForMethod()依次填充每个方法的映射信息
并调用computeRegisterMapSize()函数计算填充的每个方法映射信息的长度,用来循环遍历所有的方法
struct ChunkRegisterMapPool{
Header header;
struct{
struct RegisterMapClassPool{
u4 numClasses;
u4 classDataOffset[1];
}classpool;
struct RegisterMapMethodPool{
u2 methodCount;
u4 methodData[1];
};
}lookup;
};
写ChunkEnd结构时,writeOptData()向writeChunk()传递了一个null指针,根据传递的kDexChunkEnd类型来判断。
odex文件最后的8个字节固定为“44 4E 45 41 00 00 00 00”
struct ChunkEnd{
Header header;
}
5.2 odex文件的更多相关文章
- Android odex文件反编译
odex 是经过优化的dex文件,且独立存在于apk文件.odex 多用于系统预制应用或服务.通过将apk中的dex文件进行 odex,可以加载 apk 的启动速度,同时减小空间的占用.请参考ODEX ...
- android反编译odex文件
关于android的反编译工具,相信大家并不陌生 如APK-TOOL,dex2jar APK-TOOL 用于反编译出布局文件 下载地址http://code.google.com/p/android- ...
- DEX、ODEX、OAT文件&Dalvik和ART虚拟机
https://www.jianshu.com/p/389911e2cdfb https://www.jianshu.com/p/a468e714aca7 ODEX是安卓上的应用程序apk中提取出来的 ...
- dex和odex相互转换
一.dex和odex dex是安卓dalvik虚拟机的可执行文件,可以在导出的apk文件里用解压缩软件直接打开.odex是经过优化过的dex.odex一种是从apk程序中提取出来的,与apk文件存放在 ...
- 浅析dex文件加载机制
我们可以利用DexClassLoader来实现动态加载dex文件,而很多资料也只是对于DexClassLoader的使用进行了介绍,没有深入讲解dex的动态加载机制,我们就借助于Android4.4的 ...
- Android开发了解——ODEX
ODEX是安卓上的应用程序apk中提取出来的可运行文件,即将APK中的classes.dex文件通过dex优化过程将其优化生成一个·dex文件单独存放,原APK中的classes.dex文件会保留.这 ...
- android 反编译(dex 和 odex),非脑残转帖,绝对可靠
Android 反编译 反编译odex文件(比如framework.odex),若是反编译dex,直接第4步 1.因为反编译odex的工具在D:\Develop tools\android反编译工具\ ...
- [转]Android应用安装包apk文件的反编译与重编译、重签名
背景介绍: 最近在做Robotium自动化测试,使用到solo.takeScreenshot()函数以在测试过程中截图,但此函数需要被测试APP具有<uses-permission androi ...
- [教程] 【【【【odex教程之jar】】】】/system/framework里面的jar做odex g13
dexopt-wrapper core.jar core.odex dexopt-wrapper ext.jar ext.odex dexopt-wrapper framework.jar frame ...
随机推荐
- IConvertible接口
IConvertible接口:定义特定的方法,这些方法将实现引用或值类型的值转换为具有等效值的公共语言运行库类型. 公共语言运行库类型包括: Boolean.SByte.Byte.Int16.UInt ...
- 转 Git生成SSH
SSH keys SSH key 可以让你在你的电脑和Code服务器之间建立安全的加密连接. 先执行以下语句来判断是否已经存在本地公钥: cat ~/.ssh/id_rsa.pub 如果你看到一长串以 ...
- 树莓派项目(1-3 )目标识别 NNPACK支持版Darknet,可用于树莓派等嵌入设备
https://github.com/digitalbrain79/darknet-nnpack https://github.com/AlexeyAB/darknet#how-to-train-to ...
- MySQL版本问题导致的SQLException
背景 学习使用 SpringCloud 时,使用 消费者 调用 生产者 时抛出 SQLException,持久层框架为 MyBatis,数据库为最新版本的 MySQL 版本如下: Server v ...
- Nothing to say
1. This moment will nap, you will have a dream; but this moment study, you will interpret a dream.此刻 ...
- BootstrapTable的简单使用教程
1.引入必须的几个包 <link th:href="bootstrap/css/bootstrap.css}"/> <link th:href="boo ...
- 转载:深度学习在NLP中的应用
之前研究的CRF算法,在中文分词,词性标注,语义分析中应用非常广泛.但是分词技术只是NLP的一个基础部分,在人机对话,机器翻译中,深度学习将大显身手.这篇文章,将展示深度学习的强大之处,区别于之前用符 ...
- ASP.NET Core使用Docker-Compose实现多容器应用部署
一.需求背景 人生苦短,我用.NET Core!前面的<ASP.NET Core使用Docker进行容器化托管和部署>基础课程我们学习了如何使用Docker来部署搭建ASP.NET Cor ...
- java 执行 shell脚本通过mysql load data导入数据
1:load_data_test.sh #!/bin/sh load_data_log=/mnt/load_data_test/load.log load_sql="LOAD DATA LO ...
- python 散点图上给每个点打标签方便看到数据
import numpy as np import matplotlib.pyplot as plt x=[2.3,4.5,3,7,6.5,4,5.3] y=[5,4,7,5,5.3,5.5,6.2] ...