Python - Django - ORM 实例
准备工作:
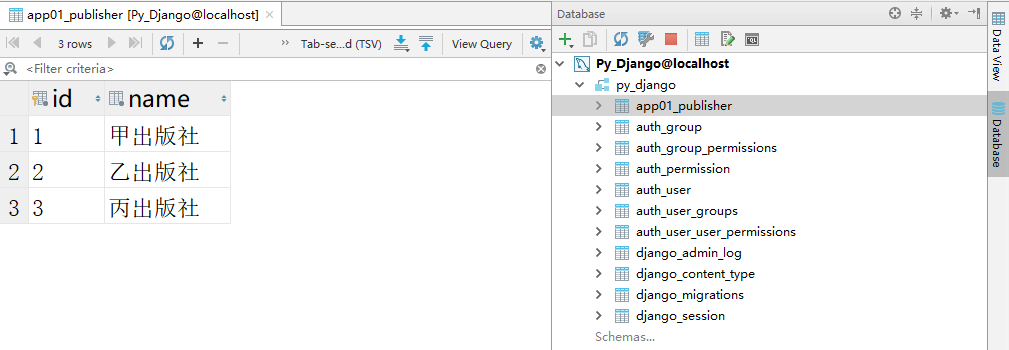
首先创建一个名为 Py_Django 的数据库
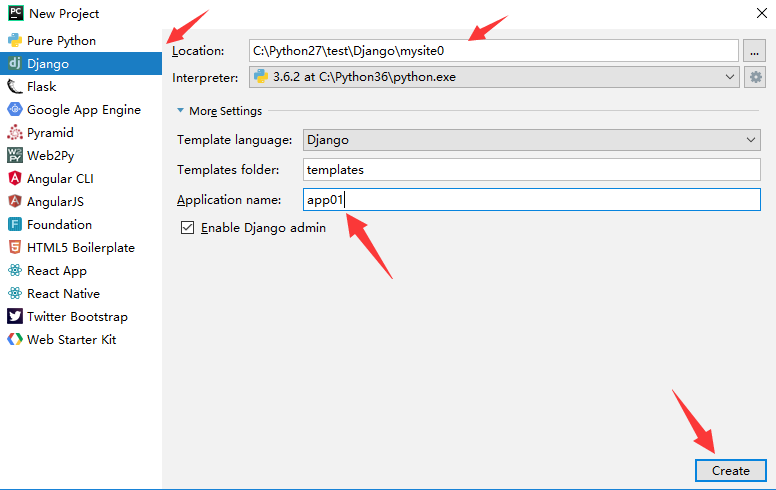
新建项目,名为 mysite0
创建完成后需要进行几项配置
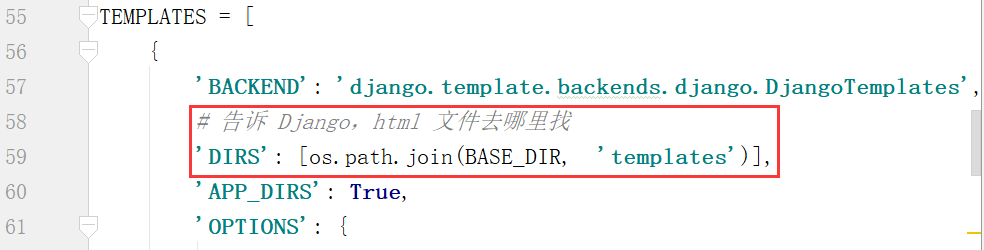
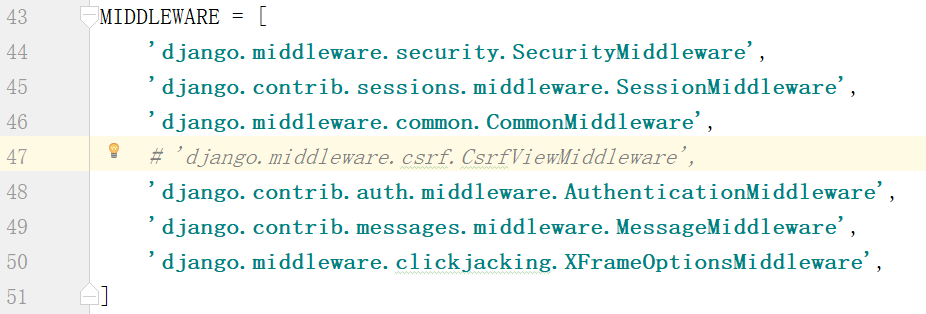
mysite0/settings.py 下
首先是 html 文件相关
其次是数据库配置

最后注释掉 CSRF 的代码
在 mysite0/__init__.py 中添加以下代码
import pymysql

pymysql.install_as_MySQLdb()
app01/models.py 中写上创建表的类
from django.db import models

# Create your models here.

# 出版社

class Publisher(models.Model):

    id = models.AutoField(primary_key=True)  # 自增的 id 主键

    # 创建一个 varchar(64) 的唯一的不为空的字段

    name = models.CharField(max_length=64, null=False, unique=True)
执行一下两条命令来创建表
python manage.py makemigrations

python manage.py migrate
连接数据库,创建三条数据
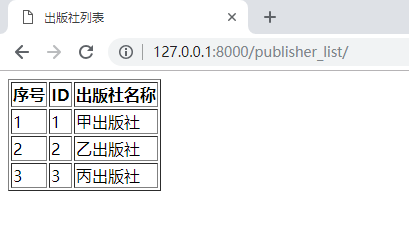
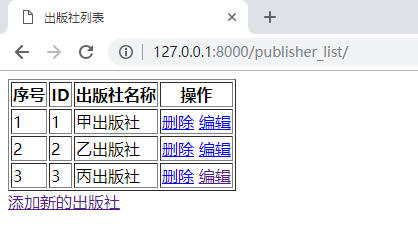
展示出版社列表:
publisher_list.html:
<!DOCTYPE html>

<html lang="en">

<head>

    <meta charset="UTF-8">

    <title>出版社列表</title>

</head>

<body>

<table border="1">

    <thead>

    <tr>

        <th>序号</th>

        <th>ID</th>

        <th>出版社名称</th>

    </tr>

    </thead>

    <tbody>

    {% for publisher in publisher_list %}

        <tr>

        <td>{{ forloop.counter }}</td>

        <td>{{ publisher.id }}</td>

        <td>{{ publisher.name }}</td>

        </tr>

    {% endfor %}

    </tbody>

</table>

</body>

</html>
第几次循环,forloop.counter 的值就是多少
app01/views.py 中 publisher_list 函数:
from django.shortcuts import render

from app01 import models

# Create your views here.

# 展示出版社列表

def publisher_list(request):

    # 去数据库查出所有的出版社,填充到 html 中,返回给用户

    ret = models.Publisher.objects.all().order_by("id")  # order_by("id") 通过 id 进行排序

    return render(request, "publisher_list.html", {"publisher_list": ret})
在 mysite0/urls.py 中添加对应关系
from django.conf.urls import url

from django.contrib import admin

from app01 import views

urlpatterns = [

    url(r'^admin/', admin.site.urls),

    url(r'^publisher_list/', views.publisher_list),

]
运行结果:
添加出版社:
修改 publisher_list.html:
<!DOCTYPE html>

<html lang="en">

<head>

    <meta charset="UTF-8">

    <title>出版社列表</title>

</head>

<body>

<table border="1">

    <thead>

    <tr>

        <th>序号</th>

        <th>ID</th>

        <th>出版社名称</th>

    </tr>

    </thead>

    <tbody>

    {% for publisher in publisher_list %}

        <tr>

        <td>{{ forloop.counter }}</td>

        <td>{{ publisher.id }}</td>

        <td>{{ publisher.name }}</td>

        </tr>

    {% endfor %}

    </tbody>

</table>

<a href="/add_publisher/">添加新的出版社</a>

</body>

</html>
创建 add_publisher.html:
<!DOCTYPE html>

<html lang="en">

<head>

    <meta charset="UTF-8">

    <title>添加出版社</title>

</head>

<body>

<h1>添加出版社</h1>

<form action="/add_publisher/" method="post">

    <input type="text" name="publisher_name">

    <input type="submit" value="提交">

</form>

</body>

</html>
在 app01/views.py 中添加 add_publisher 函数:
from django.shortcuts import render, redirect

from app01 import models

# Create your views here.

# 展示出版社列表

def publisher_list(request):

    # 去数据库查出所有的出版社,填充到 html 中,返回给用户

    ret = models.Publisher.objects.all().order_by("id")  # order_by("id") 通过 id 进行排序

    return render(request, "publisher_list.html", {"publisher_list": ret})

# 添加新的出版社

def add_publisher(request):

    # 如果是 POST 请求,就获取用户填写的数据

    if request.method == "POST":

        new_publisher = request.POST.get("publisher_name")

        # 获得数据后去数据库中新增一条数据

        models.Publisher.objects.create(name=new_publisher)

        # 添加成功后进行跳转

        return redirect("/publisher_list/")

    # 用户来到该界面返回的 html 页面

    return render(request, "add_publisher.html")
在 mysite0/urls.py 中添加对应关系
from django.conf.urls import url

from django.contrib import admin

from app01 import views

urlpatterns = [

    url(r'^admin/', admin.site.urls),

    url(r'^publisher_list/', views.publisher_list),

    url(r'^add_publisher/', views.add_publisher),

]
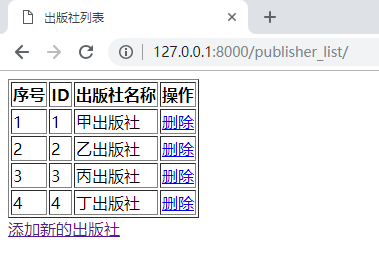
运行结果:
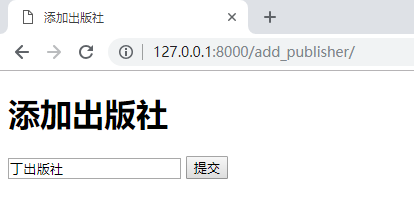
添加一个“丁出版社”

删除出版社:
修改 publisher_list.html,添加删除按钮
<!DOCTYPE html>

<html lang="en">

<head>

    <meta charset="UTF-8">

    <title>出版社列表</title>

</head>

<body>

<table border="1">

    <thead>

    <tr>

        <th>序号</th>

        <th>ID</th>

        <th>出版社名称</th>

        <th>操作</th>

    </tr>

    </thead>

    <tbody>

    {% for publisher in publisher_list %}

        <tr>

        <td>{{ forloop.counter }}</td>

        <td>{{ publisher.id }}</td>

        <td>{{ publisher.name }}</td>

        <td>

            <a href="/del_publisher/?id={{ publisher.id }}">删除</a>

        </td>

        </tr>

    {% endfor %}

    </tbody>

</table>

<a href="/add_publisher/">添加新的出版社</a>

</body>

</html>
app01/views.py 中添加 del_publisher 函数
from django.shortcuts import render, redirect, HttpResponse

from app01 import models

# Create your views here.

# 展示出版社列表

def publisher_list(request):

    # 去数据库查出所有的出版社,填充到 html 中,返回给用户

    ret = models.Publisher.objects.all().order_by("id")  # order_by("id") 通过 id 进行排序

    return render(request, "publisher_list.html", {"publisher_list": ret})

# 添加新的出版社

def add_publisher(request):

    # 如果是 POST 请求,就获取用户填写的数据

    if request.method == "POST":

        new_publisher = request.POST.get("publisher_name")

        # 获得数据后去数据库中新增一条数据

        models.Publisher.objects.create(name=new_publisher)

        # 添加成功后进行跳转

        return redirect("/publisher_list/")

    # 用户来到该界面返回的 html 页面

    return render(request, "add_publisher.html")

# 删除出版社

def del_publisher(request):

    # 从 GET 请求的参数中拿到要删除的 id 值

    del_id = request.GET.get('id', None)  # 取不到 id 值的话,默认为 None

    # 如果取到 id 值,就去数据库中删除该 id 的数据

    if del_id:

        # 根据 id 查找数据,并删除

        del_obj = models.Publisher.objects.get(id=del_id).delete()

        # 删除后返回页面

        return redirect("/publisher_list/")

    else:

        return HttpResponse("要删除的数据不存在!")
mysite0/urls.py 中添加对应关系
from django.conf.urls import url

from django.contrib import admin

from app01 import views

urlpatterns = [

    url(r'^admin/', admin.site.urls),

    url(r'^publisher_list/', views.publisher_list),

    url(r'^add_publisher/', views.add_publisher),

    url(r'^del_publisher/', views.del_publisher),

]
运行结果:
点击删除丁出版社
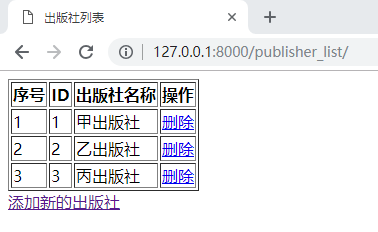
页面闪了一下,丁出版社就被删除了
编辑出版社:
修改 publisher_list.html
<!DOCTYPE html>

<html lang="en">

<head>

    <meta charset="UTF-8">

    <title>出版社列表</title>

</head>

<body>

<table border="1">

    <thead>

    <tr>

        <th>序号</th>

        <th>ID</th>

        <th>出版社名称</th>

        <th>操作</th>

    </tr>

    </thead>

    <tbody>

    {% for publisher in publisher_list %}

        <tr>

        <td>{{ forloop.counter }}</td>

        <td>{{ publisher.id }}</td>

        <td>{{ publisher.name }}</td>

        <td>

            <a href="/del_publisher/?id={{ publisher.id }}">删除</a>

            <a href="/edit_publisher/?id={{ publisher.id }}">编辑</a>

        </td>

        </tr>

    {% endfor %}

    </tbody>

</table>

<a href="/add_publisher/">添加新的出版社</a>

</body>

</html>
edit_publisher.html:
<!DOCTYPE html>

<html lang="en">

<head>

    <meta charset="UTF-8">

    <title>编辑出版社</title>

</head>

<body>

<h1>编辑出版社</h1>

<form action="/edit_publisher/" method="post">

    <input type="text" name="id" value="{{ publisher.id }}" style="display: none">

    <input type="text" name="publisher_name" value="{{ publisher.name }}">

    <input type="submit" value="提交">

</form>

</body>

</html>
在 app01/views.py 中添加 edit_publisher 函数
from django.shortcuts import render, redirect, HttpResponse

from app01 import models

# Create your views here.

# 展示出版社列表

def publisher_list(request):

    # 去数据库查出所有的出版社,填充到 html 中,返回给用户

    ret = models.Publisher.objects.all().order_by("id")  # order_by("id") 通过 id 进行排序

    return render(request, "publisher_list.html", {"publisher_list": ret})

# 添加新的出版社

def add_publisher(request):

    # 如果是 POST 请求,就获取用户填写的数据

    if request.method == "POST":

        new_publisher = request.POST.get("publisher_name")

        # 获得数据后去数据库中新增一条数据

        models.Publisher.objects.create(name=new_publisher)

        # 添加成功后进行跳转

        return redirect("/publisher_list/")

    # 用户来到该界面返回的 html 页面

    return render(request, "add_publisher.html")

# 删除出版社

def del_publisher(request):

    # 从 GET 请求的参数中拿到要删除的 id 值

    del_id = request.GET.get('id')

    # 如果取到 id 值,就去数据库中删除该 id 的数据

    if del_id:

        # 根据 id 查找数据,并删除

        del_obj = models.Publisher.objects.get(id=del_id).delete()

        # 删除后返回页面

        return redirect("/publisher_list/")

    else:

        return HttpResponse("要删除的数据不存在!")

# 编辑出版社

def edit_publisher(request):

    # 获取 POST 发来的数据,并更新到数据库中

    if request.method == "POST":

        # 获取 POST 传送来的 id 值和出版社

        edit_id = request.POST.get('id')

        new_name = request.POST.get('publisher_name')

        # 根据 id 取得出版社

        publisher = models.Publisher.objects.get(id=edit_id)

        publisher.name = new_name

        publisher.save()  # 把修改的结果提交到数据库

        return redirect("/publisher_list/")  # 跳转到列表页面

    # 从 GET 请求中取得 id 值

    publisher_id = request.GET.get('id')

    if publisher_id:

        # 获取当前编辑的出版社对象

        publisher_obj = models.Publisher.objects.get(id=publisher_id)

        return render(request, "edit_publisher.html", {"publisher": publisher_obj})

    else:

        return HttpResponse("编辑的出版社不存在!")
在 mysite0/urls.py 中添加对应关系
from django.conf.urls import url

from django.contrib import admin

from app01 import views

urlpatterns = [

    url(r'^admin/', admin.site.urls),

    url(r'^publisher_list/', views.publisher_list),

    url(r'^add_publisher/', views.add_publisher),

    url(r'^del_publisher/', views.del_publisher),

    url(r'^edit_publisher/', views.edit_publisher),

]
运行结果:
编辑“丙出版社”
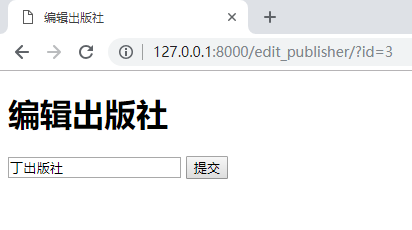
改为“丁出版社”

Python - Django - ORM 实例的更多相关文章
- Python - Django - ORM 实例(二)
在 app01/models.py 中添加 Book 类对象表 from django.db import models # Create your models here. # 出版社 class ...
- Python - Django - ORM 多对多表结构的三种方式
多对多的三种方式: ORM 自动创建第三张表 自己创建第三张表, 利用外键分别关联作者和书,关联查询比较麻烦,因为没办法使用 ORM 提供的便利方法 自己创建第三张表,使用 ORM 的 ManyToM ...
- Python - Django - ORM 操作表
ORM 的对应关系: 类 ---> 数据库表对象 ---> 数据库行属性 ---> 字段 操作数据库表 ---> ...
- Python - Django - ORM 查询方法
models.py: from django.db import models class Human(models.Model): id = models.AutoField(primary_key ...
- python django ORM
1.在models.py中创创建类 # -*- coding: utf-8 -*- from __future__ import unicode_literals from django.db imp ...
- Python Django ORM 字段类型、参数、外键操作
AutoField(Field) - int自增列,必须填入参数 primary_key=True BigAutoField(AutoField) - bigint自增列,必须填入参数 primary ...
- Python Django ORM基本增删改查
工程下的urls.py中增加如下: from cmdb import views as cmdb #要把你要操作的项目import进来 urlpatterns = [ url(r'orm', cmdb ...
- Python Django ORM创建基本类以及生成数据结构
#在项目目录下的modules.py中创建一个类,来自动生成一张表UserInfo class UserInfo(models.Model): username = models.CharField( ...
- python - django (ORM使用步骤)
print('asd') """ # 1. 手动创建一个数据库 # 2. 在 Django 项目中设置连接数据库的相关配置(告诉Django 连接哪一个数据库) 在 DA ...
随机推荐
- Docker入门讲解
1:容器重命名 [root@Docker ~]#docker run --name test_container -i -t centos /bin/bash[root@3ba67c6cf3f8 /] ...
- CentOS7.5最小化安装与初始化配置(做标准化)
本文分享CentOS的标准化安装配置方法,方便集群批量装机配置 ------------------------- 完美的分割线 ---------------------------- 1.安装标准 ...
- ftp添加虚拟用户的实例
本文主要讲解添加一个ftp虚拟用户的流程,接上文 https://www.cnblogs.com/tssc/p/9582780.html ========= 完美的分割线 ======== 1.修改授 ...
- ORA-10922 Temporary tablespace group is empty错误
错误--练习查询,发现报错: SQL> select * from range_list_part_tab where id=100000Execution Plan------------- ...
- ElasticSearch(三):ES单机版本基本操作之删除,修改,插入
1. 创建索引 1.1 直接创建索引 可以直接使用head插件创建索引,指定分片数和备份数即可.如下图: 1.2 创建结构化索引 上图创建的索引,点开索引信息,mapping是空的,表示该索引的字段并 ...
- 大家一起做训练 第一场 B Tournament
题目来源:CodeForce #27 B 有n个人比赛,两两之间都有一场比赛,一共 n * (n - 1) / 2 场比赛.每场比赛的记录方式是 a b,表示在a和b的比赛中,a胜出,b失败. 经过研 ...
- 【转】每天一个linux命令(10):cat 命令
原文网址:http://www.cnblogs.com/peida/archive/2012/10/30/2746968.html cat命令的用途是连接文件或标准输入并打印.这个命令常用来显示文件内 ...
- centos6 ext4修复
输入root密码后: fsck -y /dev/mapper/vg_logserv-lv_root 修复完后重启 reboot 若忘记了root密码,可用系统ISO盘引导进入Rescue救援模式 在这 ...
- 大数据学习资料之SQL与NOSQL数据库
这几年的大数据热潮带动了一激活了一大批hadoop学习爱好者.有自学hadoop的,有报名培训班学习的.所有接触过hadoop的人都知道,单独搭建hadoop里每个组建都需要运行环境.修改配置文件测试 ...
- Xshell连接不上Ubuntu的解决方法
xshell连接linux主机时,会出现错误:Could not connect to '127.0.0.1' (port 22): Connection failed. 但是这时能ping通. 通 ...