[RN] 02 - Overview: React Native Practice of 50 lectures
观看笔记:零基础 React Native 实战开发视频 50讲
本篇效果:RN入门,整体认识
基本原理 # 1

React到RN # 2
一个简单的例子
/**

 * Sample React Native App

 * https://github.com/facebook/react-native

 */

'use strict';

import React, {

  AppRegistry,

  Component,

  StyleSheet,

  Text,

  View

} from 'react-native';

# 引入组件

class DongFang extends Component {

  render() {

    return (

      <View style={styles.container}>

        <Text style={styles.welcome}>

          Welcome to React Native!东方耀的第5课

        </Text>

        <Text style={styles.instructions}>

          To get started, edit index.android.js

        </Text>

        <Text style={styles.instructions}>

          Shake or press menu button for dev menu

        </Text>

      </View>

    );

  }

}


# 样式表 系统api

const styles = StyleSheet.create({

  container: { # 可伸缩的表

    flex: 1,

    justifyContent: 'center',

    alignItems: 'center',

    backgroundColor: '#F5FCFF',

  },

  welcome: {

    fontSize: 20,

    textAlign: 'center',

    margin: 10,

  },

  instructions: {

    textAlign: 'center',

    color: '#333333',

    marginBottom: 5,

  },

});

AppRegistry.registerComponent('DongFang', () => DongFang);
flexbox布局 # 3,4,5
UI利器:弹性盒子布局,主流浏览器都支持。
讲义:http://www.cnblogs.com/dfy888/p/5374329.html
参考:阮一峰: Flex 布局教程:语法篇
参考:阮一峰: Flex 布局教程:实例篇
JSX入门 # 6
jsx是个语法糖;
(1) 转换 解析器 html --> js,然后在浏览器运行。

(2) 执行js表达式。html with js --> js
(3) 执行js表达式。属性 --> js

(4) 执行js表达式。延展属性 --> js,使用ES6语法。

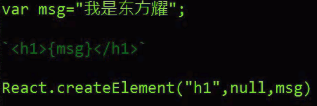
(5) 以字符串的形式完整显示HTML,借助_html属性

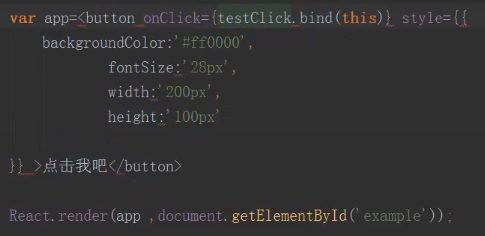
(6) 样式style的使用,比如颜色,字体大小。

(7) 事件绑定 - button
ReactJS代码结构 # 7
React.createClass: 创建组件类的方法。
React.render: 将制定组件渲染到制定的DOM节点。【会被ReactDOM.render替代】

ReactJS组件生命周期 # 8
Ref: React Native Component Lifecycle【简洁,清晰】
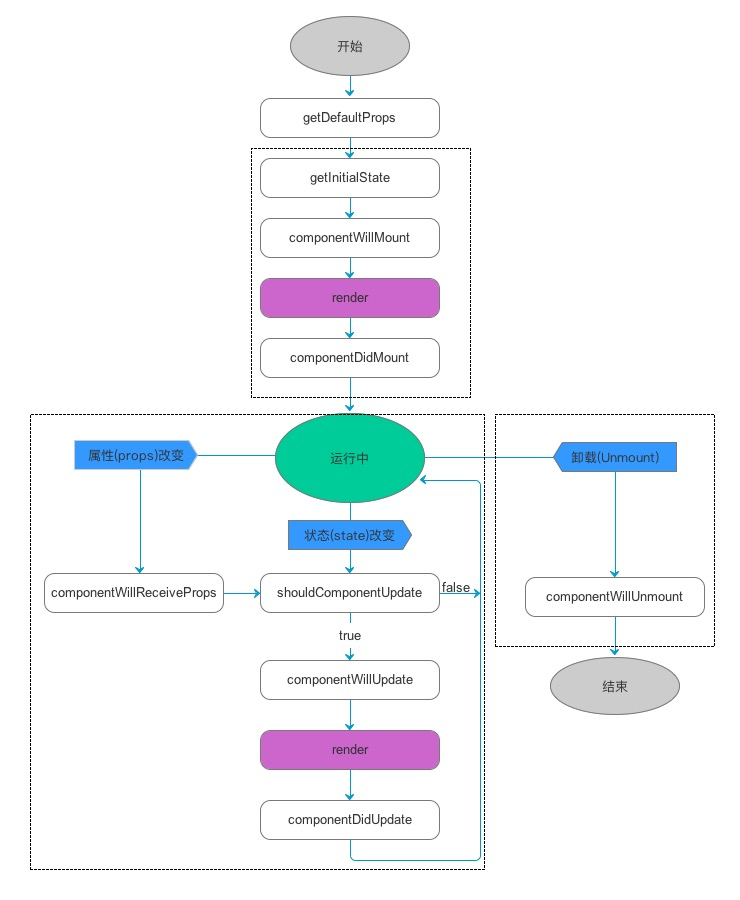
如图,可以把组件生命周期大致分为三个阶段:
- 第一阶段:是组件第一次绘制阶段,如图中的上面虚线框内,在这里完成了组件的加载和初始化;
- 第二阶段:是组件在运行和交互阶段,如图中左下角虚线框,这个阶段组件可以处理用户交互,或者接收事件更新界面;
- 第三阶段:是组件卸载消亡的阶段,如图中右下角的虚线框中,这里做一些组件的清理工作。
| 生命周期 | 调用次数 | 能否使用 setSate() |
|---|---|---|
| 创建阶段,处理props的默认值 | ||
| getDefaultProps | 1(全局调用一次) | 否 |
|
实例化阶段,React.render(<HelloMessage 启动之后 State:ReactJS内部监听state属性的变化,一旦发生变化,主动触发组件的render方法更新虚拟DOM结构, which is 真实的DOM结构映射成一个json数据结构。 |
||
| getInitialState | 1 | 否 |
| componentWillMount | 1 | 是 |
| render | >=1 | 否 |
| componentDidMount | 1 | 是 |
| 更新阶段,根据用户操作行为进行相应的页面结构的调整。 | ||
| componentWillReceiveProps | >=0 | 是 |
| shouldComponentUpdate | >=0 | 否 |
| componentWillUpdate | >=0 | 否 |
| componentDidUpdate | >=0 | 否 |
| 销毁阶段,取消事件绑定、移除虚拟DOM等。 | ||
| componentWillUnmount | 1 | 否 |
ReactJS组件通信 # 9
父子组件之间的通信方式?
Ref: http://blog.csdn.net/p106786860/article/details/52408875 【代码实例】
var Parent=React.craeteClass({
  click:function() {
    this.refs.child.getDOMNode().stype.color="red";
  },
  render:function() {
    return (
      <div onClick={this.click} >Parent is :
      <Child name={this.props.name} ref="child"></Child>
      </div> );   #子组件 调用 父组件
  }
});
var Child=React.craeteClass({
  render:function() {
    return <span> {this.props.name} </span>
  }
});
ReactDOM.render(<Parent name="React语法基础" />, document.getElementById('example'));
Ref: react native 之子组件和父组件之间的通信
*** 父组件 --> 子组件 ***
/**

 * Sample React Native App

 * https://github.com/facebook/react-native

 *  父组件传递给子组件

 *  父组件把值或者navigator传给子组件,然后在子组件里面实现push和显示

 */

import React, { Component } from 'react';

import ChildOne from './ChildOne'

import {

    AppRegistry,

    StyleSheet,

    Text,

    View

} from 'react-native';

export default class HomeOne extends Component {

    render() {

        return (
          // 类似:调用函数,将参数传入子函数,将参数看作一种通信方式

          <ChildOne navigatorPush = {this.props.navigator} passValue = '我是一个父组件传给子组件的值'/>

        );

    }

}

const styles = StyleSheet.create({

    container: {

        flex: 1,

        justifyContent: 'center',

        alignItems: 'center',

        backgroundColor: '#F5FCFF',

    },

    welcome: {

        fontSize: 20,

        textAlign: 'center',

        margin: 10,

    },

    instructions: {

        textAlign: 'center',

        color: '#333333',

        marginBottom: 5,

    },

});
子组件,childOne的代码:通过 this.props.属性名 使用传过来的值。
/**

 * Sample React Native App

 * https://github.com/facebook/react-native

 *  父组件传递给子组件

 */

import React, { Component } from 'react';

import {

    AppRegistry,

    StyleSheet,

    Text,

    View,

    navigator,

} from 'react-native';

import OneDetails from './OneDetails'

export default class ChildOne extends Component {

    render() {

        return (

            <View style={styles.container}>

                <Text style={styles.welcome}  onPress={()=>this.pushOneDetails()}>

                    我是子组件ONE

                </Text>

                <Text>

                    {this.props.passValue}  # 直接获取

                </Text>

            </View>

        );

    }

    pushOneDetails = ()=>{

        this.props.navigatorPush.push({

          component: OneDetails

      })

  }

}

const styles = StyleSheet.create({

    container: {

        flex: 1,

        justifyContent: 'center',

        alignItems: 'center',

        backgroundColor: '#F5FCFF',

    },

    welcome: {

        fontSize: 20,

        textAlign: 'center',

        margin: 10,

    },

    instructions: {

        textAlign: 'center',

        color: '#333333',

        marginBottom: 5,

    },

});
*** 父组件 --> 子组件 ***
子组件通过定义一个属性直接把事件传递给主组件。
/**

 * Sample React Native App

 * https://github.com/facebook/react-native

 *  子组件传递给父组件

 */

import React, { Component } from 'react';

import {

    AppRegistry,

    StyleSheet,

    Text,

    View

} from 'react-native';

export default class ChildTwo extends Component {

    static defaultProps = {

        two: '我是子组件传给主组件的值'

    };

    render() {

        return (

                <Text style={styles.welcome} onPress={()=>this.passMenthod()}>

                    我是子组件TWO

                </Text>

        );

    }

    passMenthod = () =>{

        this.props.pushDetails()

    }

}

const styles = StyleSheet.create({

    container: {

        flex: 1,

        justifyContent: 'center',

        alignItems: 'center',

        backgroundColor: '#F5FCFF',

    },

    welcome: {

        fontSize: 20,

        textAlign: 'center',

        margin: 10,

    },

    instructions: {

        textAlign: 'center',

        color: '#333333',

        marginBottom: 5,

    },

});
父组件这边直接通过子组件的属性来接受事件,从而在主组件这边push和pop。
/**

 * Sample React Native App

 * https://github.com/facebook/react-native

 *  子组件传递给父组件

 *  子组件把事件或值传递给父组件,然后在父组件push和显示

 */

import React, { Component } from 'react';

import {

    AppRegistry,

    StyleSheet,

    Text,

    View

} from 'react-native';

import ChildTwo   from './ChildTwo'

import TwoDetails from './TwoDetails'

export default class HomeTwo extends Component {

    // 构造

      constructor(props) {

        super(props);

        // 初始状态

        this.state = {

            value:''

        };

      }

    render() {

        return (

            <View style={styles.container}>

            <ChildTwo pushDetails = {()=>this.pushDetails()} />

                <Text>

                    {ChildTwo.defaultProps.two}

                </Text>

            </View>

        );

    }

    pushDetails = ()=>{

        this.props.navigator.push({

            component:TwoDetails

        })

    }

}

const styles = StyleSheet.create({

    container: {

        flex: 1,

        justifyContent: 'center',

        alignItems: 'center',

        backgroundColor: '#F5FCFF',

    },

    welcome: {

        fontSize: 20,

        textAlign: 'center',

        margin: 10,

    },

    instructions: {

        textAlign: 'center',

        color: '#333333',

        marginBottom: 5,

    },

});
总体感觉,需要一个系统的文章来学习,以上关于通信这块,还是很零碎,需要看书上的相关章节来系统地加强认识。
状态、属性、样式
继续细细分析【props】和【state】in: [RN] Try a little bit of React Native
我们使用两种数据来控制一个组件:props和state。
- props: 在父组件中指定,而且一经指定,在被指定的组件的生命周期中则不再改变。
- state: 对于需要改变的数据,我们需要使用state。
关于属性:props
/**
* Sample React Native App
* https://github.com/facebook/react-native
* @flow
*/ import React, { Component } from 'react';
import {
Platform,
StyleSheet,
Text,
View,
Image
} from 'react-native'; export default class App extends Component {
render() {
let pic = {
uri: 'https://upload.wikimedia.org/wikipedia/commons/d/de/Bananavarieties.jpg'
}; // 如下:pic 被一个<Image/>控件所引用 return (
<Image source={pic} style={{width: 193, height: 110}}/>
);
}
}
{pic} 括号把JSX语句嵌入其中,括号里可能是表达式也可以是js变量,所以,这一切 都可以是 动态的。
例如下面这代码:
import React, { Component } from 'react';

import { AppRegistry, Text, View } from 'react-native';


// 创建了一个 Greeting 对象

class Greeting extends Component {

  render() {

    return (

      <Text>Hello {this.props.name}!</Text>

    );

  }

}

class LotsOfGreetings extends Component {

  render() {

    return (

      <View style={ {alignItems: 'center'} }>

        <Greeting name='Rexxar' />

        <Greeting name='Jaina' />

        <Greeting name='Valeera' />

      </View>

    );

  }

}

AppRegistry.registerComponent('LotsOfGreetings', () => LotsOfGreetings);
关于状态:state
1 .props是在父组件中指定,一经指定,在被指定的生命周期中则不再改变
2 .对于需要改变的数据,我们需要使用state
3 .需要在constructor中初始化state,然后在需要修改时调用setState方法。
/**

 * Sample React Native App

 * https://github.com/facebook/react-native

 * @flow 此代码可直接运行

 */

import React, { Component } from 'react';

import {

  Platform,

  StyleSheet,

  Text,

  View

} from 'react-native';

class Blink extends Component {

  constructor(props) {

    super(props);

    this.state = { showText: true };


    // 调用计时器方法

    // 每1000毫秒对showText状态做一次取反操作

    setInterval(() => {

      this.setState({ showText: !this.state.showText });

    }, 1000);

  }

  render() {

    // 根据当前showText的值决定是否显示text内容

    let display = this.state.showText ? this.props.text : ' ';

    return (

      <Text>{display}</Text>

    );

  }

}


// main

export default class App extends Component<Props> {

  render() {

    return (

      <View>

        <Blink text='I love to blink' />

        <Blink text='Yes blinking is so great' />

        <Blink text='Why did they ever take this out of HTML' />

        <Blink text='Look at me look at me look at me' />

      </View>

    );

  }

}
关于样式:style
一个View可以有多个样式属性,他们以数组形势共存,
当然如果多个样式出现重复,排在右边的会覆盖之前的,具体情况我们看一例子:
import React, { Component } from 'react';

import { AppRegistry, StyleSheet, Text, View } from 'react-native';

class LotsOfStyles extends Component {

  render() {

    return (

      <View>

        <Text style={styles.red}>just red</Text>

        <Text style={styles.bigblue}>just bigblue</Text>

        <Text style={[styles.bigblue, styles.red]}>bigblue, then red</Text>

        <Text style={[styles.red, styles.bigblue]}>red, then bigblue</Text>

      </View>

    );

  }

}

const styles = StyleSheet.create({

  bigblue: {

    color: 'blue',

    fontWeight: 'bold',

    fontSize: 30,

  },

  red: {

    color: 'red',

  },

});

AppRegistry.registerComponent('LotsOfStyles', () => LotsOfStyles);
JSX实战 # 10,11
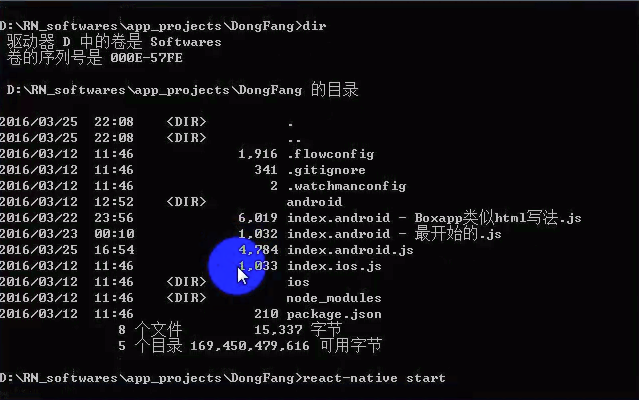
- 调试五步骤
(1). 启动js服务器。
(2). 确定手机连接可靠。
(3). 加载代码。

(4). 设置为与本地同一网段:Dev Settings。
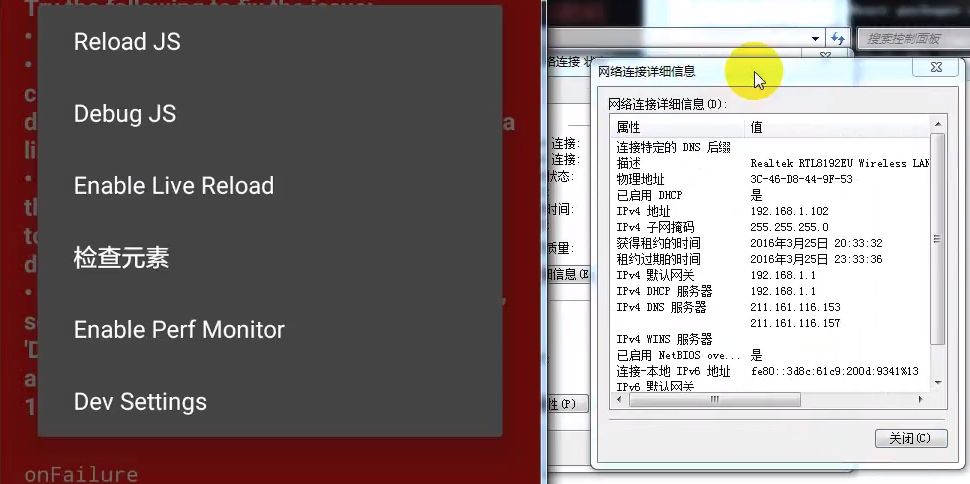
(5). 点击Debug server host & port for device,设置ip地址。


Reload JS:手动刷新
Debug JS:远端调试工具,需要chrome。
Enable Live Reload:自动刷新
检查元素
Enable Perf Monitor
Dev Settings
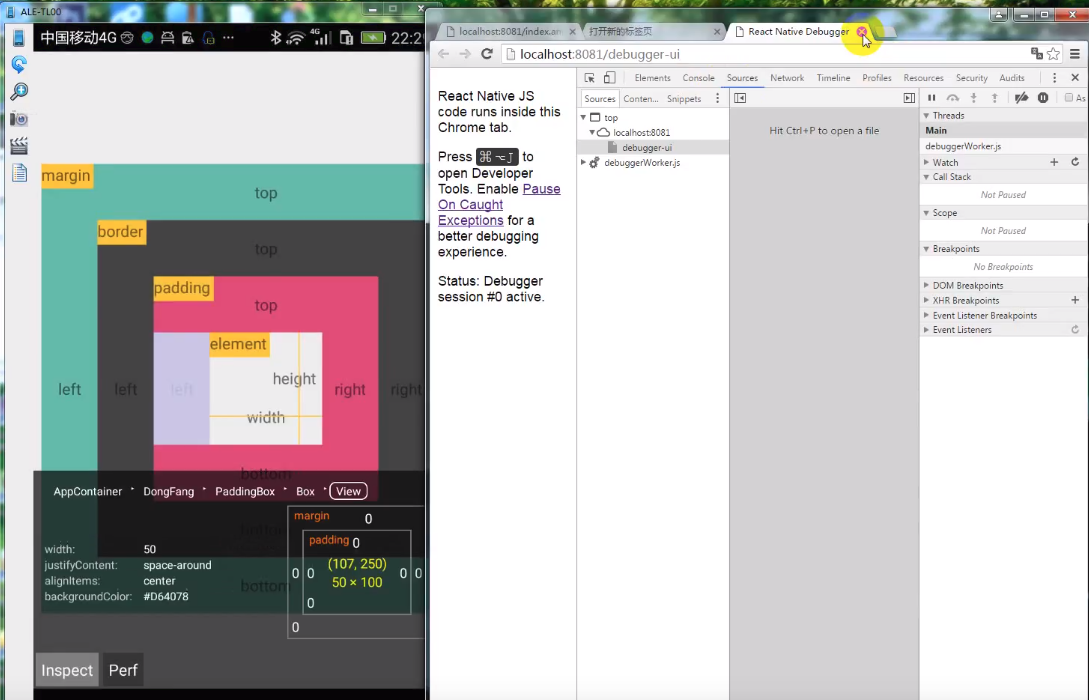
原理:包服务器,手机端调试依赖这个bundle,也涉及到热更新。

F12进入开发者模式,然后通过浏览器调试,这是Google的牛逼之处。【Debug JS】
当然,Facebook的RN也提供了在线手机上的简单版本的frond-end调试。【检查元素】
发布六步骤
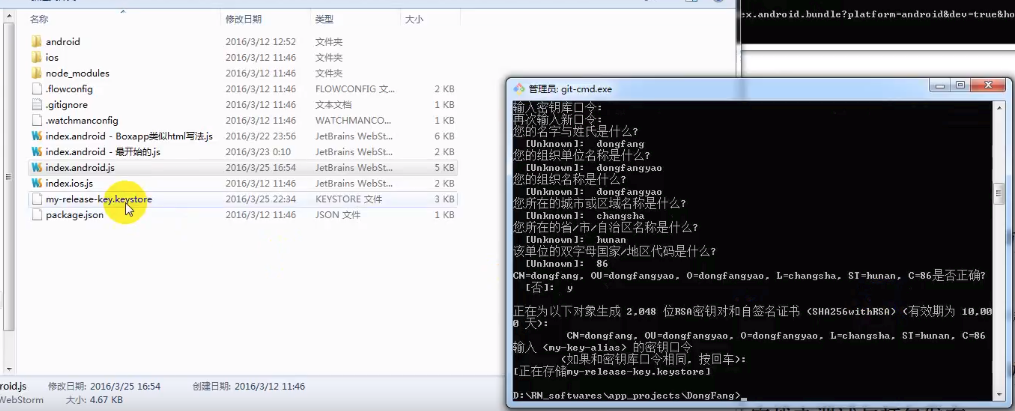
(1). 创建密钥
keytool -genkey -v -keystore my-release-key.keystore -alias my-key-alias -keyalg RSA -keysize 2048 -validity 10000
生成了用于应用发布的秘钥: my-release-key.keystore
(2). bundle文件
在工程目录下将index.android.bundle下载并保存到assets资源文件中。
首先,创建文件夹:./android/app/src/main/assets;然后,执行命令:
curl -k "http://localhost:8081/index.android.bundle" > android/app/src/main/assets/index.android.bundle
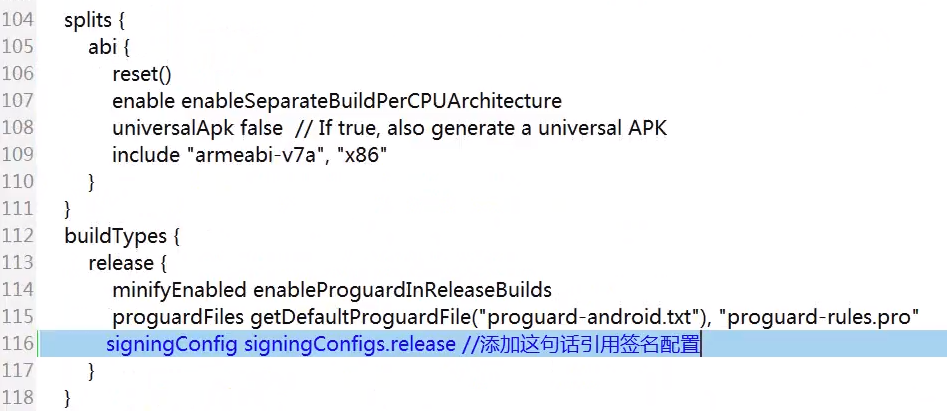
(3). 配置gradle中的签名
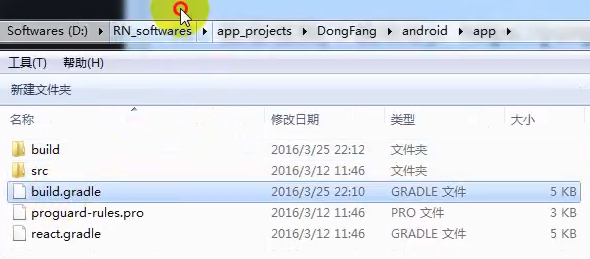
(4). 在build.gradle中设置密钥的属性

接下来,使签名生效:添加一行,如下:
(5). 为减小发布包的大小,修改如下属性为true
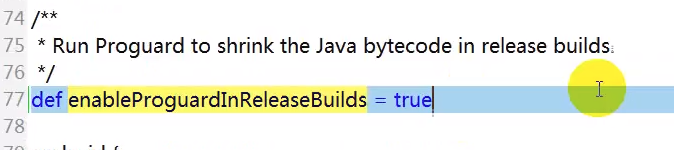
如果是涉及到第三方库,会修改app/proguard-rules.pro。在此,先保持默认配置。
(6). gradle打包并发布
在android目录下执行,便自动编译打包。
gradle assembleRelease
执行成功后在下面的目录中会生成对应的release的两个版本。
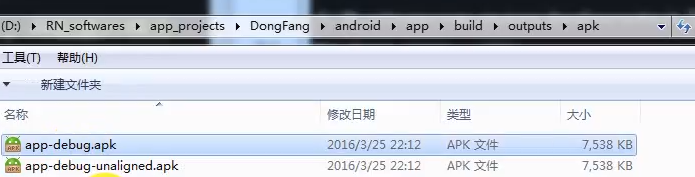
如何生成APK?
From: 无签名的:https://www.jianshu.com/p/32a99c273be1
From: 有签名的:React Native发布APP之签名打包APK ----> 生成的位置是./android/app/目录下
"Android要求所有的APP都需要进行数字签名后,才能够被安装到相应的设备上。"
注意事项:
1. 在开发环境下,为方便调试,APP会在启动时从JS Server服务器将index.android.bundle文件加载到APP。
2. 签名打包后的APP变成了生产环境,此时APP会默认从本地加载 index.android.bundle文件,由于通过Android Studio打包的APK没有将index.android.bundle文件打包进apk,所以会因缺少index.android.bundle文件而无法启动。
Step 1:
RN主目录:

keytool -genkey -v -keystore my-release-key.keystore -alias my-key-alias -keyalg RSA -keysize  -validity

[注:在产生的时候需要提供密钥和存储密码,后续会用到]

mv my-release-key.keystore android/app/
Step 2:
android/gradle.properties文件:

MYAPP_RELEASE_STORE_FILE     = my-release-key.keystore  // 签名文件
MYAPP_RELEASE_KEY_ALIAS      = my-key-alias
MYAPP_RELEASE_STORE_PASSWORD = xx
MYAPP_RELEASE_KEY_PASSWORD   = xx

 [注意替换xx为你自己设置的密钥和存储密码]
Step 3:
android/app/build.gradle文件:

...

android {

  ...

  defaultConfig {

    ...

  }

  signingConfigs {

    release {

        storeFile file(MYAPP_RELEASE_STORE_FILE)

        storePassword MYAPP_RELEASE_STORE_PASSWORD

        keyAlias MYAPP_RELEASE_KEY_ALIAS

        keyPassword MYAPP_RELEASE_KEY_PASSWORD

    }

  }

  buildTypes {

    release {

      ...

      signingConfig signingConfigs.release

    }

  }

}
 cd android/

./gradlew assembleRelease
[RN] 02 - Overview: React Native Practice of 50 lectures的更多相关文章
- [RN] 01 - Init: Try a little bit of React Native
Ref: React Native跨平台移动应用开发 后记:这本书博客味有点浓. 本篇涉及新建工程的若干套路,以及一点语法知识. 创建新工程 (1) 解决的一大核心问题: (2) 使用Javascri ...
- React Native 二维码扫描组件
学rn得朋友们,你们知道rn开源项目吗?来吧看这里:http://www.marno.cn/(rn开源项目) React Native学习之路(9) - 注册登录验证的实现 + (用Fetch实现po ...
- React Native 开发工具篇
正文 概述:开发RN的工具有很多,选择性也比较多,比如Facebook专门为React开发的IDE:Nuclide,还有做前端比较熟悉的WebStorm.Sublime Text 3.VS Code等 ...
- Xamarin vs React Native vs Ionic vs NativeScript: Cross-platform Mobile Frameworks Comparison
CONTENTS Reading time: 14 minutes Cross-platform mobile development has long been a viable alternati ...
- 【独家】React Native 版本升级指南
前言 React Native 作为一款跨端框架,有一个最让人头疼的问题,那就是版本更新.尤其是遇到大版本更新,JavaScript.iOS 和 Android 三端的配置构建文件都有非常大的变动,有 ...
- react native 0.50与OC交互 && Swift与RN交互
新公司也打算做rn,还是得捡起来再度学习.开撸! react native一个版本一个样子,之前写的rn与iOS交互系列在最新版本中有点出入(0.50.4版本).今天填一下坑. 首先上npm版本,re ...
- React Native 0.50版本新功能简介
React Native在2017年经历了众多版本的迭代,从接触的0.29版本开始,到前不久发布的0.52版本,React Native作为目前最受欢迎的移动跨平台方案.虽然,目前存在着很多的功能和性 ...
- [RN] React Native 常用命令行
[RN] React Native 常用命令行 1.查看当前版本 react-native --version 或 react-native -v 2.创建指定版本的React Native项目 1) ...
- 从零学React Native之02状态机
本篇文章首发于简书 欢迎关注 之前我们介绍了RN相关的知识: 是时候了解React Native了 从零学React Native之01创建第一个程序 本篇文章主要介绍下下面的知识: 1.简单界面的搭 ...
随机推荐
- Spark算子---实战应用
Spark算子实战应用 数据集 :http://grouplens.org/datasets/movielens/ MovieLens 1M Datase 相关数据文件 : users.dat --- ...
- centos7安装rabbitmq3.7
centos7安装rabbitmq3.7安装erlang # vim /etc/yum.repos.d/rabbitmq-erlang.repo [rabbitmq-erlang] name=rabb ...
- SpringBoot的文件下载
SpringBoot的文件下载 2017年11月29日 10:32:20 阅读数:3907 SpringBoot的文件下载方法有很多,此处只记录使用Spring的Resource实现类FileSyst ...
- 使用postman测试文件上传
调试API神奇----postman 请求方法:POST Body-->form-data-->key(选择file) QQ技术交流群:282575808 ---------------- ...
- PHP 打乱数组
$arr = array( array( "id"=>1, "name"=>"张三", "sex"=> ...
- 安卓程序代写 网上程序代写[原]BluetoothSocket详解
一. BluetoothSocket简介 1. 简介 客户端与服务端 : BluetoothSocket 和 BluetoothServerSocket 类似于Java中的套接字的 Socket 和 ...
- 攻城狮送女友的CSS3生日蛋糕
在线预览:http://keleyi.com/keleyi/phtml/html5/29.htm 代码如下: <!DOCTYPE html> <html> <head&g ...
- Sword STL仿函数示例
一元函数 unary_function .有返回值. .只有一个参数. template <class Arg, class Result> struct unary_function { ...
- Mac 系统上安装Lua和SubmlimeText 编译器
第一步:安装命令 curl -R -O http://www.lua.org/ftp/lua-5.2.3.tar.gz tar zxf lua-5.2.3.tar.gz cd lua-5.2.3 ma ...
- 第三百四十四节,Python分布式爬虫打造搜索引擎Scrapy精讲—craw母版l创建自动爬虫文件—以及 scrapy item loader机制
第三百四十四节,Python分布式爬虫打造搜索引擎Scrapy精讲—craw母版l创建自动爬虫文件—以及 scrapy item loader机制 用命令创建自动爬虫文件 创建爬虫文件是根据scrap ...