
puppet5.1 安装与配置
一、Puppet概念
简介
当服务器数量达到一定的规模时,仅依靠人为完成批量部署服务器个资源的配置,运维工作将变得繁琐且容易出错,为了解决这一问题,我们应该怎么办呢?我们可以引入一批工具,这批工具可编写相应的manifests代码,运行它便可以自动完成所有的工作,目前比较流行的运维工具主要有:puppet,ansible, slackstack等,在这我们主要以puppet来展开话题。在一些大型互联网企业中,运维自动化管理着几百甚至上千台服务器,它可以针对多台服务器进行统一操作,例如部署统一软件、进行统一上线维护等,而且能够快速完成上线部署,减少人力及人力误操作风险。
工作原理
puppet的目的是让系统管理员只集中于要管理的目标服务器,而忽略实现的细节。puppet既可以在单机上使用,也可以C/S结构使用,在大规模部署puppet的情况下,通常我们会使用C/S结构,在这种结构下,服务端运行puppet-master程序客户端运行puppet-client服务程序
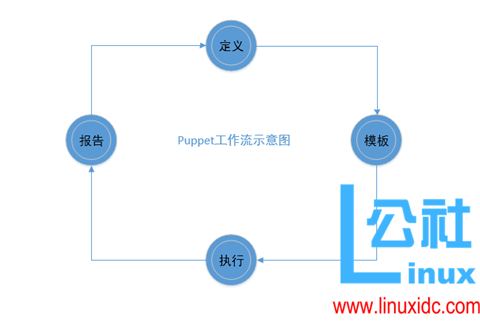
具体的工作流程图如下所示:
对于puppet的的掌握,理解puppet的工作原理是一个必要的的阶段,只有在了解了puppet的工作原理后才能更好应用puppet,下面让我们一起了解学习puppet的工作原理:
说到puppet的工作原理,不得不从以下四个方面来说到,如下所示:
(1)定义:使用Puppet特定的语言定义基础配置信息。通常我们把这些信息写在Modules中。
(2)模板:在配置执行之前检测代码,但并不真正执行。
(3)执行:定义的配置自动部署。检测并记录下所发生变化的部分。
(4)报告:将期待的变化、实际发生的变化及任何修改发送给报告系统。
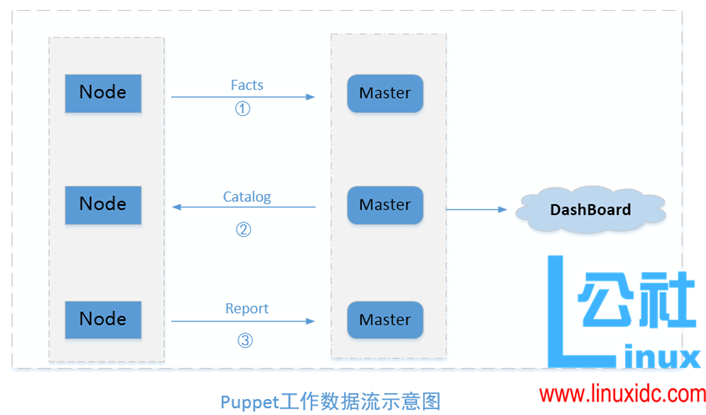
如下所示为puppet的工作数据流示意图
数据流说明:
1.首先所有的节点(Node)Node节点将Facts和本机信息发送给Master
2.Master告诉Node节点应该如何配置,将这些信息写入Catalog后传给Node。
3.Node节点在本机进行代码解析验证并执行,将结果反馈给Master。
4.Master通过API将数据发给分析工具。报告完全可以通过开放API或与其他系统集成。
整个数据流的走向是基于SSL安全协议的,如下图所示:
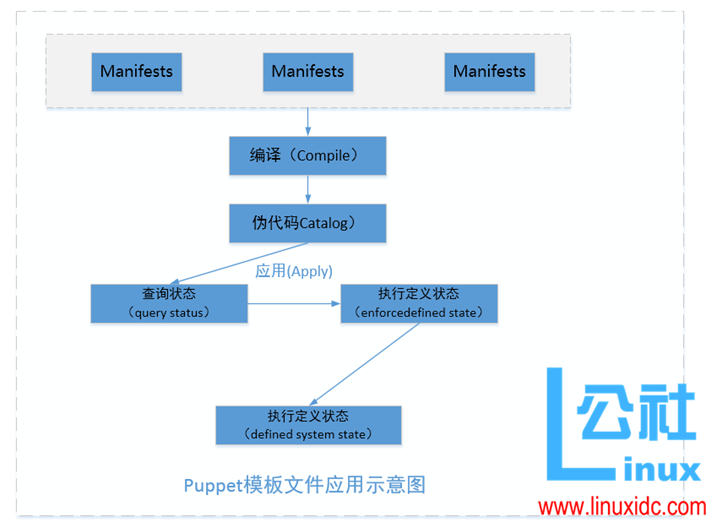
模板文件处理过程说明如下:
Puppet通过编译Manifest中的内容 (即模板中内容),将编译好的代码存入Catalog。在执行前先进行代码的验证,再执行,完成最开始所定义好的状态。代码编译过程如图所示:
如下所示为整个puppet自动部署过程中agent和master的详细的交互过程:
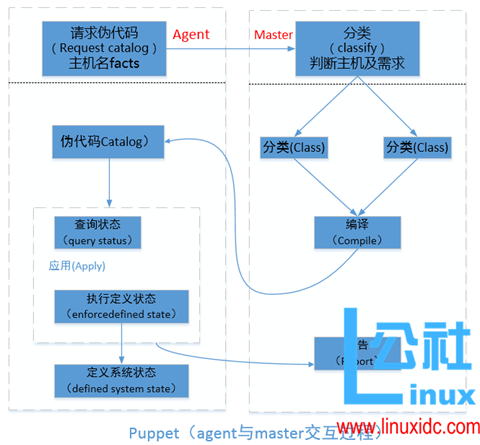
过程说明:
1. Puppet客户端Agent将节点名与facts信息发送给Master。
2. Puppet服务端Master通过分类判断请求的客户端是谁,它将要做什么。这个判断是通过site.pp中包含的Node.pp配置文件定义的。
3. Puppet服务端Master将所需要的Class类信息进行编译后存入Catalog并发送给Puppet客户端Agent,到此完成第一次交互。
4. Puppet客户端Agent对Catalog进行代码验证(语法检查及错误检查)并执行。主要是代码的验证,并将执行过程的信息及结果写入日志。
5. Puppet客户端Agent最终达到最开始所定义的状态,并且将结果及任何执行数据通过开放API的形式发送给Puppet服务端Master。
以上就是puppet的工作原理需要注意是:因为整个过程中都是基于ssl实现的,所以首要的是保证agent和master间可以基于ssl通讯!
Hardware
The Puppet agent service has no particular hardware requirements and can run on nearly anything.
However, the Puppet master service is fairly resource intensive, and should be installed on a robust dedicated server.
- At a minimum, your Puppet master server should have two processor cores and at least 1 GB of RAM.
- To comfortably serve at least 1,000 nodes, it should have 2-4 processor cores and at least 4 GB of RAM.
The demands on the Puppet master vary widely between deployments. The total needs are affected by the number of agents being served, how frequently those agents check in, how many resources are being managed on each agent, and the complexity of the manifests and modules in use.
来自 <https://docs.puppet.com/puppet/5.0/system_requirements.html>
Puppet consists of:
- A puppet-agent "All-in-One" package that installs Puppet, Ruby, Facter, Hiera, and supporting code.
- A puppetserver package that installs Puppet Server.
- A puppetdb package that installs PuppetDB.
To install these, read the pre-install instructions, then see the Puppet installation guides for Linux, Windows, and macOS.
Puppet 5 Platform contents
Puppet 5 Platform contains the following components:
|
Package |
Contents |
|
Puppet, Facter, Hiera, MCollective, pxp-agent, root certificates, and prerequisites like Ruby and Augeas |
|
|
puppetserver |
Puppet Server; depends on puppet-agent 5 or greater |
|
puppetdb |
|
|
puppetdb-termini |
Plugins to let Puppet Server talk to PuppetDB |
What puppet-agent and Puppet Server are
We distribute Puppet as two core packages.
- puppet-agent — This package contains Puppet's main code and all of the dependencies needed to run it, including Facter, Hiera, and bundled versions of Ruby and OpenSSL. It also includes MCollective. Once it's installed, you have everything you need to run the Puppet agent service and the puppet apply command.
- puppetserver — This package depends on puppet-agent, and adds the JVM-based Puppet Server application. Once it's installed, Puppet Server can serve catalogs to nodes running the Puppet agent service.
Settings for agents (all nodes)
Roughly in order of importance. Most of these can go in either [main] or [agent], or be specified on the command line.
Basics
- server — The Puppet master server to request configurations from. Defaults to puppet; change it if that's not your server's name.
- ca_server and report_server — If you're using multiple masters, you'll need to centralize the CA; one of the ways to do this is by configuring ca_server on all agents. See the multiple masters guide for more details. The report_server setting works about the same way, although whether you need to use it depends on how you're processing reports.
- certname — The node's certificate name, and the unique identifier it uses when requesting catalogs; defaults to the fully qualified domain name.
- For best compatibility, you should limit the value of certname to only use letters, numbers, periods, underscores, and dashes. (That is, it should match /\A[a-z0-9._-]+\Z/.)
- The special value ca is reserved, and can't be used as the certname for a normal node.
- environment — The environment to request when contacting the Puppet master. It's only a request, though; the master's ENC can override this if it chooses. Defaults to production.
Note on Non-Certname Node Names
Although it's possible to set something other than the certname as the node name (using either the node_name_fact or node_name_value setting), we don't generally recommend it. It allows you to re-use one node certificate for many nodes, but it reduces security, makes it harder to reliably identify nodes, and can interfere with other features.
Setting a non-certname node name is not officially supported in Puppet Enterprise.
来自 <https://docs.puppet.com/puppet/5.1/puppet_platform.html>
二、环境准备
CentOS7.3.1611
NTP/chroynd
DNS
Sudo users
SELinux/Firewalld
/etc/hosts
puppet master: puppet-master.gw.local
puppet client: lux-vm32.gw.local
三、软件安装
- 软件下载
rpm repo
rpm -Uvh https://yum.puppetlabs.com/puppet5/puppet5-release-el-7.noarch.rpm
rpm pacakge
puppetserver
wget https://yum.puppetlabs.com/puppet/el/7/x86_64/puppetserver-5.0.0-1.el7.noarch.rpm
puppet-agent
wget https://yum.puppetlabs.com/puppet/el/7/x86_64/puppet-agent-5.1.0-1.el7.x86_64.rpm
2、安装
puppet master
yum -y install puppetserver (同时会安装puppet-agent)
puppet agent
yum -y install puppet-agent
3、配置
Config files
- puppet.conf — Puppet's main config file. (Any node.)
- auth.conf — access control rules for the Puppet master's network services. (Master only.)
- autosign.conf — a list of pre-approved certificate requests. (CA master only.)
- csr_attributes.yaml — optional data to be inserted into new certificate requests. (Any node.)
- device.conf — configuration for network devices managed by the puppet device command. (Any node acting as an intermediary to configure network devices.)
- fileserver.conf — configuration for additional fileserver mount points. (Master only.)
- hiera.yaml — global configuration for the Hiera data lookup system. Note that environments and modules can have their own hiera.yaml files. (Master, or standalone nodes running Puppet apply.)
- routes.yaml — advanced configuration of indirector behavior. (Master only.)
Location
The puppet.conf file is always located at $confdir/puppet.conf.
Although its location is configurable with the config setting, it can only be set on the command line (e.g. puppet agent -t --config ./temporary_config.conf).
The location of the confdir depends on your OS. See the confdir documentation for details.
Examples
Example agent config
[main]
certname = agent01.example.com
server = puppet
environment = production
runinterval = 1h
splay = true
Example master config
[main]
certname = puppetmaster01.example.com
server = puppet
environment = production
runinterval = 1h
strict_variables = true
[master]
dns_alt_names = puppetmaster01,puppetmaster01.example.com,puppet,puppet.example.com
reports = puppetdb
storeconfigs_backend = puppetdb
storeconfigs = true
environment_timeout = unlimited
Puppet uses four config sections:
- main is the global section used by all commands and services. It can be overridden by the other sections.
- master is used by the Puppet master service and the Puppet cert command.
- agent is used by the Puppet agent service.
- user is used by the Puppet apply command, as well as many of the less common Puppet subcommands.
Puppet prefers to use settings from one of the three application-specific sections (master, agent, or user). If it doesn't find a setting in the application section, it will use the value from main. (If main doesn't set one, it will fall back to the default value.)
来自 <https://docs.puppet.com/puppet/5.0/dirs_confdir.html>
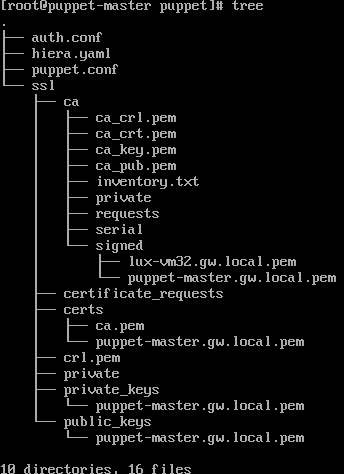
puppet master

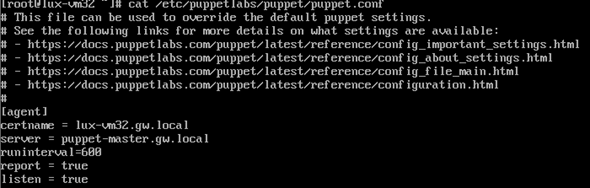
puppet client
/etc/puppetlabs/puppet/puppet.conf
Q:碰到的问题
Reason: puppet master 内存不够,默认JVM需要2G
A: 更改java vm内存设置
/etc/sysconfig/puppetserver
- Update the line:
# Modify this if you'd like to change the memory allocation, enable JMX, etc
JAVA_ARGS="-Xms2g -Xmx2g"
Replace 2g with the amount of memory you want to allocate to Puppet Server. For example, to allocate 1GB of memory, use JAVA_ARGS="-Xms1g -Xmx1g"; for 512MB, use JAVA_ARGS="-Xms512m -Xmx512m".
For more information about the recommended settings for the JVM, see Oracle's docs on JVM tuning. - Restart the puppetserver service after making any changes to this file.

#查询证书
puppet cert list --all
|
证书列表中有cs_agnet1的申请,目前是未审核状态(最前面没有+)。审核证书 |
#生成证书
puppet cert genarate <client DNS name>
#分配证书
puppet cert sign lux-vm32.gw.local

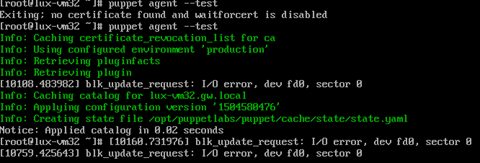
#启动 puppet agent
puppet agent --test
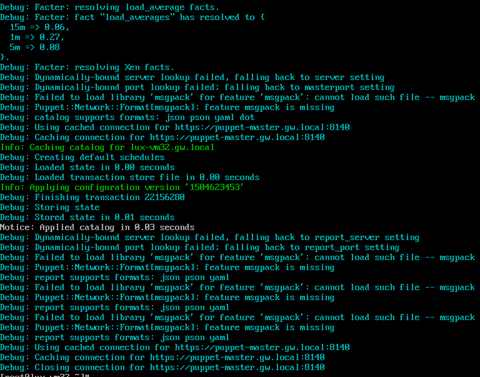
puppet agent -test --debug
puppet master
puppet module search <search_string>
puppet module search apaches
puppet module install <module name>
# puppet master --genconfig #就会将master的所有配置选项都列出来,我们可以>到一个文件中,可以去查看其它的参数选项和介绍,但是实际情况我们并不需要如此全面的配置文件,只会用到很少的一部分,大部分的选项还是使用默认的。
puppet5.1 安装与配置的更多相关文章
- JDK安装与配置
JDK安装与配置 一.下载 JDK是ORACLE提供免费下载使用的,官网地址:https://www.oracle.com/index.html 一般选择Java SE版本即可,企业版的选择Java ...
- Node.js 教程 01 - 简介、安装及配置
系列目录: Node.js 教程 01 - 简介.安装及配置 Node.js 教程 02 - 经典的Hello World Node.js 教程 03 - 创建HTTP服务器 Node.js 教程 0 ...
- 烂泥:redis3.2.3安装与配置
本文由ilanniweb提供友情赞助,首发于烂泥行天下 想要获得更多的文章,可以关注我的微信ilanniweb 前一段时间写过一篇codis集群的文章,写那篇文章主要是因为当时的项目不支持redis自 ...
- mysql源码包手动安装、配置以及测试(亲测可行)
笔记编者:小波/qq463431476博客首页:http://www.cnblogs.com/xiaobo-Linux/ 记下这篇mysql笔记,望日后有用! redhat6采用centos yum源 ...
- 环境搭建系列-系统安装之centos 6.5安装与配置
按照国际惯例,系列目录先奉上: 系列一:系统安装之centos 6.5安装与配置 系列二:准备工作之Java环境安装 系列三:数据为先之MySQL读写集群搭建 系列四:谈分布式之RabbitMQ集群搭 ...
- ZooKeeper安装与配置
一. 单机安装.配置: 1. 下载zookeeper二进制安装包下载地址:http://apache.dataguru.cn/zookeeper/zookeeper-3.4.3/zookeeper-3 ...
- mac 下JDK 与 tomcat 的安装与配置
一.Mac下JDK的安装 1.先检测Mac是否已经安装过JDK,在终端中输入java 或者 javac 显示说明,表明已经安装过JDK,JDK版本查询终端键入java -version,终端会返回JD ...
- 烂泥:zabbix3.0安装与配置
本文由ilanniweb提供友情赞助,首发于烂泥行天下 想要获得更多的文章,可以关注我的微信ilanniweb 这个月又快过完了,最近也比较忙,没时间写文章,今天挤点时间把zabbix3.0安装与配置 ...
- Jenkins入门系列之——02第二章 Jenkins安装与配置
2014-12-08:已不再担任SCM和CI的职位,Jenkins的文章如无必要不会再维护. 写的我想吐血,累死了. 网页看着不爽的,自己去下载PDF.有问题请留言! Jenkins入门系列之——03 ...
随机推荐
- 豆瓣 URLError: <urlopen error [SSL: CERTIFICATE_VERIFY_FAILED] certificate verify failed (_ssl.c:719)>
import urllib.request as urlrequest #import ssl#ssl._create_default_https_context = ssl._create_unve ...
- 分布式远程调用SpringCloud-Feign的两种具体操作方式(精华)
一 前言 几大RPC框架介绍 1.支持多语言的RPC框架,google的gRPC,Apache(facebook)的Thrift 2.只支持特定语言的RPC框架,例如新浪的Motan 3.支持服务治理 ...
- 基于 HTML5 + WebGL 的太阳系 3D 展示系统
前言 近年来随着引力波的发现.黑洞照片的拍摄.火星上存在水的证据发现等科学上的突破,以及文学影视作品中诸如<三体>.<流浪地球>.<星际穿越>等的传播普及,宇宙空间 ...
- Service Mesh 是新瓶装旧酒吗?
点击下载<不一样的 双11 技术:阿里巴巴经济体云原生实践> 本文节选自<不一样的 双11 技术:阿里巴巴经济体云原生实践>一书,点击上方图片即可下载! 作者 | 李云(花名: ...
- .Net Core使用分布式缓存Redis:基础
一.前言 Redis的介绍网上很多不再赘述.本次环境为net core 2.2,使用的StackExchange.Redis来操作Redis. 二.引用Microsoft.Extensions.Cac ...
- Java项目多版本部署及快速回滚(含完整命令)
1. 场景描述 java项目linux环境下快速部署,以前介绍过,今天主要结合linux的软连接,实现版本的快速切换(回滚),包含完整的start.sh与stop.sh,只需修改包名和路径即可运行,有 ...
- 【集合系列】- 深入浅出分析HashMap
一.摘要 在集合系列的第一章,咱们了解到,Map的实现类有HashMap.LinkedHashMap.TreeMap.IdentityHashMap.WeakHashMap.Hashtable.Pro ...
- Spring Boot和Feign中使用Java 8时间日期API(LocalDate等)的序列化问题【转】
Spring Boot和Feign中使用Java 8时间日期API(LocalDate等)的序列化问题 http://blog.didispace.com/Spring-Boot-And-Feign- ...
- 第五章 Unity中的基础光照(2)
目录 1. Unity中的环境光和自发光 2. 在UnityShader中实现漫反射光照模型 2.1 实践:逐顶点光照 2.2 实践:逐像素光照 2.3 半兰伯特模型 1. Unity中的环境光和自发 ...
- C#程序编写高质量代码改善的157个建议【13-15】[为类型输出格式化字符串、实现浅拷贝和深拷贝、用dynamic来优化反射]
前言 本文已更新至http://www.cnblogs.com/aehyok/p/3624579.html .本文主要学习记录以下内容: 建议13.为类型输出格式化字符串 建议14.正确实现浅拷贝和深 ...