Okhttp3源码解析(2)-Request分析
### 前言
前面我们讲了
[Okhttp的基本用法](https://www.jianshu.com/p/8e404d9c160f)
[Okhttp3源码解析(1)-OkHttpClient分析](https://www.jianshu.com/p/bf1d01b79ce7)
今天主要分析下Request源码!
### Request初始化
当我们构建完OkHttpClient对象,需要构造Request对象,构造方式如下:
###### 1.Get请求
```
final Request request=new Request.Builder()
.url("https://www.wanandroid.com/navi/json")
.get()
.build();
```
###### 2.POST请求
拿POST提交表单请求,这时就需要声明一个RequestBody对象了
```
RequestBody requestBody = new FormBody.Builder()
.add("username", "qinzishuai")
.add("password", "123456")
.build();
Request request = new Request.Builder()
.url("https://www.wanandroid.com/user/login")
.post(requestBody)
.build();
```
看到上面代码是不是很熟悉?和OkHttpClient很相似, 没错 Request 的构建也是Builder模式!

我们点击Request源码进去,果然 其中有静态的Builder内部类:

然后我们查一下**Request在初始化时配置了哪些参数???**
```
public static class Builder {
HttpUrl url;
String method;
Headers.Builder headers;
RequestBody body;
public Builder() {
this.method = "GET";
this.headers = new Headers.Builder();
}
//省略部分代码
public Request build() {
if (url == null) throw new IllegalStateException("url == null");
return new Request(this);
}
}
```
从代码看到了 如果没有声明,默认是Get请求 ` this.method = "GET"` ,至于`url`等字段需要我们自己去配置:
###### HttpUrl
请求访问的url ,可以传String与URL 具体方法如下:
```
public Builder url(String url) {
if (url == null) throw new NullPointerException("url == null");
// Silently replace web socket URLs with HTTP URLs.
if (url.regionMatches(true, 0, "ws:", 0, 3)) {
url = "http:" + url.substring(3);
} else if (url.regionMatches(true, 0, "wss:", 0, 4)) {
url = "https:" + url.substring(4);
}
return url(HttpUrl.get(url));
}
public Builder url(URL url) {
if (url == null) throw new NullPointerException("url == null");
return url(HttpUrl.get(url.toString()));
}
```
###### method
请求类型 `String method `,支持多种请求类型
```
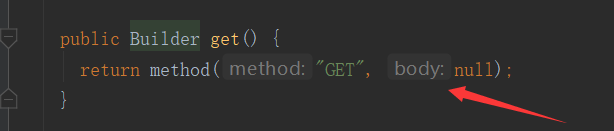
public Builder get() {
return method("GET", null);
}
public Builder head() {
return method("HEAD", null);
}
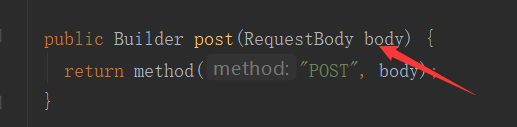
public Builder post(RequestBody body) {
return method("POST", body);
}
public Builder delete(@Nullable RequestBody body) {
return method("DELETE", body);
}
public Builder delete() {
return delete(Util.EMPTY_REQUEST);
}
public Builder put(RequestBody body) {
return method("PUT", body);
}
public Builder patch(RequestBody body) {
return method("PATCH", body);
}
```
###### Headers
`Headers.Builder ` Http消息的头字段
前面看到了, **我们在初始化Request的时候 同时初始化了headers**, ` this.headers = new Headers.Builder()`
可以通过 `header ` `addHeader ` `removeHeader ` ` headers ` 方法做一些操作
```
public Builder header(String name, String value) {
headers.set(name, value);
return this;
}
public Builder addHeader(String name, String value) {
headers.add(name, value);
return this;
}
public Builder removeHeader(String name) {
headers.removeAll(name);
return this;
}
public Builder headers(Headers headers) {
this.headers = headers.newBuilder();
return this;
}
```
###### body
RequestBody类型,它是抽象类, 有些请求需要我们传入body实例 ,我们在通过源码来看一下:
如果是GET请求,body对象传的是null
**Get与head方法不能传body对象 ,其他method是可以的**
如果是POST请求,就需要我们去设定了
### RequestBody解析
首先我们看一下RequestBody如何初始化??拿提交表单举例:
```
RequestBody requestBody = new FormBody.Builder()
.add("username", "qinzishuai")
.add("password", "000000")
.build();
```
不出所料,也是Builder模式,而且`RequestBody` 是抽象类, `FormBody`是`RequestBody`的其中一种实现类 ,另一个实现类是`MultipartBody`
RequestBody源码如下:
```
public abstract class RequestBody {
/** Returns the Content-Type header for this body. */
public abstract @Nullable MediaType contentType();
/**
* Returns the number of bytes that will be written to {@code sink} in a call to {@link #writeTo},
* or -1 if that count is unknown.
*/
public long contentLength() throws IOException {
return -1;
}
/** Writes the content of this request to {@code sink}. */
public abstract void writeTo(BufferedSink sink) throws IOException;
/**
* Returns a new request body that transmits {@code content}. If {@code contentType} is non-null
* and lacks a charset, this will use UTF-8.
*/
public static RequestBody create(@Nullable MediaType contentType, String content) {
Charset charset = Util.UTF_8;
if (contentType != null) {
charset = contentType.charset();
if (charset == null) {
charset = Util.UTF_8;
contentType = MediaType.parse(contentType + "; charset=utf-8");
}
}
byte[] bytes = content.getBytes(charset);
return create(contentType, bytes);
}
/** Returns a new request body that transmits {@code content}. */
public static RequestBody create(
final @Nullable MediaType contentType, final ByteString content) {
return new RequestBody() {
@Override public @Nullable MediaType contentType() {
return contentType;
}
@Override public long contentLength() throws IOException {
return content.size();
}
@Override public void writeTo(BufferedSink sink) throws IOException {
sink.write(content);
}
};
}
/** Returns a new request body that transmits {@code content}. */
public static RequestBody create(final @Nullable MediaType contentType, final byte[] content) {
return create(contentType, content, 0, content.length);
}
//省略部分代码...
}
```
核心方法有三个:
- contentType()//数据类型
- contentLength()//数据长度
- writeTo(BufferedSink sink) //写操作
今天就讲到这里,希望对大家有所帮助...
大家可以关注我的微信公众号:「秦子帅」一个有质量、有态度的公众号!

Okhttp3源码解析(2)-Request分析的更多相关文章
- Okhttp3源码解析(3)-Call分析(整体流程)
### 前言 前面我们讲了 [Okhttp的基本用法](https://www.jianshu.com/p/8e404d9c160f) [Okhttp3源码解析(1)-OkHttpClient分析]( ...
- Okhttp3源码解析(1)-OkHttpClient分析
### 前言 上篇文章我们讲了[Okhttp的基本用法](https://www.jianshu.com/p/8e404d9c160f),今天根据上节讲到请求流程来分析源码,那么第一步就是实例化OkH ...
- Okhttp3源码解析(4)-拦截器与设计模式
### 前言 回顾: [Okhttp的基本用法](https://www.jianshu.com/p/8e404d9c160f) [Okhttp3源码解析(1)-OkHttpClient分析](htt ...
- Okhttp3源码解析(5)-拦截器RetryAndFollowUpInterceptor
### 前言 回顾: [Okhttp的基本用法](https://www.jianshu.com/p/8e404d9c160f) [Okhttp3源码解析(1)-OkHttpClient分析](htt ...
- 【转】aiohttp 源码解析之 request 的处理过程
[转自 太阳尚远的博客:http://blog.yeqianfeng.me/2016/04/01/python-yield-expression/] 使用过 python 的 aiohttp 第三方库 ...
- lesson8:AtomicInteger源码解析及性能分析
AtomicInteger等对象出现的目的主要是为了解决在多线程环境下变量计数的问题,例如常用的i++,i--操作,它们不是线程安全的,AtomicInteger引入后,就不必在进行i++和i--操作 ...
- Spring源码解析-AOP简单分析
AOP称为面向切面编程,在程序开发中主要用来解决一些系统层面上的问题,比如日志,事务,权限等等,不需要去修改业务相关的代码. 对于这部分内容,同样采用一个简单的例子和源码来说明. 接口 public ...
- Okhttp3源码解析
首先是Okhttp的使用: //缓存文件夹 File cacheFile = new File(getExternalCacheDir().toString(), "cache") ...
- Jquery源码解析及案例分析
本人刚学先上链接(别人写的挺好的)后期同步补上
随机推荐
- Git常用命令--了解这些就够了
<div class="show-content-free"> <blockquote> Csdn 将本地工程push到远程 方式一: 建立本地仓库 git ...
- Java中常见的异常类型
一. Java中常见的异常类 异常类 说明 ClassCastException 类型准换异常 ClassNotFoundException 未找到相应类异常 ArithmeticException ...
- 第一次使用cnblog,希望大佬们多多指教
我目前在学习ML和DeepLearning,在这里和大家共同成长
- Java、Java SE、Java Web和Java EE的区别
刚接触Java对这些概念上的东西有点模糊,查了很多资料,想把它分享出来,要是哪里不对请大家指正(^_^) 1.Java 毫无疑问这就是门语言和C.C++.C#一样没什么好说的. 2.Java SE和J ...
- 为 Editor.md 编辑器插件增加预览和发布按钮
前言 一直在使用 Editor.md 插件作为博客的编辑器,用着挺好,但是在全屏下编辑时,每次想预览或者保存又必须切换到非全屏状态下才可以点击按钮,用着不舒服,所以花了一点时间在工具栏上增加了预览.保 ...
- Flink实战(八) - Streaming Connectors 编程
1 概览 1.1 预定义的源和接收器 Flink内置了一些基本数据源和接收器,并且始终可用.该预定义的数据源包括文件,目录和插socket,并从集合和迭代器摄取数据.该预定义的数据接收器支持写入文件和 ...
- stack函数怎么用嘞?↓↓↓
c++ stl栈stack的头文件书写格式为: #include 实例化形式如下: stack StackName; 其中成员函数如下: 1.检验堆栈是否为空 empty() 堆栈为空则返回真 形式如 ...
- WAMP运行原理
Apache运行原理 Apache的诸多功能都是通过模块进行加载的,自己本身并不具备那么多功能. php文件动态网页请求原理 请求步骤: 1. 用户在浏览器中输入需要访问的网站的域名以及具体要请求的网 ...
- spark 源码分析之二十一 -- Task的执行流程
引言 在上两篇文章 spark 源码分析之十九 -- DAG的生成和Stage的划分 和 spark 源码分析之二十 -- Stage的提交 中剖析了Spark的DAG的生成,Stage的划分以及St ...
- python post接口测试第一个用例日记
如下是我自己公司的一个请求,学习过程顺便记录下,都是白话语言,不那么专业,不喜勿喷! 首先看下图,post请求一般需要填写参数url, data(一般是表格类型的参数,如我们智联驾驶APP登录的参数) ...