android布局学习-使用FrameLayout和LinearLayout制作QQ空间底部导航栏
【声明:本博客通过学习“J灬叶小超 ”博客而写,链接:http://www.cnblogs.com/yc-755909659/p/4288260.html】
--------------------------------------------------------------------------------------------------------
界面效果如下所示:
-------------------------------------------------------------------------------------------------------------
【分析】
此导航栏的设计通过FrameLayout和LinearLayout编写,我们知道每个FrameLayout都是具有叠加效果: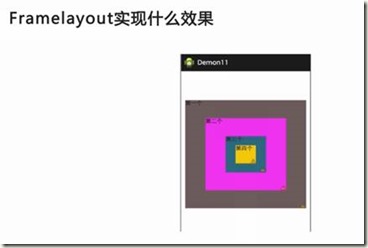 (通过图片可以进一步理解)
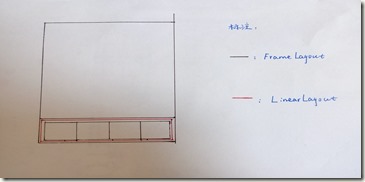
对这个分析,小编花了一个图:
-------------------------------------------------------------------------------------------------------------
【代码】
<RelativeLayout xmlns:android="http://schemas.android.com/apk/res/android"

    xmlns:tools="http://schemas.android.com/tools"

    android:layout_width="match_parent"

    android:layout_height="match_parent">

    <FrameLayout

        android:id="@+id/frame_content"

        android:layout_width="match_parent"

        android:layout_height="match_parent"

        android:layout_above="@+id/frameMenu"

        android:layout_alignParentTop="true">

        </FrameLayout>

    <FrameLayout

        android:id="@+id/frameMenu"

        android:layout_width="match_parent"

        android:layout_height="wrap_content"

        android:layout_alignParentBottom="true" >

        <LinearLayout

            android:layout_width="match_parent"

            android:layout_height="match_parent"

            android:background="@color/skin_tabbar_bg"

            android:orientation="horizontal">

            <!--动态-->

            <FrameLayout

                android:id="@+id/layout_at"

                android:layout_width="fill_parent"

                android:layout_height="wrap_content"

                android:layout_weight="1">

                <ImageView

                    android:id="@+id/image_at"

                    android:layout_width="wrap_content"

                    android:layout_height="wrap_content"

                    android:layout_gravity="top|center"

                    android:background="@drawable/skin_tabbar_icon_auth_select"/>

                <TextView

                    android:layout_width="wrap_content"

                    android:layout_height="wrap_content"

                    android:layout_gravity="bottom|center"

                    android:text="@string/skin_tabbar_icon_auth"

                    android:textSize="12sp"/>

            </FrameLayout>

            <!-- 与我相关 -->

            <FrameLayout

                android:id="@+id/layout_auth"

                android:layout_width="fill_parent"

                android:layout_height="wrap_content"

                android:layout_weight="1" >

                <ImageView

                    android:id="@+id/image_auth"

                    android:layout_width="wrap_content"

                    android:layout_height="wrap_content"

                    android:layout_gravity="top|center"

                    android:src="@drawable/skin_tabbar_icon_at_select" />

                <TextView

                    android:layout_width="wrap_content"

                    android:layout_height="wrap_content"

                    android:layout_gravity="bottom|center"

                    android:text="@string/skin_tabbar_icon_at"

                    android:textColor="@android:color/black"

                    android:textSize="12sp" />

            </FrameLayout>

            <!-- 留白 -->

            <FrameLayout

                android:layout_width="fill_parent"

                android:layout_height="wrap_content"

                android:layout_weight="1" >

            </FrameLayout>

            <!-- 我的空间 -->

            <FrameLayout

                android:id="@+id/layout_space"

                android:layout_width="fill_parent"

                android:layout_height="wrap_content"

                android:layout_weight="1" >

                <ImageView

                    android:id="@+id/image_space"

                    android:layout_width="wrap_content"

                    android:layout_height="wrap_content"

                    android:layout_gravity="top|center"

                    android:src="@drawable/skin_tabbar_icon_space_select" />

                <TextView

                    android:layout_width="wrap_content"

                    android:layout_height="wrap_content"

                    android:layout_gravity="bottom|center"

                    android:text="@string/skin_tabbar_icon_space"

                    android:textColor="@android:color/black"

                    android:textSize="12sp" />

            </FrameLayout>

            <!-- 玩吧 -->

            <FrameLayout

                android:id="@+id/layout_more"

                android:layout_width="fill_parent"

                android:layout_height="wrap_content"

                android:layout_weight="1" >

                <ImageView

                    android:id="@+id/image_more"

                    android:layout_width="wrap_content"

                    android:layout_height="wrap_content"

                    android:layout_gravity="top|center"

                    android:src="@drawable/skin_tabbar_icon_more_select" />

                <TextView

                    android:layout_width="wrap_content"

                    android:layout_height="wrap_content"

                    android:layout_gravity="bottom|center"

                    android:text="@string/skin_tabbar_icon_more"

                    android:textColor="@android:color/black"

                    android:textSize="12sp" />

            </FrameLayout>

         </LinearLayout>

        <LinearLayout

            android:layout_width="match_parent"

            android:layout_height="1px"

            android:background="@android:color/black" >

        </LinearLayout>

     </FrameLayout>

    <!-- 中间按钮背景 -->

    <ImageView

        android:id="@+id/toggle_btn"

        android:layout_width="wrap_content"

        android:layout_height="wrap_content"

        android:layout_alignParentBottom="true"

        android:layout_alignTop="@+id/frameMenu"

        android:layout_centerInParent="true"

        android:src="@drawable/skin_tabbar_btn"/>

    <!-- 中间按钮 -->

    <ImageView

        android:id="@+id/plus_btn"

        android:layout_width="wrap_content"

        android:layout_height="wrap_content"

        android:layout_alignParentBottom="true"

        android:layout_alignTop="@+id/frameMenu"

        android:layout_centerInParent="true"

        android:src="@drawable/skin_tabbar_icon_select" />

</RelativeLayout>
【结构图】
【分析】
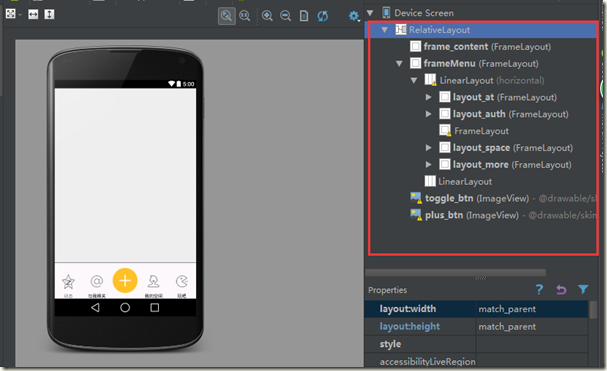
Q1:布局分析:页面中创建两个FrameLayout,frame_content用于存放图片资源,frameMenu用于存放菜单信息
Q2:菜单分析:菜单的框架采用LinearLayout,这个LinearLayout的基础为FrameLayout,菜单项采用FrameLayout,依次创建了5个
Q3:中间(橘黄色)按钮分析:中间的图片在FrameLayout之外,所以不受FrameLayout的限制,故可以通过布局的方向来设定这两个图片的位置
Q4:菜单项的水平分割线:由于分割线隶属于FrameLayout,所以它的位置应该从左上角开始
android布局学习-使用FrameLayout和LinearLayout制作QQ空间底部导航栏的更多相关文章
- Android 布局学习之——Layout(布局)具体解释二(常见布局和布局參数)
[Android布局学习系列] 1.Android 布局学习之--Layout(布局)具体解释一 2.Android 布局学习之--Layout(布局)具体解释二(常见布局和布局參数) ...
- Android布局学习——android:gravity和android:layout_gravity的区别
[Android布局学习系列] 1.Android 布局学习之——Layout(布局)详解一 2.Android 布局学习之——Layout(布局)详解二(常见布局和布局参数) 3.And ...
- Android 布局学习之——Layout(布局)详解二(常见布局和布局参数)
[Android布局学习系列] 1.Android 布局学习之——Layout(布局)详解一 2.Android 布局学习之——Layout(布局)详解二(常见布局和布局参数) 3.And ...
- Android底部导航栏——FrameLayout + RadioGroup
原创文章,转载请注明出处http://www.cnblogs.com/baipengzhan/p/6285881.html Android底部导航栏有多种实现方式,本文详细介绍FrameLayout ...
- Android学习笔记- Fragment实例 底部导航栏的实现
1.要实现的效果图以及工程目录结构: 先看看效果图吧: 接着看看我们的工程的目录结构: 2.实现流程: Step 1:写下底部选项的一些资源文件 我们从图上可以看到,我们底部的每一项点击的时候都有不同 ...
- Android UI-仿微信底部导航栏布局
现在App基本的标配除了侧滑菜单,还有一个就是底部导航栏,常见的聊天工具QQ,微信,购物App都有底部导航栏,用户可以随便切换看不同的内容,说是情怀也好,用户体验也罢.我们开发的主要的还是讲的是如何如 ...
- Android之RadioGroup+ViewPager制作的底部导航栏
在日常开发中我们常常会用到类似微信或者QQ的底部导航.实现这样的效果有多种,今天就为大家介绍一种实现简单,可控性好的底部导航的实现方法. 首先创建activity_main.xml布局文件,里面主要由 ...
- AndroidStudio制作底部导航栏以及用Fragment实现切换功能
前言 大家好,给大家带来AndroidStudio制作底部导航栏以及用Fragment实现切换功能的概述,希望你们喜欢 学习目标 AndroidStudio制作底部导航栏以及用Fragment实现切换 ...
- Android应用底部导航栏(选项卡)实例
现在很多android的应用都采用底部导航栏的功能,这样可以使得用户在使用过程中随意切换不同的页面,现在我采用TabHost组件来自定义一个底部的导航栏的功能. 我们先看下该demo实例的框架图: 其 ...
随机推荐
- BZOJ 1191 【HNOI2006】 超级英雄Hero
Description 现在电视台有一种节目叫做超级英雄,大概的流程就是每位选手到台上回答主持人的几个问题,然后根据回答问题的多少获得不同数目的奖品或奖金.主持人问题准备了若干道题目,只有当选手正确回 ...
- Windbg调优Kafka.Client内存泄露
从来没写过Blog,想想也是,工作十多年了,搞过N多的架构.技术,不与大家分享实在是可惜了.另外,从传统地ERP行业转到互联网,也遇到了很所前所未有的问题,原来知道有一些坑,但是不知道坑太多太深.借着 ...
- Canvas之蛋疼的正方体绘制体验
事情的起因 之前写了篇谈谈文字图片粒子化 I,并且写了个简单的demo -> 粒子化.正当我在为写 谈谈文字图片粒子化II 准备demo时,突然想到能不能用正方体代替demo中的球体粒子.我不禁 ...
- 从语言到库到框架,再到API,再到标记最后到DSL语言
计算机技术发展很快,而且越来越快,结果也是越来越复杂,那么我们到底怎么搞定复杂性并重用代码? 很明显,这是个大难题.一开始我们要解决计算问题,发展了基本的编程语言. 很快,编程语言不能满足需求,我们需 ...
- C# 退出应用程序办法
Application.Exit();//好像只在主线程可以起作用,而且当有线程,或是阻塞方法的情况下,很容易失灵 this.Close();//只是关闭当前窗体. Application.E ...
- java中的集合和数组
数组Array和集合的区别: (1)数组是大小固定的,并且同一个数组只能存放类型一样的数据(基本类型/引用类型) (2)JAVA集合可以存储和操作数目不固定的一组数据. (3)若程序时不知道究竟需要多 ...
- 各组对final发布产品的排名
结果 排名 组名 项目简称 组长 平均 方差 1 新蜂 俄罗斯 武志远 2 0.80 2 天天向上 连连看 王森 2.50 1.90 3 奋斗吧兄弟 食物链 黄兴 2.83 0.97 4 金洲勇士 考 ...
- ps打造逼真印章效果
新建500*500px--->路径工具 最后通过 通道扣取选取,填充白色,即可
- 通过js写一个消息弹框
prompt(data,time) { let alertForm = document.createElement('div'); alertForm.id="promptBox" ...
- Notes on 'Selective Search For Object Recognition'
UijlingsIJCV2013, Selective Search For Object Recognition code 算法思想 利用分割算法将图片细分成很多region, 或超像素. 在这个基 ...