关于我开发tinymce的自由表单、病历插件这件事
项目地址:https://gitee.com/zhao-xuhang/tinymce
1.前期准备
这是个vue2项目所以要使用vue-cli (虽然开发tinymce插件和这个没关系)
1. 使用npm安装下面的依赖
1  "@packy-tang/vue-tinymce": "^1.1.2",

2  "@tinymce/tinymce-vue": "^3.2.8",

3  "tinymce": "^6.0.1",
1 Vue.prototype.$tinymce = tinymce // 将全局tinymce对象指向给Vue作用域下

2 Vue.use(VueTinymce)              // 安装vue的tinymce组件
5.在组件中引入tinymce
<vue-tinymce id="myTinymce" v-model="content" :setting="setting" :setup="setup" />
setting配置
 1 setting: {

 2             menubar: 'file edit view insert format tools table tc help',

 3             toolbar:

 4             "template preview | undo redo | fullscreen | formatselect alignleft aligncenter alignright alignjustify | link unlink | numlist bullist | image media table | fontselect fontsizeselect forecolor backcolor | bold italic underline strikethrough | indent outdent | superscript subscript | removeformat | help | print | control",

 5             // toolbar_drawer: "sliding",

 6             quickbars_selection_toolbar:

 7             "removeformat | bold italic underline strikethrough | fontsizeselect forecolor backcolor",

 8             plugins: "template preview link image media table lists fullscreen quickbars help control",

 9             language: "zh_CN", //本地化设置

10             height: 500,

11             templates: [

12                 {

13                     title: "Some title 1",

14                     description: "Some desc 1",

15                     content: '<input type="text" />',

16                 },

17                 {

18                     title: "Some title 2",

19                     description: "Some desc 2",

20                     content: '15111',

21                 },

22             ],

23         }
2.开发插件
tinymce文档:https://www.tiny.cloud/docs/api/tinymce/root_tinymce/
1.打开目录public\tinymce\plugins 在里面找一个文件复制一份

2.文件夹改个名字control(这个名字最好是要引入的插件名),把plugin.js中的代码复制到plugin.min.js中 把control添加到toolbar和plugins

3.添加按钮 绑定方法 dialogOpener
1 // 添加插件的 button 和 菜单栏
2 const register = (editor, dialogOpener) => {
3 editor.ui.registry.addButton('control', {
4 icon: 'non-breaking', //图标
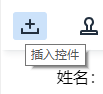
5 tooltip: '插入控件', //提示
6 onAction: dialogOpener //执行的方法
7 });
8 };
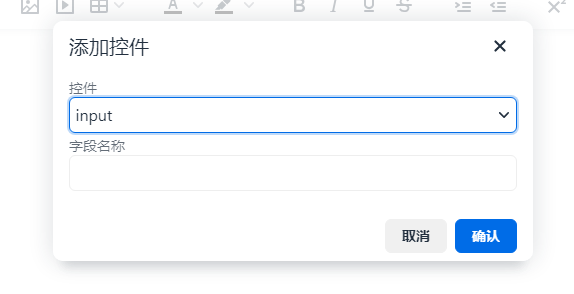
点击时会打开弹框 关于弹框的配置:https://www.tiny.cloud/docs/ui-components/dialog/
点击确定会执行弹框中的 onSubmit向内容中添加对应控件
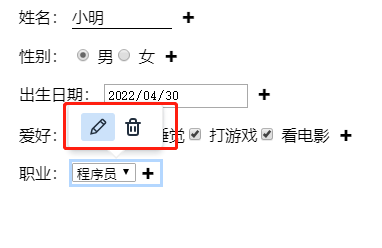
4.添加上下文菜单 对控件执行编辑,删除操作 关于添加上下文菜单:https://www.tiny.cloud/docs/ui-components/contexttoolbar/
1.注册上下文菜单的按钮
编辑按钮 editor.ui.registry.addButton('changecontrol', {}) //获取到对应的控件数据,执行打开弹框进行编辑控件数据

删除按钮 editor.ui.registry.addButton('removecontrol', {})
1 dom.bind(dom.select('.c-menu'), 'click', (e)=>{

2           // 显示指定的上下文菜单

3           editor.dispatch('contexttoolbar-show', { toolbarKey: 'editcontrol' });

4           // 隐藏指定的上下文菜单

5           // editor.dispatch('contexttoolbar-hide', { toolbarKey: 'editcontrol' });

6           console.log(e)

7           e.stopPropagation()

8       });
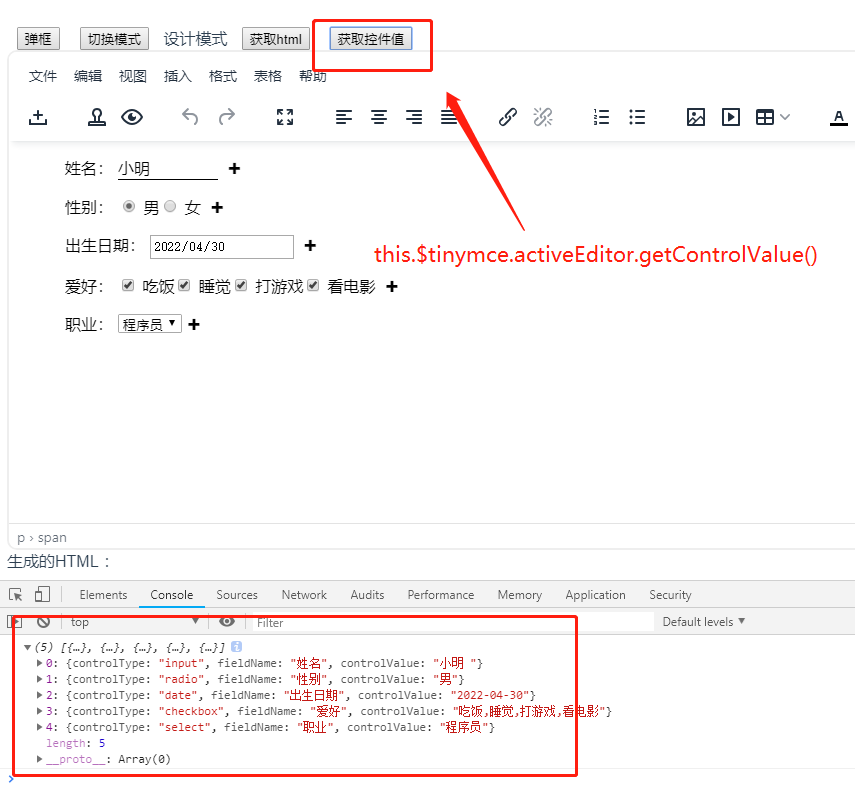
5.获取控件数据 将 editor.getControlValue = getControlValue 绑定到editor上
 1 // 获取控件数据值

 2     let getControlValue = (editor)=>{

 3       let dom = tinymce.activeEditor.dom

 4       let controls = dom.select('.control')

 5       let data = controls.map(item=>{

 6         let dataControl = JSON.parse(item.getAttribute('data-control'))

 7         let controlValue = item.getAttribute('data-value')

 8         //文本框 没有data-value

 9         if(!controlValue){

10           controlValue = item.firstElementChild.innerHTML

11         }

12         return {

13           controlType:dataControl.initialData.select,

14           fieldName:dataControl.initialData.name,

15           controlValue,

16         }

17       })

18       console.log(data)

19       return data

20     }
3.总结
复制新建插件文件->将插件添加到tinymce->编辑插件文件(1.注册添加控件插件按钮,2.绑定插件按钮的方法,3.添加编辑删除控件的上下文菜单按钮,4.获取控件数据)
预留问题:
1.插件按钮应该做成下拉选择控件类型而不是弹框后再选择控件类型
2.只能获取一次控件值,执行获取控件值 this.$tinymce.activeEditor.getControlValue() 后,再次修改控件值没有改变控件数据
关于我开发tinymce的自由表单、病历插件这件事的更多相关文章
- 表单元素(控件)不可见,你用visibility还是display?(转)
属性大比拼:visibility和display的介绍 今天在做一个表单时涉及到这方面,当选中相应的选项后设置相应的几个元素(控件可见或不可见),后来还是用了visibility来实现.我们先来看下v ...
- 微信小程序——仿jqueryValidate表单验证插件WxValidate的二次封装(一)
在做web开发时,表单验证插件我们前端用的是jqueryValidate,由于个人主要精力是在后台JAVA开发上,为了让插件与后台更好的结合和使用,通过JAVA的自定义组件将表单全部重新写了一边,同时 ...
- 如何使用.NET开发全版本支持的Outlook插件产品(二)——完善插件
插件项目所有代码都已经上传至 https://github.com/VanPan/TestOutlookAdding 勿在浮砂筑高台--定位错误 在介绍后面的插件开发技术之前,让我们先来看看已经达到的 ...
- SNF开发平台WinForm之三-开发-单表选择控件创建-SNF快速开发平台3.3-Spring.Net.Framework
3.1运行效果: 3.2开发实现: 3.2.1 这个开发与第一个开发操作步骤是一致的,不同之处就是在生成完代码之后,留下如下圈红程序,其它删除. 第一个开发地址:开发-单表表格编辑管理页面 http: ...
- SNF快速开发平台MVC-各种级联绑定方式,演示样例程序(包含表单和表格控件)
做了这么多项目,经常会使用到级联.联动的情况. 如:省.市.县.区.一级分类.二级分类.三级分类.仓库.货位. 方式:有表单需要做级联的,还是表格行上需要做级联操作的. 实现:实现方法也有很多种方式. ...
- 数据库开发-Django ORM的单表查询
数据库开发-Django ORM的单表查询 作者:尹正杰 版权声明:原创作品,谢绝转载!否则将追究法律责任. 一.查询集 1>.查询集相关概述 查询会返回结果的集,它是django.db.mod ...
- jQuery学习之:Validation表单验证插件
http://polaris.blog.51cto.com/1146394/258781/ 最近由于公司决定使用AJAX + Struts2来重构项目,让我仔细研究一下这两个,然后集中给同事讲讲,让每 ...
- Atitit.hybrid混合型应用 浏览器插件,控件的实现方式 浏览器运行本地程序的解决方案大的总结---提升用户体验and开发效率..
Atitit.hybrid混合型应用 浏览器插件,控件的实现方式 浏览器运行本地程序的解决方案大的总结---提升用户体验and开发效率.. 1. hybrid App 1 1.1. Hybrid Ap ...
- 【jquery】Validform,一款不错的 jquery 表单验证插件
关于 Validform 这是一款很不错的 jquery 表单验证插件,它几乎能够满足任何验证需求,仅仅一行代码就能搞定整站的表单验证. $('form').Validform(); 为什么能如此方便 ...
随机推荐
- MCU选型
含义: MCU(Micro Controller Unit)中文名称为微控制单元,又称单片微型计算机(Single Chip Microcomputer),是指随着大规模集成电路的出现及其发展,将计算 ...
- 15_伯德图,为什么是20logM?分贝又是什么?_Bode Plot_Part1
- 针对于iosAPP内嵌H5,-webit-overflow-scrolling:touch;产生空白情况
问题描述:一个内嵌IOSAPP的H5页面,长页面,大概1.6个屏幕高度,由于有列表滑动起来很不流畅,所以用了-webit-overflow-scrolling:touch;这个只针对ios端的物理滚动 ...
- 推荐一个用于压缩图片的JS插件:localResizeIMG
惯例,先贴传送门:https://github.com/think2011/localResizeIMG 首先说到,为嘛要压缩图片,这需求一般出现在需要上传照片(尤其是移动端)的情况下,现在手机拍出来 ...
- mpvue小程序加载不出图片 Failed to load local image resource
我的GitHub博客,很多内容可以看,喜欢的给星星哦 https://github.com/liangfengbo/frontend 第一道:图片引入本地静态文件失效? mpvue开发小程序时候,要添 ...
- python-模拟页面调度LRU算法
[题目描述]所谓LRU算法,是指在发生缺页并且没有空闲主存块时,把最近最少使用的页面换出主存块,腾出地方来调入新页面. 问题描述:一进程获得n个主存块的使用权,对于给定的进程访问页面次序,问当采用LR ...
- python-排列组合序列
[题目描述]用户输入整数n(1<=n<=26)和整数m(m<=n),然后输入n个不同的字母,请编写程序输出在这n个字母中选择m个字母的所有排列序列和组合序列. [练习要求]请给出源代 ...
- EMS查看及修改邮箱发送和接受邮件大小的方法
默认情况下,新建用户邮箱没有进行单独设置,故用户邮箱默认值为"Unlimited"(未限制),即遵从全局设置(继承邮箱数据库策略).通过EMS查看用户邮箱发送和接受邮件大小的默认值 ...
- Codeforces Round #741 (Div. 2), problem: (D1) Two Hundred Twenty One (easy version), 1700
Problem - D1 - Codeforces 题意: 给n个符号(+或-), +代表+1, -代表-1, 求最少删去几个点, 使得 题解(仅此个人理解): 1. 这题打眼一看, 肯定和奇 ...
- vue学习day01
什么是 vue 构建用户界面 用 vue 往 html 页面中填充数据,非常的方便 框架 框架是一套现成的解决方案,程序员只能遵守框架的规范,去编写自己的业务功能! 要学习 vue,就是在学习 vue ...