OpenLayers地图标注及弹窗实现
1. 引言
地图标注是在地图中进行文字或图标的标注,从而显示对应的信息
本文基于OpenLayers实现地图上图文的标注与弹窗显示
OpenLayers官网:OpenLayers - Welcome
OpenLayers的GitHub站点:openlayers/openlayers: OpenLayers (github.com)
OpenLayers API文档:OpenLayers v6.15.1 API - Index
2. 图文标注实现
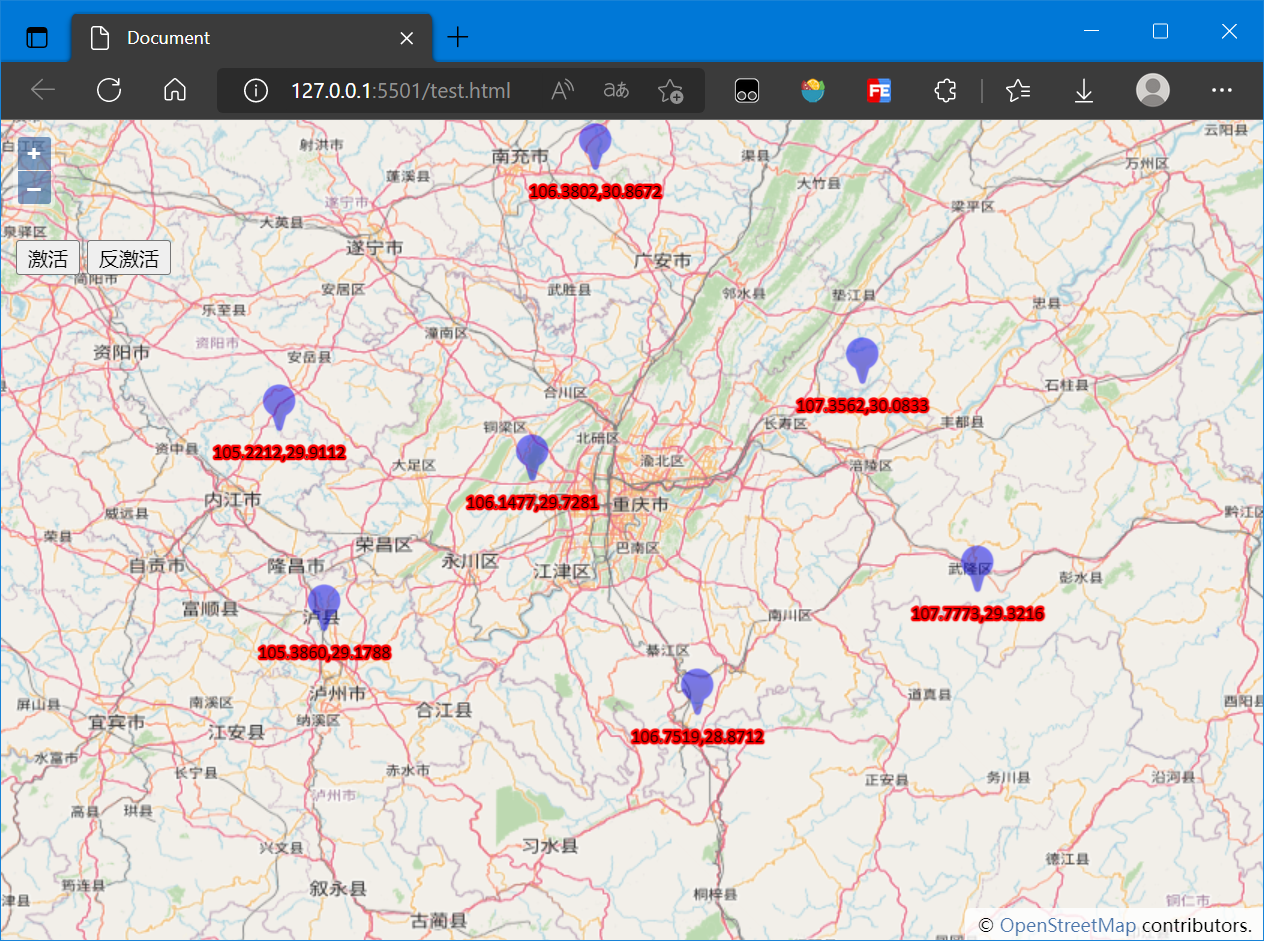
本文实现图文标注的实质就是添加点时设置点要素(Point)的Style
设置图片标注就是在Style中添加Image
设置文字标注就是在Style中添加Text
以下是实现图文标注的核心代码:
const feature = new ol.Feature({

    geometry: new ol.geom.Point(evt.coordinate)

});

feature.setStyle(new ol.style.Style({

    text: new ol.style.Text({

        text: evt.coordinate[0].toFixed(4) + ',' + evt.coordinate[1].toFixed(4),

        offsetY: 30,

        font: '12px Calibri,sans-serif',

        fill: new ol.style.Fill({

            color: '#000'

        }),

        stroke: new ol.style.Stroke({

            color: '#fff',

            width: 3

        })

    }),

    image: new ol.style.Icon({

        src: './images/blueIcon.png',

        scale: 0.5,

        anchor: [0.5, 0.5],

        rotateWithView: true,

        rotation: 0,

        opacity: 0.5,

        color: '#0000ff'

    })

}));

vectorSource.addFeature(feature);
完整代码如下:
<!DOCTYPE html>

<html lang="en">

<head>

    <meta charset="UTF-8">

    <meta http-equiv="X-UA-Compatible" content="IE=edge">

    <meta name="viewport" content="width=device-width, initial-scale=1.0">

    <title>Document</title>

    <link rel="stylesheet"

        href="https://cdn.jsdelivr.net/gh/openlayers/openlayers.github.io@master/en/v6.14.1/css/ol.css" type="text/css">

    <script src="https://cdn.jsdelivr.net/gh/openlayers/openlayers.github.io@master/en/v6.14.1/build/ol.js"></script>

    <style>

        html,

        body,

        #map {

            padding: 0;

            margin: 0;

            height: 100%;

            width: 100%;

        }

        #button {

            position: absolute;

            top: 80px;

            left: 10px;

            z-index: 100;

        }

    </style>

</head>

<body>

    <div id="map"></div>

    <div id="button">

        <button onclick="active()">激活</button>

        <button onclick="deactive()">反激活</button>

    </div>

    <script>

        function active() {

            map.on('click', onClick);

        }

        function deactive() {

            map.un('click', onClick);

        }

    </script>

    <script>

        const map = new ol.Map({

            target: 'map',

            layers: [

                new ol.layer.Tile({

                    source: new ol.source.OSM()

                })

            ],

            view: new ol.View({

                center: [128, 31.5],

                zoom: 5,

                projection: 'EPSG:4326'

            })

        });

        const vectorSource = new ol.source.Vector({

            features: []

        });

        const vectorLayer = new ol.layer.Vector({

            source: vectorSource,

            style: new ol.style.Style({

            })

        });

        map.addLayer(vectorLayer);

        function onClick(evt) {

            console.log(evt.coordinate);

            const feature = new ol.Feature({

                geometry: new ol.geom.Point(evt.coordinate)

            });

            feature.setStyle(new ol.style.Style({

                text: new ol.style.Text({

                    text: evt.coordinate[0].toFixed(4) + ',' + evt.coordinate[1].toFixed(4),

                    offsetY: 30,

                    font: '12px Calibri,sans-serif',

                    fill: new ol.style.Fill({

                        color: '#000'

                    }),

                    stroke: new ol.style.Stroke({

                        color: '#f00',

                        width: 3

                    })

                }),

                image: new ol.style.Icon({

                    src: './images/blueIcon.png',

                    scale: 0.5,

                    anchor: [0.5, 0.5],

                    rotateWithView: true,

                    rotation: 0,

                    opacity: 0.5,

                    color: '#0000ff'

                })

            }));

            vectorSource.addFeature(feature);

        }

    </script>

</body>

</html>
实现效果如下:
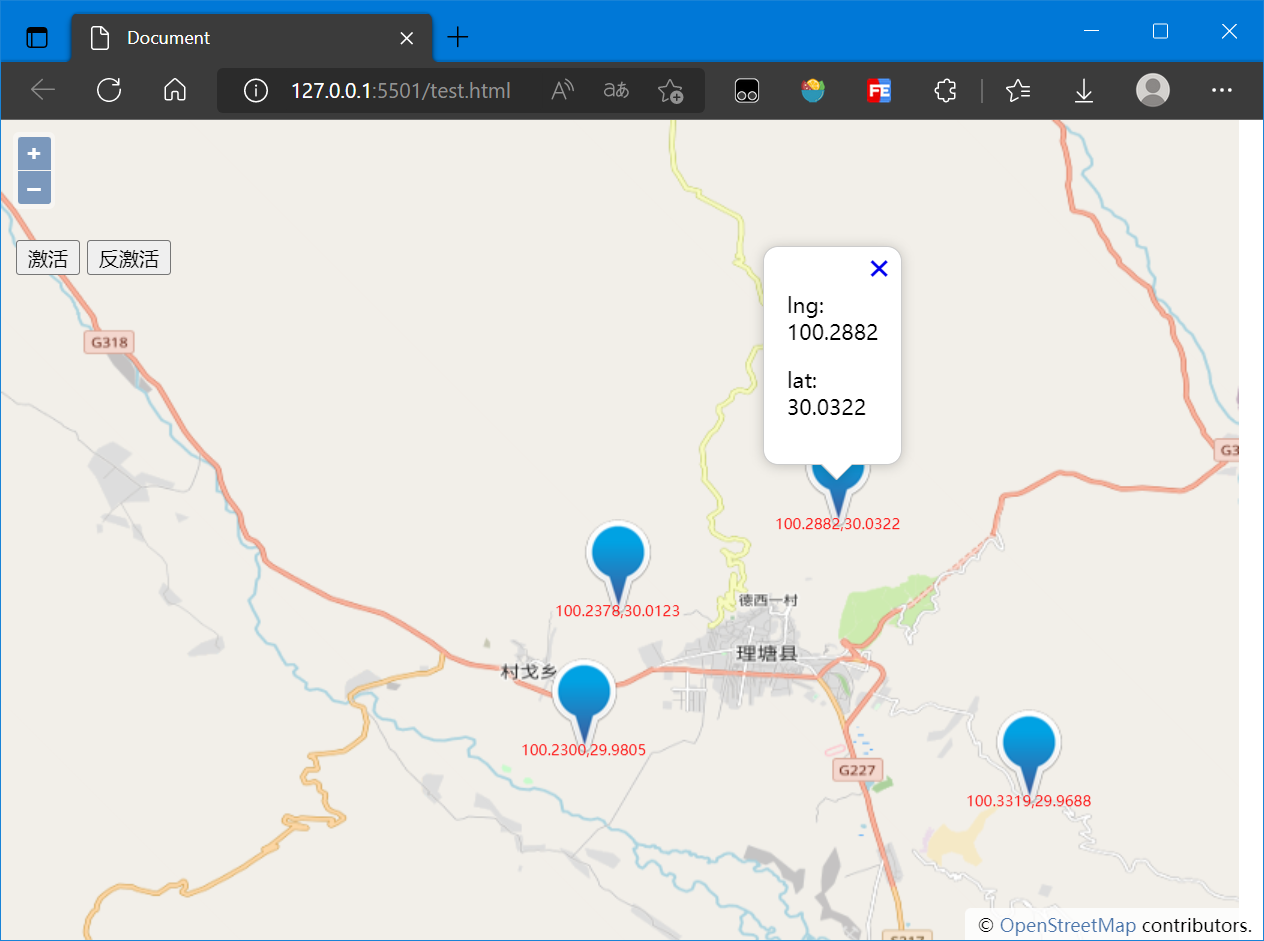
3. Popup弹窗
当我们点击某个要素时,希望在这个要素附近显示其具体信息,这个时候往往使用Popup弹出框实现
本文的Popup弹出框的实现实质就是在OpenLayers中创建一个Overlay,其实现流程为:
- 创建DOM元素(通常为div及包含的子元素)
- 创建Overlay并将DOM元素挂载
- 监听地图点击事件
- 点击地图中的要素时读取要素信息并向地图(Map)中添加Overlay
具体实现流程如下:
创建DOM元素
<div id="popup" class="ol-popup">

    <a href="#" id="popup-closer" class="ol-popup-closer"></a>

    <div id="popup-content"></div>

</div>
创建Overlay并将DOM元素挂载
const popup = new ol.Overlay({

    element: document.getElementById('popup')

});
监听事件,读取要素信息并向地图中添加Overlay
map.on('click', popupFunc)

function popupFunc(evt) {

    var feature = map.forEachFeatureAtPixel(evt.pixel, function (feature, layer) {

        return feature

    })

    if (feature) {

        console.log(evt.coordinate);

        const content = feature.getGeometry().getCoordinates();

        popup.setPosition(content);

        map.addOverlay(popup);

        document.getElementById('popup-content').innerHTML = `

            <p>lng: ${content[0].toFixed(4)}</p>

            <p>lat: ${content[1].toFixed(4)}</p>

            `;

        document.querySelector('#popup-closer').addEventListener('click', function () {

            map.removeOverlay(popup);

        });

    }

}
完整代码如下:
<!DOCTYPE html>

<html lang="en">

<head>

    <meta charset="UTF-8">

    <meta http-equiv="X-UA-Compatible" content="IE=edge">

    <meta name="viewport" content="width=device-width, initial-scale=1.0">

    <title>Document</title>

    <link rel="stylesheet"

        href="https://cdn.jsdelivr.net/gh/openlayers/openlayers.github.io@master/en/v6.14.1/css/ol.css" type="text/css">

    <script src="https://cdn.jsdelivr.net/gh/openlayers/openlayers.github.io@master/en/v6.14.1/build/ol.js"></script>

    <style>

        html,

        body,

        #map {

            padding: 0;

            margin: 0;

            height: 100%;

            width: 100%;

        }

        #button {

            position: absolute;

            top: 80px;

            left: 10px;

            z-index: 100;

        }

        .ol-popup {

            position: absolute;

            background-color: white;

            -webkit-filter: drop-shadow(0 1px 4px rgba(0, 0, 0, 0.2));

            filter: drop-shadow(0 1px 4px rgba(0, 0, 0, 0.2));

            padding: 15px;

            border-radius: 10px;

            border: 1px solid #cccccc;

            bottom: 10px;

            left: -50px;

        }

        .ol-popup:after,

        .ol-popup:before {

            top: 100%;

            border: solid transparent;

            content: ' ';

            height: 0;

            width: 0;

            position: absolute;

            pointer-events: none;

        }

        .ol-popup:after {

            border-top-color: white;

            border-width: 10px;

            left: 48px;

            margin-left: -10px;

        }

        .ol-popup:before {

            border-top-color: #cccccc;

            border-width: 11px;

            left: 48px;

            margin-left: -11px;

        }

        .ol-popup-closer {

            text-decoration: none;

            position: absolute;

            top: 2px;

            right: 8px;

        }

        .ol-popup-closer:after {

            content: '';

        }

        #popup-content {

            font-size: 14px;

            font-family: '微软雅黑';

        }

        #popup-content .markerInfo {

            font-weight: bold;

        }

    </style>

</head>

<body>

    <div id="map"></div>

    <div id="popup" class="ol-popup">

        <a href="#" id="popup-closer" class="ol-popup-closer"></a>

        <div id="popup-content"></div>

    </div>

    <div id="button">

        <button onclick="active()">激活</button>

        <button onclick="deactive()">反激活</button>

    </div>

    <script>

        function active() {

            map.addInteraction(draw);

            map.un('click', popupFunc);

        }

        function deactive() {

            map.removeInteraction(draw);

            map.on('click', popupFunc)

        }

    </script>

    <script>

        const map = new ol.Map({

            target: 'map',

            layers: [

                new ol.layer.Tile({

                    source: new ol.source.OSM()

                })

            ],

            view: new ol.View({

                center: [100.2382, 30.0207],

                zoom: 12,

                projection: 'EPSG:4326'

            })

        });

        const popup = new ol.Overlay({

            element: document.getElementById('popup')

        });

        const source = new ol.source.Vector({

            features: []

        });

        const vector = new ol.layer.Vector({

            source: source

        });

        map.addLayer(vector);

        const draw = new ol.interaction.Draw({

            source: source,

            type: 'Point'

        })

        function popupFunc(evt) {

            var feature = map.forEachFeatureAtPixel(evt.pixel, function (feature, layer) {

                return feature

            })

            if (feature) {

                console.log(evt.coordinate);

                const content = feature.getGeometry().getCoordinates();

                popup.setPosition(content);

                map.addOverlay(popup);

                document.getElementById('popup-content').innerHTML = `

            <p>lng: ${content[0].toFixed(4)}</p>

            <p>lat: ${content[1].toFixed(4)}</p>

            `;

                document.querySelector('#popup-closer').addEventListener('click', function () {

                    map.removeOverlay(popup);

                });

            }

        }

        draw.on('drawend', function (evt) {

            const feature = evt.feature;

            const coordinates = feature.getGeometry().getCoordinates();

            console.log(coordinates);

            feature.setStyle(new ol.style.Style({

                image: new ol.style.Icon({

                    src: './images/blueIcon.png'

                }),

                text: new ol.style.Text({

                    text: coordinates[0].toFixed(4) + ',' + coordinates[1].toFixed(4),

                    offsetY: 30,

                    fill: new ol.style.Fill({

                        color: '#f00'

                    })

                })

            }))

        });

    </script>

</body>

</html>
最后的结果如下图:
4. 参考资料
[1]OpenLayers v6.15.1 API - Index
OpenLayers地图标注及弹窗实现的更多相关文章
- iOS开发之百度地图的集成——地图标注&POI检索
本篇分为两部分: 一.地图标注 第一步:首先创建 BMKMapView 视图 第二步:在视图完全显示出来后设置,并实现代理方法 第三步:运行程序,此时大头针效果可以正常显示 二.POI检索 第一步:延 ...
- [转] 基于ArcGISServer实现活动地图标注
——王嘉彬(Esri中国上海分公司) 1.背景 1.1.主流互联网地图应用的现状 在目前主流的互联网地图应用中,如 Google Map(图 1).搜狗地图(图2),POI 兴趣点的文字标注越来越多的 ...
- ios开发,地图标注聚集。搜索标注title功能
最近在做地图功能,要实现的就是地图标注聚集,还有搜索地图 地图标注通常都是大头针.如果地图缩小到一定范围的时候,会显示密密麻麻的大头针.这样会显的难看 所以设计了一定区域范围内的大头针,缩小的时候给聚 ...
- 一款基于jQuery的图片场景标注提示弹窗特效
今天给大家分享一款基于jQuery的图片场景标注提示弹窗特效,这款实例适合在图片上标注某个物件,单击弹出详情说明,兼容360.FireFox.Chrome.Safari.Opera.傲游.搜狗.世界之 ...
- 51地图标注接口(EZMarker API)
功能 在很多时候,您需要您的用户标出一个位置,比如:一个房地产网站,用户在登记新楼盘的时候,就需要在地图上标出这个楼盘的位置,这个时候就可以用到本接口. 地图标注接口(EZMarker API)是我要 ...
- Vue中使用百度地图——设置地图标注
知识点:创建Map实例,为指定的位置设置标注 参考博客:https://www.cnblogs.com/liuswi/p/3994757.html 1.效果图:初始化地图,设置指定经纬度为地图中心点坐 ...
- 百度地图标注及结合ECharts图谱数据可视化
本示例中根据企业位置经纬度,在页面右侧百度地图中标注企业名称.同时页面左侧ECharts图谱饼状图用于统计企业行业与注册资本.当右侧百度地图缩放拖拽,左侧ECharts图谱根据右侧地图上出现的企业动态 ...
- vue项目使用openlayers来添加地图标注,标注样式设置的简要模板
先把代码贴出来,注释以后有时间再写(需要留意一下这里图标的引入方式,函数内相同路径无法找到图片) import sk from "../../assets/img/home/sk-activ ...
- openlayers 添加标记点击弹窗 定位图标闪烁
环境vue3.0 ,地图为公用组件,将添加图标标记的方法放在公共地图的初始化方法里 同一时间弹窗和定位标识都只有一个,因而我把弹窗和定位标记的dom预先写好放到了页面 //矢量标注样式设置函数,设置i ...
- 百度地图Api详解之地图标注
标注概述 标注(Marker)是用来表示一个点位置的可见元素,每个标注自身都包含地理信息.比如你在西单商场位置添加了一个标注,不论地图移动.缩放,标注都会跟随一起移动,保证其始终指向正确的地理位置. ...
随机推荐
- 【算法题型总结】--6、BFS
// 计算从起点 start 到终点 target 的最近距离 int BFS(Node start, Node target) { Queue<Node> q; // 核心数据结构 Se ...
- 【py模板】xlsx转csv
import numpy as np import pandas as pd def xlsx_to_csv(): data_xls = pd.read_excel('cupHaveHead1.xls ...
- 【FAQ】在华为鸿蒙车机上集成华为帐号的常见问题总结
随着新一代信息技术与汽车产业的深度融合,智能网联汽车正逐渐成为汽车产业发展的战略制高点,无论是传统车企还是新势力都瞄准了"智能座舱"这种新一代人机交互方式.面对竞争如此激烈的车机市 ...
- 用 while 生成猜数字
import java.util.Random; import java.util.Scanner; public class zy2 { public static void main(String ...
- 4、PageHelper分页查询
1.MyBatis的分页方式: 逻辑分页与物理分页 1.逻辑分页:使用MyBatis自带的RowBounds进行分页,是一次性查询很多数据,然后再在结果中检索分页的数据.这样做弊端是需要消耗大量的内存 ...
- Android录屏实现
使用方案: mediacodec + mediaprojection + mediamuxer MediaProjectionManager主要作用是获得录屏权限 startActivityForRe ...
- S2-008
漏洞名称 S2-008(CVE-2012-0392) 远程代码执行漏洞 利用条件 Struts 2.0.0 - Struts 2.3.17 漏洞原理 S2-008 涉及多个漏洞,Cookie 拦截器错 ...
- iOS根据两点经纬度坐标计算指南针方位角
目录 需求 设计 代码实现 新建CLLocation 分类方法 调用示例 结论 需求 在地图导航时,始终保持当前路段竖直超前. 设计 因地图暴露的方法中只有设置地图相对于正北的方向角的方法.因此,需要 ...
- Java进阶篇——springboot2源码探究
1.@EnableAutoConfiguration 除了元注解之外,EnableAutoConfiguration包含了两大重要部分: 1)@AutoConfigurationPackage注解 该 ...
- SPOJLCMSUM - LCM Sum
简要题意 \(T\) 组数据,每组数据给出一个 \(n\),计算: \[\sum_{i=1}^{n}{\operatorname{lcm}(i,n)} \] \(1 \leq T \leq 3\tim ...