小程序生成海报 canvas
前言
微信小程序需要生成海报进行朋友圈分享,但是不同的手机会有问题,
然后首先是图片的问题
图片
在模拟器上没有报错,可是真机测试却什么也没画出来。 canvas.drawImage 是不支持网络图片的,只支持本地图片。
所以,任何的网络图片都需要先缓存到本地,(当然上线的时候需要把网络图片的前缀加入白名单里面)
再通过 drawImage 调用存储的本地资源进行绘制,
缓存可以通过 wx.getImageInfo 和 wx.downloadFile 实现
wx.getImageInfo({

  src: 'https://i415454.jpg',

  success: function (res) {

    console.log(res.width)

    console.log(res.path)

  }

})
然后通过 draw 方法 的是 draw 方法是异步的,如果图片还没加载成功,有可能画出来的是空的,所以 draw 方法通常都会带有定时器这样的回调。
 this.ctx.draw(false, () => {

        wx.setStorageSync('canvasdrawer_pic_cache', this.cache)

        const system = wx.getSystemInfoSync().system

        if (/ios/i.test(system)) {

          this.saveImageToLocal()

        } else {

          // 延迟保存图片,解决安卓生成图片错位bug。

          setTimeout(() => {

            this.saveImageToLocal()

          }, 800)

        }

      })
画布首先分为 矩形, 图片,文字,线这几种,
是结合了promise 来处理 ,
产生的图片 直接通过 previewImage 进入手机预览模式,预览模式的图片可以直接保存到本地
然后就是我的DEMO 先放2张图
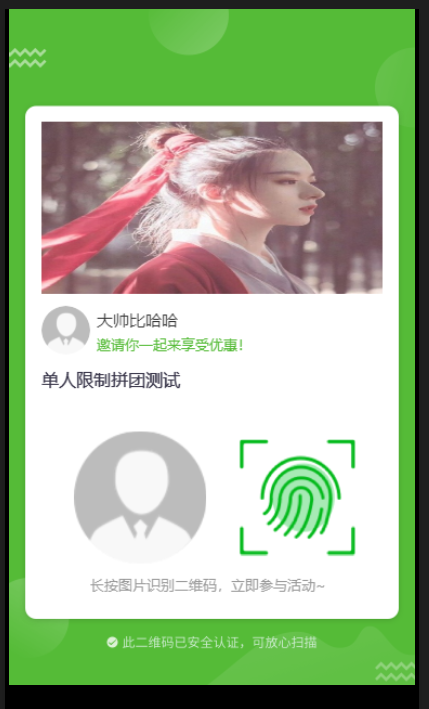
这就是生成后的图片了
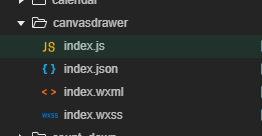
先写组件 canvasdrawer
js:
Component({

  properties: {

    painting: {

      type: Object,

      value: { view: [] },

      observer(newVal, oldVal) {

        if (!this.data.isPainting) {

          if (JSON.stringify(newVal) !== JSON.stringify(oldVal)) {

            if (newVal && newVal.width && newVal.height) {

              this.setData({

                showCanvas: true,

                isPainting: true

              })

              this.readyPigment()

            }

          } else {

            if (newVal && newVal.mode !== 'same') {

              this.triggerEvent('getImage', { errMsg: 'canvasdrawer:samme params' })

            }

          }

        }

      }

    }

  },

  data: {

    showCanvas: false,

    width: 100,

    height: 100,

    tempFileList: [],

    isPainting: false

  },

  ctx: null,

  cache: {},

  ready() {

    wx.removeStorageSync('canvasdrawer_pic_cache')

    this.cache = wx.getStorageSync('canvasdrawer_pic_cache') || {}

    this.ctx = wx.createCanvasContext('canvasdrawer', this)

  },

  methods: {

    readyPigment() {

      const { width, height, views } = this.data.painting

      this.setData({

        width,

        height

      })

      const inter = setInterval(() => {

        if (this.ctx) {

          clearInterval(inter)

          this.ctx.clearActions()

          this.ctx.save()

          this.getImagesInfo(views)

        }

      }, 100)

    },

    getImagesInfo(views) {

      const imageList = []

      for (let i = 0; i < views.length; i++) {

        if (views[i].type === 'image') {

          imageList.push(this.getImageInfo(views[i].url))

        }

      }

      const loadTask = []

      for (let i = 0; i < Math.ceil(imageList.length / 8); i++) {

        loadTask.push(new Promise((resolve, reject) => {

          Promise.all(imageList.splice(i * 8, 8)).then(res => {

            resolve(res)

          }).catch(res => {

            reject(res)

          })

        }))

      }

      Promise.all(loadTask).then(res => {

        let tempFileList = []

        for (let i = 0; i < res.length; i++) {

          tempFileList = tempFileList.concat(res[i])

        }

        this.setData({

          tempFileList

        })

        this.startPainting()

      })

    },

    startPainting() {

      const { tempFileList, painting: { views } } = this.data

      for (let i = 0, imageIndex = 0; i < views.length; i++) {

        if (views[i].type === 'image') {

          this.drawImage({

            ...views[i],

            url: tempFileList[imageIndex]

          })

          imageIndex++

        } else if (views[i].type === 'text') {

          if (!this.ctx.measureText) {

            wx.showModal({

              title: '提示',

              content: '当前微信版本过低,无法使用 measureText 功能,请升级到最新微信版本后重试。'

            })

            this.triggerEvent('getImage', { errMsg: 'canvasdrawer:version too low' })

            return

          } else {

            this.drawText(views[i])

          }

        } else if (views[i].type === 'rect') {

          this.drawRect(views[i])

        }

      }

      this.ctx.draw(false, () => {

        wx.setStorageSync('canvasdrawer_pic_cache', this.cache)

        const system = wx.getSystemInfoSync().system

        if (/ios/i.test(system)) {

          this.saveImageToLocal()

        } else {

          // 延迟保存图片,解决安卓生成图片错位bug。

          setTimeout(() => {

            this.saveImageToLocal()

          }, 800)

        }

      })

    },

    drawImage(params) {

      this.ctx.save()

      const { url, top = 0, left = 0, width = 0, height = 0, borderRadius = 0, deg = 0 } = params

      if (borderRadius) {

        // 圓角

        this.ctx.beginPath()

        this.ctx.arc(width / 2 + left, height / 2 + top, width / 2, 0, Math.PI * 2, false);

        this.ctx.clip()

        this.ctx.drawImage(url, left, top, width, height)

      }

     else if (deg !== 0) {

        this.ctx.translate(left + width / 2, top + height / 2)

        this.ctx.rotate(deg * Math.PI / 180)

        this.ctx.drawImage(url, -width / 2, -height / 2, width, height)

      } else {

        this.ctx.drawImage(url, left, top, width, height)

      }

      // }

      this.ctx.restore()

    },

    drawText(params) {

      this.ctx.save()

      const {

        MaxLineNumber = 2,

        breakWord = false,

        color = 'black',

        content = '',

        fontSize = 16,

        top = 0,

        left = 0,

        lineHeight = 20,

        textAlign = 'left',

        width,

        bolder = false,

        textDecoration = 'none'

      } = params

      this.ctx.beginPath()

      this.ctx.setTextBaseline('top')

      this.ctx.setTextAlign(textAlign)

      this.ctx.setFillStyle(color)

      this.ctx.setFontSize(fontSize)

      if (!breakWord) {

        this.ctx.fillText(content, left, top)

        this.drawTextLine(left, top, textDecoration, color, fontSize, content)

      } else {

        let fillText = ''

        let fillTop = top

        let lineNum = 1

        for (let i = 0; i < content.length; i++) {

          fillText += [content[i]]

          if (this.ctx.measureText(fillText).width > width) {

            if (lineNum === MaxLineNumber) {

              if (i !== content.length) {

                fillText = fillText.substring(0, fillText.length - 1) + '...'

                this.ctx.fillText(fillText, left, fillTop)

                this.drawTextLine(left, fillTop, textDecoration, color, fontSize, fillText)

                fillText = ''

                break

              }

            }

            this.ctx.fillText(fillText, left, fillTop)

            this.drawTextLine(left, fillTop, textDecoration, color, fontSize, fillText)

            fillText = ''

            fillTop += lineHeight

            lineNum++

          }

        }

        this.ctx.fillText(fillText, left, fillTop)

        this.drawTextLine(left, fillTop, textDecoration, color, fontSize, fillText)

      }

      this.ctx.restore()

      if (bolder) {

        this.drawText({

          ...params,

          left: left + 0.3,

          top: top + 0.3,

          bolder: false,

          textDecoration: 'none'

        })

      }

    },

    drawTextLine(left, top, textDecoration, color, fontSize, content) {

      if (textDecoration === 'underline') {

        this.drawRect({

          background: color,

          top: top + fontSize * 1.2,

          left: left - 1,

          width: this.ctx.measureText(content).width + 3,

          height: 1

        })

      } else if (textDecoration === 'line-through') {

        this.drawRect({

          background: color,

          top: top + fontSize * 0.6,

          left: left - 1,

          width: this.ctx.measureText(content).width + 3,

          height: 1

        })

      }

    },

    drawRect(params) {

      this.ctx.save()

      const { background, top = 0, left = 0, width = 0, height = 0, radius = 0 } = params

      this.ctx.setFillStyle(background)

      this.ctx.fillRect(left, top, width, height)

      if (radius!=0){

        this.ctx.beginPath()

        this.ctx.setFillStyle(background)

        this.ctx.setStrokeStyle(background);

        this.ctx.setLineJoin('round');  //交点设置成圆角

        this.ctx.setLineWidth(radius) ;

        this.ctx.strokeRect(width + radius / 2, height + radius / 2, width - radius, height - radius);

        this.ctx.fillRect(width + radius, height + radius, width - radius * 2, height - radius * 2);

        this.ctx.stroke();

        this.ctx.closePath();

      }

      this.ctx.restore();

    },

    getImageInfo(url) {

      return new Promise((resolve, reject) => {

        if (this.cache[url]) {

          resolve(this.cache[url])

        } else {

          const objExp = new RegExp(/^http(s)?:\/\/([\w-]+\.)+[\w-]+(\/[\w- .\/?%&=]*)?/)

          if (objExp.test(url)) {

            wx.getImageInfo({

              src: url,

              complete: res => {

                if (res.errMsg === 'getImageInfo:ok') {

                  this.cache[url] = res.path

                  resolve(res.path)

                } else {

                  this.triggerEvent('getImage', { errMsg: 'canvasdrawer:download fail' })

                  reject(new Error('getImageInfo fail'))

                }

              }

            })

          } else {

            this.cache[url] = url

            resolve(url)

          }

        }

      })

    },

    saveImageToLocal() {

      const { width, height } = this.data

      wx.canvasToTempFilePath({

        x: 0,

        y: 0,

        width,

        height,

        canvasId: 'canvasdrawer',

        complete: res => {

          if (res.errMsg === 'canvasToTempFilePath:ok') {

            this.setData({

              showCanvas: false,

              isPainting: false,

              tempFileList: []

            })

            this.triggerEvent('getImage', { tempFilePath: res.tempFilePath, errMsg: 'canvasdrawer:ok' })

          } else {

            this.triggerEvent('getImage', { errMsg: 'canvasdrawer:fail' })

          }

        }

      }, this)

    }

  }

})
html :
<canvas canvas-id="canvasdrawer" style="width:{{width}}px;height:{{height}}px;" class="board" wx:if="{{showCanvas}}"></canvas>
css:
.board {

  position: fixed;

  top: 2000rpx;

}
在页面中调用这个组件 canvasdrawer

html:
<canvasdrawer painting="{{painting}}" class="canvasdrawer" bind:getImage="eventGetImage"/>
js:
 // 生成

    eventDraw() {

      wx.showLoading({

        title: '绘制分享图片中',

        mask: true

      })

      this.setData({

        painting: {

          width: 375,

          height: app.globalData.screenHeight,

          clear: true,

          views: [

            {

              type: 'rect',

              background: this.data.skin.theme_color,

              top: 0,

              left: 0,

              width: 375,

              radius:10,

              height: app.globalData.screenHeight,

            },

            {

              type: 'image',

              url: '/images/common/posterBg.png',  // 背景 //https://hybrid.xiaoying.tv/miniprogram/viva-ad/1/1531103986231.jpeg

              top: 0,

              left: 0,

              width: 375,

              height: 667

            },

            {

              type: 'image',

              url: '/images/common/avatar.png',

              top: 274,

              left: 30,

              width: 45,

              borderRadius:45,

              height: 45  //头像

            },

            {

              type: 'text',

              content: '大帅比哈哈',

              fontSize: 15,

              color: '#333333',

              textAlign: 'left',

              top: 564/2,

              left: 162/2,

              bolder: false

            },

            {

              type: 'text',

              content: '邀请你一起来享受优惠!',

              fontSize: 13,

              color: this.data.skin.theme_color,

              textAlign: 'left',

              top: 611/2,

              left: 162 / 2

            },

            {

              type: 'image',

              url: this.data.shareActivity.topImage, //活动图片

              top: 104,

              left: 30,

              width:  315,

              height: 159

            },

            {

              type: 'image',

              url: '/images/common/avatar.png',

              top: (600 +179) /2,

              left: 60,

              width: 245/2,

              height: 245/2

            },

            {

              type: 'image',

              url: this.data.fingerImage, // 指紋 'https://hybrid.xiaoying.tv/miniprogram/viva-ad/1/1531385433625.jpeg'

              top: (615 + 179) / 2,

              left: 213,

              width: 215 / 2,

              height: 215 / 2,

            },

            {

              type: 'text',

              content: this.data.shareActivity.shareTitle, //'正品MAC魅可口红礼盒生日唇膏小辣椒Chili西柚情人',

              fontSize: 16,

              lineHeight: 21,

              color: '#383549',

              textAlign: 'left',

              top: 336,

              left: 30,

              width: 310,

              MaxLineNumber: 2,

              breakWord: true,

              bolder: true

            },

            {

              type: 'text',

              content: '长按图片识别二维码,立即参与活动~',

              fontSize: 13,

              color: '#999',

              textAlign: 'left',

              top: (879+176)/ 2 ,

              left: 75,

              lineHeight: 20,

              MaxLineNumber: 2,

              breakWord: true,

              width: 209

            }

          ]

        }

      })

    },

    //保存

    eventGetImage(event) {

      let _this = this;

      wx.hideLoading()

      const { tempFilePath, errMsg } = event.detail

      if (errMsg === 'canvasdrawer:ok') {

        this.setData({

          shareImage: tempFilePath,

        })

        wx.previewImage({

          urls: [tempFilePath],

          success: function () {

            _this.setData({

              isShareBtnDisabled: false,

              painting:{},

            })

          },

          fail: function () {

          }

        })

      }

    }
这要就可以啦 海报就兼容 苹果和安卓 手机 嘻嘻
还需努力
小程序生成海报 canvas的更多相关文章
- 小程序生成海报图片(或者原有的)并下载,&&相册授权&&按钮拉起二次授权
这是自己做小程序生成推广海报,并保存到本地相册的方法,向后台发起请求,返回一个海报图片,下载保存到相册, 如果只是单纯的下载图片代码43行-63行就足够了 如果想直接保存到相册,则不要做downFil ...
- 小程序生成海报:通过 json 配置方式轻松制作一张海报图
背景 由于我们无法将小程序直接分享到朋友圈,但分享到朋友圈的需求又很多,业界目前的做法是利用小程序的 Canvas 功能生成一张带有二维码的图片,然后引导用户下载图片到本地后再分享到朋友圈.而小程序 ...
- 微信小程序生成海报分享:canvas绘制文字溢出如何换行
主要思路: 1.先分割为字符串数组,然后一个字一个字绘图,利用ctx.measureText(string) 方法,获取绘制后的宽度,判断宽度在多少内就另起一行,再将各行拼成一个字符串 2.计算另起的 ...
- 小程序生成海报demo
效果图: <view class='poste_box' id='canvas-container' style="margin:0 auto;border-radius:16rpx; ...
- 微信小程序生成海报保存图片到相册小测试
test.wxml <canvas style="width:{{imageWidth}}px;height:{{imageHeight}}px;" canvas-id=&q ...
- 小程序利用canvas 绘制图案 (生成海报, 生成有特色的头像)
小程序利用canvas 绘制图案 (生成海报, 生成有特色的头像) 微信小程序生成特色头像,海报等是比较常见的.下面我来介绍下实现该类小程序的过程. 首先选择前端来通过 canvas 绘制.这样比较节 ...
- 微信小程序-基于canvas画画涂鸦
代码地址如下:http://www.demodashi.com/demo/14461.html 一.前期准备工作 软件环境:微信开发者工具 官方下载地址:https://mp.weixin.qq.co ...
- 【python基础】 Tkinter小构件之canvas 画布
[python之tkinter画布] 要画布就要使用tkinter的小构件,canvas(结构化的图形,用于绘制图形,创建图形编辑器以及实现自定制的小构件类) 我们先使用create_rectangl ...
- 微信小游戏开发Canvas资源汇总
Demo: 微信小程序demo组件:股票分时图 微信小程序小组件:仿直播点赞气泡效果,基于Canvas 优质demo推荐:二维码生成器:使用canvas与纯JS版二维码生成 微信小程序学习用完整dem ...
随机推荐
- 2019-07-31 C#基础知识学习
什么是进程:进程是系统中正在运行的一个程序,程序一旦运行就是进程. 什么是线程:线程是进程的一个实体,是进程的一条执行路径. 进程和线程的区别体现在以下几个方面: 1.地址空间和其他资源(如打开文件) ...
- 安装oracle数据库11g及问题解决
安装步骤可借鉴https://www.cnblogs.com/qfb620/p/4577255.html 1.安装后发现用Navicat无法连接数据库显示报错ORA-28547:connection ...
- FZU2275 Game(kmp
暑假wa的题了,,,看见vj的attempt痕迹打算挨个补了,简单kmp题,判断bob的串是不是全为0或者是alice的字串就好了 #include<algorithm> #include ...
- vue 评论 computed watch 分隔符 局部组件 全局组件 子传父消息|父传子消息
评论案例 splice: (start 几位,替换(新增)内容) splice(0,0,内容)在头部插入内容 splice(0,1) 把索引为0的往后删除1位 splice(0,1,内容)把索引为0 ...
- LeetCode 19——删除链表的倒数第N个节点(JAVA)
给定一个链表,删除链表的倒数第 n 个节点,并且返回链表的头结点. 示例: 给定一个链表: 1->2->3->4->5, 和 n = 2. 当删除了倒数第二个节点后,链表变为 ...
- cef chromium 编译
前言 目前客户端引用了cef sharp库来嵌入web页面 cef sharp是对cef (chromium embed framework)的c#封装 cef是对chromium内核的c++封装 什 ...
- ubuntu 编译zbar 静态库
wget http://downloads.sourceforge.net/project/zbar/zbar/0.10/zbar-0.10.tar.gz tar -zvxf zbar-0.10.ta ...
- java实现spark常用算子之mapPartitionsWithIndex
import org.apache.spark.SparkConf;import org.apache.spark.api.java.JavaRDD;import org.apache.spark.a ...
- Advanced Installer 不弹出预安装的软件的窗口
需求:当他电脑上没有sql server client 的时候,或没有localdb的时候,那么安装包会弹出窗口,让他选择 一个组件 一个组件的安装 太麻烦. 有没有办法,打开安装包就安装 安装的过程 ...
- js大神成长指路
随着我的成长,我的兴趣也在不断地分化,他们似乎都是不相关的领域.我喜欢数学就像我喜欢历史一样.我的目标是成为一个多才多艺的人——一个学者——在许多领域都能成为杰出的人才.这是一项艰巨的任务.突然间,我 ...