
LNMP详解
目录
LNMP
环境
Mysql:192.168.10.10
Nginx、PHP:192.168.10.11
在服务都部署好之后,对其进行关联;
相关操作命令:
# /usr/local/nginx/sbin/nginx -t
# /usr/local/nginx/sbin/nginx -s reload
Nginx配置
[root@c1 /usr/local/nginx/conf]# cat nginx.conf
worker_processes 1;
events {
worker_connections 1024;
}
http {
include mime.types;
default_type application/octet-stream;
sendfile on;
keepalive_timeout 65;
server {
listen 80;
server_name localhost;
location / {
root html;
index index.html index.htm;
}
error_page 500 502 503 504 /50x.html;
location = /50x.html {
root html;
}
}
include extra/kazihuo.conf;
}
PHP解析
[root@c1 /usr/local/nginx/conf/extra]# cat kazihuo.conf
server {
listen 80;
server_name www.kazihuo.com;
location / {
root html/kazihuo;
index index.php index.html index.htm;
}
location ~ .*\.(php|php5)?$ {
root html/kazihuo;
fastcgi_pass 127.0.0.1:9000;
fastcgi_index index.php;
include fastcgi.conf;
}
}
[root@c1 /usr/local/nginx/html/kazihuo]# cat index.php
<?php phpinfo(); ?>
# 以上代码是显示PHP配置信息
测试:
现在本地电脑做好解析,打开浏览器http://www.kazihuo.com/index.php
Mysql操作
服务安装
详细步骤见博文MYSQL汇总;
连接测试
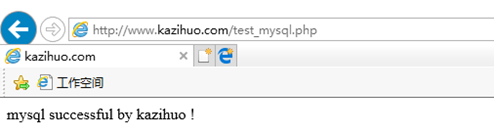
[root@c1 /usr/local/nginx/html/kazihuo]# cat test_mysql.php
<?php
//$link_id=mysql_connect('主机名','用户','密码');
$link_id=mysql_connect('192.168.10.10','root','000000') or mysql_error();
if ($link_id) {
echo "mysql successful by kazihuo !";
}
else{
echo mysql_error();
}
// 单行注释
/* 多行注释 */
?>
测试结果:
数据配置
# mysql -uroot -p000000
> create database wordpress;
> grant all on wordpress.* to wordpress@'192.168.10.%' identified by '123456';6';
> flush privileges;
> show grants for wordpress@'192.168.10.%';
+---------------------------------------------------------------------+
| Grants for wordpress@192.168.10.% |
+---------------------------------------------------------------------+
| GRANT USAGE ON *.* TO 'wordpress'@'192.168.10.%' |
| GRANT ALL PRIVILEGES ON `wordpress`.* TO 'wordpress'@'192.168.10.%' |
+---------------------------------------------------------------------+
> select user,host from mysql.user;
+-----------+--------------+
| user | host |
+-----------+--------------+
| root | % |
| root | 127.0.0.1 |
| wordpress | 192.168.10.% |
| mysql.sys | localhost |
| root | localhost |
+-----------+--------------+
Blogs建立
# wget https://cn.wordpress.org/wordpress-4.9.1-zh_CN.tar.gz
# tar -axvf wordpress-4.9.1-zh_CN.tar.gz
[root@c1 /usr/local/nginx/html/kazihuo]# rm -rf index.php test_mysql.php #此步骤是删除之前的测试文件
# cd wordpress/
# mv * /usr/local/nginx/html/kazihuo/
[root@c1 /usr/local/nginx/html]# chown -R nginx.nginx kazihuo
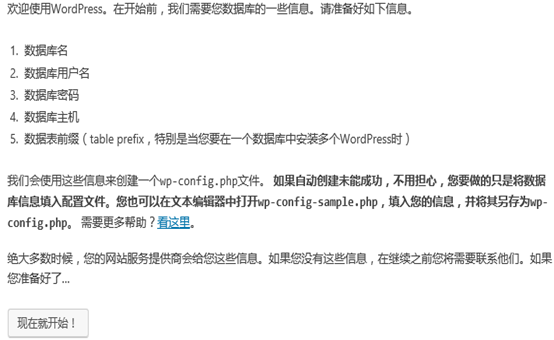
测试:
浏览器输入:www.kazihuo.com
LNMP详解的更多相关文章
- nginx详解反向代理、负载均衡、LNMP架构上线动态网站(week4_day1_part1)-技术流ken
nginx介绍 Nginx是俄罗斯人编写的十分轻量级的HTTP服务器,Nginx,它的发音为“engine X”,是一个高性能的HTTP和反向代理服务器,同时也是一个IMAP/POP3/SMTP 代理 ...
- nginx详解反向代理,负载均衡,LNMP架构上线动态网站
1.nginx介绍 nginx.org Nginx是俄罗斯人编写的十分轻量级的HTTP服务器,Nginx,它的发音为“engine X”,是一个高性能的HTTP和反向代理服务器,同时也是一个IMAP/ ...
- LNMP笔记:php-fpm – 启动参数及重要配置详解
约定几个目录/usr/local/php/sbin/php-fpm/usr/local/php/etc/php-fpm.conf/usr/local/php/etc/php.ini php-fpm的启 ...
- lnmp 一键安装详解
1.使用putty或类似的SSH工具登陆VPS或服务器: 登陆后运行:screen -S lnmp 如果提示screen: command not found 命令不存在可以执行:yum instal ...
- Nginx 反向代理、负载均衡、页面缓存、URL重写及读写分离详解
转载:http://freeloda.blog.51cto.com/2033581/1288553 大纲 一.前言 二.环境准备 三.安装与配置Nginx 四.Nginx之反向代理 五.Nginx之负 ...
- PHP写在线视频直播技术详解
2016年7月22日 22:26:45 交流QQ:903464207 本文会不断更新 废话一句,如果你要做高性能服务器服务,请去读底层的东西 http tcp/ip socket 了解基础协议,你对如 ...
- Nginx反向代理、负载均衡、页面缓存、URL重写及读写分离详解
大纲 一.前言 二.环境准备 三.安装与配置Nginx 四.Nginx之反向代理 五.Nginx之负载均衡 六.Nginx之页面缓存 七.Nginx之URL重写 八.Nginx之读写分离 注,操作系统 ...
- 详解linux运维工程师入门级必备技能
详解linux运维工程师入门级必备技能 | 浏览:659 | 更新:2013-12-24 23:23 | 标签:linux it自动化运维就是要很方便的运用各种工具进行管理维护,有效的实施服务器保护 ...
- 【转】Nginx+php-fpm+MySQL分离部署详解
转:http://www.linuxidc.com/Linux/2015-07/120580.htm Nginx+php-fpm+MySQL分离部署详解 [日期:2015-07-26] 来源:Linu ...
随机推荐
- ANTD mobile源码分析 -- popover
最近的开发中要用到很多的各式各样的组件.但是发现ant design mobile(后面简称ANTDM)里很多的资源.于是就分析一下,学习学习. ANTDM直接使用了typescript,没有用ES2 ...
- 工业级GBDT算法︱微软开源 的LightGBM(R包正在开发....)
看完一篇介绍文章后,第一个直觉就是这算法已经配得上工业级属性.日前看到微软已经公开了这一算法,而且已经发开python版本,本人觉得等hadoop+Spark这些平台配齐之后,就可以大规模宣传啦~如果 ...
- Android Parcelable和Serializable的区别
本文主要介绍Parcelable和Serializable的作用.效率.区别及选择,关于Serializable的介绍见Java 序列化的高级认识. 1.作用 Serializable的作用是为了保存 ...
- 安装JBoss Tool 出错
安装JBoss Tool 出错 具体报错如下:
- return *this 与return this的区别
return *this返回当前对象的引用(也就是返回当前对象) return this返回当前对象的地址. #include <iostream> using namespace std ...
- 图解MBR分区无损转换GPT分区+UEFI引导安装WIN8.1
确定你的主板支持UEFI引导.1,前期准备,WIN8.1原版系统一份(坛子里很多,自己下载个),U盘2个其中大于4G一个(最好 准备两个U盘)2,大家都知道WIN8系统只支持GPT分区,传统的MBR分 ...
- jquery绑定onkeyup()事件3中方法
$('input').keyup(function () { ... }); $('input').bind('keyup', function () { ... }); $('input').liv ...
- Oracle11g客户端client的下载与安装
下载地址: http://www.oracle.com/technetwork/database/enterprise-edition/downloads/112010-win64soft-09446 ...
- TestLink和RedMine的集成
1. TestLink的安装 1.1. TestLink简介 TestLink是一个php语言开发的开源免费的测试管理工具,包括产品测试需求,测试计划,测试用例的创建和执行, ...
- C#多线程编程(1)--线程,线程池和Task
新开了一个多线程编程系列,该系列主要讲解C#中的多线程编程. 利用多线程的目的有2个: 一是防止UI线程被耗时的程序占用,导致界面卡顿:二是能够利用多核CPU的资源,提高运行效率. 我没有进行很 ...