前端技术之_CSS详解第三天
前端技术之_CSS详解第三天
二、权重问题深入
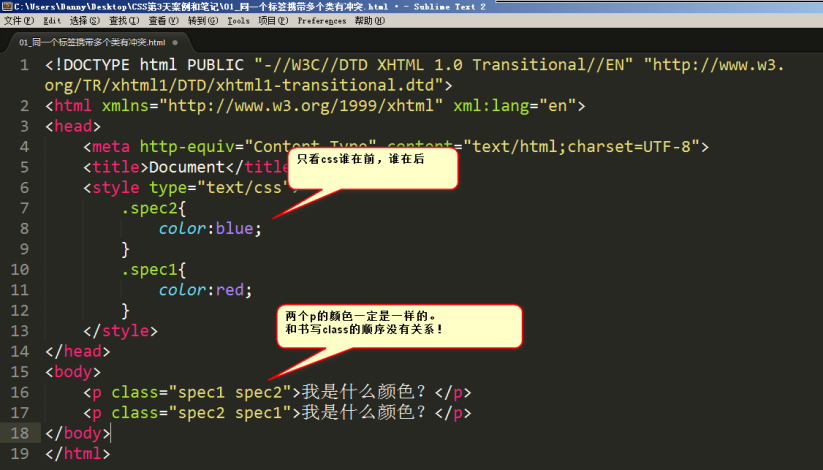
2.1 同一个标签,携带了多个类名,有冲突:
<!DOCTYPE html PUBLIC "-//W3C//DTD XHTML 1.0 Transitional//EN" "http://www.w3.org/TR/xhtml1/DTD/xhtml1-transitional.dtd">
<html xmlns="http://www.w3.org/1999/xhtml" xml:lang="en">
<head>
    <meta http-equiv="Content-Type" content="text/html;charset=UTF-8">
    <title>Document</title>
    <style type="text/css">
        .spec2{
            color:blue;
        }
        .spec1{
            color:red;
        }
    </style>
</head>
<body>
    <p class="spec1 spec2">我是什么颜色?</p>
    <p class="spec2 spec1">我是什么颜色?</p>
</body>
</html>
1     <p class="spec1 spec2">我是什么颜色?</p>

2     <p class="spec2 spec1">我是什么颜色?</p>
1     .spec2{
2     color:blue;
3     }
4     .spec1{
5     color:red;
6     }
7     </style>
红色的。因为css中red写在后面。和在标签中的挂类名的书序无关,只和css的顺序有关:
2.2 !important标记
<!DOCTYPE html PUBLIC "-//W3C//DTD XHTML 1.0 Transitional//EN" "http://www.w3.org/TR/xhtml1/DTD/xhtml1-transitional.dtd">
<html xmlns="http://www.w3.org/1999/xhtml" xml:lang="en">
<head>
    <meta http-equiv="Content-Type" content="text/html;charset=UTF-8">
    <title>Document</title>
    <style type="text/css">
        p{
            color:red !important;
            font-size: 100px ;
        }
        #para1{
            color:blue;
            font-size: 50px;
        }
        .spec{
            color:green;
            font-size: 20px;
        }
    </style>
</head>
<body>
    <p id="para1" class="spec">文字</p>
</body>
</html>
1     <style type="text/css">
2     p{
3    color:red !important;
4     }
5     #para1{
6     color:blue;
7     }
8     .spec{
9     color:green;
10     }
11     </style>
1 k:v !important;
来给一个属性提高权重。这个属性的权重就是无穷大。important是英语里面的“重要的”的意思。我们可以通过语法:
一定要注意语法:
正确的:
1 font-size:60px !important;
错误的:
1 font-size:60px; !important;     → 不能把!important写在外面
1 font-size:60px important;      →  不能忘记感叹号
!important需要强调3点:
1) !important提升的是一个属性,而不是一个选择器
1     p{
2     color:red !important;   → 只写了这一个!important,所以就字体颜色属性提升权重
3     font-size: 100px ;      → 这条属性没有写!important,所以没有提升权重
     }
5     #para1{
6     color:blue;
7    font-size: 50px;
8     }
9     .spec{
10     color:green;
11     font-size: 20px;
12     }
所以,综合来看,字体颜色是red(听important的);字号是50px(听id的);
2) !important无法提升继承的权重,该是0还是0
比如HTML结构:
1     <div>
2     <p>哈哈哈哈哈哈哈哈</p>
3     </div>
1     div{
2     color:red !important;
3     }
4     p{
5     color:blue;

6     }
由于div是通过继承性来影响文字颜色的,所以!important无法提升它的权重,权重依然是0。
<!DOCTYPE html PUBLIC "-//W3C//DTD XHTML 1.0 Transitional//EN" "http://www.w3.org/TR/xhtml1/DTD/xhtml1-transitional.dtd">
<html xmlns="http://www.w3.org/1999/xhtml" xml:lang="en">
<head>
    <meta http-equiv="Content-Type" content="text/html;charset=UTF-8">
    <title>Document</title>
    <style type="text/css">
        div{
            color:red !important;
        }
        p{
            color:blue;
        }
    </style>
</head>
<body>
    <div>
        <p>哈哈哈哈哈哈哈哈</p>
    </div>
</body>
</html>
有CSS样式:
干不过p标签,因为p标签是实实在在选中了,所以字是蓝色的(以p为准)。
3)!important不影响就近原则
<!DOCTYPE html PUBLIC "-//W3C//DTD XHTML 1.0 Transitional//EN" "http://www.w3.org/TR/xhtml1/DTD/xhtml1-transitional.dtd">
<html xmlns="http://www.w3.org/1999/xhtml" xml:lang="en">
<head>
    <meta http-equiv="Content-Type" content="text/html;charset=UTF-8">
    <title>Document</title>
    <style type="text/css">
        div{
            color:red !important;
        }
        ul{
            color:green;
        }
    </style>
</head>
<body>
    <div>
        <ul>
            <li>猜猜我是什么颜色</li>
        </ul>
    </div>
</body>
</html>
如果大家都是继承来的,按理说应该按照“就近原则”,那么important能否影响就近原则呢?
答案是:不影响。远的,永远是远的。不能给远的写一个important,干掉近的。
! important做站的时候,不允许使用。因为会让css写的很乱。
现在,我们知道层叠性能比较很多东西:
选择器的写法权重,谁离的近,谁写在下面。
2.3 权重计算的总结
还要知道 ! important 的性质。

三、盒模型
3.1 盒子中的区域
<!DOCTYPE html PUBLIC "-//W3C//DTD XHTML 1.0 Transitional//EN" "http://www.w3.org/TR/xhtml1/DTD/xhtml1-transitional.dtd">
<html xmlns="http://www.w3.org/1999/xhtml" xml:lang="en">
<head>
    <meta http-equiv="Content-Type" content="text/html;charset=UTF-8">
    <title>Document</title>
    <style type="text/css">
        div{
            width: 200px;
            height: 200px;
            border:1px solid red;
            padding: 100px;
        }
    </style>
</head>
<body>
    <div>文字文字文字文字文字文字文字文字文字文字文字文字文字文字文字文字文字文字文字文字文字文字文字文字文字文字文字文字文字文字文字文字文字文字文字文字文字文字文字文字文字文字文字文字文字文字文字文字文字文字文字文字</div>
</body>
</html>
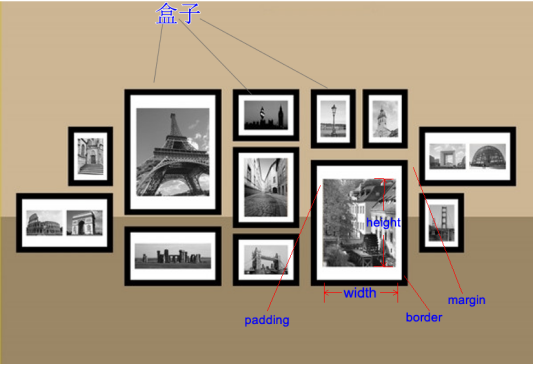
一个盒子中主要的属性就5个:width、height、padding、border、margin。
width是“宽度”的意思,CSS中width指的是内容的宽度,而不是盒子的宽度。
height是“高度”的意思,CSS中height指的是内容的高度,而不是盒子的高度
padding是“内边距”的意思
border是“边框”
margin是“外边距”
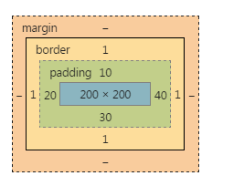
盒模型的示意图:
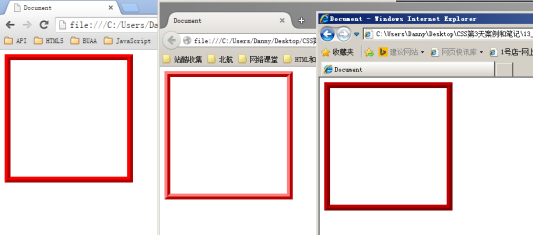
代码演示:
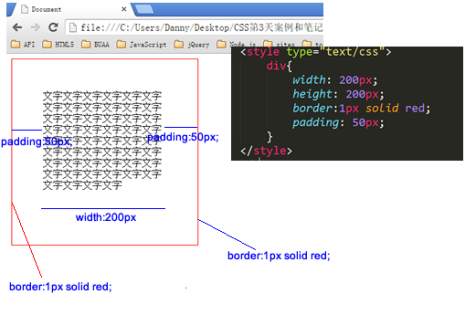
这个盒子width:200px; height:200px; 但是真实占有的宽高是302*302。 这是因为还要加上padding、border。
宽度和真实占有宽度,不是一个概念!!
<!DOCTYPE html PUBLIC "-//W3C//DTD XHTML 1.0 Transitional//EN" "http://www.w3.org/TR/xhtml1/DTD/xhtml1-transitional.dtd">
<html xmlns="http://www.w3.org/1999/xhtml" xml:lang="en">
<head>
    <meta http-equiv="Content-Type" content="text/html;charset=UTF-8">
    <title>Document</title>
    <style type="text/css">
        .box1{
            width: 100px;
            height: 100px;
            padding: 100px;
            border: 1px solid red;
        }

        .box2{
            width: 250px;
            height: 250px;
            padding: 25px;
            border:1px solid red;
        }
    </style>
</head>
<body>
    <div class="box1">文字文字文字文字文字文字文字文字文字文字文字文字文字文字文字文字文字文字文字文字文字文字</div>
    <div class="box2">文字文字文字文字文字文字文字文字文字文字文字文字文字文字文字文字文字文字文字文字文字文字文字文字文字文字文字文字文字文字文字文字文字文字文字文字文字</div>
</body>
</html>
3.2 认识width、height
一定要知道,在前端开发工程师眼中,世界中的一切都是不同的:
比如丈量一个包子多宽?前端开发工程师,只会丈量包子馅:

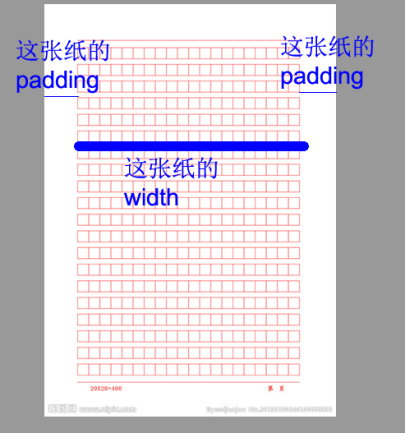
丈量稿纸,前端开发工程师只会丈量内容宽度:
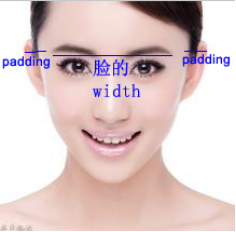
丈量人脸,只会丈量五官:
下面这两个盒子,真实占有宽高,完全相同,都是302*302:
1     .box1{
2     width: 100px;
3     height: 100px;
4     padding: 100px;
5     border: 1px solid red;
6     }
7
8     .box2{
9     width: 250px;
10     height: 250px;
11     padding: 25px;
12     border:1px solid red;
13     }
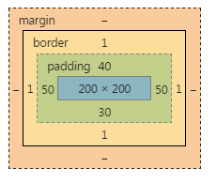
这两个盒子的盒模型图,见下表:真实占有宽度= 左border + 左padding + width + 右padding + 右border
答案(答案有无穷多种,我们只写其中三种):小练习,大家自己写三个402*402的盒子
1 .box1{
2     width: 400px;
3     height: 400px;
4     border: 1px solid red;
5 }
6 .box2{
7     width: 200px;
8     height: 200px;
9     border: 6px solid red;
10     padding: 95px;
11 }
12 .box3{
13     width: 0px;
14     height: 0px;
15     padding: 200px;
16     border: 1px solid red;
17 }
这三个盒子的盒模型图:
如果想保持一个盒子的真是占有宽度不变,那么加width就要减padding。加padding就要减width。
3.3 认识padding
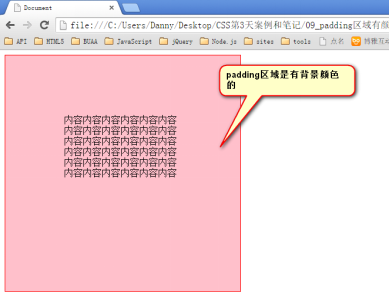
padding就是内边距。padding的区域有背景颜色,css2.1前提下,并且背景颜色一定和内容区域的相同。
也就是说,background-color将填充所有boder以内的区域。
padding是4个方向的,所以我们能够分别描述4个方向的padding。
<!DOCTYPE html PUBLIC "-//W3C//DTD XHTML 1.0 Transitional//EN" "http://www.w3.org/TR/xhtml1/DTD/xhtml1-transitional.dtd">
<html xmlns="http://www.w3.org/1999/xhtml" xml:lang="en">
<head>
    <meta http-equiv="Content-Type" content="text/html;charset=UTF-8">
    <title>Document</title>
    <style type="text/css">
        div{
            width: 200px;
            height: 200px;
            padding: 100px;
            border: 1px solid red;
            background-color: pink;
        }
    </style>
</head>
<body>
    <div>内容内容内容内容内容内容内容内容内容内容内容内容内容内容内容内容内容内容内容内容内容内容内容内容内容内容内容内容内容内容内容内容内容内容内容内容</div>
</body>
</html>
方法有两种,第一种写小属性;第二种写综合属性,用空格隔开。
<!DOCTYPE html PUBLIC "-//W3C//DTD XHTML 1.0 Transitional//EN" "http://www.w3.org/TR/xhtml1/DTD/xhtml1-transitional.dtd">
<html xmlns="http://www.w3.org/1999/xhtml" xml:lang="en">
<head>
    <meta http-equiv="Content-Type" content="text/html;charset=UTF-8">
    <title>Document</title>
    <style type="text/css">
        div{
            width: 200px;
            height: 200px;
            /*padding-top: 30px;
            padding-right: 20px;
            padding-bottom: 40px;
            padding-left: 100px;*/
            /*padding:30px 20px 40px 100px;*/
            /*padding: 20px 30px 40px;*/
            padding: 30px 40px;

            border: 1px solid red;
        }
    </style>
</head>
<body>
    <div>内容内容内容内容内容内容内容内容内容内容内容内容内容内容内容内容内容内容内容内容内容内容内容内容内容内容内容内容内容内容内容内容内容内容内容内容</div>
</body>
</html>
小属性:
1 padding-top: 30px;
2 padding-right: 20px;
3 padding-bottom: 40px;
4 padding-left: 100px;
这种属性,就是复合属性。比如不写padding-left那么就是没有左内边距。top上、right右、bottom下、left左。
快捷键就是pdt、pdr、pdb、pdl 然后按tab。
综合属性:
如果写了4个值:
1 padding:30px 20px 40px 100px;
上、右、下、左

空格隔开的,四个数字就是上、右、下、左。
也就是说,前端开发工程师眼中的顺序不一样。
老百姓:上下左右
强调开发工程师:上、右、下、左
如果只写3个值:
1 padding: 20px 30px 40px;
上、右、下、??和右一样
如果只写2个值:
1 padding: 30px 40px;
也就是说,
1 padding: 30px 40px;
等价于:
1 padding-top: 30px;
2 padding-bottom: 30px;
3 padding-left: 40px;
4 padding-right: 40px;
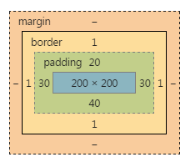
要懂得,用小属性层叠大属性:
对应的盒模型图:
1 padding: 20px;
2 padding-left: 30px;
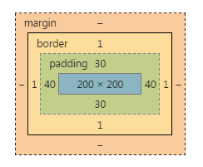
下面的写法错误:
1 padding-left: 30px;
2 padding: 20px;
不能把小属性,写在大属性前面。
下面的题,会做了,说明你听懂了:
<!DOCTYPE html PUBLIC "-//W3C//DTD XHTML 1.0 Transitional//EN" "http://www.w3.org/TR/xhtml1/DTD/xhtml1-transitional.dtd">
<html xmlns="http://www.w3.org/1999/xhtml" xml:lang="en">
<head>
    <meta http-equiv="Content-Type" content="text/html;charset=UTF-8">
    <title>Document</title>
    <style type="text/css">
        div{
            width: 200px;
            height: 200px;
            padding-left: 10px;
            padding-right: 20px;
            padding:40px 50px 60px;
            padding-bottom: 30px;
            border: 1px solid #000;
        }
    </style>
</head>
<body>
    <div></div>
</body>
</html>
题目1,说出下面盒子真实占有宽高,并画出盒模型图:
1     div{

2     width: 200px;

3     height: 200px;

4     padding: 10px 20px 30px;

5     padding-right: 40px;

6     border: 1px solid #000;

7     }
真实占有宽度 = 200 + 20 + 40 + 1 + 1 = 262px
题目2,说出下面盒子真实占有宽高,并画出盒模型图:
1     div{
2     width: 200px;
3     height: 200px;
4     padding-left: 10px;
5     padding-right: 20px;
6     padding:40px 50px 60px;
7     padding-bottom: 30px;
8     border: 1px solid #000;
9     }
padding-left:10px; 和padding-right:20px; 没用,因为后面的padding大属性,层叠掉了他们。
强调一点,padding-left 不是padding-left-width
1 padding-left:10px;  √
2 padding-left-width:30px; ×
第3题,我现在给你盒模型图,请写出代码,试着用最最简单的方法写

width:123px;
height:123px;
padding:20px 40px;
border:1px solid red;
第4题:
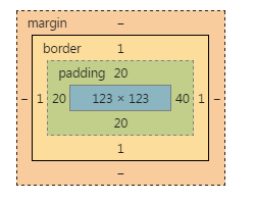
width:123px;
height:123px;
padding:20px;
padding-right:40px;
border:1px solid red;
一些元素,默认带有padding,比如ul标签。

所以,我们为了做站的时候,便于控制,总是喜欢清除这个默认的padding:
1     *{
2     margin:;
3     padding:;
4     }
1 body,div,dl,dt,dd,ul,ol,li,h1,h2,h3,h4,h5,h6,pre,code,form,fieldset,legend,input,textarea,p,blockquote,th,td{
2     margin:;
3     padding:0
4 }
*的效率不高,所以我们使用并集选择器,罗列所有的标签(不用背,有专业的清除默认样式的样式表,今后学习):
3.4 border
就是边框。边框有三个要素:粗细、线型、颜色。
颜色如果不写,默认是黑色。另外两个属性不写,要命了,显示不出来边框。
<!DOCTYPE html PUBLIC "-//W3C//DTD XHTML 1.0 Transitional//EN" "http://www.w3.org/TR/xhtml1/DTD/xhtml1-transitional.dtd">
<html xmlns="http://www.w3.org/1999/xhtml" xml:lang="en">
<head>
    <meta http-equiv="Content-Type" content="text/html;charset=UTF-8">
    <title>Document</title>
    <style type="text/css">
        div{
            width: 200px;
            height: 200px;
            border-width:10px 20px;
            border-style:solid dashed dotted;
            border-color:red green blue yellow;
        }
    </style>
</head>
<body>
    <div></div>
</body>
</html>
1 border: 1px dashed red;
所有的线型:
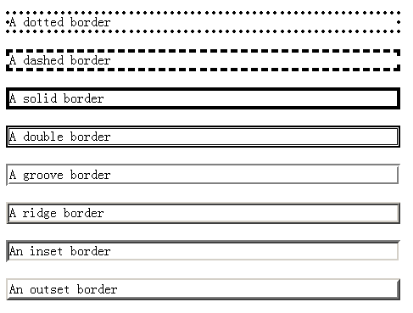
比如,border:10px ridge red; 在chrome和firefox、IE中有细微差别:
如果公司里面的设计师,处女座的,追求极高的页面还原度,那么不能使用css来制作边框。
就要用到图片,就要切图了。所以,比较稳定的就几个:solid、dashed、dotted
border是一个大综合属性,
1 border:1px solid red;
border属性能够被拆开,有两大种拆开的方式:就是把4个边框,都设置为1px宽度、线型实线、red颜色。
1) 按3要素:border-width、border-style、border-color
2) 按方向:border-top、border-right、border-bottom、border-left
<!DOCTYPE html PUBLIC "-//W3C//DTD XHTML 1.0 Transitional//EN" "http://www.w3.org/TR/xhtml1/DTD/xhtml1-transitional.dtd">
<html xmlns="http://www.w3.org/1999/xhtml" xml:lang="en">
<head>
    <meta http-equiv="Content-Type" content="text/html;charset=UTF-8">
    <title>Document</title>
    <style type="text/css">
        div{
            width: 200px;
            height: 200px;

            border-top-width:10px;
            border-top-style:solid;
            border-top-color:red;
            border-right-width:10px;
            border-right-style:solid;
            border-right-color:red;
            border-bottom-width:10px;
            border-bottom-style:solid;
            border-bottom-color:red;
            border-left-width:10px;
            border-left-style:solid;
            border-left-color:red;
        }
    </style>
</head>
<body>
    <div></div>
</body>
</html>
按3要素拆开:
1 border-width:10px;    → 边框宽度
2 border-style:solid;     → 线型
3 border-color:red;      → 颜色。
1 border:10px solid red;
现在心里要明白,原来一个border是由三个小属性综合而成:等价于:
border-width border-style border-color。
如果某一个小要素后面是空格隔开的多个值,那么就是上右下左的顺序:

1 border-width:10px 20px;

2 border-style:solid dashed dotted;

3 border-color:red green blue yellow;
按方向来拆
1 border-top:10px solid red;

2 border-right:10px solid red;

3 border-bottom:10px solid red;

4 border-left:10px solid red;
等价于
1 border:10px solid red;
按方向还能再拆一层,就是把每个方向的,每个要素拆开,一共12条语句:
1 border-top-width:10px;

2 border-top-style:solid;

3 border-top-color:red;

4 border-right-width:10px;

5 border-right-style:solid;

6 border-right-color:red;

7 border-bottom-width:10px;

8 border-bottom-style:solid;

9 border-bottom-color:red;

10 border-left-width:10px;

11 border-left-style:solid;

12 border-left-color:red;
等价于
1 border:10px solid red;
工作中到底用什么?很简答:什么简单用什么?
写法:
1 border:10px solid red;

2 border-right-color:blue;
写法:
1 border:10px solid red;

2 border-style:solid dashed;
border可以没有,
1 border:none;
也可以调整左边边框的宽度为0:某一条边没有:
1 border-left: none;
1 border-left-width: 0;
四、标准文档流
宏观的讲,我们的web页面和photoshop等设计软件有本质的区别:web页面的制作,是个“流”,必须从上而下,像“织毛衣”。而设计软件,想往哪里画个东西,都能画。
我们要看看标准流有哪些微观现象:
<!DOCTYPE html PUBLIC "-//W3C//DTD XHTML 1.0 Transitional//EN" "http://www.w3.org/TR/xhtml1/DTD/xhtml1-transitional.dtd">
<html xmlns="http://www.w3.org/1999/xhtml" xml:lang="en">
<head>
    <meta http-equiv="Content-Type" content="text/html;charset=UTF-8">
    <title>Document</title>
    <style type="text/css">
        span{
            font-size: 90px;
        }
    </style>
</head>
<body>
    <p>
        人人人人 人人<span>姚明</span>人人人人人人人
        <img src="data:images/0.jpg" alt="" />
        <img src="data:images/1.jpg" alt="" />
    </p>
</body>
</html>
1) 空白折叠现象:
比如,如果我们想让img标签之间没有空隙,必须紧密连接:
1 <img src="data:images/0.jpg" />
2 <img src="data:images/1.jpg" />
3 <img src="data:images/2.jpg" />
2) 高矮不齐,底边对齐:
3) 自动换行,一行写不满,换行写。
4.1 块级元素和行内元素
<!DOCTYPE html PUBLIC "-//W3C//DTD XHTML 1.0 Transitional//EN" "http://www.w3.org/TR/xhtml1/DTD/xhtml1-transitional.dtd">
<html xmlns="http://www.w3.org/1999/xhtml" xml:lang="en">
<head>
    <meta http-equiv="Content-Type" content="text/html;charset=UTF-8">
    <title>Document</title>
    <style type="text/css">
        h1{
            width: 400px;
            height: 90px;
            background-color: pink;
        }
        span{
            width: 400px;
            height: 90px;
            background-color: pink;
        }
    </style>
</head>
<body>
    <h1>哈哈哈哈</h1>
    <h1>嘻嘻嘻嘻</h1>

    <span>哈哈哈哈</span>
    <span>嘻嘻嘻嘻</span>
</body>
</html>
学习的初期,你就要知道,标准文档流等级森严。标签分为两种等级:
1) 块级元素
● 霸占一行,不能与其他任何元素并列
● 能接受宽、高
● 如果不设置宽度,那么宽度将默认变为父亲的100%。
2) 行内元素
● 与其他行内元素并排
● 不能设置宽、高。默认的宽度,就是文字的宽度。
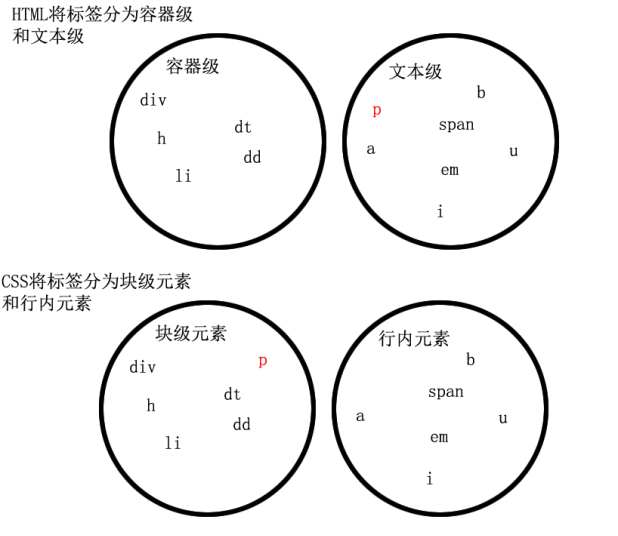
在HTML中,我们已经将标签分过类,当时分为了:文本级、容器级。
文本级:p、span、a、b、i、u、em
容器级:div、h系列、li、dt、dd
CSS的分类和上面的很像,就p不一样:
所有的文本级标签,都是行内元素,除了p,p是个文本级,但是是个块级元素。
所有的容器级标签都是块级元素。
4.2 块级元素和行内元素的相互转换
块级元素可以设置为行内元素
<!DOCTYPE html PUBLIC "-//W3C//DTD XHTML 1.0 Transitional//EN" "http://www.w3.org/TR/xhtml1/DTD/xhtml1-transitional.dtd">
<html xmlns="http://www.w3.org/1999/xhtml" xml:lang="en">
<head>
    <meta http-equiv="Content-Type" content="text/html;charset=UTF-8">
    <title>Document</title>
    <style type="text/css">
        div{
            display: inline;
            background-color: pink;
            width: 500px;
            height: 500px;
        }
        h1{
            background-color: greenyellow;
            display: inline;
            font-size: 20px;
            font-weight: normal;
        }
    </style>
</head>
<body>
    <div>我是一个div</div>
    <div>我是一个div</div>

    <h1>我</h1><h1>爱</h1><h1>你</h1><h1>们</h1>
</body>
</html>
行内元素可以设置为块级元素
<!DOCTYPE html PUBLIC "-//W3C//DTD XHTML 1.0 Transitional//EN" "http://www.w3.org/TR/xhtml1/DTD/xhtml1-transitional.dtd">
<html xmlns="http://www.w3.org/1999/xhtml" xml:lang="en">
<head>
    <meta http-equiv="Content-Type" content="text/html;charset=UTF-8">
    <title>Document</title>
    <style type="text/css">
        span{
            display: block;
            width: 200px;
            height: 200px;
            background-color: pink;
        }
        a{
            display: block;
            width: 250px;
            height: 40px;
            /*文本居中:*/
            text-align: center;
            /*行高40,和盒子一样高,所以就垂直居中了,后面讲*/
            line-height: 40px;
            background-color: orange;
        }
    </style>
</head>
<body>
    <a href="http://www.163.com">点击我去网易</a>

    <span>我是一个span</span>
    <span>我是一个span</span>

</body>
</html>
1     div{
2     display: inline;
4     width: 500px;
5     height: 500px;
6     }
inline就是“行内”。display是“显示模式”的意思,用来改变元素的行内、块级性质
一旦,给一个标签设置
1 display: inline;
● 此时这个div不能设置宽度、高度;那么,这个标签将立即变为行内元素。此时它和一个span无异:
● 此时这个div可以和别人并排了
同样的道理,
1     span{
2     display: block;
3     width: 200px;
4     height: 200px;
5
6     }
让标签变为块级元素。此时这个标签,和一个div无异:“block”是“块”的意思
● 此时这个span能够设置宽度、高度
● 此时这个span必须霸占一行了,别人无法和他并排
● 如果不设置宽度,将撑满父亲
标准流里面限制非常多,标签的性质恶心。比如,我们现在就要并排、并且就要设置宽高。
所以,移民!脱离标准流!
css中一共有三种手段,使一个元素脱离标准文档流:
1) 浮动
2) 绝对定位
3) 固定定位
五、浮动
浮动是css里面布局用的最多的属性。
<!DOCTYPE html PUBLIC "-//W3C//DTD XHTML 1.0 Transitional//EN" "http://www.w3.org/TR/xhtml1/DTD/xhtml1-transitional.dtd">
<html xmlns="http://www.w3.org/1999/xhtml" xml:lang="en">
<head>
    <meta http-equiv="Content-Type" content="text/html;charset=UTF-8">
    <title>Document</title>
    <style type="text/css">
        .box1{
            float: left;
            width: 300px;
            height: 400px;
            background-color: yellowgreen;
        }
        .box2{
            float: left;
            width: 400px;
            height: 400px;
            background-color: skyblue;
        }
    </style>
</head>
<body>
    <div class="box1"></div>
    <div class="box2"></div>
</body>
</html>

1     .box1{
2     float: left;
3     width: 300px;
4     height: 400px;
6     }
7     .box2{
8     float: left;
9     width: 400px;
10     height: 400px;
12     }
两个元素并排了,并且两个元素都能够设置宽度、高度了(这在刚才的标准流中,不能实现)。
浮动想学好,一定要知道三个性质。
5.1 浮动的元素脱标
证明1:
<!DOCTYPE html PUBLIC "-//W3C//DTD XHTML 1.0 Transitional//EN" "http://www.w3.org/TR/xhtml1/DTD/xhtml1-transitional.dtd">
<html xmlns="http://www.w3.org/1999/xhtml" xml:lang="en">
<head>
    <meta http-equiv="Content-Type" content="text/html;charset=UTF-8">
    <title>Document</title>
    <style type="text/css">
        .box1{
            float: left;
            width: 200px;
            height: 200px;
            background-color: yellowgreen;
        }
        .box2{
            width: 350px;
            height: 350px;
            background-color: skyblue;
        }
    </style>
</head>
<body>
    <div class="box1"></div>
    <div class="box2"></div>
</body>
</html>

证明2:
<!DOCTYPE html PUBLIC "-//W3C//DTD XHTML 1.0 Transitional//EN" "http://www.w3.org/TR/xhtml1/DTD/xhtml1-transitional.dtd">
<html xmlns="http://www.w3.org/1999/xhtml" xml:lang="en">
<head>
    <meta http-equiv="Content-Type" content="text/html;charset=UTF-8">
    <title>Document</title>
    <style type="text/css">
        span{
            float: left;
            width: 200px;
            height: 200px;
            background-color: orange;
        }
    </style>
</head>
<body>
    <span>我是span</span>
    <span>我是span</span>
    <span>我是span</span>
    <span>我是span</span>
    <span>我是span</span>
</body>
</html>
一个span标签不需要转成块级元素,就能够设置宽度、高度了。所以能够证明一件事儿,就是所有标签已经不区分行内、块了。也就是说,一旦一个元素浮动了,那么,将能够并排了,并且能够设置宽高了。无论它原来是个div还是个span。
1     span{
2     float: left;
3     width: 200px;
4     height: 200px;
6     }
5.2 浮动的元素互相贴靠

如果有足够空间,那么就会靠着2哥。如果没有足够的空间,那么会靠着1号大哥。
如果没有足够的空间靠着1号大哥,自己去贴左墙。
右浮动: float:right;
<!DOCTYPE html PUBLIC "-//W3C//DTD XHTML 1.0 Transitional//EN" "http://www.w3.org/TR/xhtml1/DTD/xhtml1-transitional.dtd">
<html xmlns="http://www.w3.org/1999/xhtml" xml:lang="en">
<head>
    <meta http-equiv="Content-Type" content="text/html;charset=UTF-8">
    <title>Document</title>
    <style type="text/css">
        body{
            font-size: 60px;
        }
        .box1{
            float: left;
            width: 100px;
            height: 100px;
            background-color: yellowgreen;
        }
        .box2{
            float: left;
            width: 120px;
            height: 220px;
            background-color: gold;
        }
        .box3{
            float: left;
            width: 340px;
            height: 300px;
            background-color: skyblue;
        }
    </style>
</head>
<body>
    <div class="box1">1</div>
    <div class="box2">2</div>
    <div class="box3">3</div>
</body>
</html>

<!DOCTYPE html PUBLIC "-//W3C//DTD XHTML 1.0 Transitional//EN" "http://www.w3.org/TR/xhtml1/DTD/xhtml1-transitional.dtd">
<html xmlns="http://www.w3.org/1999/xhtml" xml:lang="en">
<head>
    <meta http-equiv="Content-Type" content="text/html;charset=UTF-8">
    <title>Document</title>
    <style type="text/css">
        body{
            font-size: 60px;
        }
        .box1{
            float:right;
            width: 100px;
            height: 400px;
            background-color: yellowgreen;
        }
        .box2{
            float: right;
            width: 120px;
            height: 220px;
            background-color: gold;
        }
        .box3{
            float: right;
            width: 340px;
            height: 300px;
            background-color: skyblue;
        }
    </style>
</head>
<body>
    <div class="box1">1</div>
    <div class="box2">2</div>
    <div class="box3">3</div>
</body>
</html>
5.3 浮动的元素有“字围”效果
<!DOCTYPE html PUBLIC "-//W3C//DTD XHTML 1.0 Transitional//EN" "http://www.w3.org/TR/xhtml1/DTD/xhtml1-transitional.dtd">
<html xmlns="http://www.w3.org/1999/xhtml" xml:lang="en">
<head>
    <meta http-equiv="Content-Type" content="text/html;charset=UTF-8">
    <title>Document</title>
    <style type="text/css">
        div{
            float: left;
            width: 344px;
            height: 516px;
            background-color: orange;
        }
    </style>
</head>
<body>
    <div>
        <img src="data:images/1.jpg" alt="" />
    </div>
    <p>123文字文字文字文字文字文字文字文字文字文字文字文字文字文字文字文字文字文字文字文字文字文字文字文字文字文字文字文字文字文字文字文字文字文字文字文字文字文字文字文字文字文字文字文字文字文字文字文字文字文字文字文字文字文字文字文字文字文字文字文字文字文字文字文字文字文字文字文字文字文字文字文字文字文字文字文字文字文字文字文字文字文字文字文字文字文字文字文字文字文字文字文字文字文字文字文字文字文字文字文字文字文字文字文字文字文字文字文字文字文字文字文字文字文字文字文字文字文字文字文字文字文字文字文字文字文字文字文字文字文字文字文字文字文字文字文字文字文字文字文字文字文字文字文字文字文字文字文字文字文字文字文字文字文字文字文字文字文字文字文字文字文字文字文字文字文字文字文字文字文字文字文字文字文字文字文字文字文字文字文字文字文字文字文字文字文字文字文字文字文字文字文字文字文字文字文字文字文字文字文字文字文字文字文字文字文字文字文字文字文字文字文字文字文字文字文字文字文字文字文字文字文字文字文字文字文字文字文字文字文字文字文字文字文字文字文字文字文字文字文字文字文字文字文字文字文字文字文字文字文字文字文字文字文字文字文字文字文字文字文字文字文字文字文字文字文字文字文字文字文字文字文字文字文字文字文字文字文字文字文字文字文字文字文字文字文字文字文字文字文字文字文字文字文字文字文字文字文字文字文字文字文字文字文字文字文字文字文字文字文字文字文字文字文字文字文字文字文字文字文字文字文字文字文字文字文字文字文字文字文字文字文字文字文字文字文字文字文字文字文字文字文字文字文字文字文字文字文字文字文字文字文字文字文字文字文字文字文字文字文字文字文字文字文字文字文字文字文字文字文字文字文字文字文字文字文字文字文字文字文字文字文字文字文字文字文字文字文字文字文字文字文字文字文字文字文字文字文字文字文字文字文字文字文字文字文字文字文字文字文字文字文字文字文字文字文字文字文字文字文字文字文字文字文字文字文字文字文字文字文字文字文字文字文字文字文字文字文字文字文字文字文字文字文字文字文字文字文字文字文字文字文字文字文字文字文字文字文字文字文字文字文字文字文字文字文字文字文字文字文字文字文字文字文字文字文字文字文字文字文字文字文字文字文字文字文字文字文字文字文字文字文字文字文字文字文字文字文字文字文字文字文字文字文字文字文字文字文字文字文字文字文字文字文字文字文字文字文字文字文字文字文字文字文字文字文字文字文字文字文字文字文字文字文字文字文字文字文字文字文字文字文字文字文字文字文字文字文字文字文字文字文字文字文字文字文字文字文字文字文字文字文字文字文字文字文字文字文字文字文字文字文字文字文字文字文字文字文字文字文字文字文字文字文字文字文字文字文字文字文字文字文字文字文字文字文字文字文字文字文字文字文字文字文字文字文字文字文字文字文字文字文字文字文字文字文字文字文字文字文字文字文字文字文字文字文字文字文字文字文字文字文字文字文字文字文字文字文字文字文字文字文字文字文字文字文字文字文字文字文字文字文字文字文字文字文字文字文字文字文字文字文字文字文字文字文字文字文字文字文字文字文字文字文字文字文字文字文字文字文字文字文字文字文字文字文字文字文字文字文字文字文字文字文字文字文字文字文字文字文字文字文字文字文字文字文字文字文字文字文字文字文字文字文字文字文字文字文字文字文字文字文字文字文字文字文字文字文字文字文字文字文字文字文字文字文字文字文字文字文字文字文字文字文字文字文字文字文字文字文字文字文字文字文字文字文字文字文字文字文字文字文字文字文字文字文字文字文字文字文字文字文字文字文字文字文字文字文字文字文字文字文字文字文字文字文字文字文字文字文字文字文字文字文字文字文字文字文字文字文字文字文字文字文字文字文字文字文字文字文字文字文字文字文字文字文字文字文字文字文字文字文字文字文字文字文字文字文字文字文字文字文字文字文字文字文字文字文字文字文字文字文字文字文字文字文字文字文字文字文字文字文字文字文字文字文字文字文字文字文字文字文字文字文字文字文字文字文字文字文字文字文字文字文字文字文字文字文字文字文字文字文字文字文字文字文字文字文字文字文字文字文字文字文字文字文字文字文字文字文字文字文字文文字文字文字文字文字文字文字文字文字文字文字文字文字文字文字文字文字文字文字文字文字文字文字文字文字文字文字文字文字文字文字文字文字文字文字文字文字文字文字文字文字文字文字文字文字文字文字文字文字文字文字文字文字文字文字文字文字文字文字文字文字文字文字文字文字文字文字文字文字文字文字文字文字文字文字文字文字文字文字文字文字文字文字文字文字文字文字文字文字文字文字文字文字文字文字文字文字文字文字文字文字文字文字文字文字文字文字文字文字文字文字文字文字文字文字文字文字文字文字文字文字文字文文字文字文字文字文字文字文字文字文字文字文字文字文字文字文字文字文字文字文字文字文字文字文字文字文字文字文字文字文字文字文字文字文字文字文字文字文字文字文字文字文字文字文字文字文字文字文字文字文字文字文字文字文字文字文字文字文字文字文字文字文字文字文字文字文字文字文字文字文字文字文字文字文字文字文字文字文字文字文字文字文字文字文字文字文字文字文字文字文字文字文字文字文字文字文字文字文字文字文字文字文字文字文字文字文字文字文字文字文字文字文字文字文字文字文字文字文字文字文字文字文字文字文文字文字文字文字文字文字文字文字文字文字文字文字文字文字文字文字文字文字文字文字文字文字文字文字文字文字文字文字文字文字文字文字文字文字文字文字文字文字文字文字文字文字文字文字文字文字文字文字文字文字文字文字文字文字文字文字文字文字文字文字文字文字文字文字文字文字文字文字文字文字文字文字文字文字文字文字文字文字文字文字文字文字文字文字文字文字文字文字文字文字文字文字文字文字文字文字文字文字文字文字文字文字文字文字文字文字文字文字文字文字文字文字文字文字文字文字文字文字文字文字文字文字文文字文字文字文字文字文字文字文字文字文字文字文字文字文字文字文字文字文字文字文字文字文字文字文字文字文字文字文字文字文字文字文字文字文字文字文字文字文字文字文字文字文字文字文字文字文字文字文字文字文字文字文字文字文字文字文字文字文字文字文字文字文字文字文字文字文字文字文字文字文字文字文字文字文字文字文字文字文字文字文字文字文字文字文字文字文字文字文字文字文字文字文字文字文字文字文字文字文字文字文字文字文字文字文字文字文字文字文字文字文字文字文字文字文字文字文字文字文字文字文字文字文字文文字文字文字文字文字文字文字文字文字文字文字文字文字文字文字文字文字文字文字文字文字文字文字文字文字文字文字文字文字文字文字文字文字文字文字文字文字文字文字文字文字文字文字文字文字文字文字文字文字文字文字文字文字文字文字文字文字文字文字文字文字文字文字文字文字文字文字文字文字文字文字文字文字文字文字文字文字文字文字文字文字文字文字文字文字文字文字文字文字文字文字文字文字文字文字文字文字文字文字文字文字文字文字文字文字文字文字文字文字文字文字文字文字文字文字文字文字文字文字文字文字文字文文字文字文字文字文字文字文字文字文字文字文字文字文字文字文字文字文字文字文字文字文字文字文字文字文字文字文字文字文字文字文字文字文字文字文字文字文字文字文字文字文字文字文字文字文字文字文字文字文字文字文字文字文字文字文字文字文字文字文字文字文字文字文字文字文字文字文字文字文字文字文字文字文字文字文字文字文字文字文字文字文字文字文字文字文字文字文字文字文字文字文字文字文字文字文字文字文字文字文字文字文字文字文字文字文字文字文字文字文字文字文字文字文字文字文字文字文字文字文字文字文字文字文文字文字文字文字文字文字文字文字文字文字文字文字文字文字文字文字文字文字文字文字文字文字文字文字文字文字文字文字文字文字文字文字文字文字文字文字文字文字文字文字文字文字文字文字文字文字文字文字文字文字文字文字文字文字文字文字文字文字文字文字文字文字文字文字文字文字文字文字文字文字文字文字文字文字文字文字文字文字文字文字文字文字文字文字文字文字文字文字文字文字文字文字文字文字文字文字文字文字文字文字文字文字文字文字文字文字文字文字文字文字文字文字文字文字文字文字文字文字文字文字文字文字文文字文字文字文字文字文字文字文字文字文字文字文字文字文字文字文字文字文字文字文字文字文字文字文字文字文字文字文字文字文字文字文字文字文字文字文字文字文字文字文字文字文字文字文字文字文字文字文字文字文字文字文字文字文字文字文字文字文字文字文字文字文字文字文字文字文字文字文字文字文字文字文字文字文字文字文字文字文字文字文字文字文字文字文字文字文字文字文字文字文字文字文字文字文字文字文字文字文字文字文字文字文字文字文字文字文字文字文字文字文字文字文字文字文字文字文字文字文字文字文字文字文字文文字文字文字文字文字文字文字文字文字文字文字文字文字文字文字文字文字文字文字文字文字文字文字文字文字文字文字文字文字文字文字文字文字文字文字文字文字文字文字文字文字文字文字文字文字文字文字文字文字文字文字文字文字文字文字文字文字文字文字文字文字文字文字文字文字文字文字文字文字文字文字文字文字文字文字文字文字文字文字文字文字文字文字文字文字文字文字文字文字文字文字文字文字文字文字文字文字文字文字文字文字文字文字文字文字文字文字文字文字文字文字文字文字文字文字文字文字文字文字文字文字文字文文字文字文字文字文字文字文字文字文字文字文字文字文字文字文字文字文字文字文字文字文字文字文字文字文字文字文字文字文字文字文字文字文字文字文字文字文字文字文字文字文字文字文字文字文字文字文字文字文字文字文字文字文字文字文字文字文字文字文字文字文字文字文字文字文字文字文字文字文字文字文字文字文字文字文字文字文字文字文字文字文字文字文字文字文字文字文字文字文字文字文字文字文字文字文字文字文字文字文字文字文字文字文字文字文字文字文字文字文字文字文字文字文字文字文字文字文字文字文字文字文字文字文</p>
</body>
</html>
HTML:
1     <div>
2     <img src="data:images/1.jpg" alt="" />
3     </div>
4     <p>123文字文字文字文字文字文字文字文字文字文字文字文字文字文字文字文字文字文字文字文字文文字文字文字文字文字文字文字
5   </p>

让div浮动,p不浮动:
div挡住了p,但是p中的文字不会被挡住,形成“字围”效果。
关于浮动我们要强调一点,浮动这个东西,我们在初期一定要遵循一个原则:
永远不是一个东西单独浮动,浮动都是一起浮动,要浮动,大家都浮动。
<!DOCTYPE html PUBLIC "-//W3C//DTD XHTML 1.0 Transitional//EN" "http://www.w3.org/TR/xhtml1/DTD/xhtml1-transitional.dtd">
<html xmlns="http://www.w3.org/1999/xhtml" xml:lang="en">
<head>
    <meta http-equiv="Content-Type" content="text/html;charset=UTF-8">
    <title>Document</title>
    <style type="text/css">
        *{
            margin:;
            padding:;
        }
        div{
            width: 400px;
            height: 400px;
            padding: 100px;
            background-color: pink;
        }
        .para1{
            float: left;
            width: 100px;
            height: 300px;
            background-color: yellowgreen;
        }
        .para2{
            float: left;
            width: 280px;
            height: 300px;
            padding: 10px;
            background-color: skyblue;
        }
    </style>
</head>
<body>
    <div>
        <p class="para1">1</p>
        <p class="para2">
            <span></span>
            <span></span>
        </p>
    </div>
</body>
</html>
前端技术之_CSS详解第三天的更多相关文章
- 前端技术之_CSS详解第一天
前端技术之_CSS详解第一天 一html部分 略.... 二.列表 列表有3种 2.1 无序列表 无序列表,用来表示一个列表的语义,并且每个项目和每个项目之间,是不分先后的. ul就是英语unorde ...
- 前端技术之_CSS详解第四天
前端技术之_CSS详解第四天 一.第三天的小总结 盒模型box model,什么是盒子? 所有的标签都是盒子.无论是div.span.a都是盒子.图片.表单元素一律看做文本. 盒模型有哪些组成: wi ...
- 前端技术之_CSS详解第五天
前端技术之_CSS详解第五天 一.行高和字号 1.1 行高 CSS中,所有的行,都有行高.盒模型的padding,绝对不是直接作用在文字上的,而是作用在“行”上的. <!DOCTYPE html ...
- 前端技术之_CSS详解第六天--完结
前端技术之_CSS详解第六天--完结 一.复习第五天的知识 a标签的伪类4个: a:link 没有被点击过的链接 a:visited 访问过的链接 a:hover 悬停 a:active 按下鼠标不松 ...
- 前端技术之_CSS详解第二天
前端技术之_CSS详解第二天 1.css基础选择器 html负责结构,css负责样式,js负责行为. css写在head标签里面,容器style标签. 先写选择器,然后写大括号,大括号里面是样式. & ...
- Spark技术内幕: Shuffle详解(三)
前两篇文章写了Shuffle Read的一些实现细节.但是要想彻底理清楚这里边的实现逻辑,还是需要更多篇幅的:本篇开始,将按照Job的执行顺序,来讲解Shuffle.即,结果数据(ShuffleMap ...
- Android高效率编码-第三方SDK详解系列(三)——JPush推送牵扯出来的江湖恩怨,XMPP实现推送,自定义客户端推送
Android高效率编码-第三方SDK详解系列(三)--JPush推送牵扯出来的江湖恩怨,XMPP实现推送,自定义客户端推送 很久没有更新第三方SDK这个系列了,所以更新一下这几天工作中使用到的推送, ...
- HAProxy详解(三):基于虚拟主机的HAProxy负载均衡系统配置实例【转】
一.基于虚拟主机的HAProxy负载均衡系统配置实例 1.通过HAProxy的ACL规则配置虚拟主机: 下面将通过HAProxy的ACL功能配置一套基于虚拟主机的负载均衡系统.这里操作系统环境为:Ce ...
- wpf 客户端【JDAgent桌面助手】开发详解(三) 瀑布流效果实现与UI虚拟化优化大数据显示
目录区域: 业余开发的wpf 客户端终于完工了..晒晒截图 wpf 客户端[JDAgent桌面助手]开发详解-开篇 wpf 客户端[JDAgent桌面助手]详解(一)主窗口 圆形菜单... wpf 客 ...
随机推荐
- Spark技术内幕:究竟什么是RDD
RDD是Spark最基本,也是最根本的数据抽象.http://www.cs.berkeley.edu/~matei/papers/2012/nsdi_spark.pdf 是关于RDD的论文.如果觉得英 ...
- Android简易实战教程--第十五话《在外部存储中读写文件》
第七话里面介绍了在内部存储读写文件 点击打开链接. 这样有一个比较打的问题,假设系统内存不够用,杀本应用无法执行,或者本应用被用户卸载重新安装后.以前保存的用户名和密码都不会得到回显.所以,有必要注意 ...
- Android 5.1 添加硬件抽象层(HAL)和JNI接口总结
点击打开链接
- 【java集合框架源码剖析系列】java源码剖析之TreeMap
注:博主java集合框架源码剖析系列的源码全部基于JDK1.8.0版本.本博客将从源码角度带领大家学习关于TreeMap的知识. 一TreeMap的定义: public class TreeMap&l ...
- 基于表单数据的封装,泛型,反射以及使用BeanUtils进行处理
在Java Web开发过程中,会遇到很多的表单数据的提交和对表单数据的处理.而每次都需要对这些数据的字段进行一个一个的处理就显得尤为繁琐,在Java语言中,面向对象的存在目的便是为了消除重复代码,减少 ...
- FreeMarker生成word的代码
用于生成word用的freemarker工具类 package com.ucap.netcheck.utils; import java.io.File; import java.io.File ...
- iOS中 SDWebImage手动清除缓存的方法 技术分享
1.找到SDImageCache类 2.添加如下方法: - (float)checkTmpSize { float totalSize = 0; NSDirectoryEnumerator *file ...
- javascript之DOM编程根据属性找标签练习
首先看一下需求: 当点击全选时,选中所有的,当再点击时,全部取消.且选中某些项,点击总金额,会显示处总的金钱数. <!DOCTYPE html PUBLIC "-//W3C//DTD ...
- 小强的HTML5移动开发之路(12)——从一个多媒体标签说起
来自:http://blog.csdn.net/dawanganban/article/details/18136813 一.视频播放 <html> <head> <ti ...
- ORACLE sid,pid,spid总结
概念上:1.spid (system process id) 是操作系统层面的进程id .2.pid(process id) 这个是基于oracle的进程id个人理解为就是oracle给自己的进程 ...