SpringCloud开发学习总结(七)—— 声明式服务调用Feign(二)
参数绑定
在上一章的示例中,我们使用Spring Cloud Feign实现的是一个不带参数的REST服务绑定。然而现实系统中的各种业务接口要比它复杂得多,我们有时会在HTTP的各个位置传入各种不同类型的参数,并且在返回请求响应的时候也可能是一个复杂的对象结构。在这章中,我们将详细介绍Feign中对几种不同形式参数的绑定方法。
在介绍Spring Cloud Feign的参数绑定之前,先扩展服务提供方hello-service。增加包含带有Request参数的请求、带有Header信息的请求、带有RequestBody①的请求以及请求响应体中是一个对象的请求。
 @RestController

 public class HelloController {

     @RequestMapping("/hello")

     public String hello() {

         return "hello provide";

     }

     @RequestMapping("/hello1")

     public String hello(@RequestParam String name) {

         return "Hello "+name;

     }

     @RequestMapping("/hello2")

     public User hello(@RequestHeader String name,@RequestHeader Integer age) {

         return new User(name,age);

     }

     @RequestMapping("/hello3")

     public String hello(@RequestBody User user) {

         return "Hello "+user.getName()+","+user.getAge();

     }

 }
 public class User {

     private String name;

     private Integer age;

     public User() {

     }

     public User(String name, Integer age) {

         this.name = name;

         this.age = age;

     }

     public String getName() {

         return name;

     }

     public void setName(String name) {

         this.name = name;

     }

     public Integer getAge() {

         return age;

     }

     public void setAge(Integer age) {

         this.age = age;

     }

     @Override

     public String toString() {

         return "name=" + name + ", age=" + age;

     }

 }
在完成了对hello-service的改造之后,下面在feign-consumer应用中实现这些新增的请求的绑定。
- 首先,在feign-consumer中创建与上面一样的User类。
- 然后,在HelloService接口中增加对上述三个新增接口的绑定声明,修改后的HelloService接口如下所示:
 @FeignClient("hello-service")  //用于通知Feign组件对该接口进行代理(不需要编写接口实现),name属性指定我们要调用哪个服务。使用者可直接通过@Autowired注入。
                     //原理:Spring Cloud应用在启动时,Feign会扫描标有@FeignClient注解的接口,生成代理,并注册到Spring容器中。生成代理时Feign会为每个接口方法创建一个RequetTemplate对象,
                     //该对象封装了HTTP请求需要的全部信息,请求参数名、请求方法等信息都是在这个过程中确定的,Feign的模板化就体现在这里。

 public interface HelloService {

     @RequestMapping(value="/hello")

     String hello();

     @RequestMapping(value="/hello1",method=RequestMethod.GET)

     String hello(@RequestParam("name")String name);

     @RequestMapping(value="/hello2",method=RequestMethod.GET)

     String hello(@RequestHeader("name") String name,@RequestHeader("age") Integer age);

     @RequestMapping(value="/hello3",method=RequestMethod.POST)

     String hello(@RequestBody User user);

 }
- 最后,在ConsumerController中新增一个/feign-consumer2接口,来对本节新增的声明接口进行调用:
 @RestController

 public class ConsumeController {

     @Autowired

     HelloService helloService;

     @Autowired

     RefactorHelloService refactorHelloService;

     @RequestMapping(value="/feign-consumer",method=RequestMethod.GET)

     public String helloConsumer(){

         return helloService.hello();

     }

     @RequestMapping(value="/feign-consumer2",method=RequestMethod.GET)

     public String helloConsumer2(){

         StringBuilder sb = new StringBuilder();

         sb.append(helloService.hello()).append("\n");

         sb.append(helloService.hello("LULU")).append("\n");

         sb.append(helloService.hello("LULU",18)).append("\n");

         sb.append(helloService.hello(new User("LULU",18))).append("\n");

         return sb.toString();

     }

 }
继承特性
通过上面的示例,可以发现当时在消费方用SpringMVC的注解来绑定服务接口时,可以几乎完全从服务提供方的Controller中依靠复制操作,构建出相应的服务客户端绑定接口。既然存在那么多可复制的操作,自然需要考虑这部分内容是否可以得到进一步的抽象?在Spring Cloud Feign中,针对该问题提供了继承特性来帮助解决这些可复制的操作,进一步减少编码量。下面,详细介绍如何通过Spring Cloud Feign的继承特性来实现REST接口定义的复用。
- 为了能够复用DTO②与接口定义,首先创建一个基础的Maven工程,命名为hello-service-api
- 由于在hello-service-api中需要定义可同时服用于服务端与客户端的接口,需要用到SpringMVC注解,所以在pom.xml中引入spring-boot-starter-web依赖
- 将上一节中实现的User对象复制到该工程,并创建HelloService接口,该接口的User为本项目的User
 @RequestMapping(value="/refactor")

 public interface HelloService {

     @RequestMapping(value="/hello4",method=RequestMethod.GET)

     String hello(@RequestParam("name") String name);

     @RequestMapping(value="/hello5",method=RequestMethod.GET)

     User hello(@RequestHeader("name") String name,@RequestHeader("age") Integer age);

     @RequestMapping(value="/hello6",method=RequestMethod.POST)

     String hello(@RequestBody User user);

 }
- 下面对服务提供者hello-service进行重构,在pom.xml中新增对hello-service-api的依赖
        <dependency>

            <groupId>com.kingbrook</groupId>

            <artifactId>hello-service-api</artifactId>

            <version>0.0.1-SNAPSHOT</version>

        </dependency>
- 创建RefactorHelloController类继承hello-service-api中定义的HelloService接口,并参考之前的HelloController来实现这三个接口:
 @RestController③

 public class RefactorHelloController implements HelloService {

     @Override

     public String hello(@RequestParam("name") String name) {

         return "Hello "+name;

     }

     //注解后面必须要有参数

     @Override

     public User hello(@RequestHeader("name") String name,@RequestHeader("age") Integer age) {

         return new User(name,age);

     }

     @Override

     public String hello(@RequestBody User user) {

         return "Hello "+user.getName()+","+user.getAge();

     }

 }
可以发现通过继承的方式,在Controller中不再包含以往会定义的请求映射注解@RequestMapping,而参数的注解定义在重写的时候会自动带过来。在这个类中,除了要实现接口逻辑之外,只需要再增加@RestController注解使该类成为一个REST接口类就大功告成了。
接下来在服务消费者中
- 在feign-consumer的pom.xml文件中,和服务提供者一样,新增对hello-service-api的依赖。
- 创建RefactorHelloService接口,并继承hello-service-api包中的HelloService接口,然后添加@FeignClient注解来绑定服务
@FeignClient("HELLO-SERVICE")

public interface RefactorHelloService extends HelloService {

}
- 最后,在ConsumerController中,注入RefactorHelloService实例,并新增一个请求/feign-consumer3来触发对RefactorHelloService的实例的调用。
 @RestController

 public class ConsumeController {

     @Autowired

     HelloService helloService;

     @Autowired

     RefactorHelloService refactorHelloService;

     @RequestMapping(value="/feign-consumer",method=RequestMethod.GET)

     public String helloConsumer(){

         return helloService.hello();

     }

     @RequestMapping(value="/feign-consumer2",method=RequestMethod.GET)

     public String helloConsumer2(){

         StringBuilder sb = new StringBuilder();

         sb.append(helloService.hello()).append("\n");

         sb.append(helloService.hello("LULU")).append("\n");

         sb.append(helloService.hello("LULU",18)).append("\n");

         sb.append(helloService.hello(new User("LULU",18))).append("\n");

         return sb.toString();

     }

     @RequestMapping(value="/feign-consumer3",method=RequestMethod.GET)

     public String helloConsumer3(){

         StringBuilder sb = new StringBuilder();

         sb.append(refactorHelloService.hello("KINGKANG")).append("\n");

         sb.append(refactorHelloService.hello("KINGKANG",18)).append("\n");

         sb.append(refactorHelloService.hello(new com.kingbrook.dto.User("KINGKANG",18))).append("\n");

         return sb.toString();

     }

 }
测试
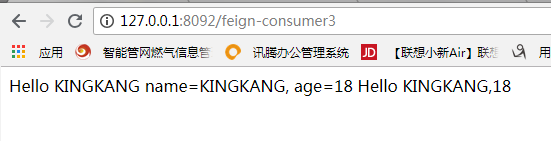
由于提供者和消费者都依赖hello-service-api,所以必须先构建hello-service-api工程,接着我们分别启动服务注册中心,hello-service和feign-consumer,并访问http://localhost:8092/feign-consumer3,得到:
至此,关于SpringCloud+Feign的参数绑定,和继承特性搭建成功!
项目完整代码见https://github.com/Adosker/springCloudAllDemo
注释一: @RequestParam和@PathVariable的区别就在于请求时当前参数是在url路由上还是在请求的body上,@RequestParam修饰的参数最后通过key=value的形式放在http请求的Body传过来 eg:http://xxxxx?kingName=xxx,作用相当于Request.getParameter() ,而后者http://xxxxx/kingName kingName即是参数又是路由
@RequestBody能把简单json结构参数转换成实体类,@RequestHeader 注解可以把Request请求header部分的值绑定到方法的参数上
注释二:数据传输对象(DTO)(Data Transfer Object)
注释三:@RestController注解相当于@ResponseBody + @Controller合在一起的作用。Spring 4.0以后提供
SpringCloud开发学习总结(七)—— 声明式服务调用Feign(二)的更多相关文章
- SpringCloud 源码系列(6)—— 声明式服务调用 Feign
SpringCloud 源码系列(1)-- 注册中心 Eureka(上) SpringCloud 源码系列(2)-- 注册中心 Eureka(中) SpringCloud 源码系列(3)-- 注册中心 ...
- SpringCloud开发学习总结(七)—— 声明式服务调用Feign(一)
在实践的过程中,我们会发现在微服务架构中实现客户端负载均衡的服务调用技术Spring Cloud Ribbon<SpringCloud开发学习总结(四)—— 客户端负载均衡Ribbon> ...
- SpringCloud之声明式服务调用 Feign(三)
一 Feign简介 Feign是一种声明式.模板化的HTTP客户端,也是netflix公司组件.使用feign可以在远程调用另外服务的API,如果调用本地API一样.我们知道,阿里巴巴的doubbo采 ...
- 004声明式服务调用Feign & 断路器Hystrix
1.POM配置 和普通Spring Boot工程相比,添加了Eureka Client.Feign.Hystrix依赖和Spring Cloud依赖管理 <dependencies> &l ...
- Spring Cloud第七篇 | 声明式服务调用Feign
本文是Spring Cloud专栏的第七篇文章,了解前六篇文章内容有助于更好的理解本文: Spring Cloud第一篇 | Spring Cloud前言及其常用组件介绍概览 Spring Cloud ...
- 【Dalston】【第三章】声明式服务调用(Feign)
当我们通过RestTemplate调用其它服务的API时,所需要的参数须在请求的URL中进行拼接,如果参数少的话或许我们还可以忍受,一旦有多个参数的话,这时拼接请求字符串就会效率低下,并且显得好傻.那 ...
- 声明式服务调用Feign
什么是 Feign Feign 是种声明式.模板化的 HTTP 客户端(仅在 consumer 中使用). 什么是声明式,有什么作用,解决什么问题? 声明式调用就像调用本地方法一样调用远程方法;无 ...
- Spring Cloud 声明式服务调用 Feign
一.简介 在上一篇中,我们介绍注册中心Eureka,但是没有服务注册和服务调用,服务注册和服务调用本来应该在上一章就应该给出例子的,但是我觉得还是和Feign一起讲比较好,因为在实际项目中,都是使用声 ...
- Spring Cloud Feign 1(声明式服务调用Feign 简介)
Spring Cloud Feign基于Netflix Feign 同时整合了Spring Cloud Ribbon和Spring Cloud Hytrix,除了提供两者的强大功能外,它还提供了一种声 ...
随机推荐
- Chrome浏览器V43版本号不支持silverlight 5.0的解决的方法
场景: 浏览器:chrome V43 插件:silverlight 5.0 操作系统:xp 问题: 自己开发silverlight站点在IE7和firefox中能正常打开,但在chrome中打开失败. ...
- 用Delphi7 调用.NET 2.0的WebService 所要注意的问题(Document格式和UTF8编码)
Delphi7 调用VS.NET 2005开发的基于.NET 2.0的WebService时发生了错误.查阅资料 http://www.community.borland.com/article/bo ...
- (C)strcpy ,strncpy和strlcpy的基本用法
好多人已经知道利用strncpy替代strcpy来防止缓冲区越界. 但是如果还要考虑运行效率的话,也许strlcpy是一个更好的方式. 1. strcpy strcpy 是依据 /0 作为结束判断的, ...
- JavaScript模板引擎使用
1. [代码]tmpl.js // Simple JavaScript Templating// John Resig - http://ejohn.org/ - MIT Licensed(f ...
- html5--6-55 动画效果-关键帧动画
html5--6-55 动画效果-关键帧动画 实例 @charset="UTF-8"; div{ width: 150px; height: 150px; font-size: 2 ...
- nginx网站日志配置
用yum安装的nginx的日志默认安装在路径:/var/log/nginx nginx配置文件:/etc/nginx/nginx.conf (总配置文件)/etc/nginx/conf.d/defau ...
- Android自动化测试环境搭建
Android自动化环境的搭建主要包括: 1. java jdk和jre的安装和环境的配置 2. appium服务器的安装和配置 3. eclipse开发工具,这里不必要用Android Studio ...
- 出现"Unable to instantiate Action,xxxxx, defined for 'login' in namespace '/' xxxxx 解决办法
转自:https://blog.csdn.net/heroful/article/details/17261169 问题原因: 在MyEclipse 利用SSH框架写程序,运行时出现 " U ...
- 【208】CentOS 下安装 Wine
参考:centos6.5安装wine 参考:用FreeGate自-由-门软件在Linux上更新Android SDK 参考:CentOS 5.3 使用wine装QQ
- 004--linux命令tar 软硬链接
一.tar命令介绍: -c:创建一个新的tar文件 -t:列出tar文件中目录的内容 -x:从tar文件中抽取文件 -f:指定归档文件或磁带(也可能是软盘)设备(一般都要选) -v:显示所打包的文件的 ...